

C# ПІДРУЧНИКИ / c# / Hungry Minds - C# Bible
.pdfFigure 30-6: Screen height and width on the Nokia emulator
Not all the properties contained within this class work across all devices. The help file for the Microsoft Mobile Internet Toolkit contains a Device Capabilities Table that defines what properties will generally work with HTML, cHTML, and with WML.
The Visual Studio .NET toolbox also contains a control called DeviceSpecific that you can place upon your form to perform certain tasks (depending on what device it is communicating with). This is done with filters and greatly reduces the amount of effort it would take to code all the possible scenarios.
Understanding How Mobile Controls Work
The mobile Web controls must be very adaptable when it comes to displaying visual interfaces. Some of the controls require more space than is available on most mobile devices. When this happens, it is up to the control to determine how to handle the situation. The following sections cover two of these controls - Calendar and Image - and how they change their visual interfaces when the need arises.
Using the Calendar control
The Calendar control enables you to display a full-fledged calendar within a mobile Web page. To examine just how versatile this control is, create a new Mobile Web Application and place a Calendar control on Form1 of the project.
When you run this new application using your default browser or the Pocket PC emulator, you see a full monthly calendar that enables you to click any day of the week. Shown in Figure 30-7 is this application running on a Pocket PC.
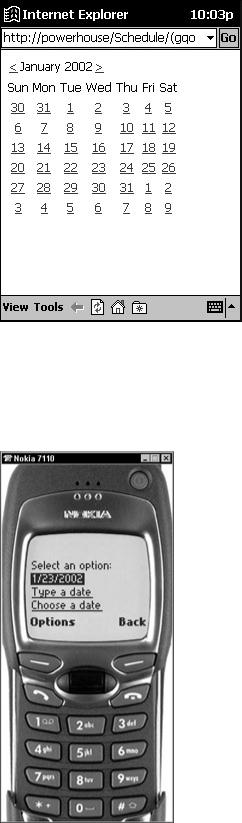
Figure 30-7: Calendar test application running onthe Pocket PC emulator
How could this calendar possibly be displayed on a much smaller device, such as a cellular phone? The Calendar control knows what type of device it is to be displayed on and changes its user interface accordingly. Figure 30-8 shows this same Web application running in the cellular phone emulator.
Figure 30-8: Calendar test application running on the Nokia emulator
You no longer see the calendar, but instead see the current date followed by two options. These options enable you to type in a date directly or browse by one week at a time and then by each day of the week.

long list of contacts on the mobile Web form and the particular device cannot display that much on its small screen.
You'll be happy to know that you can program this type of behavior to be handled automatically by the mobile Web form by changing just two properties. The Paginate property, when set to True, automatically breaks up all content into several pages of information, depending on the capabilities of the remote device. You must also set the ItemsPerPage property for a particular control - the List control, for example - to force pagination to a certain number of items. Generally, this is not needed, however, as the default of seven typically works well.
You can test this out by creating a new mobile Web application called Contacts. Set the Paginate property of Form1 to True, and then add a List control to the page. Set the ItemsPerPage property of the List control to 7.
Now you need to add several items to this List control, as shown in the following code:
List1.Items.Add("Kim Pack");
List1.Items.Add("Timothy Hyde");
List1.Items.Add("Donna Malone");
List1.Items.Add("Joshua Trueblood");
List1.Items.Add("Staci Springer");
List1.Items.Add("Chris Stephens");
List1.Items.Add("Amy Sherman");
List1.Items.Add("Steve Million");
List1.Items.Add("Jim Mattingly");
List1.Items.Add("Ryan Boyles");
List1.Items.Add("Scott Leathers");
These 11 items are added to your list. Therefore, you should see seven items on the first page, along with a Next link to a second page containing four items.
Run the application in the mobile device of your choice. As expected, your first seven items show up on the first page, along with a link to the next page, as shown in Figure 30-10.
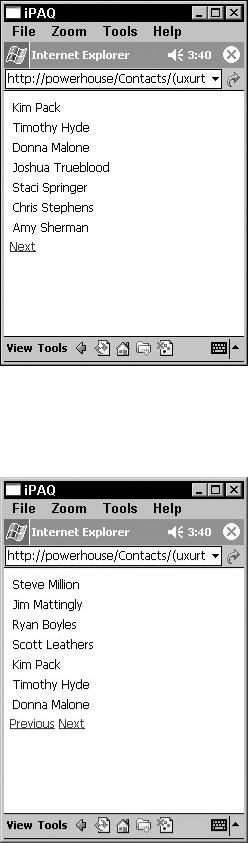
Figure 30-10: First seven items of the list
The user can click the Next button to view the second page. On the second page, you don't have four items as expected but a full seven items, because your List control wrapped the contents from the first page onto the second page, as shown in Figure 30-11.
Figure 30-11: The remaining list items are shown on the second page.
When pagination is enabled as demonstrated here, several properties can now be taken advantage of, such as Page, which enables you to specify an index number of the page to view.
Summary
In this chapter, you looked at the different features of the Mobile Internet Toolkit, which enables you to deploy Web content to mobile devices. You built several applications that demonstrate how mobile Web controls dynamically change their presentation at runtime depending on the mobile device on which they are used. You also explored ways to detect device capabilities to exploit the features of various mobile devices.
Though the chapter only touched on some of these features, you now have an excellent starting point for building very dynamic Web content for mobile deployment.
Part V: C# and the .NET Framework
Chapter List
Chapter 31: Working with Assemblies
Chapter 32: Reflection
Chapter 33: C# Threading
Chapter 34: Working with COM
Chapter 35: Working with COM+ Services
Chapter 36: Working with .NET Remoting
Chapter 37: C# and .NET Security
Chapter 31: Working with Assemblies
In This Chapter
Code that is designed to take advantage of the .NET Framework is built into a packaging unit called an assembly. Assemblies are at the heart of the code deployment and security strategy for the .NET Framework, so it is important to understand them and how they work.
In this chapter, you take a look at assemblies and how you can write C# code to work with the information in assemblies. The .NET Framework contains a class called Assembly that makes working with assemblies simple, and this chapter will introduce you to the inner workings of the Assembly class.
Understanding Assemblies
Assemblies can contain code, resources, or a combination of both. Code contained in an assembly must contain the actual Microsoft Intermediate Language (MSIL) instructions that can be executed by the Common Language Runtime (CLR), as well as a manifest that describes the contents of the code. Manifests contain type and other descriptive information

that describes the code to the CLR. Assemblies also form boundaries around the code that they enclose. Assemblies form type boundaries, in that any type that can be used in any .NET code comes from a single assembly, and similarly named types from different assemblies are, in fact, different types. Assemblies also form a security boundary, whereby all of the code in the assembly holds the same set of security information, restrictions, and allowances.
Assemblies are packaged using the Win32 Portable Execution file format, and can be packaged as DLLs or EXEs. Any code produced by a CLR-aware compiler and build into a console executable, a Windows executable, or a library is packaged into an assembly. This packaging forms a unit of deployment for a set of types in an assembly. Do not assume that only DLL-based .NET code can be considered an assembly. Any packaging of .NET code, resources, and metadata that targets an executable or a library is an assembly, even if the packaging takes the form of an executable. WinForms applications, for example, are valid
.NET assemblies, just as DLL-based class libraries are valid assemblies.
Keep in mind that the C# compiler can also produce modules, but that modules are not assemblies. Modules are compiled pieces of code (and possibly resources) that are merged into an assembly at a later date. Modules contain MSIL, and they contain metadata describing the types found in the module, but do not contain a manifest. Modules cannot be loaded and executed by the CLR, and thus cannot be considered to be assemblies.
Finding loaded assemblies
You begin exploring the assembly concept by writing a small console application that lists a bit of information about assemblies loaded into a process. If type information comes from assemblies, the CLR must load assembly information into the process space of an executing piece of .NET code. For every type referenced in an application, the CLR must retrieve information from the assembly that contains the type, so that the CLR can use the type properly. These assemblies are called referenced assemblies, because they are referenced by another .NET assembly.
Discovering the list of referenced assemblies is a simple process. Consider the simple console application in Listing 31-1.
Listing 31-1: Retrieving a List of Referenced Assemblies
using System;
using System.Reflection;
public class MainClass
{
static void Main()
{
Assembly EntryAssembly;
EntryAssembly = Assembly.GetEntryAssembly(); foreach(AssemblyName Name in
EntryAssembly.GetReferencedAssemblies()) Console.WriteLine("Name: {0}", Name.ToString());
}
}
Listing 31-1 introduces many important concepts. First, it introduces a .NET class called Assembly, which is found in the .NET System.Reflection namespace. The Assembly class is the class through which any .NET code can examine and work with the contents of a .NET assembly. If you need to do any work with a .NET assembly, you need to use the Assembly class to examine the assembly's contents.
The second important concept reflected by Listing 31-1 is that of an entry assembly. The entry assembly is the first assembly to begin executing in the current process. For executables, such as the console executable produced by Listing 31-1, the entry assembly is the assembly containing the entry point function. Normally, the entry point function is named Main() for executable-based assemblies, although that can be changed through C# by using the /main argument and specifying another entry point for the assembly. Accessing the entry assembly is performed through a static method on the Assembly class called GetEntryAssembly(). This method returns an instance of an Assembly object that references the entry assembly.
The third important concept reflected by Listing 31-1 is that an assembly may contain referenced assemblies. Information on referenced assemblies is obtained through a call to an assembly method called GetReferencedAssemblies(). This method returns an array of objects of a class called AssemblyName. AssemblyName objects fully describe the name of an assembly and can be easily turned into a simple string using the familiar ToString() method. Obtaining a string-based representation of an assembly name makes it easy for applications to display assembly name information in user interfaces.
Given this information, digesting the operation of Listing 31-1 is simple. The code obtains a reference to the entry assembly and sends the names of referenced assemblies to the console. Compiling and executing the code in Listing 31-1 results in the following information being sent to the console:
Name: mscorlib, Version=1.0.3300.0, Culture=neutral,
PublicKeyToken=b77a5c561934e089
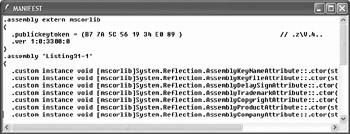
How does the .NET Framework know that Listing 31-1 references the mscorlib assembly? That information is stored in the manifest for the Listing 31-1 assembly. To see this information, launch the ILDASM tool that ships with the .NET Framework and load the Listing 31-1 assembly into it. Double-click the manifest entry in the tree that appears, and the manifest for the assembly is shown in a separate window, as shown in Figure 31-1.
Figure 31-1: External assembly references in a manifest
The manifest contains an entry labeled .assembly extern. This manifest entry describes an external assembly on which the assembly containing the manifest depends. This entry notes that the assembly containing this manifest depends on version 1.0.3300.0 of an external
assembly called mscorlib. It is the task of the .NET Framework to read this manifest and load dependent assemblies into the currently executing process space.
Note The mscorlib assembly contains core type information for classes such as System.Object, and is always referenced without any special compiler arguments. Other assemblies can be referenced using the /r option to the C# command-line compiler, or with the Add References menu item in Visual Studio .NET.
Understanding strong assembly names
The output of Listing 31-1 may seem a bit confusing at first, as it lists more than just the assembly name, which in this case is named mscorlib. This output actually defines four pieces of information for the assembly name:
•The name itself (mscorlib)
•A version number (1.0.3300.0)
•Culture information (neutral)
•A public key token (b77a5c561934e089)
At a minimum, all assemblies contain a name, a version, and a culture. .However, assemblies can contain a public key. An assembly containing all four pieces of information is said to be strongly named.
Only assemblies that contain strong names can be stored in the global assembly cache. The global assembly cache (GAC) is a disk-based collection of .NET assemblies that can be accessed by any piece of .NET code on the machine containing the GAC. The .NET Framework looks for an assembly in the entry assembly directory when an assembly needs to be loaded. This deployment scheme is simple; however, it can create several copies of an assembly on a disk volume for heavily used assemblies, as each assembly needs to be copied to each entry assembly that needs the referenced assembly. The .NET Framework includes the GAC to simplify things, so that heavily used assemblies, such as the assemblies that ship with the .NET Framework, can be placed on a machine once and referenced many times. The .NET Framework checks the GAC when searching for an assembly.
When the .NET Framework is installed on a machine, the setup process installs a Windows Explorer shell extension that makes the GAC appear as a standard Windows folder. The base Windows directory, which is C:\WINDOWS on most machines, contains a folder called assembly on machines with the .NET Framework installed. This folder shows the contents of the GAC, with strong name information in columns, as shown in Figure 31-2.

Figure 31-2: Viewing the GAC as a Windows folder
You can place assemblies with different strong names side by side in the global assembly cache, even if the segment names match. For example, version 1.0.0.0 of an assembly named assembly.dll can be installed in the global assembly cache along with version 2.0.0.0 of an assembly also named assembly.dll. Code that references a strongly named assembly has the assembly's strong name listed in the manifest and always binds to the assembly with that strong name, even if other assemblies with some components of the strong name are the same. If an entry assembly references version 1.0.0.0 of assembly.dll, for example, the .NET Framework always loads version 1.0.0.0 of assembly.dll into the process space of the entry assembly, even if other versions of assembly.dll exist in the GAC.
Setting the information that comprises a strong name for an assembly is as easy as adding some attributes to one of the source code files for a project. These attributes can be added to a source file containing C# code or can be added to a separate file containing only the attributes themselves.
Note Visual Studio .NET adds a source file called AssemblyInfo.cs to new C# projects and places attributes needed for strongly named assemblies into that source file. The filename can be changed once it is created and will still work, as long as the renamed file remains a part of the project build.
Setting version information
You can set assembly version information using an attribute called AssemblyVersion. The AssemblyVersion attribute takes a string describing the version number for the assembly, which is a series of four integers. The first integer is the major version number; the second integer is the minor version number; the third integer is the build number; and the fourth integer is the revision number. You can specify all four numbers for an assembly using the AssemblyVersion attribute:
[assembly: AssemblyVersion("1.0.0.0")]
As a shortcut, the C# compiler generates a revision number automatically if an asterisk is used instead of a revision number:
[assembly: AssemblyVersion("1.0.0.*")]