

C# ПІДРУЧНИКИ / c# / Hungry Minds - C# Bible
.pdfwell be stopped for several milliseconds, and another running thread overwrite data that another thread was using. This is not the end of the world, however, because several methods enable you to stop this from occurring. Consider the following code:
{
int Y; int V;
for(int Z = 0; Z < 20; Z++){ return Y * V;}
}
It is highly likely that during the loop, a running thread will stop to allow another thread a chance at this method. Remember that this only occurs if you are allowing multiple threads to access this code block. When you write multithreaded applications, this happens frequently, so you need to know how to address the situation. The following code solves this problem:
lock(this){ int Y; int V;
for(int Z = 0; Z < 20; Z++){ return Y * V;}
}
The Lock statement is one way to force the joining of threads. Its implementation is a little different from the Join method. With Lock, you are evaluating an expression passed to the Lock block. When a thread reaches the Lock block, it waits until it can get an exclusive lock on the expression being evaluated before it attempts any further processing. This ensures that multiple threads cannot corrupt shared data.
The Monitor class enables synchronization using the Monitor.Enter, Monitor.TryEnter, and Monitor.Exit methods. After you have a lock on a code region, you can use the Monitor.Wait, Monitor.Pulse, and Monitor.PulseAll methods to determine if a thread should continue a lock, or if any previously locked methods are now available. Wait releases the lock if it is held and waits to be notified. When Wait is called, the lock is freed and it returns and obtains the lock again.
Polling and Listening
Polling and listening are two more instances that represent the usefulness of multithreading. Class libraries, such as System.Net.Sockets, include a full range of multithreaded classes that can aid you in creating TCP listeners, UDP listeners, and a bevy of other network-related tasks that require multithreading.
Take note of the TimerCallBack class of the System.Threading namespace. This class is very similar to others you have been using so far, except that a timer period is part of the constructor, which enables you to poll for something to happen at certain intervals.
You can accomplish the same result by adding a timer control to your form, but by using the TimerCallBack class, the timing and the callback to the addressed procedure are automatic.
Listing 33-5 uses a timer callback to poll for files in a directory. If a file is found, it is promptly deleted. You should only run this code against a test directory, because it deletes

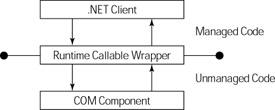
.NET code can access unmanaged code through a proxy called the Runtime-Callable Wrapper, or RCW. The RCW enables a .NET application to see the unmanaged component as a managed component. It does this by marshalling method calls, events, and properties through a wrapper created by your application or created manually using tools (such as the Type Library Importer) provided in the Framework. Using information from the COM type library, the RCW handles the interoperability between the managed and unmanaged code. When your application runs, it is unaware that the code being executed is from an unmanaged, or COM, DLL. The consumers of the components do not need any special knowledge of how the code was written, what language it was written in, or if it is a .NET component. All of the features of the managed environment, such as garbage collection and exception handling, are available to the .NET client as if it were consuming managed code. This makes it extremely simple to port modules in your pre-.NET applications to .NET, without having to reinvent the wheel or fully understand the intricacies of whatever .NET language you are using, be it C#, J#, or VB .NET, or whatever. You can rework the client code and leave your existing business and data logic in place by using COM Interop. Figure 34-1 shows the relationship between the COM DLL, the RCW and the managed .NET application.
Figure 34-1: Managed and unmanaged code living in peace together
Creating .NET Assemblies from COM Components
To use your COM component in your .NET application, you need to create the Interop Assembly, or RCW, that marshals the method calls from your .NET client to the COM server. There are several ways to do this in .NET. The two most common ways are as follows:
•The Type Library Importer utility, or Tlbimp.exe, supplied with the .NET Framework
•Directly reference the COM from your VS .NET C# application
Both of these are covered in detail within this chapter.
The proxy that is created for Interop is based on the metadata exposed in the type library of the COM component you are attempting to access. COM type libraries can be made available in one of two forms:
•Type libraries can be found as standalone files. Standalone type libraries usually have an extension of TLB. Older standalone type libraries may ship with an extension of OLB. If you are creating a Visual Basic ActiveX DLL, you can create a standalone type library for your component by selecting the Remote Server Files option in the project's Property dialog box.
•Type libraries can also be found embedded in a COM server as a binary resource. Inprocess COM servers, packaged as DLLs, as well as out-of-process COM servers, packaged as EXEs, can include the type library as a resource in the COM server itself. COM components built with Visual Basic have the type library compiled inside of the DLL.
In the following section, you learn how to create the Interop assembly from a COM DLL using the two methods described in the beginning of this section: using the Tlbimp utility and directly referencing the DLL from Visual Studio .NET.
Using the Tlbimp utility
The Tlbimp utility is a standalone console application that creates the .NET Interop assembly based on the COM DLL that you specify. It is located in the Framework SDK directory in Program Files. The following code snippet demonstrates the syntax of Tlbimp:
tlbimp [COMDllFilename] /[options]
The command-line options for tlbimp.exe are described in Table 34-1.
|
Table 34-1: Tlbimp.exe Options |
||
|
|
|
|
Option |
|
|
Description |
|
|
|
|
/asmversion:versionumber |
|
|
Specifies the version of the assembly to create |
|
|
|
|
/delaysign |
|
|
Tells Tlbimp to sign the assembly using delayed signing |
|
|
|
|
/help |
|
|
Displays help options for tlbimp.exe |
|
|
|
|
/keycontainer:containername |
|
|
Signs the assembly with a strong name using the |
|
|
|
public/private key pair found in the key container specified |
|
|
|
in the containername parameter |
|
|
|
|
/nologo |
|
|
Suppresses the Microsoft startup banner display |
|
|
|
|
/out:filename |
|
|
Specifies the name of the output file to be created. By |
|
|
|
default, the output file has the same name as the COM DLL, |
|
|
|
but you are warned if you attempt to overwrite the file if it |
|
|
|
exists in the same path. |
|
|
|
|
/primary |
|
|
Produces a primary Interop assembly for the type library |
|
|
|
|
/publickey:filename |
|
|
Specifies the file containing the public key to use to sign the |
|
|
|
resulting assembly |
|
|
|
|
/reference:filename |
|
|
Specifies the assembly file to use to resolve references to |
|
|
|
types defined outside of the current type library |
|
|
|
|
/silent |
|
|
Suppresses the display of success messages |
|
|
|
|
/strictref |
|
|
Does not import a type library if the tool cannot resolve all |
|
|
|
references defined within the current assembly or |
|
|
|
assemblies specified with the /reference option |
|
|
|
|
/sysarray |
|
|
Imports any COM-style SafeArray as a managed |
|
|
|
System.Array Class type |
|
|
|
|
/unsafe |
|
|
Produces interfaces without .NET Framework security |
|
|
|
checks. You should not use this option unless you are aware |
|
|
|
of the risks of exposing code as unsafe. |
|
|
|
|
/verbose |
|
|
Displays additional information about the imported type |
|
|
|
library when tlbimp.exe is run |
|
|
|
|
/? |
|
|
Displays help about the syntax for tlbimp.exe |
|
|
|
|

This command produces a .NET assembly with a DLL extension whose base name is set to the name of the library embedded in the type library file (which may be different from the filename of the type library itself). The tlbimp command can accept the name of a type library file as input:
tlbimp server.tlb
It can also accept the name of a COM server that holds an embedded type library:
tlbimp server.dll
By using the /out option, you can specify an alternate name for the .NET assembly created:
tlbimp server.dll /out:dotNetServer.dll
The assembly that is output by the Tlbimp.exe tool is a standard .NET assembly that you can view with Ildasm.exe. The assembly does not contain the COM server's code; instead, it contains references that help the CLR find the COM objects housed in the server, such as the COM object's GUIDs. Think of the assembly generated by tlbimp as a bridge that connects your .NET code to your COM server. Because the COM code still resides in the COM server, you need to remember to install and register any COM servers you plan to use with your
.NET applications. This actually works to your advantage. Because the COM server is still registered with Windows, standard COM applications that are not .NET-aware can continue to use the same COM server without moving any of the code to a .NET-specific platform.
Creating a COM component
Before using the Tlbimp utility, you need a COM component to work with. Listing 34-1 shows the code for a simple VB6 ActiveX DLL with several common class functions, such as setting and retrieving a property, firing an event, and returning a value from a method that has input parameters.
Listing 34-1: Visual Basic 6.0 COM Server Code
Option Explicit
Private strMessage As String
Public Event COMEvent(Message As String)
Private Sub Class_Initialize()
strMessage = "Default Message"
End Sub
Public Property Get Message() As String
Message = strMessage
End Property
Public Property Let Message(ByVal vNewValue As String)
strMessage = vNewValue
End Property
Public Function SquareIt(int1 As Integer, int2 As Integer) As Integer

SquareIt = int1 * int2
End Function
Public Sub FireCOMEvent()
RaiseEvent COMEvent(strMessage)
End Sub
This code is placed into a class module named COMObject. The class module is enclosed in a project named VB6COMServer. Visual Basic 6.0 compiles this code into an in-process COM server and embeds a type library into the server. The readable representation of the type library, written in COM's Interface Description Language (IDL), is shown in Listing 34-2.
Listing 34-2: IDL Source for the COM Server In Listing 34-1
//Generated .IDL file (by the OLE/COM Object Viewer)
//typelib filename: VB6COMServer.dll
[
uuid(B4096C50-ACA4-4E1F-8D36-F36F1EE5F03B), version(1.0)
]
library VB6COMServer
{
//TLib : // TLib : OLE Automation : {00020430-0000-0000-C000-000000000046}
importlib("stdole2.tlb");
//Forward declare all types defined in this typelib interface _COMObject;
dispinterface __COMObject;
[
odl, uuid(5960D780-FEA2-4383-B2CB-9F78E4677142), version(1.0),
hidden,
dual,
nonextensible, oleautomation
]
interface _COMObject : IDispatch { [id(0x68030000), propget]
HRESULT Message([out, retval] BSTR* ); [id(0x68030000), propput]
HRESULT Message([in] BSTR ); [id(0x60030002)]
HRESULT SquareIt(
[in, out] short* int1, [in, out] short* int2, [out, retval] short* );
[id(0x60030003)] HRESULT FireCOMEvent();
};
[
uuid(50730C97-09EB-495C-9873-BEC6399AA63A),
version(1.0)
]
coclass COMObject {
[default] interface _COMObject;
[default, source] dispinterface __COMObject;
};
[
uuid(A4D4C3D8-DFFF-45DB-9A14-791E4F82EF35), version(1.0),
hidden, nonextensible
]
dispinterface __COMObject { properties:
methods:
[id(0x00000001)]
void COMEvent([in, out] BSTR* Message);
};
};
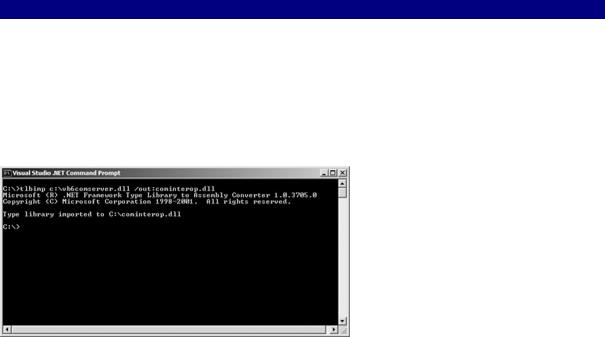
To create the Interop assembly that enables your C# application to consume the unmanaged DLL, you need to run the Tlbimp utility described in the preceding section. In Figure 34-2, you can see that the /out: parameter is used to give the Interop assembly the name compinterop.dll. The name of the output assembly can be anything that you choose — it can even be the same name as the original COM component.
Figure 34-2: The Tlbimp utility in action
The VB6COMServer.dll that was created using VB6 can now be consumed from any .NET client — as long as the cominterop.dll assembly is referenced by the application, and the VB6 component is registered on the machine that is attempting to consume the code. Because the output from Tlbimp is now a .NET assembly, you can use the ILDASM utility to view details about the metadata that was created from the ActiveX DLL that the CLR actually uses. Figure 34-3 shows the ILDSM utility when run against the new cominterop.dll just created.
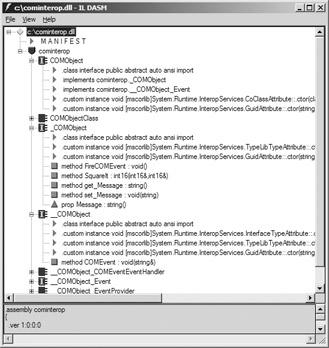
Figure 34-3: ILDASM with assembly generated by Tlbimp
The assembly generated by importing the type library whose source code is shown in Listing 34-3 includes a namespace called cominterop, which is the name of the assembly that was passed to the /out parameter from the Tlbimp utility. This namespace must be treated just like a namespace defined by your code or the .NET Framework: Your code must reference the namespace when using any of the classes in the namespace.
Figure 34-3 illustrates the classes inserted into the assembly generated by tlbimp. The class that you use in your C# code to work with the COM object has the same name as the name given to the COM object in the IDL source's coclass statement. In Listing 34-3, the COM object is given a coclass name of COMObject. The assembly generated by tlbimp includes a
.NET class of the same name, and this is the class that you use in your code to work with the Visual Basic COM object.
Using the Interop assembly from C#
Consuming the COM component from C# is very straightforward now that you have created the Interop assembly. To use your Interop assembly, perform the following steps:
1.Create a test client application. For simplicity, create a new Windows Forms application and call it Interop.
2.Once the application is created, you put your code in the click event of a button, so go ahead and add a button to the default Form1.cs. Next, right-click References in the Solution Explorer, and select Add. The Add Reference dialog box opens. This is similar to the Add Reference dialog box in VB6. Basically, you need to make a reference to the assembly that you need to use, just as any other .NET assembly is not added by default to a new project.
3.To add a reference to the Cominterop DLL that you created earlier, click the Browse button and locate the assembly on your hard drive. Once you have done this, your Add Reference dialog box should look something like Figure 34-4.
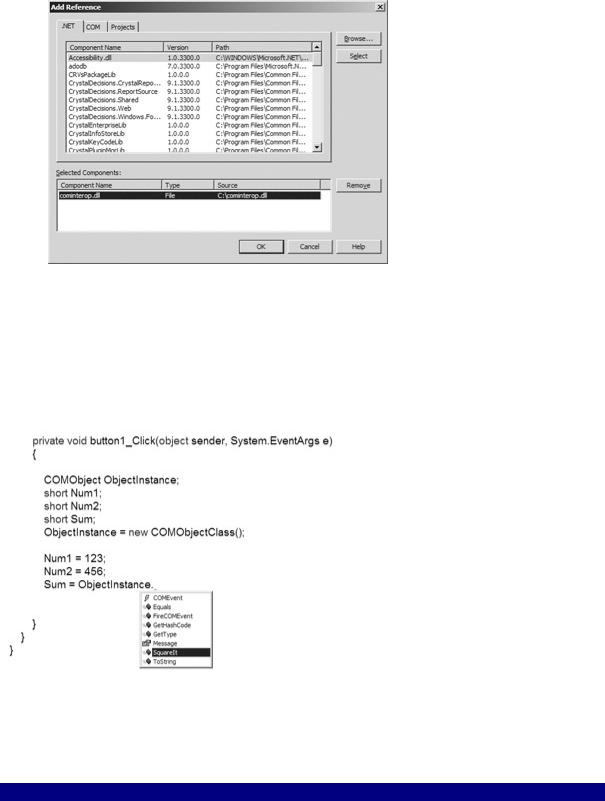
Figure 34-4: Adding the Cominterop reference
After the assembly is referenced by your application, you can use it just as you would any other .NET assembly. Because Visual Studio .NET has such great features — such as autocomplete and auto-list members — once the reference is added, your methods, events, and properties are available to you through the IDE. Figure 34-5 shows the auto-list members in action once the instance of the Cominterop object is created and the assembly is reference with the using statement.
Figure 34-5: Auto-List members in action
To test all of the methods, properties, and events that you wrote in the ActiveX DLL, duplicate Listing 34-3 in your WindowsForms application.
Listing 34-3: COM Client Code Written in C#
///<summary>
///The main entry point for the application.
///</summary>
[STAThread] static void Main()
{
Application.Run(new Form1());
}