

C# ПІДРУЧНИКИ / c# / Hungry Minds - C# Bible
.pdfBackColor property. By using this property, you can either specify the color to be used as the background color of a control or check to see what the current background color is.
Properties are easily implemented in your project by using the Visual Studio.NET IDE a very simple wizard. Within the Class View window, right-click your control's class, and then choose Add → Add Property. The wizard, shown in Figure 29-1, enables you to set the type of access, the property type (int, bool, and so on), the property name, accessors, and modifiers.
Figure 29-1: The Add Property Wizard enables you to add a property to your project.
After you complete the wizard, you are greeted with a skeleton code for your property:
public int TestProperty
{
get
{
return 0;
}
set
{
}
}
Some basic elements are missing in this code. When setting the property to a value, the information is not being stored. You must first create a private class variable that this property can use to store and retrieve the value. In this case, you simply include the following declaration at the top of your class declaration:
private int m_TestProperty;
From within the set method of your property, you can assign the data to your private variable using the value keyword:
set
{
m_TestProperty = value;
}
Now that the value of the property has been stored in the private class variable, you have to ensure that the Get method returns the correct value when used. The following code accomplishes this; simply return the value of the private variable within the get block, as shown in the following snippet:
get
{
return m_TestProperty
}
It is also useful to map properties from existing components in your control. For example, assume you have created a control that contains a label. Your control should contain a Font property that gets and sets the font of the label component within your control. To enable the container to manipulate the font of your label, simply create a property as follows:
public Font CurrentFont
{
get
{
return label1.Font;
}
set
{
label1.Font = value;
}
}
This code creates a property called CurrentFont, which returns the current font of the label control when requested. When the container wishes to change the font, you simply set the current font of the label control to that of value.
Methods
A method is defined as a function that is part of a class. Methods are implemented in the same manner as many other languages, such as C++, C, VB, and so on. Methods are most commonly used for initiating an action within a control. An example of this would be the Start method within the Timer control.
You can add a method to a control in one of two ways. You can use the C# Method Wizard, accessible through the Solution Explorer while in Class view, or you can simply add a public function to your project.
The C# Method Wizard, shown in Figure 29-2 enables you to specify the method name, return type, access method, and parameter information in a very straightforward manner.
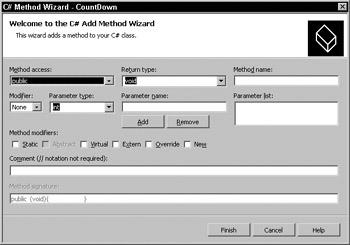
Figure 29-2: The C# Method Wizard creates the skeleton code needed for a method.
The drawback to the Method Wizard is that it provides you with only simple return types. For example, suppose you want a method that returns a value of type Font. The Font type is not an option in the Return Type combo box. When you experiment with the wizard, you learn that you can enter your own types in these boxes; you are not limited to the options they contain. The options presented are merely the most commonly used types so as not to confuse the new programmer. After all, if every option were presented in this wizard, it would take a considerable amount of time to scroll through the list in search of the type you require.
The .NET Framework also brings some much-needed functionality to methods. Methods can now be overloaded. That is, they can have the same name just as long as their parameter lists are different.
Fields
Fields are simply public variables defined within a control. The container application can set the field to a particular value and retrieve the value. Because these are merely variables, they have no functions associated with them; fields cannot perform calculations or call other methods when a value is set or retrieved from them.
There are two types of fields: instance and static. A field is defined as an instance field by default. An instance field can contain its own data within each object that contains it. When a field is declared as static, the field contains the same data across all instances of the object. A static field is normally not a good idea because other instances of an object can change the value while the remaining instances are unaware of it.
Fields provide low coding overhead but are also limited in terms of functionality. You can set and retrieve a field's values, but doing so cannot trigger other actions within the control itself. Fields are useful when you need to assign operating parameters to a control.
Events
To define an event, you must first make a public class declaration, such as the following:
Public event EventHandler Expired;
You can use events in one of two ways with Windows controls: You can either click the Event icon within the Properties window and double-click the event to automatically add the handler, or you can create an event handler yourself.
A basic event is declared as type EventHandler, but you have many more event types to choose from, and each one has a unique signature. The parameter of every event contains a System.EventArgs structure. This structure enables the control to pass information into the event, defining many things, such as what fired the event, which control caused the event to fire, and so on. Before picking an event type for your control, be sure to explore the different types, as well as the parameters they pass.
Knowledge by Example
Let's begin by building a countdown timer control. This exercise enables you to examine the ins and outs of building controls.
Creating a countdown timer
Before you begin building the countdown timer control, you need to identify what this control should and should not do. This mapping simplifies the process of building the control. It's always a good idea to have everything mapped out well in advance of beginning a control project, more so than with any typical programming project. This particular control should have the following features:
•The control should be a visible component that you can place on a form. This control should have typical properties, such as BackColor, Anchor, and so on.
•The control should accept a value indicating the number of seconds to count down.
•The control should have a Start() and Stop() method to begin and end the countdown.
•Finally, the control should fire an event when the countdown has reached zero.
With the requirements defined, you can begin building your control.
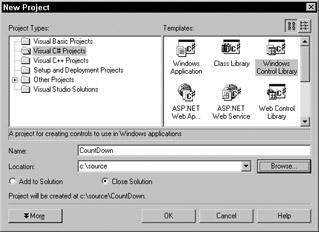
Open Visual Studio.NET and create a new Windows Control Library project. Name this project CountDown, as shown in Figure 29-3.
Figure 29-3: Create a new Windows Control Library project.
1.When Visual Studio has created your skeleton control, you are presented with a UserControl. This will be the visual interface to your CountDown control. It is here that you place any visual elements that you want the user to view and/or interact with.
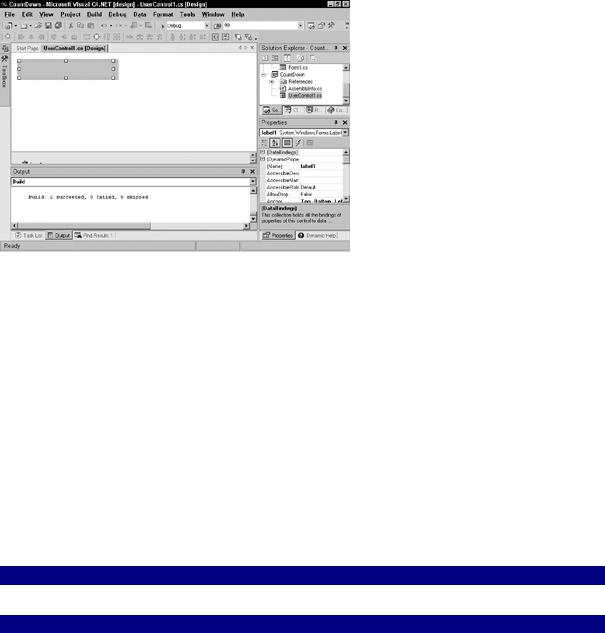
2.The first thing you must do is place a Label control on the UserControl, as shown in Figure 29-4.
Figure 29-4: Place a label on the UserControl.
3.Change the Anchor property of this Label control to Top,Left,Bottom,Right. This ensures that when the control is resized, the label is resized along with it. You should exercise much care when adding existing components to a control because many elements can change visually when the user places a control on the form.
4.Now you must add a Timer control to the project (from the toolbox). The Timer control enables you to count one second at a time until you have determined that the time has expired. The visual aspect of your control is now complete. You must now add the code to support this control.
5.In Listing 29-1, you declare a member variable to hold the number of seconds the countdown timer counts down from. You must also declare an EventHandler to fire when the control reaches the end of the countdown. Place the following code just below the class declaration within UserControl:
Listing 29-1: Public Members
private int m_Seconds;
public event EventHandler Expired;
6.The m_Seconds variable doesn't need to be exposed to the controls container, but only to control itself, so you make the variable private. By declaring a public EventHandler, Expired shows up within the Event window. You can then program this event by simply double-clicking it.
7.In the Tick event of the Timer object, you must subtract a second from your total number of seconds. You can then check to see whether the total number of seconds elapsed has reached zero. If so, you have to stop the timer and then fire off Expired event. After this, you can update the Label control to reflect the current value of your
CountDown Timer control. In the Properties window, click the Object Selector combo box, and select the Timer control. Next click the Event toolbar button toward the top of the Properties window. You see all the events exposed by the Timer control. Double-click the Tick event. Place the code shown in Listing 29-2 in the Tick event handler of the Timer control.
Listing 29-2: The Tick Event Updates Your Control
private void timer1_Tick(object sender, System.EventArgs e)
{
m_Seconds -= 1;
if (m_Seconds <= 0)
{
timer1.Stop();
Expired(this,e);
}
label1.Text = m_Seconds.ToString();
}
8.Your control also needs a public() method that enables the container to start the control on its journey to counting seconds. Listing 29-3 defines the interval of the Timer control (in milliseconds) and then starts the Timer control. After the timer has been started, you must update the Label control because it won't be get updated until 1 second later when the timer fires the Tick event for the first time.
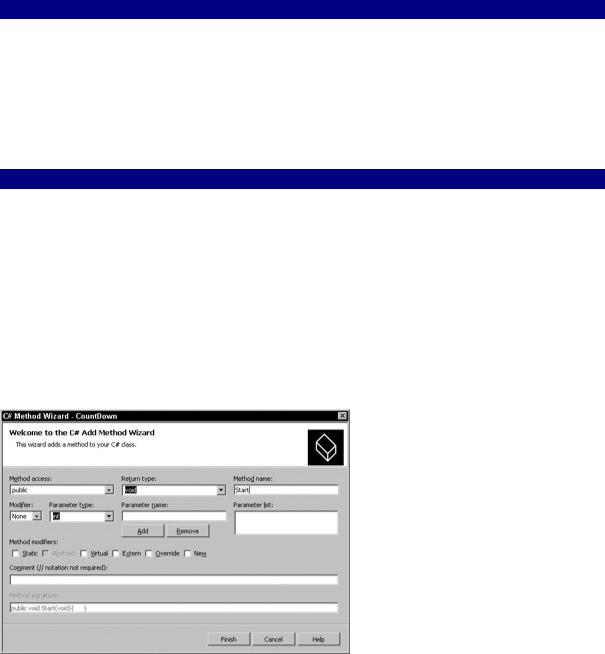
9.To add a method to the control, switch the Solution Explorer to Class view by clicking the Class View tab. Expand the Class view, until you come to the controls class. Right-click; select Add, and then select Add Method. The C# Method Wizard opens, as shown in Figure 29-5.
Figure 29-5: The C# Method Wizard
10.Name this new method Start and ensure that it is a public method. You can leave all the other settings at their default. After you create the new method, add the code shown in Listing 29-3 to the method's code listing.
Listing 29-3: Start Method
public void Start()
{
timer1.Interval = 1000; timer1.Start(); label1.Text=m_Seconds.ToString();
}
11.A Stop() method complements your Start() method. The Stop() method should first stop the Timer control so that the Tick event no longer fires. You must also assign the value of the Seconds property to your m_Seconds member variable. This ensures that if the control is started again, it starts from the beginning and not from where it left off when it was stopped. Create a new method called Stop(), just as you created the Start() method. Add the code from Listing 29-4 to this new method.
Listing 29-4: Stop Method
public void Stop()
{
timer1.Stop();
m_Seconds = this.Seconds;
}
You have not yet created the Seconds property. The Seconds property enables you to get and set the total number of seconds that your control will count down from. You create a property much as you create a method.
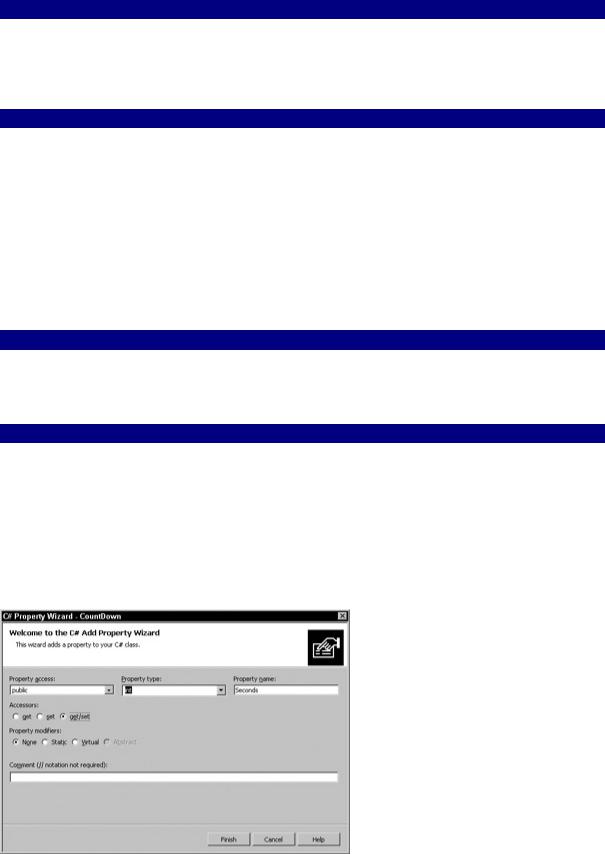
1.From Class view in the Solution Explorer, right-click and choose Add and then Add Property. The C# Property Wizard, shown in Figure 29-6 opens.
Figure 29-6: In the C# Property Wizard, name this property Seconds. Ensure that this property has public access and that the property type is set to Int.

2.You want the controls container application to be able to assign a value to this property or read the value from this property. Therefore, you want the accessor set to get/set. Add the code in Listing 29-5 to the code created by the C# Property Wizard.
Listing 29-5: Seconds Property
public int Seconds
{
get
{
return m_Seconds;
}
set
{
m_Seconds = value;
}
}
Pay special attention to the value keyword. When a value is passed in to a property (e.g., set), it can be retrieved with the value keyword.
Thus far, your control isn't very advanced, nor does it look good, but it is functional. At this point, you can build the new control by selecting Build Solution from the Build menu.
Now you build a test harness that uses this control and enables you to test all methods, properties, and events of the control.
Creating a CountDown test harness
One of Visual Studio's strengths is that it enables you to add a project to an existing project, which plays an important role when it comes to testing controls. This capability enables you to create a test harness application that uses a control you just created. When errors are encountered, not only does your application break, but it breaks in the code where your control malfunctioned. This saves you countless hours of debugging code when you start to build complex controls. Perform the following steps to create a test harness:
1.From within your CountDown control project, click the File menu and select New → Project. The New Project window opens.
2.Select Windows Application and name this application CDHarness. At the bottom of this window, ensure that the Add To Solution radio button is clicked. Click OK.
3.The Solution Explorer displays both projects. Right-click the CDHarness application in the Solution Explorer and select Set As Startup Project. When you run the application now, your test harness will be the main application to run, and it can use any other projects currently loaded in the "group."
4.Ensure that you are within the CDHarness project by clicking it on the Solution Explorer. Right-click the toolbox and choose Customize Toolbox.
5.When the Customize Toolbox window opens, click the .NET Framework Components tab. It is here that you add your new control to the project.
6.Click the Browse button and browse for the CountDown timer control. When you find it, select it and highlight it. Click OK.
7.In the list of controls, you see this control; check the box next to it. Now you can click OK on this form. From within the control toolbox, you see the CountDown timer control listed.
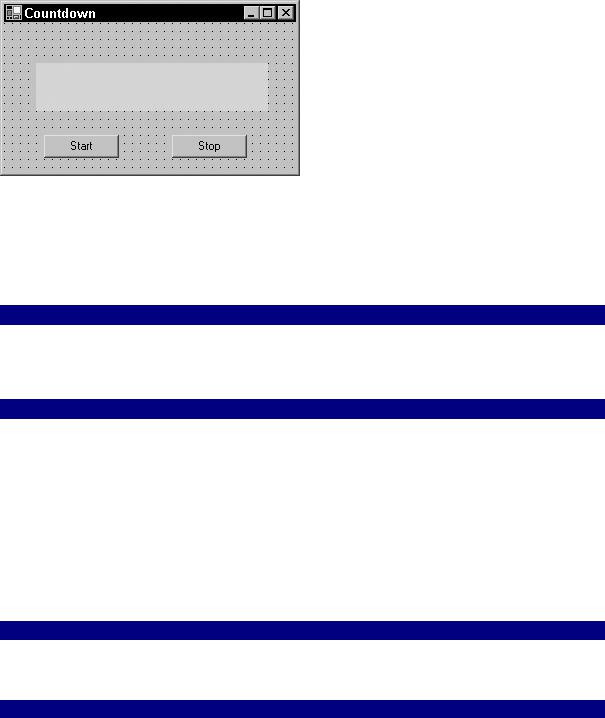
8.Double-click the control to add it to your project. While you are in the toolbox, add two buttons to your form as well. The first button is used to start the countdown timer; and the second button is used to stop the Countdown control. Arrange and set the text properties as shown in Figure 29-7.
Figure 29-7: The main interface for your CountDown harness application
9.Double-click the Start button within your application so you can begin coding. Add the code in Listing 29-6 to the Click event of the Start button.
Listing 29-6: Start Your Control
private void button1_Click(object sender, System.EventArgs e)
{
cdTimer1.Seconds=60;
cdTimer1.Start();
}
10.The Start button serves one purpose and one purpose only: to prepare and start your CountDown control. To begin, you set the number of seconds to 60, and then you call the Start method of the control.
11.You also need to be able to stop your control. Double-click the Stop button so you can place code in the Click event of this button. Place the following code from Listing 29- 7 in the Click event of the Stop button.
Listing 29-7: Stop Your Control
private void button2_Click(object sender, System.EventArgs e)
{
cdTimer1.Stop();
}
12.The Expired event of the CountDown control needs to perform some action so you know that your countdown has reached zero. In the Properties window, click the Events button on the toolbar. Now double-click the Expired event. It is within this code that you want to code this special action. You won't attempt anything extravagant here; you are simply going to change the caption of your form to Done. Place the code shown in Listing 29-8 into the Expired event of the CountDown control.
Listing 29-8: Expired Event Code
private void cdTimer1_Expired(object sender, System.EventArgs e)
{
this.Text="Done!";
}
Your control and test application are now ready to roll. Press F5 to run the application. When the applications opens, click the Start button to begin the countdown. Your test application should begin to count down. When the countdown has reached zero, the caption of the form should change, thanks to your Expired event.
Using a Class Library
A class library is an efficient means to re-use and distribute re-usable code. Class libraries are stored in DLLs, but there is no need to wrap the code with export statements and declarations as required in languages, such as C++.
As with any re-usable component, class libraries provide class constructs and destructors for initialization and cleanup, but these items are not actually required.
To begin your journey into class libraries, you build a simple DLL with a few public methods for demonstration purposes; and then you build upon the control with some additional bells and whistles.
Building the windchill calculations class
Not only will your windchill calculation class library provide a function to calculate the windchill, it will also provide functions to ascertain Celsius from Fahrenheit and Fahrenheit from Celsius.
Because the operations you are going to perform in this class library fall under two distinct categories, Conversion and Calculation, you are going to include two separate classes. Create a new class library project and name it Temperature. Visual Studio creates the skeleton code shown in Listing 29-9.
Listing 29-9: Code Created for a Class Library by Visual Studio
using System;
namespace TmpTure