

C# ПІДРУЧНИКИ / c# / Hungry Minds - C# Bible
.pdf22. return "Provider=SQLOLEDB.1;"
23. +"User ID=sa;Initial
24. Catalog=WebService_1_0_0;Data Source=localhost;";
25.
26.}
27.}
29.// WEB SERVICE EXAMPLE
30.[WebMethod]
31.public DataSet getList()
32.{
33.// Set SQL statement strings
34.string strSQLSelect = "[pc_getBooks]";
36.// Create OleDb objects
37.OleDbConnection databaseConnection = new
38.OleDbConnection(oleDbConnectionString);
39.OleDbCommand selectCommand = new
40.OleDbCommand(strSQLSelect, databaseConnection);
41.OleDbDataAdapter dsCmd = new OleDbDataAdapter();
42.DataSet resultDataSet = new DataSet();
43.
44.// We are dealing with a Stored Proc (i.e. NOT a SQL
45.statement)
46.selectCommand.CommandType = CommandType.StoredProcedure;
48.try
49.{
50.// Establish database connection
51.databaseConnection.Open();
52.
53.// Execute SQL Command
54.dsCmd.SelectCommand = selectCommand;
55.int numRows = dsCmd.Fill(resultDataSet, "Books");
57.}
58.catch (Exception e)
59.{
60.Console.WriteLine("****** Caught an exception:\n{0}",
61.e.Message);
62.}
63.finally
64.{
65.databaseConnection.Close();
66.}
67.
68.return resultDataSet;
69.}
The oleDbConnectionString property contains the connection string to the SQL Server database. In production code, you would use an account with proper security rights (and a password) instead of the almighty "sa" account. The getList() method opens a connection to the SQL Server database, and retrieves a DataSet containing the list of books by invoking the pc_getBooks command. You can see how straightforward it is to use ADO.NET.
Cross-Reference You also find more details on ADO.NET in Chapter 23.
70.That's it! You can also add a namespace declaration to the class, as shown in the following example:
71.[WebService(Namespace="http://microsoft. com/webservices/")]
public class Books : System.Web.Services.WebService
Namespaces are a way to avoid duplication of names. A unique prefix is used to distinguish similarly named Web services. Typically, URLs are used as the basis for these unique names. This is in accordance on how URLs are used in XML namespaces as described in the appendix.
72. Save the project, then press F5 to test the Web service.
Now that you have created a Web service, try creating a client application that uses this Web service.
Using Visual Studio .NET to Access a Web Service
The following example shows the steps required to create a Web service application in C#:
1.Open Visual Studio .NET and select File → New Project.
2.Select ASP.NET Web Application as the project type.
3.Name the project BookRetailer.
4.Choose Project → Add Web Reference.
5.Click Web References on Local Server to have Visual Studio .NET automatically detect the available Web services on localhost.
6.Select http://localhost/BookSeller/BookSeller.vsdisco and then click Add Reference. You have imported the information needed to call this Web service.
7.In Design mode, add a Label control to the top of the page and a DataGrid control below the label, and then switch to Code view.
8.Add a using declaration to the ASP.NET page: This tells the compiler that you will be using the code from the Web service.
using BookRetailer.localhost;
9.Add the following code to the Page_Init method. In this example, you set the text for the label and then populate the DataGrid in a quick and easy way (this page will not win any awards for aesthetics):
10.private void Page_Init(object sender, EventArgs e)
11.{
12.//
13.// CODEGEN: This call is required by the ASP.NET Windows
Form Designer.
14.//
15.InitializeComponent();
17.// Added by PGB
18.Label1.Text = "Available Books";
20.Books books = new BookRetailer.localhost.Books();
21.DataSet bookList = books.getList();
22.DataGrid1.DataSource =
23.bookList.Tables["Books"].DefaultView;
24.DataGrid1.DataBind();
25.// End PGB Addition
26.}
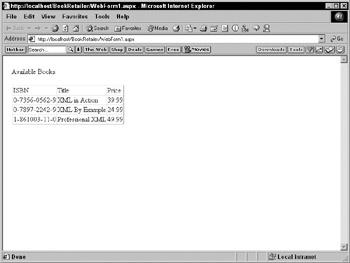
27.Save and run the project (using the F5 shortcut). A screen similar to the one shown in
Figure 27-4 appears.
Figure 27-4: A Web service in action, having retrieved a list of books from the Web service provider
Let's reflect on what we have accomplished. You created a Web service (that would run on a server connected to the Internet). In this section, you built a Web page (that would run on a different server) that uses this Web service to retrieve a list of books from the first server.
Summary
In this chapter, you have examined the XML-based standards behind Web services. You looked at the two optional technologies involved in defining Web services: UDDI for the discovery mechanism and WSDL for the service description. You also looked at the message format used during the actual invocation of a Web service: SOAP. You built a simple Web service using Visual Studio. Then, you built a second project that was using the Web service you previously built.
Chapter 28: Using C# in ASP.NET
In This Chapter
The advent of Internet and corporate intranets has led to the development of distributed applications. A distributed application can access information from different data sources that might be spread across multiple geographical locations. Visual Studio .NET takes distributed applications to new heights by enabling you to utilize Web services and Web service clients.
ASP.NET Web services are XML-based services that are exposed on the Internet that can be accessed by other Web services and Web service clients. A Web service exposes Web
methods that can be accessed by Web service clients, which implement the functionality of the Web service.
Before Visual Studio .NET, ASP programming was done using VBScript. However, with the advent of Visual Studio .NET, you can use two languages for ASP programming: Visual C# and Visual Basic .NET. Visual C# enables you to write ASP.NET code for Web services and Web applications. Finally, you can learn how to deploy the Web application by using Visual Studio .NET.
In this chapter, you learn to use C# for creating ASP.NET applications. You begin by creating a Web service in Visual C#. After creating the Web service, you create a Web service client in C#, which is actually a Web application that uses the Web service.
Creating a Web Service
In Visual Studio .NET, Web services are used for integrating remote applications with your present line-of-business solutions. Broadly speaking, Web services offer two advantages:
•You can utilize a Web service offered by another organization to build a customized application for your organization. For example, you can use the Microsoft Passport authentication service to enable Microsoft Passport authentication on your Web site. You can benefit from such a venture because you need not establish the necessary infrastructure to implement custom authentication on your Web site. In addition, your site can cater to a larger audience because all users registered with the Passport service (which includes all Hotmail and MSN users) can log on to your Web site.
•You can also utilize Web services to communicate with your business partners. To cite a simple example, consider a bookseller who houses the books of numerous publishers. If each publisher can host a Web service that provides information about the latest books that are released by them, the bookseller can develop a Web service client that connects to these Web services and retrieves details about these books.
Cross-Reference For more information on Web services, refer to Chapter 27.
Now you create a Web service that utilizes a database. Therefore, in the first step, you learn how to create the database for the Web service. Next, you learn how to use the database and create the Web service.
Note While creating the Web service in this example, you concentrate only on the tasks involved in its creation. Refer to Chapter 27 to learn about the concepts involved in implementing Web services.
Creating a database for a Web service
Web services or Web applications often employ a database to store data that pertains to the application. In an enterprise environment, databases, such as Microsoft SQL Server and Oracle, are well suited for managing data.
In the Web service that you create in this chapter, you use an SQL Server database. Before you create the SQL Server database and tables for the Web service, quickly review important Relational Database Management Systems (RDBMS) concepts.
Relational Database Management Systems concepts
A Relational Database Management System (RDBMS) is best suited for enterprise business solutions. An RDBMS, such as Microsoft SQL Server, Oracle, and DB2, enables the creation, updating, and administration of relational databases. A relational database is a collection of data organized in the form of tables. Applications can access data in tables using the Structured Query Language (SQL) statements. In an RDBMS, you can access data and reorganize data without reorganizing the entire database. This improves the performance of the database considerably. In addition, you can easily apply business rules, validations, and constraints to the data in the tables of an RDBMS. Business rules and validations ensure data integrity. For example, when you book a passenger on a flight in an airway reservation system, the flight number should exist. You can determine the flight number by establishing a business rule and using it while booking a ticket.
SQL Server data types
Data in a database is stored in tables, as rows and columns. The columns of a table store categorized information, such as product identification number, product name, and quantity available. The rows of a table store specific records. Each column in a table has a specific data type. Table 28-1 describes some of the common SQL Server data types.
|
|
Table 28-1: SQL Data Types |
Data type |
|
Description |
|
|
|
Integer |
|
Used to store whole numbers. |
|
|
|
Float |
|
Used to store decimal numbers. |
|
|
|
char(n) |
|
Used to store character data that can be alphabetical, numerical, |
|
|
special characters, such as #, %, or $, or a combination of letters |
|
|
and characters. |
|
|
A char data type stores a single character. To store more than one |
|
|
character, you use char(n), where n refers to the number of |
|
|
characters that you want to store |
|
|
|
varchar(n) |
|
Used to store character data, where n refers to the number of |
|
|
characters you want to store. A varchar data type is different |
|
|
from a char data type because the memory allotted to a varchar |
|
|
data type depends upon the size of data, unlike the char data |
|
|
type, in which allocated memory is predefined. |
|
|
|
Datetime |
|
Used to store date and time data. |
|
|
|
Money |
|
Used to store currency-related data values that demand high |
|
|
precision. |
|
|
|
Tip Each table must have at least one column that uniquely identifies a row (referred to as a record) in the table. Such a column is the primary key of the table. For example, the ProductID column in a Products table identifies each row uniquely and is therefore a primary key. No two values in a primary key can be identical.
Creating databases and tables
In Microsoft SQL Server, you can create databases, tables, stored procedures, and queries by using Transact-SQL (T-SQL).
Tip You can also use SQL Server Enterprise Manager to create a database and tables. SQL Server Enterprise Manager provides a graphical interface to perform the same steps that are performed by using T-SQL statements.
To create a database or a table using T-SQL, you use the Create statement. For example, to create a database Sales, you write the following code in the query analyzer window:
Create Database Sales
After creating the database, you can add tables to it. Add the Products table to the Sales database by using the following syntax:
Create Table Products
(
ProductID VarChar (4) Primary Key, ProductName VarChar (20), UnitPrice Integer,
QtyAvailable Integer
)
Retrieving data
You can retrieve information stored in tables by using the Select statement. For example, to retrieve all the records from the Products table of the Sales database, you use the following statements:
Use Sales
Select * From Products
Inserting, updating, and deleting data
You can add, update, and delete data from an SQL Server database by using the steps outlined in the following list:
•Add a record: To add a new row to an SQL Server table, you use the Insert statement. For example, to add a new record to the Products table, you use the following statement:
•Insert Into Products (ProductID, ProductName, UnitPrice,
•QtyAvailable)
Values ('P001', 'Baby Food', 2.5, 12000)
Caution In order for the insert operation to be successful, the column values must be supplied in the same order as the columns in the table. In addition, if the data type of a column is char, varchar, or datetime, you need to specify values in quotes.
•Modify a record: To modify a record in an SQL Server table, you use the Update statement:
•Update Products
• Set UnitPrice=75
Where ProductID="P010"
The preceding code updates the unit price of the record whose product ID is P010 to 75.
•Delete a record: To delete a record from a table, you use the Delete statement. For example, to delete a record from the Products table with the Product ID of P011, you specify the following statement:
Delete From Products where ProductID="P011"
Using stored procedures
A stored procedure is a set of SQL statements used to perform specific tasks. A stored procedure resides on the SQL Server and can be executed by any user who has the appropriate permissions. You can create a stored procedure by using the Create Procedure statement. Create a stored procedure that accepts the ProductID as a parameter and returns the unit price of the record matching the ProductID by using the following code:
Create Procedure ProductPrice (@id char (4))
As
Select UnitPrice
From Products Where ProductID=@id
Return
The preceding procedure requires a parameter, @id, at the time of execution.
Stored procedures are particularly useful when you need to perform a number of tasks on a database one after the other. For example, when you want to cancel the reservation of a passenger, you might need to calculate the fare that needs to be refunded to the customer and delete the reservation of the customer from a reservations table. At the same time, you might also need to update the status of other passengers who might be overbooked on the flight. Instead of specifying SQL queries each time you want to cancel a reservation, you can use a stored procedure to cancel the reservation of a passenger.
Caution Each stored procedure must end with a Return statement.
To execute the preceding procedure to display the price of the product with the ID P010, use the following code:
Execute ProductPrice "P010"
Creating the database structure
In this chapter, you need to create a Sales database for your Web service. After creating the Sales database, you add a Products table to the database. To create the Sales database and add the Products table to it, follow these steps:
1.Select Start → Programs → Microsoft SQL Server → Query Analyzer to open Query Analyzer. The Connect to SQL Server dialog box opens.
2.In the Connect to SQL Server dialog box, type the name of the SQL Server in the SQL Server text box, specify a login name in the Login Name text box, and specify the password for the login name in the Password text box.
3.Click OK to connect to the SQL Server and open the query editor.
4.In the query editor, enter the following statements to create the Sales database and add the Products table to the database:
5.Create database Sales
6.GO
7.Use Sales
8.Create Table Products
9.(
10.ProductID VarChar (4) Primary Key,
11.ProductName VarChar (20),
12.UnitPrice Integer,
13.QtyAvailable Integer
14.)
GO
15. Select Query → Execute to execute the query.
After you execute the query, the database structure is in place. You are now ready to create the Web service - the first of the ASP.NET applications that you create in this chapter. The Web service that is created in this chapter adds records to the Products table of the Sales database that you created in this section.
Using the ASP.NET Web service template
You need to use the ASP.NET Web Service project template to create a Web service. This project serves as a Web-based template for creating the Web service components. To create a Web service, perform the following steps:
1. Select File → New → Project to open the New Project dialog box.
Tip You can also press Ctrl+Shift+N simultaneously to open the New Project dialog box.
2.From the Project Types list, select Visual C# Projects.
3.From the Templates pane on the right side of the dialog box, select ASP.NET Web Service.
4.In the Name box, type OrdersWebService. In the Location box, and enter the name of your Web server as http://<servername>. Click OK.
Tip You can also type localhost in the Location box if the Web server is installed on the computer on which you are creating the Web service.
Note You may have to wait for some time while Visual Studio .NET creates the Web service.
After Visual Studio .NET creates the Web service, you can configure the Web service to manage data in SQL Server. You do that in the next section.
Adding data controls to the Web service
You need to add data controls to your Web service to enable communication with the Sales database that you created in the previous section. To communicate with the party database, you need to add the following controls to your Web service:
•SqlDataAdapter: You use the SqlDataAdapter control to transfer data between data sources.
•SqlConnection and SqlDataAdapter: You use the SqlDataAdapter and SqlConnection controls to connect to the data source.
•SqlCommand: After connecting to the data source, you use the OleDbCommand control to access data.
•DataSet: You store data in a DataSet control.
The steps to add the SqlDataAdapter control are as follows:
1.Select View → Toolbox to open the toolbox.
2.In the toolbox, click Data to activate the Data tab.
3.Drag the SqlDataAdapter control from the toolbox to the Component Designer.
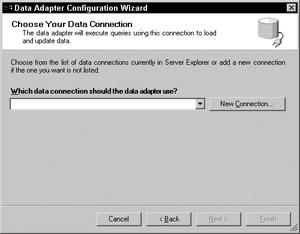
4.When you drag the SqlDataAdapter control from the toolbox, the Data Adapter Configuration wizard launches. On the Welcome screen of the wizard, click Next.
5.The Choose Your Data Connection dialog box of the wizard, shown in Figure 28-1 appears. Click New Connection to create a new connection by using the OleDbDataAdapter control.
Figure 28-1: The Choose Your Data Connection dialog box
6.The Data Link Properties dialog box opens. By default, the Connection tab of this dialog box is selected. Specify the name of the SQL Server on the Select or Enter a Server Name dialog box.
7.Select the user name and password to connect to the SQL Server, and select the Sales database from the Select the Database on the Server drop-down list. The completed Data Link Properties screen is shown in Figure 28-2. Click OK.

Figure 28-2: Connect to the data source by using the Data Link Properties dialog box.
8.The data adapter that you configured appears in the Choose Your Data Connection dialog box. Click Next to continue.
9.The Choose a Query Type dialog box opens. To use an SQL query for retrieving data from the database, retain the default option, Use SQL Statements, and click Next.
10.The Generate the SQL Statements dialog box opens. In this dialog box, type the query
Select * from Products and click Next.
11.The View Wizard Results dialog box opens. This dialog box summarizes the options that you selected in the preceding dialog boxes of the wizard. Click Finish to complete the Data Adapter Configuration Wizard.
After you complete the Data Adapter Configuration Wizard, the SqlDataAdapter control is configured for your application. As shown in Figure 28-3, the sqlDataAdapter1 and sqlConnection1 controls are added to your application.
Figure 28-3: The sqlDataAdapter1 and sqlConnection1 controls are added to your application.