

C# ПІДРУЧНИКИ / c# / Premier Press - C# Professional Projects
.pdf98 |
Part II |
HANDLING DATA |
|
|
|
|
|
||
|
When you call the Abort() method of the Thread class, the method throws the |
|||
|
ThreadAbortException exception. In addition to the base class that is used to |
|||
|
handle threads, C# provides base classes to generate exceptions. The Thread- |
|||
|
AbortException is an exception of the ThreadAbortException class. C# provides |
|||
|
you with no mechanism to handle this exception. In other words, if you try to |
|||
|
abort the thread that is being executed inside the try block, the C# compiler first |
|||
|
executes any associated finally blocks before aborting the thread. |
|||
|
As you have seen, .NET provides you with a mechanism for safer killing of |
|||
|
threads compared with the earlier environments that killed the targeted thread |
|||
|
instantly. Having learned about creating and aborting threads, the next section |
|||
|
|
|
|
Y |
|
will continue the discussion about working with threads.It will discuss the Join() |
|||
|
method that allows you to wait for a threadLto finish execution or to be killed by |
|||
|
the Abort() method. |
F |
||
|
Joining Threads |
M |
|
|
|
A |
|
||
|
|
|
|
|
|
C# allows you to wait for a thread to terminate before the C# compiler proceeds |
|||
|
|
|
E |
|
|
with the execution of the other thread. To do so, the Thread class contains a Join() |
|||
|
method, which takesTthe following syntax: |
|
||
Thread1.Join();
The previous statement calls the Join() method of the Thread class to wait for Thread1 to terminate. If you do not know the time the thread takes to terminate, you can also specify the maximum time for which you want the C# compiler to wait before proceeding with the execution of the next thread. If the maximum time limit is not specified, the compiler waits for the thread to terminate on its own.
The Join() method is often used with the Abort() method. As explained earlier, when you call the Abort() method, the thread is not terminated instantly if it is in the middle of the try block. This implies that you need to wait for the finally statements to be executed before the thread terminates. However, you might not know the time the C# compiler takes to execute the finally block, and you are not ready to wait for a long period of time. Therefore, you can call the Abort() method followed by the Join() method to terminate the thread.
Team-Fly®

THREADS |
Chapter 6 |
99 |
|
|
|
You have learned how to abort and join a thread. In some cases, you might only need to stop or suspend the execution of a thread for a specified time. The following section discusses suspending threads.
Suspending Threads
You have learned about aborting threads. When a thread is aborted, you cannot resume the execution of the thread. However, when you suspend a thread, you can resume its execution whenever required. To suspend the execution of a thread, you use the Suspend() method. The Suspend() method is another method of the Thread class and does not take any parameters. The syntax of the Suspend() method is:
Thread1.Suspend();
The Suspend() method does not kill the thread permanently. It just stops the execution of the thread until it is resumed. Therefore, when you need to restart the execution of a thread, you can call another method of the Thread class, the Resume() method. The Resume() method starts executing the thread from the point at which the execution was suspended. The syntax of the Resume() method is shown in the following code.
Thread1.Resume();
TIP
You can only resume the execution of a suspended thread.
Similar to the Abort() method, the Suspend() method does not instantly stop the execution of the targeted thread. It waits for the thread to reach a safe point before suspending it.
You can also call the Suspend() and Resume() methods from an executing thread. Therefore, a thread can call the Suspend() method to suspend itself or another thread.
For example, if thread1 suspends itself, another thread needs to call the Resume() method to restart its execution. However, if thread1 suspends another thread,such

100 |
Part II |
HANDLING DATA |
|
|
|
as thread2, the execution of thread2 is not resumed until thread1 calls the
Resume() method on thread2.
In addition to the Suspend() method, you can block the execution of a thread by calling the Sleep() method of the Thread class.
Making Threads Sleep
The Thread class contains another method, called the Sleep() method, to stop the execution of a thread for a specified time. You can specify the time for which you want to stop the execution of a thread by passing the time as a parameter to the Sleep() method. The time is specified in milliseconds. Consider the following example that puts the thread to sleep for 2 seconds.
Thread.Sleep(2000);
As you can see in the previous code, the Sleep() method is called by the class itself and not the instance of the class.
You may wonder how the Sleep() method is different from the Suspend() method. Both of these methods are used to stop the execution of a thread for some time. You have seen that the Suspend() method does not instantly stop the execution of the thread. It waits for the thread to reach a safe point before stopping its execution. However, if you need to block the execution of a thread immediately, you can do this by calling the Sleep() method instead of the Suspend() method.
Figure 6-1 shows the difference between the Sleep() and Suspend() methods.
FIGURE 6-1 Differences between the Suspend() and Sleep() methods

THREADS |
Chapter 6 |
|
101 |
|
|||
|
|
|
|
Until now, you have learned about various methods that can be used with threads. To understand more about these operations, here is a simple thread with operations performed on it.
using System;
using System.Threading; class Class1
{
public void Method1()
{
Console.WriteLine(“Method1 is the starting point of execution of the thread”);
}
public static void Main()
{
Class1 newClass = new Class1();
Thread Thread1 = new Thread(new ThreadStart(newClass.Method1));
Thread1.Name = “Sample Thread”;
Thread1.Start ();
Console.WriteLine (“The execution of Sample Thread has started.”);
Thread1.Abort();
}
}
The previous code imports the System and System.Threading namespaces in your program code. The code then creates a class with the name Class1 and declares a method Method1 in the class.This method is specified as the starting point of execution of a thread named Sample Thread, which is an instance of the Thread class. Next, an instance of the ThreadStart delegate is created that takes Method1 as the parameter. The instance of the Thread class is used to call the methods of the Thread class that perform operations on Sample Thread.
The output of the previous code is shown in Figure 6-2.
102 |
Part II |
HANDLING DATA |
|
|
|
FIGURE 6-2 Output of the previous code
When you call the methods of the Thread class, the state of the thread changes. For example, before you start a thread, the thread is not running. After you call the Start() method, the state of the thread changes to Running. This state changes further when you call the Suspend() or Abort() methods. In other words, whenever you perform an action on the thread, its state changes. The next section discusses the various states of a thread in detail.
Thread States
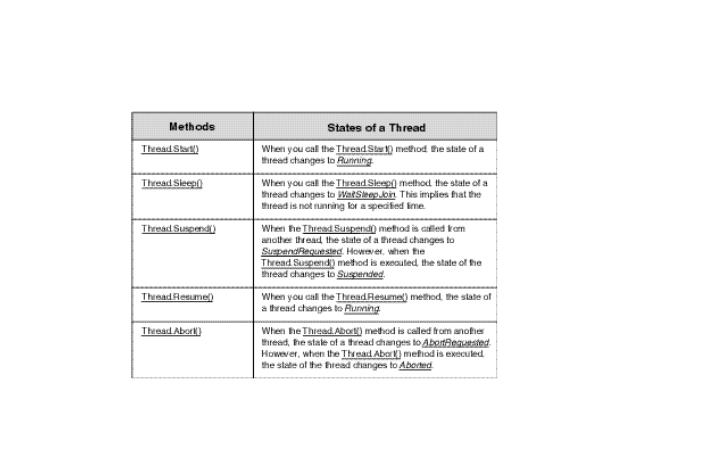
The change in the state of a thread results from the action performed on the thread. In other words, when you call a method of the Thread class, it changes the state of the thread. Figure 6-3 shows the effect of various methods of the Thread class on the states of a thread.
You have seen that you can suspend, sleep, or abort a running thread. However, if you do not want any other user to change the state of your thread, you can set the priority of your thread to Highest. The following section discusses thread priorities in detail.
Thread Priorities
The thread priorities define the sequence of executing various threads on a system. For example, if you have two threads running on a system, the thread with higher priority is executed first. C# allows you to set different priorities for different threads running simultaneously on your system.
THREADS |
Chapter 6 |
103 |
|
|
|
FIGURE 6-3 Effect of methods on the states of a thread
The priority levels supported by C# are as follows:
Highest. A thread with the Highest priority is executed first. When the C# compiler finds the thread with the Highest priority, it stops executing all other threads until the thread with the Highest priority is executed.
AboveNormal. A thread with the AboveNormal priority is executed before any other threads except the thread with the Highest priority.
Normal. A thread with the Normal priority is third in the priority list. This thread is given a time slice according to the process of preemptive multitasking.
BelowNormal and Lowest. A thread with the BelowNormal or Lowest priority is executed only if the operating system does not encounter any other thread with a higher priority. You normally assign these priority levels to threads whose execution is not important to the system.
All of the priority levels mentioned here are a part of an enumeration object
known as ThreadPriorityEnumeration.
You can see that the priority levels can be set to define the sequence of execution of threads. However, the priority levels that you set are only applicable to the

104 |
Part II |
HANDLING DATA |
|
|
|
threads of a single process. For example, if you have a multithreaded application with five threads, the sequence in which these threads will be executed is affected by the priority levels. A thread with a higher priority does not affect the execution of threads of another application running on the system.
You can change the priority of a thread by specifying the value in the ThreadPriority property of the thread. To understand the syntax of the ThreadPriority property, look at the following example:
Thread Thread1 = new Thread(new ThreadStart(newClass.Method1));
Thread1.Priority = ThreadPriority.Highest;
The previous code sets the priority of Thread1 as Highest. This stops the execution of all the threads with a lower priority level until Thread1 is executed.
CAUTION
You should be very careful while setting priorities because specifying a priority level of Highest stops the execution of all the threads running on a system.
You have seen that by specifying the priority level of threads, you can set the sequence of executing multiple threads on your system. In addition to setting the priority levels, you need to synchronize multiple threads.This ensures smooth and bug-free execution of multiple threads simultaneously. The next section will help you understand the concept of synchronization so that the operating system does not encounter any problems while executing multithreaded applications.
Synchronization
As the name suggests, synchronization helps you to synchronize the use of variables and objects accessed by multiple threads running on your system. In simpler words, synchronization ensures that a variable can be accessed by only one thread at a time. Therefore, by preventing multiple threads from accessing a single variable, you can ensure bug-free execution of the threads on your system.
To understand the need for synchronization, consider a scenario in which two threads with the same priority, thread1 and thread2, are running simultaneously on a system. When the first thread is executed in its time slice, it may write some value to a public variable, variable1. However, in the next time slice, the other

THREADS |
Chapter 6 |
|
105 |
|
|||
|
|
|
|
thread might try to read or write a value to variable1. This situation can result in an error if the process of writing a value to variable1 is not completed in the first time slice. When another thread reads this variable, it may read the w rong value, resulting in an error. This situation can be avoided by synchronizing the use of variable1 by only one thread.
C# provides you with the lock keyword to synchronize the use of variables and objects. The lock statement takes the name of the object or variable to be locked as a parameter by the lock keyword. The name of the variable is enclosed in parentheses as shown in the following example:
lock (variable1)
{
------------
}
Here, variable1 is the name of the variable to be locked by a thread. The statements to be executed after placing a lock on variable1 are enclosed in curly braces following the lock statement. The lock statement locks the variable so that no other thread can access it for the time the lock is placed on the variable. To do this, the lock statement places an object known as mutual exclusion lock or mutex on the variable. No other thread is given access to a variable for the time mutex is placed on the variable.
Therefore, if thread1 places a lock or mutex on variable1, the operating system puts thread2 on sleep for the time mutex is placed on variable1.
By now, you know that synchronization is essential to prevent bugs in your multithreaded application. However, excessive synchronization might reduce the performance of your application. Now, look at the problems associated with the use of excessive synchronization.
When you place a lock on an object, no other thread is allowed to access this object. Therefore, any other thread that needs access to this object waits for the other thread to release the lock. If there are several threads waiting for the thread to release the lock, the overall performance of the application is affected. The performance of the application can be balanced to some extent by placing locks effectively. The lock on the object is placed for the time the compiler executes the statements in the lock block. Therefore, if you write minimum code in the lock statement, you can minimize the effect of placing a lock on a variable by an application.

106Part II HANDLING DATA
Placing and releasing a lock on an object is a resource-intensive activity and adds to the overhead cost of the application.
Another critical problem that occurs while synchronizing objects is deadlocking. Consider a situation in which two different objects are locked by two different threads. Now, each thread wants to access the objects
locked by the other. If thread1 wants to access object1 that is locked by thread2, thread1 enters the sleep mode for the time thread2 releases the lock on object1. However, this never happens, because thread2 itself enters the sleep mode while trying to access object2, which is held by thread1. Both the threads go to sleep while waiting for the other to release its lock. This situation results in a deadlock because even the operating system cannot release the lock on the objects. The locks on object1 and object2 can only be released by thread2 and thread1, respectively. Therefore, the application hangs.
TIP
Despite the problems that are discussed here, locks are required on objects in a multithreaded environment.Therefore, you need to be careful while synchronizing the objects in applications.
Summary
In this chapter, you learned that a thread is a basic unit of execution of a program. In other words, a thread is the smallest unit to which the operating system allocates processor time.Threads allow you to execute multiple applications simultaneously and make the execution of a complex application simple and less time consuming. Therefore, you can create threads for your application. A thread that you create is an instance of the Thread class.The Thread class is a .NET base class located in the System.Threading namespace. You can then create the object of the Thread class that represents a thread.
In addition to creating threads, you learned about performing operations on threads that include aborting, sleeping, suspending, and resuming threads. In this chapter, you also learned about various states and priorities of threads.The change in the state of a thread is a result of the action performed on the thread. The

THREADS |
Chapter 6 |
107 |
|
|
|
thread priorities supported by C# are Highest, AboveNormal, Normal, BelowNormal, and Lowest. All of these priority levels are a part of an enumeration object known as ThreadPriorityEnumeration. Finally, you learned about synchronization, which ensures that a variable can be accessed by only one thread at a time. By preventing multiple threads from accessing a single variable, you can ensure bug-free execution of the threads on your system.