

C# ПІДРУЧНИКИ / c# / Premier Press - C# Professional Projects
.pdf138 Project 1 CREATING A CUSTOMER MAINTENANCE PROJECT
Integration and Testing
The integration of different modules and testing are conducted during the integration and testing phase. The quality assurance (QA) team validates whether the functional requirements, defined in the requirements document, are met. The development team also submits a test case report to the QA team so that the application that the development team has created can be tested in various possible scenarios.
User Acceptance Testing |
F |
|
In the user acceptance phase, based on the predefinedYacceptance criteria, the client |
||
|
M |
|
conducts acceptance testing of the project.LIn this phase, the acceptance criteria |
||
|
A |
|
include the fulfillment of all the requirements identified during the requirements |
||
analysis phase. |
E |
|
|
|
|
ImplementationT
The system is installed and made operational in a production environment. The implementation phase is initiated after the system has been tested and accepted by the client. This phase continues until the system operates in a production environment.
Operations and Maintenance
In the operations and maintenance phase, software is monitored for performance in accordance with user requirements. In addition, the modifications that are required are incorporated in the software. Operations continue as long as a system can effectively adapt to an organization’s needs. However, when modifications or changes are identified, the system may re-enter the planning phase.
In the next few chapters, you will learn to develop the Windows application,starting with the creation of the Windows forms.
Summary
This chapter introduced you to a project case study. You learned about the different stages in a project life cycle. These stages include project initiation, project
Team-Fly®

PROJECT CASE STUDY |
Chapter 7 |
139 |
|
|
|
execution, and project deployment.Then, you looked at various phases of the project execution stage, such as analyzing requirements, creating high-level design, creating low-level design, constructing, integration and testing, and user acceptance testing.
While learning about the high-level and low-level designs of a project, you learned to create a database design and the layout of the forms used in the Customer Maintenance project. In the forthcoming chapters, I will take you through the process of developing the project.
This page intentionally left blank

Chapter 8
Windows Forms
and Controls

142 Project 1 CREATING A CUSTOMER MAINTENANCE PROJECT
In this chapter, you will be introduced to Visual Studio .NET projects and solutions. In addition, you will learn to create a new project in Visual Studio .NET.
This chapter introduces you to console applications and Windows applications. Finally, you will learn to create Windows forms and add controls to the forms used in the Customer Maintenance project.
Introduction to Visual Studio
.NET Projects
Visual Studio .NET projects are containers that hold development material for an application. Visual Studio .NET projects contain files, folders, and references to databases, which you require while developing your project. To develop any application in Visual Studio .NET, you need to create a new project by using the New Project dialog box. You will look at creating a new project later in this chapter.
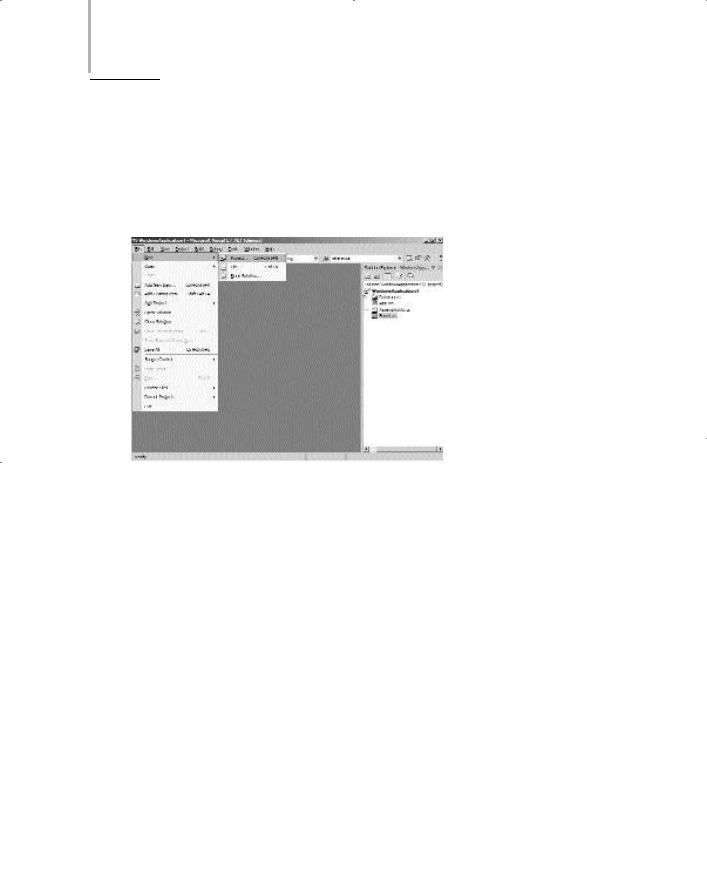
Projects in Visual Studio .NET are contained within solutions, which help you create simple or complex applications by using the templates and tools available in Visual Studio .NET. A solution can also contain multiple projects or other solutions. In Visual Studio .NET, after you create a project, it is automatically placed within a solution. Using solutions and projects enables you to manage and organize the files and folders that will be used to create your application. To do this, Visual Studio .NET provides you with a Solution Explorer window in which you can view and manage solutions and projects. Figure 8-1 shows the Solution Explorer window.

WINDOWS FORMS AND CONTROLS |
Chapter 8 |
|
143 |
|
|||
|
|
|
|
FIGURE 8-1 The Solution Explorer window
A project includes an HTML file, a project file, and source files. In addition, you may include several other files in your project, depending on the complexity of the application you create. For example, you may create an .xsd file to include a dataset in your project. You will learn about these files later in this project.
When a project is completed, you usually convert the project into an executable program (.exe), a dynamic-link library (.dll), or a module. The following sectio n discusses how to create a new project.
Creating a New Project
To create a new project in Visual Studio .NET, perform the following steps:
1.On the Start menu, point to Programs and click on Microsoft Visual Studio .NET.
2.From the list that is displayed, select the Microsoft Visual Studio .NET option.
The Microsoft Development Environment window is displayed.
144 Project 1 CREATING A CUSTOMER MAINTENANCE PROJECT
FIGURE 8-2 The Project option of the Add New dialog box

WINDOWS FORMS AND CONTROLS |
Chapter 8 |
|
145 |
|
|||
|
|
|
|
FIGURE 8-3 Templates provided by Visual Studio .NET
Using the available templates, you can create a variety of applications, such as Windows applications, ASP.NET Web applications, ASP.NET Web services, console applications, and so on. In this chapter, you will learn about console applications and Windows applications. However, ASP.NET Web applications and ASP.NET Web services will be discussed in the next project.
Console Application
Using Visual Studio .NET templates, you can create applications that display the output in a console window. Such applications are called console applications . To create a console application, select the Console Application project template in the right pane of the New Project dialog box. In the Name text box, specify the name SampleConsoleApplication.
When you create a console application, Visual Studio .NET adds the necessary files to the project.These files include References, App.ico, and AssemblyInfo.cs. You will learn about these files later in this chapter.
In addition to the previously mentioned files, a class file with the name Class1.cs is created. This file contains empty code for the class module. Figure 8-4 shows
the Class1.cs file.

146 Project 1 CREATING A CUSTOMER MAINTENANCE PROJECT
FIGURE 8-4 Class1.cs file
A console application does not have a user interface, and it is run from the command prompt. You can now create a simple console application that displays the
message This is a sample console application. in the console window.
To display the message, you need to add the following code to the void Main() method of the application.
static void Main(string[] args)
{
Console.WriteLine(“This is a sample console application.”);
}
The WriteLine() method is present in the Console class, which lies in the System namespace.The WriteLine() method is used to write the current line to the Console window. Similarly, to read from the Console window, you can include the Console.ReadLine() method in the following manner:
static void Main(string[] args)
{
Console.WriteLine(“This is a sample console application.”);
Console.ReadLine();
}
The output of the previous code is displayed in Figure 8-5.

WINDOWS FORMS AND CONTROLS |
Chapter 8 |
147 |
|
|
|
FIGURE 8-5 Output of the previous code
Windows Applications
Programmers worldwide have been using different programming languages to create Windows applications that can run locally on a computer. However, all of these languages have their own advantages and limitations. For example, C programmers use the Win32 API (application programming interface) to create Windows applications. On the other hand, Visual Basic provides programmers with a graphical interface to create forms and applications, and Visual C++ uses MFC (Microsoft Foundation Classes) to create Windows applications.
Until now, there was no environment that provided the combined features of these languages. As a result, Microsoft came up with Visual Studio .NET, which provides you with a common framework for developing Windows applications in any of the Visual Studio .NET languages, such as Visual Basic .NET, Visual C++
.NET, and Visual C#. Visual Studio .NET provides a graphical interface for creating applications, and the .NET class library provides you with the classes you can use to write the code for your application.There’s no doubt that you can create Windows applications easily and in far less time by using the .NET Framework. The next section will look at creating a Windows application.
Creating a Windows Application
To create a Windows application, select the Windows Application project template in the Templates pane of the New Project dialog box. In the Name text box, specify a name for your application, SampleWindowsApplication, and in the Location text box, type the path or browse to the directory in which you want to save your application.