


Twitter Bootstrap Web Development How-To
Be sure to add the same attribute to the other two tab links as well.
Save. Refresh. Click your tabs. See your panes. High five!
There's more…
The fun needn't stop here! Take a moment to visit the Nav: tabs, pills, and list section of Bootstrap's Components documentation at:
http://twitter.github.com/bootstrap/components.html#navs
You'll see that Bootstrap provides several options for positioning and styling the navs and pills, simply by adjusting classes on key elements. Be bold. Try out some creative variations. Have some fun. Grow your palette of design possibilities in the process!
Creating a homepage carousel (Should know)
Bootstrap abounds with well-built JavaScript plugins. We can't possibly introduce them all here. But let's choose another of the more popular ones—the carousel plugin—to enhance our homepage with a sliding carousel of content and images. Such carousels are very effective at giving users a visually attractive overview of what a website is about. We've seen them.
We want one. Bootstrap has it ready for us.
Getting ready
In this exercise, we'll replace the homepage's large welcome message with a carousel, using Bootstrap's built-in styles and JavaScript.
Start by lining up sample images for your carousel. If you'd like, you may use the images provided with the files for this exercise, which you will find in the _Carousel Images folder. You'll see that these are sized and cropped to equal dimensions—1200 px wide by 480 px high. These dimensions will provide a pleasing ratio while allowing the images to stretch to the full width of our site on a widescreen monitor.
We'll be replacing hero-unit in index.html with our new carousel. Before we do that, let's make a backup copy, so that we'll have a template file that contains hero-unit with its large welcome message. Make a copy of the index.html file and name it hero.html. With the images ready and the backup copy preserved, we're set to go.
37 
www.it-ebooks.info

Twitter Bootstrap Web Development How-To
How to do it…
We are going to work in index.html, first adding the markup for our images and then adding the additional markup and a bit of JavaScript to enable the carousel.
1.Open index.html in your editor.
2.Delete the entire div class="hero-unit" and all of its contents.
3.Copy or move the images for your carousel to the img folder. We'll use the img folder for all images used in our web pages.
4.In place of hero-unit, place image tags for each of your images. Include
alt attributes. To enhance the responsiveness of our images to adapt to multiple screen widths, leave out the width and height attributes.
Your resulting code should look like this so far:
<img src="img/butterfly.jpg" alt="butterfly" /> <img src="img/colors.jpg" alt="colors" />
<img src="img/galaxies.jpg" alt="galaxies" /> <img src="img/jupiter.jpg" alt="jupiter" />
Save the file. Open it in your browser, and you should see four large images displayed one after the other. Now let's add in the markup structure to turn the images into items in our carousel.
5.Wrap two containing divs around the entire set of images, as follows:
<div class="carousel" id="home-carousel"> <div class="carousel-inner">
<img … /> <img … /> <img … /> <img … />
</div><!-- .carousel-inner --> </div><!-- .carousel -->
6.Next wrap each image in its own div of class "item":
<div class="item">
<img src="img/butterfly.jpg" alt="butterfly" /> </div>
Be sure to do the same for each image.
Save the file and refresh your browser. You will see that the images have disappeared entirely! That's because the styles for these elements serve to hide all except for the currently active item.
 38
38
www.it-ebooks.info
Twitter Bootstrap Web Development How-To
7.Add the active class to the first image:
<div class="item active">
Now save and refresh, and you'll see the first image—and only the first image—appears! We're a step closer. But of course our carousel needs
to start cycling from one image to the next. This requires some JavaScript.
8.We need to initialize Bootstrap's carousel plugin to do its magic in our page. Scroll down the page to just before the closing </body> tag. After the script links to jQuery and Bootstrap's JavaScript, add the highlighted lines:
<script src="js/jquery-1.7.2.min.js"></script> <script src="js/bootstrap.min.js"></script>
<script> $(document).ready(function(){
$('.carousel').carousel();
}); // end document.ready </script>
This script does two things:
$(document). ready(function() waits until our document is ready for manipulation in the browser
$('.carousel').carousel(); tells the Bootstrap carousel plugin to do its work on our div of the carousel class
If you wanted to give your carousel container a different class, of say
"super-slider", you'd adjust this line to read: $('.super-slider'). carousel();
After providing these lines, save the file and refresh your browser. Watch it for five seconds, and you should see it switch (suddenly, with no animation) to the next image—and continue to cycle to the next image each five seconds.
Hovering your mouse over the images will pause the cycling.
9.Now let's add sliding animation. This is very simple. Add the slide class to the parent div of class="carousel", like so:
<div class="carousel slide" id="home-carousel">
39 
www.it-ebooks.info
Twitter Bootstrap Web Development How-To
10.Next, let's add the Next and Previous arrows. Add the following lines between the closing div tags for carousel-inner and carousel:
</div><!-- .carousel-inner -->
<a class="carousel-control left" href="#home-carousel" dataslide="prev">‹</a>
<a class="carousel-control right" href="#home-carousel" dataslide="next">›</a>
</div><!-- .carousel -->
It's important that the href value references the id given to the outermost parent div of our carousel. We've given it the id "home-carousel", and we've made these match.
Save the file, refresh in the browser, and you should see Next and Previous arrows at each end of your slideshow image!
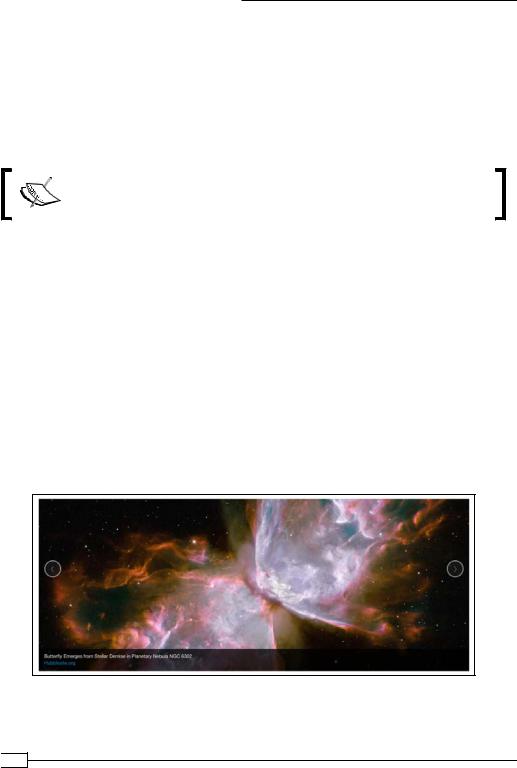
11.Now how about adding a caption to our images? Here's how it's done:
<div class="item active">
<img src="img/butterfly.jpg" alt="butterfly" />
<div class="carousel-caption"> <p>Caption content here</p>
</div>
</div>
The paragraph tag is required, as it calls in the light text color to contrast clearly against the caption background. You'll find sample caption content in the _Carousel Images/credits-captions.txt file.
Repeat for all four images. Save, refresh, and you should see a result like this:
Congratulations! You've successfully implemented one of the more complex and exciting of Bootstrap's JavaScript plugins.
 40
40
www.it-ebooks.info