


Twitter Bootstrap Web Development How-To
http://twitter.github.com/bootstrap/scaffolding.html
And of course you'll want to open bootstrap.css and check out the stylesheet rules yourself! Open the file in your editor, and search for .row or .span to find the relevant rules.
There's more…
If you're using a modern browser (Internet Explorer 9 or a recently updated version of Mozilla Firefox, Google Chrome, Opera, or Safari), resize your browser window. Make it narrower, then narrower still. You should see that the grid system adjusts to fit!
As of version 2.0 (released late January 2012), Twitter Bootstrap comes with the principles of responsive web design built into its grid system. This is documented on Bootstrap's
Scaffolding page, mentioned previously. You'll find the media queries that make this happen in the bootstrap-responsive.css file.
If you're concerned about users with old browsers, don't worry. Browsers that don't understand media queries will simply get the standard 960-pixel-width version. One of the things that makes Twitter Bootstrap such a dependable tool is that it combines powerful, cutting-edge features with the time-tested principles of progressive enhancement and graceful degradation.
Creating a standard sub-page (Must know)
Now that we're familiar with the basics of the Bootstrap's grid system, we can start creating pages for our first Bootstrap website. Let's start with a standard sub-page with a main column and sidebar. We'll make it our "About" page.
Getting ready
Let's get our new template file ready:
1.Make a copy of index.html and rename it about.html.
2.Open about.html in your editor.
3. Update the title tag to read <title>About | My Bootstrap Site</title>.
4.Update the h1 heading to read <h1>About this Site</h1>.
5.Save the file and open it in your browser.
Now let's get down to business.
19 
www.it-ebooks.info
Twitter Bootstrap Web Development How-To
How to do it…
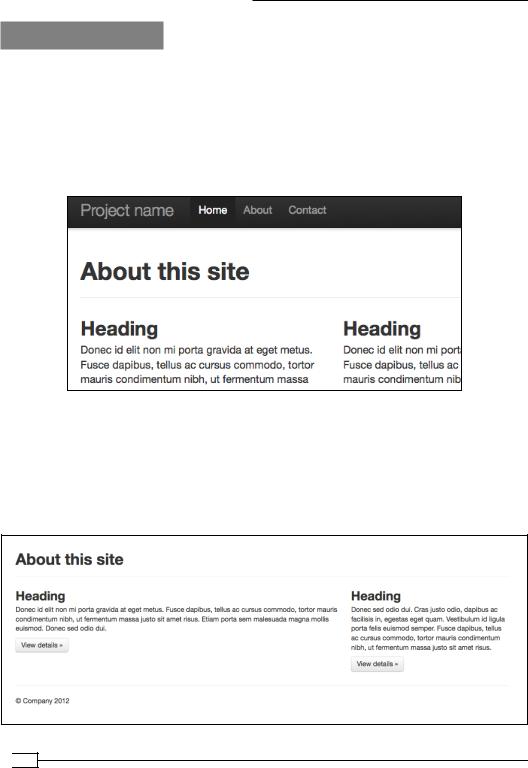
1.Inside the div class="hero-unit", beneath the h1 heading, delete the two paragraphs (including the contained text and button). We're going to turn this h1 tag into a basic page header.
2.Update the class of div class="hero-unit" so that it reads div class="page-header". Rather than a large messaging unit, the styles for class "page-header" give us a nice page title.
3.Save the file, and refresh your browser. You should see a result like this:
4.Now, inside the div class="row", look for the first div class="span4". Change it from span4 to span8. We're going to use this for our wide main column.
5.Delete the entire next div class="span4" and its contents. We're not going to need this column.
6.Save the file, and refresh your browser. You should now have a two-thirds-wide left column and one-third-wide right column.
 20
20
www.it-ebooks.info

Twitter Bootstrap Web Development How-To
Now we have a template for a two-column page, ready to be filled with main content on the left and sidebar content on the right.
Let's keep going just a little bit more, so that we have a better picture for what might be done with such a page.
7.Let's add a large introductory image to our main column. You can use one of the following methods:
Method A: Use a local image. Take any image of your choice, edit it to 600 px wide, and place it in the img folder. Name it about-image.jpg. (I've assumed it's jpg, but of course you can adjust this for png or gif formats.) Place a img tag just before the h2 heading in your div class="span8".
<img src="img/about-image.jpg" />
Method B: Use a placehold.it image. Alternatively, you may use the handy
service, placehold.it. Visit http://placehold.it and read its instructions to see how the service works. In this case, your image link will work like this:
<img src="http://placehold.it/600x300" />
8.Now let's make some adjustments to the sidebar. Repeat Method A or B , as outlined previously, to add a 300 pixel wide image before the heading inside your div class="span4".
9.Change the sidebar h2 heading to a h3 heading, as it is subordinate to the previous heading.
10.Give the sidebar some additional content by selecting the heading, paragraph, and button, and copying and pasting it below.
21 
www.it-ebooks.info
Twitter Bootstrap Web Development How-To
11.Save the file, and refresh your browser. I've used placehold.it images. Here is my result:
If your results aren't what they should be, look back over your steps, checking for unclosed tags or other errors. If you're new to web design, don't be afraid to start from scratch and repeat the process. You'll get faster with practice, and soon you'll get used to spotting errors more quickly.
If your results look more or less like mine, congratulations!
There's more…
If you're using a modern browser, resize your browser window. Make it narrower, and then narrower again. Notice that not only do the columns adjust their widths to fit your window—the images adjust to fit as well!
 22
22
www.it-ebooks.info