


52 Using ArcView Database Access
Exercise 2: Narrowing your search for new market cities
Next, you are going to format a new query for cities to research as potential markets for new homes. You will continue to use the Larger Market Cities query as your base and add other criteria to narrow down the search.
In this exercise, you’ll learn how to:
•Get statistics for a column of values in a database table.
•Add database tables from the Add Database Table dialog.
•Change a database table’s definition query.
•Save your project.
If ArcView isn’t already running, start it. Open the project you created in Exercise 1 by choosing Open Project from the File menu. If prompted, log in to the database connections stored in the project by typing your user name and password in the login dialog.

Chapter 3 Quick start tutorial for ODBC |
53 |
Repairing a database table’s connection
If there was a problem connecting (e.g., incorrect password), ArcView won’t reestablish your database connection. The project will still open, but you won’t be able to open the database tables.
You can reestablish a database tables connection yourself using a sample script called SDEODBCREST.AVE. To find information about this script, open the online help. Click the index tab and type in ‘Database Access Extension, Sample Scripts’. Then, double-click Sample Scripts, choose ‘SDEODBC restoring disconnected database tables’ and click Display.
Now you can apply more criteria to narrow your search for potential markets. The Larger Market Cities table contains many columns of demographic data for the Larger Market Cities in the United States. The Renter_occ field in this table contains the number of housing units occupied by renters in each city. The information in this field is of interest since renters represent potential home buyers. You can calculate statistics in this field to find more information.
Performing statistics within a table
1.Click the field labeled ‘renter_occ’ in the Larger Market Cities table to make it active.
2.From the Field menu choose Statistics.
Note If your database does not support the SQL STDDEV function, you will get an error message. If you see the message, click OK and all of the statistics in the next dialog will be valid except for Standard deviation.
3.The Statistics dialog box will appear displaying some statistics about the number of renter-occupied dwellings. As you can see, the count is 200, the maximum is 2012023, the minimum is 3976, and the mean is 63685 when rounded. Click OK.
4.Close the Larger Market Cities table.
After reviewing this information, you decide you want to narrow the dataset to include only larger market cities with an above average number of renter-occupied dwellings. To apply this condition, you will create a new database table using the statistics information.
54 Using ArcView Database Access
In the previous exercise you added a database table with the SQL Query Wizard. Next, you are going to add a database table using the Add Database Table dialog. The Add Database Table dialog provides all the functionality of the SQL Query Wizard in one dialog. This exercise will guide you through using the add database dialog, however, you should be familiar with SQL to use the Add Database Table dialog effectively.
The tables will only contain the records where Renter_occ is greater than 3,976.
To add a database table using theAdd Database Table dialog
1.Make the Project window active.
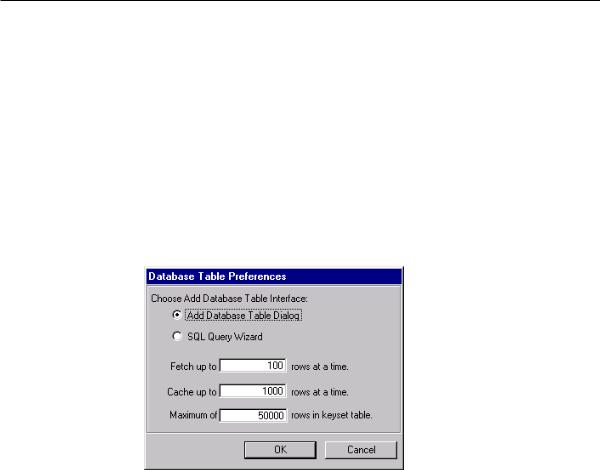
2.From the Project menu choose Database Table Preferences.
3.Choose the Add Database Table Dialog option and click OK.
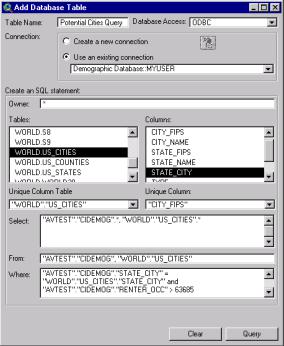
4.Choose Add Database Table from the Project menu. The Add Database Table dialog appears.
5.Choose the Use an existing ODBC connection option.
6.Set the table name to “Potential Cities Query”.
7.Double-click the Cidemog table (e.g., World.Cidemog) in the Tables list to place it in the From box.
8.Double-click the Cities table (e.g., World.US_Cities) in the Tables list to place it in the From box.
9.Click inside the Where box to place the cursor there.
10.Click the Cities table in the Tables list to get a list of columns. Then double-click the State_City column in the columns list to place it in the Where box.
11.Type “=” in the Where box after World.US_Cities.State_City.
Chapter 3 Quick start tutorial for ODBC |
55 |
12.Click the Cidemog table in the Tables list to get a list of columns. Next, doubleclick the State_City column in the Columns list to place it at the end of the Where clause.
13.Type “and” at the end of the Where clause.
14.Double-click the Renter_occ column in the Columns list to add it to the Where clause, then type “> 63685” at the end of the Where clause.
15.Click inside the Select box to place the cursor there.
16.Click the Cidemog table to see a list of 15 columns. Double-click <All Columns> from the Columns list to add it to the Select Box. This indicates that all columns in the Cidemog table will be in the database table. Keyset database tables require that all columns be specified this way instead of just using ‘*’.
17.Click the Cities table to see a list of its columns. Double-click the <All Columns> option to add it to the Select box. This indicates that all the columns in the Cities table will also be in the database table.
18.Choose the Cities table in the Unique Column Table drop-down list. Then choose State_City in the Unique Column drop-down list. Selecting State_City as the Unique Column will make the database table a keyset table.

56Using ArcView Database Access
19.Click Query. Your Potential Cities Query database table appears.
20.Close the Add Database Table dialog.
The Potential Cities Query table contains all the large market cities in the United States with an above average number of renter-occupied dwellings.
The query created above is called a Select statement. It’s a kind of SQL statement, where you choose the data you want from the database. A Select statement consists of three parts, or clauses: Select, From, and Where. The Select clause chooses the columns you want to see, From identifies the tables containing the columns, and Where specifies how the tables are joined together and which records you want to see.
More about queries
Earlier, you retrieved statistics for the values in the Renter_occ column by choosing Statistics from the Field menu. This method may not always work, depending on how you specify a column of values in the Select statement. However, you can use the Add Database Table dialog and write a new query to create a database table containing the statistical information you need. The following statement retrieves the number of values in the Renter_occ column, and the maximum, minimum, and mean values:
SELECT Count(World.Cidemog.Renter_occ) as COUNT,
MAX(World.Cidemog.Renter_occ) as MAX,
MIN(World.Cidemog.Renter_occ) as MIN,
AVG(World.Cidemog.Renter_occ) as AVG
FROM World.US_Cities, World.Cidemog
WHERE World.US_Cities.State_City = World.Cidemog.State_City
You can add other statistical operators to this Select statement to retrieve a complete set of statistical values.
The Add Database Table dialog lets you type in the select, from and where text boxes to allow you to create such tables. In this case, the Select clause in the statement specifies calculations used by the database to create the values that appear in the table. Since neither the Cities table nor the Cidemog table have a column that holds a unique value for a record of these calculated values, a forward only scrolling database table is created.
If you don’t have a lot of database experience and you’re going to do a lot of work with database tables, you should take the time to learn SQL. The online Help topic, “Tips for

Chapter 3 Quick start tutorial for ODBC |
57 |
creating SQL Where clauses,” will help you get started. You can find this topic by opening the Help, clicking the Index tab, then typing the topic’s name into the field at the top of the dialog.
Optimizing your queries
Tables in your relational database can contain millions of records. Even simple queries against large tables can take time. Try to optimize your queries to get the best performance possible.
Index the columns used in join statements and attribute criteria in the Where clause to improve your query’s performance; you can do it with a script. Choose the SQL operators for the attribute criteria carefully. Some SQL operators are faster than others; some don’t use indexes even if they exist. In a join statement, placing a table on the left or right side of the equals sign can impact the query’s performance. These are a few considerations. You should carefully read the documentation for your relational database to find out how to optimize your attribute queries.
The syntax of the queries in this book and in the Help topics are correct for Oracle databases only. Each relational database requires its queries to be a little bit different. For example, some databases are case sensitive for table and column names, while others aren’t. If you don’t know the characteristics and syntax rules of your database, talk to your database administrator and get documentation for the relational database.
You have now narrowed the search to 47 cities. To make it easier to analyze the remaining markets, you can modify the SQL statement for the Potential Cities Query table so that the records are always sorted in a relevant order.
To change a database table’s definition query
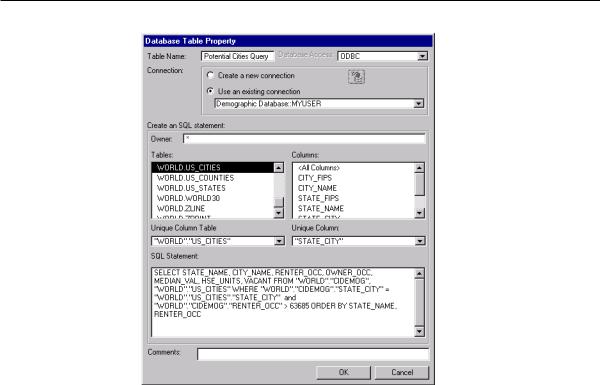
1.Make the Potential Cities Query database table active.
2.From the Table menu, choose Properties. The Database Table Property dialog appears, containing the SQL Select statement that was sent to the relational database to create the database table.
3.Add “Order by State_Name, Renter_occ” in the SQL Statement box, after the existing statement.
4.Replace “World.Cidemog.*, World.US_Cities .*” with “Cities.State_Name, Cities.City_Name, Cidemog.Renter_occ, Cidemog.Owner_occ, Cidemog.Median_Val, Cidemog.Hse_Units, Cidemog.Vacant”. You can enter the column names by typing them out.
58 Using ArcView Database Access
5.Click OK. The contents of the database table changes to reflect the new SQL query.
The table now shows the remaining 47 cities in order, by state name and number of renter-occupied dwellings. Also, the irrelevant columns have been removed, leaving mostly those columns that hold information specific to housing.

Chapter 3 Quick start tutorial for ODBC |
59 |
Quote characters in SQL statements
When building or modifying SQL statements, quote characters are put around table and column names that are added, using the table and column lists. These characters are required by some ODBC drivers in order to make the SQL statement easier to parse. The character that is used is driver specific. For example, the Oracle driver that is being used in the exercises requires a “ character, while the Access 97 driver requires a ` character.
For most drivers, the quotes are not required unless the table or column name contains characters that have a special meaning. For example, if a table in Access has a space in its name, you must quote the table name or there will be an error when you use the table in a query. To be safe, database access quotes all column and table names that are added using the table and column lists.
When you modified the SQL statement of the Potential Cities Query table, you did not need to use quote characters because the column names did not contain special characters.
This is the end of the tutorial. You’ve made a good start on a list of cities to start building projects. You could use this table as a base as you come up with more conditions to narrow your search.
To save your work
1.Close all of your open tables.
2.With the Project window active, from the File menu, choose Save Project.
Using Avenue
There are several other types of operations that you can perform using Avenue scripts. To learn how, you first need to understand which objects you need to use and how they work. The following chapters explain the Database Access objects and will get you started writing Avenue scripts for your ODBC data. However, if you’ve never used Avenue before, you should review the Using Avenue book before moving on to
Chapter 4.

60 Using ArcView Database Access
61
C H A P T E R 4
Understanding the Database Access objects
Avenue scripts can change the way you work with relational database data in ArcView. With Avenue you can assign spatial criteria to database themes and load new attribute tables into the database.
To write Avenue scripts, you need to know which objects together make database themes and database tables work. The extension has a set of common objects that define the general methods for working with databases and a set of objects that define specific methods for each database interface (e.g., SDE).
If you’ve never used Avenue before, you should review the Using Avenue book before reading this chapter.
Read this chapter to learn about:
•The common Database Access objects.
•The SDE interface objects.
•The ODBC interface objects.