


42 Using ArcView Database Access
Exercise 1: Identifying potential market cities in the United States
Suppose you work for a national builder of residential homes. It is your job to identify potential markets for new homes. Initially, you want to come up with a sizable list that will allow you to apply other criteria, such as cities with a population greater than 100,000, to narrow down the search. To start off, you are going to identify larger market cities. These cities represent the potential markets that you want to focus on.
You have an external database of demographic information, but you want to use this information within ArcView. As you narrow the field of potential new cities and locations within those cities, you will want the spatial analysis capabilities of ArcView.
In this exercise, you’ll learn how to:
•Load ArcView extension software.
•Add a forward only scrolling database table using the SQL Query Wizard.
•Convert a forward only scrolling database table to a keyset database table.
•Use selections on a keyset database table.
•Create a new keyset database table.
•Save your work.
Start ArcView. Before you can add your database table, you need to load the Database Access extension. Loading the extension makes the required components available for connecting ArcView to an ODBC database and working with ODBC data.
To load ArcView extensions
1.Make the Project window active.
2.From the File menu, choose Extensions.
3.Click the check box next to Database Access.
4.Click OK.
To add a forward only scrolling database table using the SQL Query Wizard
1.Make the Project window active.
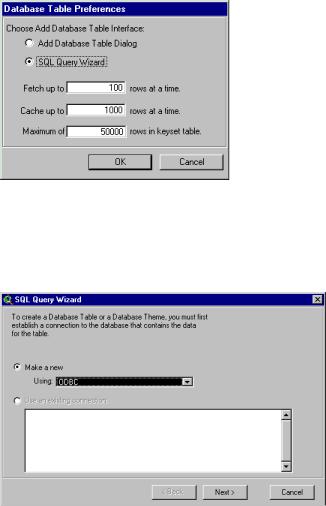
2.From the Project menu choose Database Table Preferences.
Chapter 3 Quick start tutorial for ODBC |
43 |
3.Choose the SQL Query Wizard option on the Database Table Preferences dialog and click OK. When you choose this option you will use the SQL Query Wizard dialogs to add your database tables.
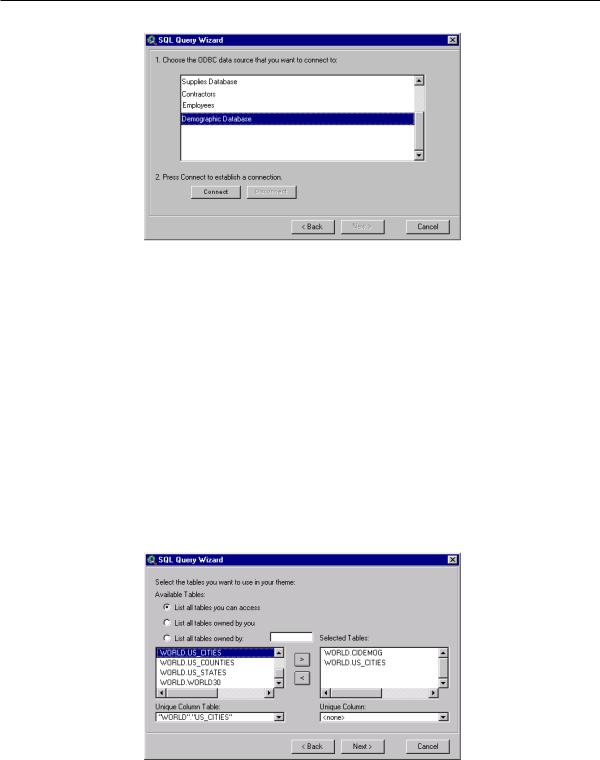
4.From the Project menu, choose Add Database Table. The SQL Query Wizard dialog appears. It will guide you through the steps of adding an ODBC database table to your project.
5.Click the Make a new connection option, and then from the drop-down list choose ODBC. Click Next.
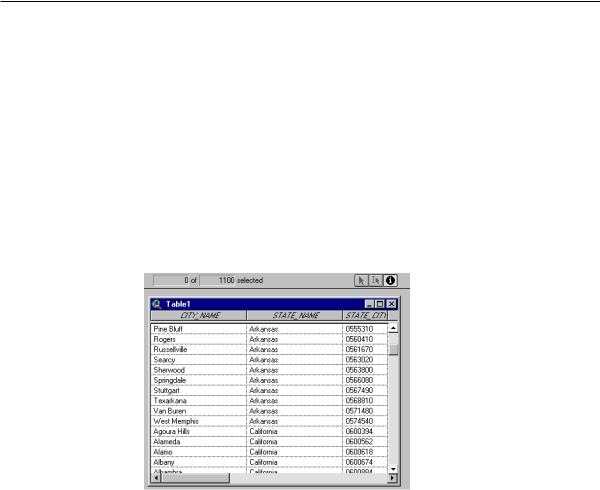
6.For this exercise you want to connect with the database that contains U.S. State, City and County data and the City and County demographic data. Once you choose the appropriate ODBC data source, click the Connect button. If your database requires it, a dialog appears for login information. Type your Username and Password in the appropriate text boxes, then click OK. Be careful when you type; ODBC is case sensitive with these text strings. When the Connect button is dimmed, you’ve successfully connected to the data source with ODBC. Click Next.
44 Using ArcView Database Access
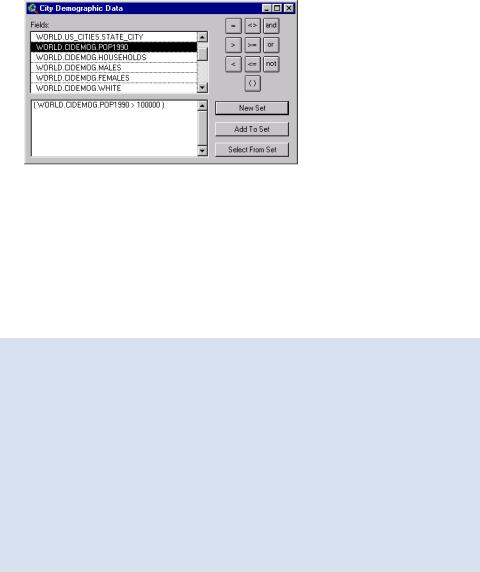
7.Choose the Cidemog table from the Available Tables list and click the ‘>’ button to send it to the Selected Tables column. Locate the Cities table in the same list and click the ‘>’ button to send it to the Selected Tables list.
The Tables list may not show the names “cidemog” or “cities”. The names may appear as something like “World.US_Cities” and “World.Cidemog”. In this example, the word World appears because the World database user owns these tables. The Cities table is named US_Cities to distinguish it from other city tables. The database and the naming convention that you use will determine how the tables appear in the list.
When tables are added to the Selected Tables list, they are also added to the Unique Column Table list.
8.Choose the Cities table from the Unique Column Table list. This fills the Unique Column list with the integer and character fields in the World.US_Cities table. From the Unique Column list, choose <none>. Setting the Unique Column to <none> means that a forward only scrolling database table will be created.
Click Next.

Chapter 3 Quick start tutorial for ODBC |
45 |
9.Double-click the Cities table in one list and the Cidemog table in the other to see a list of columns in each table. Highlight State_City in each list, then click Join. The Join statement appears below. Click Next.
10.Click Next on the following screen.
11.Click Finish on the last screen. Your new database table is created.
ODBC allows you to connect to a database (like Oracle or Sybase) and access the data stored in the database. The data can be queried through the Database Access extension and joined to ArcView tables. Instead of storing the data locally in your project, only the query used to retrieve the data is stored. This query retrieves the data from the database when the project is reopened. If the data has been updated since the project was created, the updated table will appear in your project.
When you stepped through the SQL Query Wizard, you generated an SQL query that was executed against the database. The query that you created joined two tables together. All columns from the US_Cities and Cidemog tables and all rows where the State_city values in the Cidemog table equal the State_city values in the US_Cities table were returned. For example, if the Cidemog table had demographics for Los Angeles only, the database table would only display data for Los Angeles.
When the data is returned it is displayed in the database table. There are two types: forward only scrolling database tables or keyset database tables. A forward only scrolling database table allows you to scroll forward all the way through the table but limits how far backwards you can scroll. The table that you have just created is a forward only scrolling database table.
46 Using ArcView Database Access
Viewing data in a forward only scrolling database table
1.Make the table active. Notice how the ToolBar indicates that there are only 100 records in the table.
2.Scroll vertically to the bottom of the database table. When you get to the bottom of the first 100 records, another 100 records are added and the ToolBar indicates that there are 200 records in the table.
3.Continue scrolling forward till the record count reaches 1,100. As you scroll, the table continues to grow and the scroll position indicator decreases in size.
4.Scroll vertically backwards as far as the table allows. When you reach record 100, the table will stop scrolling and not let you access records above this location. By default, you can scroll backwards up to 1,000 records from your current position in the table.
5.Scroll forwards till there are no more records added to the table. The ToolBar indicates that there are 3,149 records in the table. This is the total number of records returned by your query.
6.From the Table menu click Refresh. This repositions you back at the top of the database table and fills it with the first 100 records returned by the query. Refreshing the table at any point will reset the table to its original position.

Chapter 3 Quick start tutorial for ODBC |
47 |
Cache size and fetch count
The cache size determines the maximum number of records that will be held in memory by each database table you create. The fetch count is the maximum number of records retrieved from the database at once. The default cache size is 1,000 records, and the default fetch count is 100 records. This is why it is possible to scroll backwards up to 1,000 records in the table and why the table grows 100 records at a time when scrolling forwards. The cache size and fetch count also affect keyset database tables, which is discussed below.
The cache size and fetch count can be adjusted in Database Table Preferences. You must consider the amount of memory on your machine and the number of tables you plan to create when setting the cache size. The larger you set the cache size, the better the scrolling performance, since more of the table is held in memory at once. To demonstrate this, you can adjust the cache size and fetch count and re-create the database table as follows:
1.Make the Project window active.
2.From the Project menu choose Database Table Preferences.
3.In the Database Table dialog, set the cache size to 0 and the fetch count to
200.A cache size of 0 means that all records returned by the query will be cached. The maximum fetch count is 200.
4.Repeat steps 4–10 from the ‘To add a forward only scrolling database table using the SQL Query Wizard’ section above.
When the table is created, scroll to the bottom. Once this is done, all of the records returned from the query have been fetched and stored in memory. You can now scroll all the way forwards and backwards in the table, and there are no pauses as you scroll. Before creating another database table, you may want to go back into Database Table Preferences and reset the cache size to decrease the amount of memory used for the new tables.
A keyset database table allows you to select records and scroll back and forth through the entire table. In order to create a keyset table, one of the tables in your query must contain either an integer or a character column with a unique value for each record returned by the query. You can tell that you have successfully created a keyset table if the select tool and the select buttons in the table GUI are enabled.
The State_City column in the US_Cities table is a unique character column and can be used to make the table a keyset table. You should also rename the database table to something more meaningful, like “City Demographic Data”. Using table properties, both of these tasks can be performed at once, as you’ll see in the next section of this exercise.

48 Using ArcView Database Access
To rename and convert to a keyset database table
1.Make the table active.
2.From the Table menu choose Properties. The Database Table Property dialog appears.
3.In the table name textbox, set the name of the table to “City Demographic Data”.
4.From the Unique Column Table drop-down list, choose the Cities table.
5.From the Unique Column drop-down list, choose State_City. Choosing State_City as the unique column will transform the table to a keyset table. Click OK.
The select tool and the select buttons in the table GUI are now enabled and the database table is named “City Demographic Data”. The ToolBar displays the total number of records returned from the query (3,149) since the table is now a keyset table and can access all records.
Maximum keyset size
The maximum keyset size is the maximum number of records allowed for a keyset database table. Database tables with more records than the maximum keyset size will be converted to forward only scrolling tables.
Since keyset database tables provide more functionality, they are usually slower to generate and use more memory. It may be inefficient to use keyset database tables for very large datasets. Using Database Table Preferences, you can change the maximum keyset size to prevent database tables with more than a certain number of records from being created as keyset tables.
The default maximum keyset size is 50,000 records.
Since your company is only interested in larger market cities that have a total population greater than 100,000, you can begin to eliminate some of the cities listed in the table. Before applying this condition to a new database table, you can see the effect this will have on the data by making selections with the query builder.
Selecting records in a database table
1.Click the POP1990 column on the City Demographic Data table to make it active.
2.Click the Sort ascending button  . This sorts the records in ascending order based on population.
3.Click the query builder button  . The Query builder is displayed.
Chapter 3 Quick start tutorial for ODBC |
49 |
4.Double-click the POP1990 field (e.g., World.Cidemog.POP1990), then click the ‘>’ button and type in “100000”. Click New Set to select the cities that have a population greater than 100,000. Dismiss the query builder by clicking the ‘X’ button.
5.Click the Promote Button  . This brings the selected records to the top of the table.
All of the cities in the U.S. with a population greater than 100,000 are now displayed in yellow at the top of the City Demographic Data table. The records are also ordered from smallest to largest population. You can see that applying this condition will narrow the dataset to 200 cities.
Next, you will create a new keyset database table of just the records that satisfy the query.
Working with database tables
Some table functions work a little differently on database tables than they do on normal tables.
•The Find function is usually case sensitive on database tables. It will be case sensitive if searches involving data values are case sensitive in your database.
•If you get statistics about a column in the table, they’re calculated for all the records selected by the table’s query, not just the current selection.
•A chart cannot be created for a database table directly. You must first export it to a normal table.
•When you refresh a database table, the selection is lost.
50 Using ArcView Database Access
Create a new keyset database table
1.Make the Project window active.
2.From the Project menu choose Add Database Table. The SQL Query Wizard will appear.
3.Choose the Use an existing connection option and select the connection you used to create the City Demographic Data table. Click Next.
4.Choose the Cidemog table (e.g., World.Cidemog) and the cities table (e.g., World.US_Cities) from the list (hold down the Shift key as you click the tables) and send both to the Selected Tables column. To make a keyset table, choose the cities table from the Unique Column Table list and State_City from the Unique Column list. Click Next.
5.Double-click the Cidemog table in the left table list and the cities table in the right table list. Select the State_City field in each list and click Join. This will join the two tables based on the State_City field. Click Next.
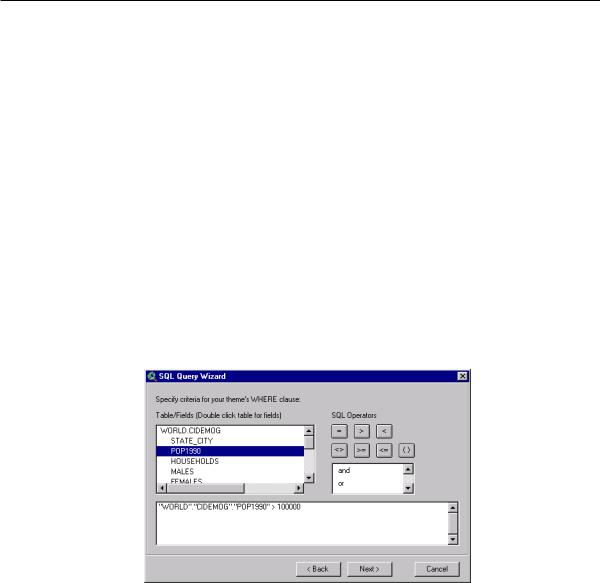
6.Double-click the Cidemog table to list the fields, then double-click the ‘POP1990’ field. Click ‘>=’ and type in 100000, where 100,000 is the smallest population that may appear in the table. Click Next.
7.On the next dialog you can choose not to display some of the columns of data. At this time you don’t need to make any changes here. Click Finish. Your new table of data appears.
8.From the Table menu choose Properties and rename the table to “Larger Market Cities”.
The query that you generated this time is the same as the query for the City Demographic table, except here you have specified that only cities with a population of greater than 100,000 are to be returned. This new table represents the larger market cities in the
Chapter 3 Quick start tutorial for ODBC |
51 |
United States as defined by your company. You now have a preliminary list that you will use to narrow down the search for new sites.
To save your work
1.Make the Project window active.
2.From the File menu choose Save Project.
3.In the dialog that appears, specify a name (e.g., “ODBCtutorial”) and location for the new project file, then click OK. ArcView will automatically add the .apr extension to the name you gave for the new project file.
4.Either close your project or continue on to the next exercise.
If you close your project now and open it again later, you will be prompted to log in if your database requires a user name and password. After you log in, ArcView will reestablish its connection to the database and retrieve the values for the tables.