
- •Section 1: System Overview
- •1.1 PFD/MFD Controls
- •1.2 PFD Softkeys
- •1.3 MFD Softkeys
- •1.4 MFD Page Groups
- •1.5 Vertical Navigation
- •1.6 Backlighting
- •1.7 XM Radio - Automatic Muting
- •1.8 Database Updates
- •Jeppesen Aviation Database
- •Garmin Databases
- •Section 2: Flight Instruments
- •2.1 Airspeed Indicator
- •Speed Indication
- •Speed Ranges
- •Airspeed Trend Vector
- •Vspeed References
- •2.2 Attitude Indicator
- •2.3 Altimeter
- •Selected Altitude Bug
- •Altitude Trend Vector
- •Barometric Setting Box
- •Altitude Alerting
- •Metric Display
- •Low Altitude Annunciation
- •2.5 Marker Beacon Annunciations
- •2.6 Vertical Speed Indicator
- •2.7 Barometric Altitude Minimums
- •2.8 Horizontal Situation Indicator (HSI)
- •Course Pointer
- •Course Deviation Indicator (CDI)
- •Bearing Pointers and Information Windows
- •DME (optional)
- •Navigation Source
- •2.9 Wind Data
- •2.10 Generic Timer
- •3.1 Engine Display
- •3.2 Lean Display
- •Normally-aspirated Aircraft
- •Turbocharged Aircraft
- •3.3 System Display
- •4.1 Radio Status Indications
- •4.2 Volume
- •4.3 Automatic Squelch
- •4.4 Quickly Activating 121.500 MHz
- •4.5 Optional NAV Radios
- •DME Radio (optional)
- •ADF Radio (optional)
- •Auto-tuning on the PFD
- •Auto-tuning on the MFD
- •4.7 Transponder
- •Mode Selection
- •Reply Status
- •Code Selection
- •Flight ID Reporting
- •5.1 COM Radio Selection
- •5.2 Cabin Speaker
- •5.3 Passenger Address (PA) System (T)182T and (T)206H Only
- •5.4 Marker Beacon Receiver
- •Marker Beacon Signal Sensitivity
- •5.5 Nav Radio Audio Selection
- •5.6 Intercom System (ICS) Isolation
- •5.7 Intercom Squelch Control
- •5.8 Digital Clearance Recorder and Player
- •6.1 AFCS Controls
- •6.2 Flight Director Operation
- •Activating the Flight Director
- •Command Bars
- •AFCS Status Box
- •6.3 Flight Director Modes
- •Pitch Modes
- •Roll Modes
- •6.4 Autopilot Operation
- •Flight Control
- •Engaging the Autopilot
- •Control Wheel Steering
- •Disengaging the Autopilot
- •6.5 Example Procedures
- •Departure
- •Intercepting a VOR Radial
- •Flying a Flight Plan/GPS Course
- •Descent
- •Approach
- •Go Around/Missed Approach
- •6.6 AFCS Annunciations and Alerts
- •AFCS Status Alerts
- •Overspeed Protection
- •Section 7: Navigation
- •7.1 Navigation Map Page
- •Direct-to Navigation from the MFD
- •Direct-to Navigation from the PFD
- •7.3 Navigating an Example Flight Plan
- •7.4 Airport Information
- •7.5 Intersection Information
- •7.6 NDB Information
- •7.7 VOR Information
- •7.8 User Waypoint Information Page
- •7.9 Nearest Airports
- •Nearest Airport Information on the MFD
- •Nearest Airports Information on the PFD
- •7.10 Nearest Intersections
- •7.11 Nearest NDB
- •7.12 Nearest VOR
- •7.13 Nearest User Waypoint
- •7.14 Nearest Frequencies
- •7.15 Nearest Airspaces
- •Section 8: Flight Planning
- •8.1 User Defined Waypoints
- •Select the User WPT Information Page
- •Create User Waypoints from the Navigation Map Page
- •8.2 Viewing the Active Flight Plan
- •8.3 Activate a Stored Flight Plan
- •8.4 Activate a Flight Plan Leg
- •8.5 Stop Navigating a Flight Plan
- •8.6 Invert Active Flight Plan
- •8.7 Create a New Flight Plan
- •Create a New Flight Plan Using the MFD
- •Create a New Flight Plan Using the PFD
- •8.8 Enter an Airway in a Flight Plan
- •8.9 Load a Departure
- •8.10 Load an Arrival
- •8.11 Load an Approach
- •8.13 Store a Flight Plan
- •8.14 Edit a Stored Flight Plan
- •8.15 Delete a Waypoint from the Flight Plan
- •8.16 Invert and Activate a Stored Flight Plan
- •8.17 Copy a Flight Plan
- •8.18 Delete a Flight Plan
- •8.19 Graphical Flight Plan Creation
- •8.20 Trip Planning
- •Section 9: Procedures
- •9.1 Arrivals and Departures
- •Load and Activate a Departure Procedure
- •Load and Activate An Arrival Procedure
- •9.2 Approaches
- •Load and/or Activate an Approach Procedure
- •Activate An Approach in the Active Flight Plan
- •Section 10: Hazard Avoidance
- •10.1 Customizing the Hazard Displays on the Navigation Map
- •10.2 STORMSCOPE® (Optional)
- •Displaying Stormscope Lightning Data on the Navigation Map Page
- •Stormscope Page
- •10.3 XM Weather (Service Optional)
- •Displaying METAR and TAF information on the Airport Information Page
- •Displaying Weather on the Weather Data Link Page
- •Weather Products & Symbols
- •Weather Product Age
- •10.4 Traffic Systems
- •10.5 Terrain and Obstacle Proximity
- •Displaying Terrain and Obstacles on the Terrain Proximity Page
- •Displaying Terrain and Obstacles on the Navigation Map
- •10.6 Terrain Awareness & Warning System (TAWS) Display (Optional)
- •Displaying Terrain on the TAWS Page
- •Enable/Disable Aviation Data
- •TAWS Inhibit
- •Manual System Test
- •Forward Looking Terrain Avoidance (FLTA)
- •Premature Descent Alert (PDA)
- •Excessive Descent Rate Alert (EDR)
- •Displaying Terrain and Obstacles on the Navigation Map
- •Pop-up Alerts
- •TAWS Alerts Summary
- •Alert Annunciations
- •11.1 Reversionary Mode
- •11.2 Abnormal COM Operation
- •11.3 Unusual Attitudes
- •11.4 Stormscope Operation with loss of Heading Input
- •11.5 Hazard Displays with Loss of GPS Position
- •11.6 Dead Reckoning
- •12.1 Alert Level Definitions
- •12.2 NAV III Aircraft Alerts
- •WARNING Alerts
- •CAUTION Alerts
- •12.3 CO Guardian Messages
- •12.4 AFCS Alerts
- •System Status Annunciation
- •12.5 TAWS Alerts
- •12.6 Other G1000 Aural Alerts
- •12.7 G1000 System Annunciations
- •12.8 G1000 System Message Advisories
- •MFD & PFD Message Advisories
- •Database Message Advisories
- •GMA 1347 Message Advisories
- •GIA 63 Message Advisories
- •GIA 63W Message Advisories
- •GEA 71 Message Advisories
- •GTX 33 Message Advisories
- •GRS 77 Message Advisories
- •GMU 44 Message Advisories
- •GDL 69A Message Advisories
- •GDC 74A Message Advisories
- •Miscellaneous Message Advisories
- •Index

SECTION 1
SYSTEM OVERVIEW
1.6BACKLIGHTING
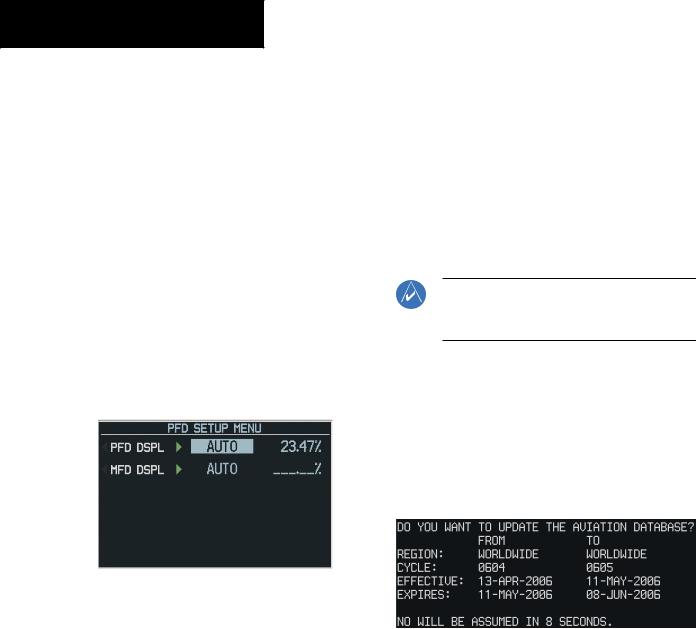
Manually adjust the backlight for the PFD and MFD:
1)Press the MENU Key on the PFD to display the PFD Setup Menu window.
2)Press the small FMS Knob to activate the cursor. ‘PFD DSPL > AUTO’ is now highlighted.
3)Turn the small FMS Knob to display the selection window.
4)Turn the small FMS Knob to select‘MANUAL’,then press the ENT Key.
5)With the intensity value now highlighted, turn the small FMS Knob to select the desired backlighting.
6)Turn the large FMS Knob to highlight ‘MFD DSPL > AUTO’ and repeat steps 3 through 5.
Figure 1-10 PFD Setup Menu Window
1.7XM RADIO - AUTOMATIC MUTING
XM Radio audio is automatically muted when the aircraft groundspeed exceeds approximately 30 kts and the airspeed is less than approximately 80 kts. The audio must be manually unmuted once the aircraft is outside the applicable speed range. Refer to the G1000 Optional Equipment section of the pilot’s guide.
1.8DATABASE UPDATES
The G1000 System uses Secure Digital (SD) cards to load and store various types of data. For basic flight operations, SD cards are required for database storage as well as Jeppesen aviation and ChartView database updates.
The following procedures pertain to updating the G1000 system with SD cards as outlined in Appendix B of the G1000 Cessna Nav III Pilot’s Guide.
Jeppesen Aviation Database
NOTE: After the aviation database is installed, the card may be removed after loading the update to each LRU.
Updating the Jeppesen aviation database:
1)With the G1000 System OFF, insert the SD card containing the aviation database update into the top card slot of the PFD to be updated (Label of SD card facing left).
2)Turn the G1000 System ON. A prompt similar to the following is displayed in the upper left corner of the PFD:
Figure 1-11 Database Update Prompt
3)Press the ENT Key to start the database update. A prompt similar to the following is displayed:
1-12 |
Garmin G1000 Cockpit Reference Guide for the Cessna Nav III |
190-00384-08 Rev.A |

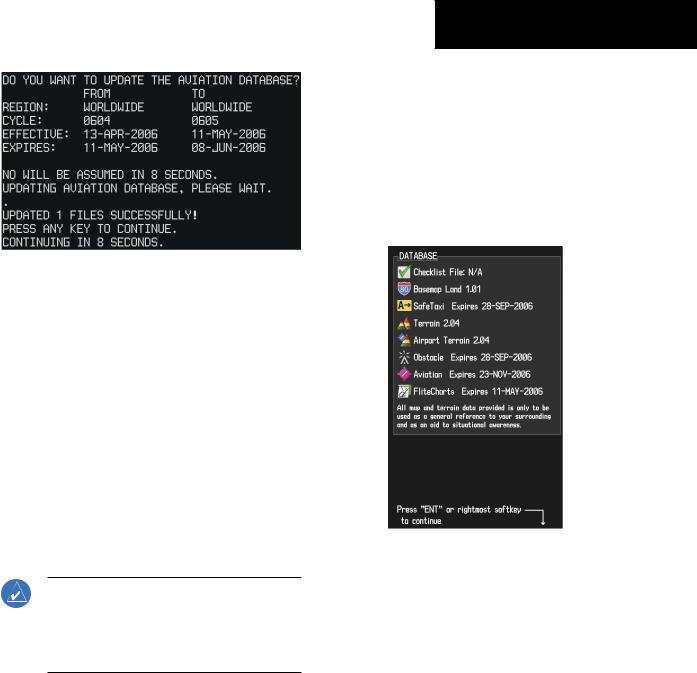
Figure 1-12 Database Update Confirmation
4)After the update completes,the PFD starts in normal mode.
5)Turn the G1000 System OFF and remove the SD card.
6)Repeat steps 1 through 4 for the MFD. The MFD and PFD databases are now updated. Remove the SD card when finished.
7)Verify that the correct update cycle is loaded during startup of the MFD.
Garmin Databases
Since these databases are not stored internally in the MFD or PFD, a Supplemental Data Card containing identical database versions must be kept in each display unit.
NOTE: The data contained in the terrain and obstacle databases comes from government agencies. Garmin accurately processes and cross-validates the data, but cannot guarantee the accuracy and completeness of the data.
1)Insert one SD card in the bottom card slot of the MFD and one in the bottom card slot of the PFD. The SD card containing the ChartView or FliteCharts database must be inserted into the bottom slot on the MFD.
SECTION 1
SYSTEM OVERVIEW
2)Apply power to the G1000 System. View the MFD power-up splash screen. Check that the databases are initialized and displayed on the scrolling window of the splash screen. When updating the terrain and FliteCharts databases, an ‘in progress’ message may be seen. If this message is present, wait for the system to finish loading before verifying the correct databases are initialized, then proceed to step 3.
Figure 1-13 Power-Up Splash Screen Window
3)Acknowledge the Power-up Page agreement by pressing the ENT Key or the right most softkey.
4)At the MAP – NAVIGATION MAP Page, press the MAP Softkey and check to make sure that the TOPO and TERRAIN Softkeys are available (not dimmed) and other database features are functioning.
5)Power down the G1000.
190-00384-08 Rev.A |
Garmin G1000 Cockpit Reference Guide for the Cessna Nav III |
1-13 |

SECTION 1
SYSTEM OVERVIEW
Blank Page
1-14 |
Garmin G1000 Cockpit Reference Guide for the Cessna Nav III |
190-00384-08 Rev.A |