

Color.Atlas.of.Endodontics-ublog.tk
.pdf132 |
Color Atlas o f Endodontics |
FIGURE 9-1 A, Teeth #6 and #7 restored with cast post and core foundations. B, Root canal treatment, cast post and cores, and porcelain fused to metal crowns have restored the maxillary right canine and lateral incisor to function and esthetics.
crown lengthening, orthodontic extrusion, or extraction. Key abutment teeth in a patient with extensive fixed reconstruction should have a good endodontic prognosis before a definitive restoration is placed. The clinician should also consider the need for elective root canal treatment and retreatment before placing the definitive restoration. Endodontically treated teeth should probably not be used as abutments for fixed partial dentures with more than one pontic because the greater load placed on the prosthesis may render them more likely to fracture.3 Anterior endodontically treated teeth used as abutments for fixed partial dentures should be restored with cast post and core restorations. Endodontically treated teeth should not be used as abutments for distal extension partial dentures because they are more than four times as likely to fail than pulpless teeth not serving as abutments.3 Nyman and Lindhe noted that fractures occurred more frequently in teeth treated endodontically and then used as abutments for free end segments. 4 Other studies support this finding as well and caution against the use of endodontically treated teeth as distal extension abutments. 5,6
Structure of Endodontically Treated Teeth
Papa and others7 found no significant difference in the moisture content between matched pairs of endodontically treated and vital teeth. Vital dentin exhibited a moisture content of 12.35%, whereas dentin from endodontically treated teeth had a moisture content of 12.10%. Huang et al 8 compared the mechanical properties of human dentin from treated pulpless teeth with dentin from normal vital teeth and noted an insignificant effect of endodontic treatment on compressive and tensile strength of the dentin. Research by Reeh and colleagues9 compared the reduction in tooth stiffness in en-
dodontic and restorative procedures. The relative tooth stiffness as a result of endodontic procedures was reduced by 5%; however, restorative procedures generated stiffness loss between 20% and 63%. Many operative preparations result in larger amounts of tooth structure loss when compared with endodontic access preparations. The volume of tooth loss is perhaps the primary factor in the decreased strength of endodontically treated teeth.
Restoration of Endodontically Treated Teeth
ANTERIOR TEETH. With only a conservative access opening, anterior teeth can be restored with a resin restoration. Placement of a post is not necessary when a complete coverage restoration is not indicated. Post installation may inhibit attempts to bleach a discolored endodontically treated tooth. Moreover, a post does not strengthen the root. A retrospective study by Sorensen and Martinoff10 showed no improvement in prognosis for endodontically treated anterior teeth restored with a post. Lovdahl and Nicolls" found that endodontically treated maxillary central incisors with intact natural crowns exhibiting access openings were stronger than teeth restored with cast posts and cores or pin-retained amalgams. Large interproximal restorations, incisal edge fractures, or esthetic concerns may necessitate the placement of a post and core, as well as full corona' coverage.'
POSTERIOR TEETH. A significant improvement is noted in the clinical success of endodontic treatment of maxillary and mandibular premolars and molars when coronal coverage restorations are present. Full-coverage crowns prevent fracture when occlusal forces act to separate the cusp tips.'° Crowns should generally be used


Chapter Nine Restoration of the Endodontically Treated Tooth |
135 |
on all endodontically treated posterior teeth.10,12 If significant tooth structure has been retained, a crown may be all the coverage required. If minimal structure remains, a post may be necessary to help retain a foundation before crown placement. If a crown cannot be placed because of a patient's financial limitations, the clinician should provide some other form of cuspal coverage such as an amalgam onlay.
The Role of Posts in the Restoration o f Endodontically Treated Teeth
Most in vitro laboratory studies that have tested endodontically treated teeth by applying force with a mechanical testing machine have shown that placement of a post and core does not increase fracture resistance. Researchers are in general agreement that posts do not reinforce endodontically treated teeth and actually weaken the root. 1,13-17 The primary purpose of a post is to retain a core that is used to retain the definitive restoration.
Types of Posts
Posts can be made of a variety of materials (Figure 9-2). Prefabricated posts are generally made of stainless steel, platinum-gold-palladium, or titanium, but newer compositions include ceramic and carbon fiber. Cast custom posts are usually cast from Type II or III gold alloy. Posts can be categorized by mode of retention (active or passive) or shape (parallel or tapered). Laboratory studies indicate that threaded (active) posts are the most retentive, followed by cemented, serrated, parallel-sided posts.18 Cemented, tapered posts are the least retentive. Although threaded posts are the most retentive, they place insertion stress on the root and can cause root
fracture. The tapered post has a wedging effect that also places stress on the root. Parallel serrated posts have the advantage of good retention with uniformly distributed functional stresses.' A study by Felton," however, demonstrated no statistical effects of post design on the potential for root fracture and concluded that the amount of remaining dentin and existing root morphology may be determining factors for fracture resistance during dowel placement in endodontically treated teeth. Although retention is often evaluated in comparisons of post and core systems, clinical experience indicates that a post placed to adequate length is not likely to fail regardless of the design. Intact, adequately placed posts are difficult to remove when necessary.
Failure o f Post and Cores
Failures occur in several ways. The post may loosen, the post and core complex may fracture or separate, or the root may fracture. Approximately 3% to 10% of post and core failures are attributable to root fractures. This may be more likely in teeth that have lost some periodontal support (Figure 9-3). A parallel, serrated (passive) post places less stress on the tooth root than tapered or threaded (active) posts. Split and threaded flexible posts do not reduce stress concentration during function because the post is not flexible in three dimensions. Cemented posts produce the least root stress." Turner found that post loosening was the most common type of failure among 100 failures examined.17 Sorensen's study of the records of 1273 endodontically treated teeth yielding 246 total failures concluded that 36% of the failures were caused by post dislodgment, 33% were related to nonrestorable tooth fractures, 5% were related to restorable tooth fractures, and 8% were related to post perforations.10
FIGURE 9-2 Posts can be made from various materials such as stainless steel (A), esthetic carbon fiber (B), carbon fiber (C), and ceramic (D).
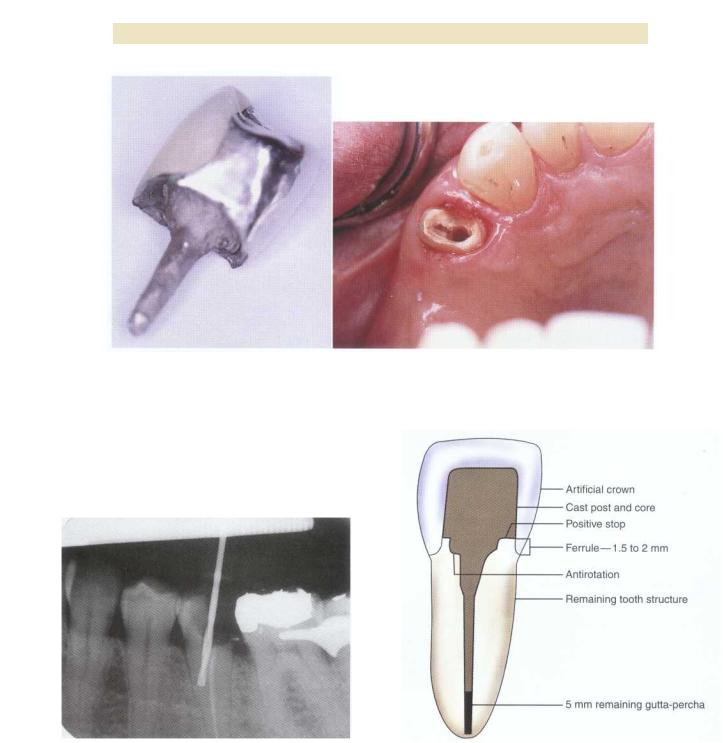
Post Size and Length
Post length is unique and individualized for each case. The clinician should have a thorough knowledge of root morphology before placing a post. The effect of the embedded depth of posts on retentive capacity has been shown to be significant.20 The longer the post, the greater the retention. A guideline of one half to three quarters of the root length is often followed but may not be reasonable for extremely long, short, narrow, or curved roots. At a minimum, research has established that the post length should be equal to or greater than the crown length of the restored tooth (see Figure 9-3). Retrospective clinical data on 1273 endodontically treated and restored teeth demonstrated few failures for posts that were as long as the crown or longer.'° At least 4 to 5 mm of gutta-percha should be left in the apical portion of the canal to ensure an adequate seal. If this guideline cannot be followed and the post is shorter than the crown, extraction should be considered. The width of the post should not be greater than one third of the

136 |
Color Atlas of Endodontics |
A B
FIGURE 9-3 A, Tooth #12, which exhibited loss of periodontal support, was restored with a post to a level unsupported by bone. B, The maxillary premolar eventually demonstrated a root fracture at the apex of the post.
Ism
width of the root at any point along the dowel. Maintaining a minimum of 1 mm of sound dentin around the post is also advisable. Tjan21 demonstrated that root Valls with 2 or 3 mm of buccal dentin were less likely to fracture than those having only 1 mm. Because of the two-dimensional nature of radiographs, buccal-lingual dimensions cannot be assessed and therefore the actual amount of dentin present in the mesio-distal direction may be smaller than the amount perceived. The clinician should keep this in mind and carefully consider teeth that have roots with fluting or depressions along the mesial and distal surfaces. Smaller posts not only conserve tooth structure, but also provide increased resistance to fracture compared with larger posts. 22
Preparation o f the Post Space As It Relates to the Apical Seal and Microleakage
The post space may be prepared immediately after root canal treatment is completed . 2,23 This procedure is a twostep process. Gutta-percha should be removed incrementally with a heated instrument or solvents before canal enlargement. This method reduces the chance of root perforation and microleakage 23 ( Figure 9-4), a common sequela of gutta-percha removal during post space preparation. The use of a heated instrument results in significantly less leakage at both the 3 and 5 mm levels of remaining gutta-percha, compared with rotary instrument removal . 23 Whenever possible, post space should be prepared with rubber dam isolation to prevent bacterial contamination of the root space. If the space becomes contaminated during post space preparation or before cementation, an antibacterial solution such as 2.5% sodium hypochlorite can be used to disinfect the space before treatment continues.
Excessive removal of gutta-percha may contribute to failure of the root canal treatment (Figure 9-5). A retrospective study of 200 patients concluded that the increased apical periodontitis associated with teeth with posts may result from the loss of the apical seal or the improper removal of root canal obturating materia1.24 Observation of teeth with less than 3 mm of remaining root filling indicated a statistically significant increased frequency of periapical radiolucencies than teeth where more than 3 mm of root filling remained.25 An in vitro study by Nixon 26 also demonstrated that leaving more than 3 mm of filling material greatly decreases the level of leakage; 5 mm or more is optimal. Numerous other authors support leaving 4 to 5 mm of undisturbed gutta-percha after post preparation.1,27-34
Anti-Rotation and Positive Stop
Anti-rotation features are required in all post and core restorations. Techniques for applying these features include using pins or keyways or preparing the remaining coronal tooth structure. In a ribbon-shaped canal antirotation is achieved in the core. The rounder the canal, the greater the need to provide anti-rotation in the preparation. 3 A positive stop of the core onto sound dentin is required to prevent a wedging effect that could contribute to root fracture.
Ferrule Effect
The ferrule effect is achieved by encircling the remaining tooth structure with a cast band of metal. This effect has been shown to significantly increase the fracture resistance of an endodontically treated tooth by counteracting functional stresses such as lever forces and wedging
Chapter Nine Restoration o f the Endodontically Treated Tooth |
137 |
A B
FIGURE 9-4 A, The inadequate length of this post, which was shorter than the crown, may have contributed to the failure of the restoration. B, The prepared tooth exhibits a lack of ferrule on the mesial side of the tooth.
FIGURE 9-5 A rotary drill was used instead of a heated instrument to remove gutta-percha. This technique resulted in perforation of the root.
FIGURE 9-6 Key features of an endodontically treated incisor restored with a crown include antirotation, ferrule, positive stop, and a minimum of 5 mm of remaining gutta-percha.
effects (Figure 9-6).28 Opinions vary regarding the amount of ferrule needed, 35,36 but 1.5 to 2 mm should
be considered the clinical minimum. 28 Surgical crown lengthening is often used to increase ferrule. This option should be considered with caution. Gegauff 37 demonstrated that decoronated premolar teeth that received surgical crown lengthening to provide a 2-mm ferrule
were more likely to fracture because of the altered crown-to-root ratio than teeth receiving no crown lengthening. Orthodontic extrusion can be used to increase ferrule without compromising the crown-to-root ratio. 38 Incorporation of a ferrule is perhaps the single most important factor in maintaining the endodontically treated tooth restored with a crown.

138 |
Color Atlas of Endodontics |
Core Materials
The core should provide an ideal preparation form for the final restoration. Similar to a preparation in natural tooth, the core provides retention and a resistance
form for the fabricated crown. A number of direct core materials are commercially available for use with pre-
fabricated posts. Categories of core materials include amalgam alloy, reinforced resins, and glass ionomer. Advantages of alloy include its strength and stability. However, it requires a bulk of material and therefore is more frequently applicable to molars and larger premolar teeth. Amalgam demonstrated no microleakage in a study of various core materials placed under crowns and should therefore be considered for a core material whenever the crown margin cannot be extended more than 1 mm from the core junction. 39 Resin cores are often placed in anterior teeth because of their ability to mimic natural tooth color, which can be advantageous under all-ceramic crowns. This matching color can be a disadvantage if it makes detecting the location of the resin with respect to the crown margin difficult. An opaque white resin core material precludes a graying effect and allows detection of its location by the clinician. In vitro research on glass ionomer has demonstrated low strength compared with other core materials. Glass ionomer cements should probably be reserved for use in very selected anterior and posterior teeth because of their insufficient adhesion when used alone with pins or posts and their questionable longterm fatigability.1
PREPARATION AND FABRICATION
TECHNIQUES
Corono-Radicular Amalgam Foundations
The corono-radicular amalgam foundation, also called an amalcore or chamber-retained amalgam, is condensed into the pulp chamber and occasionally the coronal root canal space to gain retention. It can be used for posterior teeth with adequate coronal structure (two remaining walls) that exhibit undercut chambers large enough to receive a bulk of amalgam. This foundation can be placed in one visit and can be as strong as other types of foundations provided adequate bulk is created . 40,41 Kane42 demonstrated that 4 mm of remaining pulp chamber height negated the need to place amalgam into the canals. Amalgam cores placed in the chamber can easily be removed if retreatment becomes necessary. Removal is more difficult if the amalgam has been placed into the radicular space.
1.Place a rubber dam if possible.
2.Remove the provisional restoration and all remaining coronal restorative materials, caries, and unsupported tooth structure.
3.Plan for at least a 2-mm thickness of amalgam over tooth structure that is going to be covered by amalgam.
4.Remaining gutta-percha in the pulp chamber can be removed with a warmed endodontic plugger.
5.Remove 2 mm of gutta-percha from each root canal only if this is necessary for additional retention (i.e., retention in chamber is less than ideal [4 mm]).
6.Inspect chamber for undercuts, and enhance retention if necessary by placing additional undercut areas into the chamber walls. An inverted cone or diamond bur is useful for this step.
7.Place a stainless steel or copper matrix band if needed. An existing provisional crown can be converted to a matrix by creating a large opening in the occlusal surface through which amalgam can be condensed.
8.Incrementally condense amalgam into the pulp chamber, then continue to fill the matrix to the level dictated by remaining tooth structure and predetermined height.
9.Begin to carve the alloy to the appropriate height while the matrix is in place.
10.Remove the matrix after initial setting has occurred and carefully check occlusion if the tooth has not already been prepared for a crown.
11.If the tooth has already been prepared for a crown, the amalgam may be carved to the contours of the desired crown preparation. In this situation the clin ician should select a fast set amalgam alloy that will allow careful preparation of the core at the same visit.
12.The final prepared core should be well condensed and exhibit good retention and resistance form (Fig-
ure 9-7).
13.The clinician must take care when fabricating or relining a provisional crown not to fracture the newly
placed core.
Pre fabricated Posts
The tooth type, root length, and root morphology dictate the type of post to be used. Two basic categories of prefabricated posts are available: passive and active. Active posts primarily gain their retention by threads that engage the intraradicular tooth structure. Passive posts gain their retention from the luting agent.
A large number of prefabricated posts are available in lengths ranging from 8 to 22 mm and diameters ranging from 0.5 to 1.9 mm. A majority of current prefabricated posts are a passive design, are just as likely to be parallel as tapered, and tend to be made of stainless steel or titanium. Newer compositions include the carbon fiber post (C-Post, Bisco Dental Products, Schaumburg, IL). The manufacturer of the C-post claims that it has the same elasticity as dentin and prevents the root fractures associated with cast and prefabricated metallic posts. The newer zirconium oxide posts (CosmoPost, Ivoclar North America, Inc., Amherst, NY) are tooth-shaded posts to

Chapter Nine Restoration o f the Endodontically Treated Tooth |
13 9 |
FIGURE 9-7 A, Preparation for an amalcore foundation. B, Restora- |
FIGURE 9-8 Preformed post systems usually contain calibrated |
tion with an amalcore foundation. |
drills to assist with post space preparation. |
which a tooth-colored resin or ceramic core may be attached. Zirconium oxide posts are becoming popular because of the increased use of all-ceramic crowns. They are advocated for use with the more translucent all-ceramic crowns (such as IPS Empress) where a metallic post and core may render a graying effect.43
Prefabricated post systems often come with calibrated drills that correspond to the available diameters; these allow for ease of final post space shaping and remove minimal tooth structure (Figure 9-8). The following method is used for preparation and placement of a parallel-sided prefabricated post (ParaPost XP, Coltene/Whaledent, Mahwah, NJ).
1.Prepare remaining tooth structure. Undercuts do not need to be removed.
2.Plan for the length and diameter of the post using a parallel, distortion-free radiograph as a guide.
3.Remove gutta-percha to the planned length desired for the post using a heated instrument or solvents. Adequate removal can be confirmed by exposing a radiograph.
4.Using Gates Glidden drills, enlarge the post space according to the size ParaPost desired, ending with the size that corresponds to the size of the planned ParaPost (Table 9-2).

140 |
Color Atlas o f Endodontics |
*#1 (0.50) and #2 (0.70) drills may be used to enlarge a small canal to accommodate a #3 drill.
5.To parallel the post space, select a ParaPost X drill that is smaller than the last Gates Glidden drill used in step 4. Place a rubber stop on the drill to the desired depth or use the drill markings as a guide. (ParaPost X drills can be used manually with the Universal Hand Driver or with a slow-speed contraangle [750 to 1000 rpm]. A new drill is indicated when manual drilling is performed.)
''6. Sequentially step up to the next larger ParaPost X drill until the predetermined diameter and depth are achieved.
7.Select the ParaPost XP post that corresponds to the last drill used to prepare the post space.
8.Before cementing the post, confirm that the length of the post corresponds to the depth of the newly created post space. Reinsert the last drill used into the post space to confirm the depth of the preparation. Place the post next to the drill so the base of the post head is slightly above the final depth measurement identified on the drill. Using a cutting disc, remove the portion of the post that extends beyond the apical end of the drill. Re-chamfer the end of the post to its original shape. A radiograph can be made to confirm complete seating of the post before cementation.
9.Use a cylindrical diamond or carbide bur to prepare an anti-rotational box.
0.Place the post into the post space. Check for occlusal clearance. Remove the post and further adjust the length by trimming the apical end if needed. Re-chamfer the apical end to its original shape and debride the post.
11.Air abrade the post with 50 micron aluminum oxide before cementation to enhance micro-mechan- ical retention
12.Use the dental cement of your choice, according to the manufacturer's instructions, to cement the post. Place the cement in the canal with a lentulo spiral. This results in an even coating of cement. However, this technique should be avoided when using a ce-
ment that sets by oxygen inhibition such as Panavia 21 (Kuraray America, Inc., New York, NY). For this type of cement, the luting agent should be placed only on the post.
13.Remove excess cement and fabricate the rest of the amalgam or composite core. This is most easily done with the aid of a matrix (Figure 9-9).
Cast Post and Core
The cast post and core has been considered the gold standard in restoration of the root canal treated tooth when a post must be placed to retain a core. This is particularly true for anterior teeth, where occlusal forces are oblique and not directed along the long axis of the tooth. Additionally, with a cast post and core the core will not separate from the post.
Fabrication o f the Direct Cast Post and Core Pattern
A method for fabricating a custom cast post and core pattern using the ParaPost casting system is described in the following Clinical Technique. It allows the creation of a pattern that has the retentive features of a parallel, serrated post (apical portion) and the custom fit of a tapered post (coronal portion).
1.Prepare the remaining coronal tooth structure, removing any unsupported or weakened tooth structure and all previous restorative material.
2.Plan for the diameter and depth of the post using a radiograph as a guide.
3.Remove gutta-percha to the length desired for the post using a heated instrument or solvents.
4.Using Gates Glidden drills, enlarge the post space according to the size ParaPost desired, ending with the size that corresponds to the size of the planned ParaPost (see Table 9-2).

Chapter Nine Restoration of the Endodontically Treated Tooth |
141 |
FIGURE 9-9 Restoration with a prefabricated post and core. A, Endodontically treated incisor with 5 mm of gutta-percha remaining; undercuts may persist. B, Canal space prepared with Gates Glidden burs and corresponding ParaPost drills. C, Composite resin build-up of direct core material. D, Final contour using a diamond bur and high-speed handpiece.
5.To parallel the post space, select the ParaPost X drill that is smaller than the last Gates Glidden drill used in step 4. Place a rubber stop at the desired depth or use the drill markings as a guide. (ParaPost X drills can be used manually with the Universal Hand Driver or with a slow-speed contra-angle [750 to 1000 rpm].)
6.Sequentially step up to the next larger ParaPost X drill until the predetermined diameter and depth are achieved.
7.Use a cylindrical diamond or carbide bur to prepare an anti-rotational box without undercuts.
8.Place into the prepared post space a ParaPost XP burnout post (P-751) that corresponds to the largest
ParaPost X drill used to prepare the post space. If necessary, shorten the post from the apical end.
9.Build up the core pattern with pattern resin, then shape and finish the coronal mass of resin using medium and fine diamonds with water spray while