

Color.Atlas.of.Endodontics-ublog.tk
.pdfChapter Seven Obturation |
111 |
moved. The clinician then places the cold plugger in the orifice with firm pressure and activates the heat source. The plugger is moved apically over a 1- to 2-second period until it is 3 mm short of the binding point. Care must be taken to ensure that the heat is never activated for more that 4 seconds. Pressure is maintained on the apical gutta-percha while the heat source is shut off for 5 to 10 seconds. After the gutta-percha has set the heat source is activated for 1 second to separate the plugger from the apical mass so the instrument can be removed. A hand plugger with a tip diameter of 0.4 mm is used to ensure the gutta-percha is not displaced and has set.
If no post space is required, a single cone backfill can be accomplished by placing a sealer-coated gutta-percha cone trimmed to a 0.5-mm tip diameter in the space va cated by the plugger. This cone is seared off at the orifice, and a final sustained pressure completes the condensation. An alternative method is back-filling with injectable thermoplasticized gutta-percha (Obtura).
As with all procedures, continuous wave obturation has inherent risks. The use of thermoplasticized guttapercha techniques creates a potential for extrusion of materials into the periodontal structures as well as damage to the periodontal ligament and supporting alveolar bone from heat. An increase of 10° C above body tem-
perature appears to be a critical threshold for injuring osseous tissues. 64 Evidence suggests that the use of flameheated carriers poses a greater risk of injuring the periodontal structures. 65,66 Carriers heated in this manner can reach temperatures of 342° to 380° C.67,68 The in- j ectable gutta-percha technique 69 and the continuous wave condensation technique 66,70 appear to produce temperature changes below the critical threshold when used at the recommended temperatures.
Injection o f Thermoplasticized Gutta-Percha
Instead of introducing gutta-percha into the root canal and applying heat to cause it to flow, the material can be heated outside the tooth and injected in a thermoplasticized state. The previously mentioned Obtura system ( see Figure 7-21) consists of a handheld gun that contains a chamber surrounded by a heating element into which pellets of gutta-percha are loaded and heated. Silver needles are attached to deliver the thermoplasticized material to the canal. The gun is connected by a cord to a control unit that allows the operator to adjust the temperature and therefore the viscosity of the gutta-percha. To use the system, the clinician prepares the canal in the same manner as for lateral condensation. Because the needles are small and the thermoplasticized material flows readily, the clinician should not create too much flare in the preparation. The apical terminus must remain as small as possible to prevent extrusion. After preparing and drying the canal, the clinician loads the last file used with sealer and uses it to coat the canal
walls. The gutta-percha is preheated, and the needle is placed in the canal within 3 to 5 mm of the apical ter- minus. Gutta-percha is then gradually, passively injected by squeezing the trigger of the gun. The needle backs out of the canal as it is filled. The gutta-percha is then gently compacted with pluggers that have been dipped in alcohol to prevent the plugger from sticking to the softened gutta-percha. Alternatively, the clinician may use a segmental technique, in which 3- to 4-mm segments of gutta-percha are sequentially injected and condensed. In either case, condensation should continue until the guttapercha cools and solidifies, which takes 3 to 5 minutes. This compensates for the contraction that takes place when it cools.
The difficulty with this system is the same as that of the other warm gutta-percha techniques and paste systems-lack of control. Both overextension and underextension are common findings (Figure 7-24). To overcome this drawback, the clinician may use a hybrid technique, beginning obturation using the lateral condensation technique. When the master cone and several accessory cones have been placed so that the mass is
FIGURE 7-24 A, Preoperative radiograph of a mandibular left first molar exhibiting internal resorption in the distal root. B, Obturation with thermoplasticized gutta-percha reveals obliteration of the resorptive space and extrusion of material into the periradicular tissues, a potential complication of any of the warm guttapercha techniques.

11 2 |
Color Atlas o f Endodontics |
firmly lodged in the apical portion of the canal, a hot plugger is introduced, searing the points off approximately 4 to 5 mm from the apex. Light vertical condensation is applied to restore the integrity of the apical plug of gutta-percha, and no attempt is made to warm it. The remainder of the canal is then filled with thermoplasticized gutta-percha as described previously. This technique is similar to Ruddle's but avoids the down-packing step, which is time consuming, requires additional widening of the canal, and creates potentially fractureproducing apical pressure.
Carrier-Based Gutta-Percha
Originally the gutta-percha carrier systems (Thermafil, Dentsply, Tulsa Dental, Tulsa, OK) were manufactured with a metal core to which the manufacturer applied a coating of gutta-percha. When heated over an open flame, the gutta-percha would soften and could then be introduced into the root canal. The technique became
popular because the central core provided a rigid mechanism to facilitate placement of the obturation material. This ease of placement often resulted in incomplete cleaning and shaping and an attendant decrease in prognosis. As with other obturation techniques, the quality
of cleaning and shaping dictates success. In addition, the metallic core made placement of a post challenging.
Current advances in the carrier systems include the development of a plastic core coated with alpha-phase gutta-percha and a heating device that heats the carrier and controls the temperature (Figure 7-25). Thermafil offers another alternative to obturation with heated gutta-percha71 (Figure 7-26). Recently Dentsply/Tulsa Dental (Tulsa, OK) introduced GT obturators designed to correspond to the sizes of the GT Profile nickeltitanium rotary files (Figure 7-27). Having obturators that are manufactured to correlate with the precise size of the prepared canal may enhance the quality of obturation. The traditional Thermafil obturators are manu-
FIGURE 7-25 The Thermafil oven with a Thermafil obturator.
FIGURE 7-26 AThermafil obturator and appropriate size verifier.
FIGURE 7-27 A size 50/.12 GT nickel-titanium file and the corresponding GT obturator.

Chapter Seven Obturation |
11 3 |
factured consistent with International Standards Organization file sizes but may not adapt to the coronal position of the canal, which exhibits greater taper after preparation with Gates Glidden drills.
The carrier-based technique requires the use of a sealer, and the removal of the smear layer is recommended 72 Grossman formulation sealers or resin sealers consistent with AH26 are acceptable. Tubliseal and Wach's Paste are not recommended. Size verifiers for the gutta-percha carriers are available for selecting the size of the obturator necessary for placement. The verifier should fit passively at the corrected working length. When the GT obturators are used the size should corre-
late with the shaping objective file.
After drying the canal and placing a light coat of sealer, the clinician marks a carrier with a rubber stop set at the predetermined length. This must be accom plished using the millimeter calibration markings on the carrier shaft. Markings are made at 18, 19, 20, 22, 24, 27, and 29 mm. A Bard-Parker blade can be used to remove gutta-percha on the shaft that may be obscuring the calibration rings. After the rubber stop is set, the carrier is disinfected with 5.25% sodium hypochlorite for 1 minute and rinsed in 70% alcohol. 73
The carrier is then placed in the heating device. After it is heated to the appropriate temperature, the operator has approximately 10 seconds to retrieve the carrier and insert it into the canal. This is accomplished without rotation or twisting. The position of the obturation material is verified radiographically. After waiting 2 to 4 minutes for the material to set, the clinician can section the carrier several millimeters above the canal orifice. This is accomplished by applying stabilizing pressure to the carrier and cutting the device with an inverted cone, round bur, or specially designed Prepi bur. Heated instruments are not recommended for this process because they may result in displacement of the obturator. Vertical compaction of the coronal gutta-percha can be accomplished and when necessary gutta-percha can be added, heat softened, and condensed. A lubricant should be applied to the plugger to prevent adhesion and possible displacement.
If post space is required for restoration of the tooth, specially designed ProPost (Dentsply, Tulsa Dental, Tulsa, OK) drills are recommended. The unique eccentric cutting tip keeps the instrument centered in the canal while friction softens and removes the gutta-percha and plastic carrier. Evidence suggests that the seal is not altered if this procedure is accomplished immediately. 74,75
If retreatment is required the plastic carrier has a groove along its length to provide an access point for placement of a file. Rotary .04 and .06 nickel-titanium files may facilitate complete removal of the obturation materials. When necessary, chloroform and hand files can be used to remove the gutta-percha surrounding the carrier.
The plastic carriers are composed of two materials. Sizes up to 40 are manufactured from a liquid crystal plastic. Sizes 40 to 90 are composed of polysulfone polymer. Both have similar physical characteristics, with the polysulfone carriers being susceptible to dissolution in chloroform.
THE CORONAL SEAL
Regardless of the technique used to obturate the canals, coronal microleakage can occur through seemingly wellobturated canals within a short time, potentially causing infection of the periapical area.7,76-79 A method to protect the canals in case of failure of the coronal restoration is to cover the floor of the pulp chamber with a lining of glass ionomer cement after the excess gutta-percha and sealer have been cleaned from the canal. Glass ionomers have the intrinsic ability to bond to the dentin, so they do not require a pretreatment step. The resin-modified glass ionomer cement is simply flowed approximately 1 mm thick over the floor of the pulp chamber and polymerized with a curing light for 30 seconds. Investigators found that this procedure resulted in none of the experimental canals showing leakage. 79
WHEN TO OBTURATE
In patients who are asymptomatic, obturation may be completed during the instrumentation appointment. In general, teeth exhibiting vital pulp tissue and normal periradicular structures are the best candidates for obturation at the instrumentation visit. Although there appears to be no difference in postoperative pain after single-visit endodontic treatment of teeth exhibiting pulp necrosis,$° teeth exhibiting necrotic pulps as well as those exhibiting chronic apical periodontitis and chronic apical abscesses resulting from pulp necrosis may be best managed in two treatment visits. Recent clinical studies 8l -83 indicate an improved prognosis for these cases if calcium hydroxide is placed as an intracanal medicament and obturation delayed until a second visit. 84 The calcium hydroxide serves as an antimicrobial dressing, reducing the bacteria present in the radicular space, as well as a temporary obturant.
Contraindications to single-appointment root canal treatment include the following:
1. Significant pain and/or swelling
2.Inability to dry the canal
3.Persistence of purulent drainage in the canal during instrumentation
Two additional considerations are esthetics and the ability to provide an adequate provisional restoration to prevent coronal leakage between visits. The clinician may need to obturate a tooth to facilitate placement of an esthetic temporary crown in the anterior region.

11 4 |
Color Atlas o f Endodontics |
References
1.Kakehashi S, Stanley H, Fitzgerald R: Effect of surgical exposures of dental pulps in germ-free and conventional laboratory rats, Oral Surg Oral Med Oral Pathol Oral Radiol Endod 20:340, 1965.
2.Delivanis PD, Mattison GD, Mendel RW: The survivability of F43 strain of Streptococcus sanguis in root canals filled with guttapercha and ProcoSol cement, J Endodon 9(10):407, 1983.
3.Walton RE: Histologic evaluation of different methods of enlarging the pulp canal space, J Endodon 2(10):304, 1976.
4.Peters OA, Barbakow F: Effects of irrigation on debris and smear layer on canal walls prepared by two rotary techniques: a scanning electron microscopic study, J Endodon 26(1):6, 2000.
5.Matsumiya S, Kitamura S: Histo-pathologic and histo-bacterio- logical studies of the relation between the condition of sterilization of the interior of the root canal and the healing process of periapical tissues in experimentally infected root canal treatment,
Bull Tokyo Coll 1:1, 1960.
6.Seltzer S: Endodontology, Philadelphia, 1988, Lea and Febiger.
7.Swanson K, Madison S: An evaluation of coronal microleakage in endodontically treated teeth. Part 1. Time periods, J Endodon 13(2):56, 1987.
8.Schilder H: Filling root canals in three dimensions, Dent Clin North Am 11:723, 1967.
9.Ingle JI: Endodontics, Philadelphia, 1965, Lea and Febiger.
10.Strindberg LZ: The dependence of the results of pulp therapy on certain factors. An analytic study based on radiographic and clinical follow-up examinations, Acta Odontol Scand 14:1, 1956.
11.Grahnen H, Hansson L: The prognosis of pulp and root canal therapy. A clinical and radiographic follow-up examination, Odont Rev 12:146, 1961.
12.Sjogren U, Sundqvist G, Nair PNR: Tissue reaction to gutta percha particles of various sizes when implanted subcutaneously in guinea pigs, Eur J Oral Sci 103:313, 1995.
13.Ricucci D, Langeland K: Apical limit of root canal instrumentation and obturation. Part 2. A histologic study, Int Endod J 31:394, 1998.
14.Smith CS, Setchell DJ, Harty FJ: Factors influencing the success of conventional root canal therapy-a five-year retrospective study,
Int Endod J 26(6):321, 1993.
15.Spangberg L, Langeland K: Biologic effects of dental materials 1. Toxicity of root canal filling materials on HeLa cells in vitro, Oral Surg Oral Med Oral Pathol Oral Radiol Endod 35:402, 1973.
16.Pascon EA et al: Tissue reaction to endodontic materials: methods, criteria, assessment, and observations, Oral Surg Oral Med Oral Pathol Oral Radiol Endod 72:222, 1991.
17.Malueg LA, Wilcox LR, Johnson WT: Examination of external apical root resorption with scanning electron microscopy, Oral Surg Oral Med Oral Pathol Oral Radiol Endod 82:89, 1996.
18.Tronstad L: Tissue reactions following apical plugging of the root canal with dentin chips in monkey teeth subjected to pulpectomy,
Oral Surg Oral Med Oral Pathol Oral Radiol Endod 45:297,
1978.
19.Oswald RJ, Friedman CE: Periapical response to dentin filings,
Oral Surg Oral Med Oral Pathol Oral Radiol Endod 49:344, 1980.
20.Pascon EA et al: Tissue reaction to endodontic materials: meth-
ods, criteria, assessment, and observations, Oral Surg Oral Med Oral Pathol Oral Radiol Endod 72:222, 1991.
21.Holland R et al: Tissue reactions following apical plugging of the root canal with infected dentin chips, Oral Surg Oral Med Oral Pathol Oral Radiol Endod 49:366, 1980.
22.Brady JE, Himel VT, Weir JC: Periapical response to an apical plug
of dentin filings intentionally placed after root canal overinstrumentation, J Endodon 11(8):323, 1985.
23.Pissiotis E, Spangberg LS: Biological evaluation of collagen gels containing calcium hydroxide and hydroxyapatite, J Endodon
16(10):468, 1990.
24.Torabinejad M, Chivian N: Clinical applications of mineral trioxide aggregate, J Endodon 25:197, 1999.
25.Grossman LL Oliet S, Del Rio C: Endodontics, Philadelphia, 1988, Lea and Febiger.
26.Augsburger RA, Peters DD: Radiographic evaluation of extruded
obturation materials, J Endodon 16(10):492, 1990.
27.The courts: FDA explains status of N2 material, J Am Dent Assoc 123:236, 1992.
28.Wu MK et al: Fluid transport and bacterial penetration along root canal fillings, Int Endod J 26(4):203, 1993.
29.Oksan T et al: The penetration of root canal sealers into dentinal tubules. A scanning electron microscopic study, Int Endod J 26(5):301, 1993.
30.Sen BH, Piskin B, Baran N: The effect of tubular penetration of root canal sealers on dye microleakage, Int Endod J 29(1):23, 1996.
31.Wiemann AH, Wilcox LR: In vitro evaluation of four methods of sealer placement, J Endodon 17(9):444, 1991.
32.Jasper EA: Adaptation and tissue tolerance of silver root canal fill-
ings, J Dent Res 4:355, 1941.
33.Brady JM, del Rio CE: Corrosion of endodontic silver cones in humans: a scanning electron microscope and x-ray microprobe study, J Endodon 1(6):205, 1975.
34.Seltzer S et al: A scanning electron microscope examination of silver cones removed from endodontically treated teeth, Oral Surg Oral Med Oral Pathol Oral Radiol Endod 33:589, 1972.
35.Walton RE, Torabinejad M: Principles and practice of endodontics, Philadelphia, 2002, WB Saunders.
36.Langeland K et al: Methods in the study of biologic responses to endodontic materials, Oral Surg Oral Med Oral Pathol Oral Radiol Endod 27:522, 1969.
37.Fanibunda KB: Adverse response to endodontic material containing paraformaldehyde, Bri Dent J 157:231, 1984.
38.Nguyen NT: Obturation of the root canal system. In Cohen S, Burns RC, editors: Pathways of the pulp, ed 6, St Louis, 1994,
Mosby.
39.Schilder H, Goodman A, Aldrich W. The thermomechanical prop-
erties of gutta-percha. I. The compressibility of gutta-percha, Oral Surg Oral Med Oral Pathol Oral Radiol Endod 37:946, 1974.
40.Hatton JF et al: The effect of condensation pressure on the apical seal, J Endodon 14(6):305, 1988.
41.Schilder H, Goodman A, Aldrich W: The thermomechanical properties of gutta-percha. II. The history and molecular chemistry of gutta-percha, Oral Surg Oral Med Oral Pathol Oral Radiol Endod 37:954, 1974.
42.Feldman G, Nyborg H: Tissue reactions of root canal filling materials. 1. Comparison between gutta-percha and silver amalgam implanted in rabbits, Odontol Rev 13:1, 1962.
43.Wolfson EM, Seltzer S: Reaction of rat connective tissue to some gutta-percha formulations, J Endodon 1(12):395, 1975.
44.Marshall FJ, Massler M: Sealing of pulpless teeth evaluated with radioisotopes, J Dent Med 16:172, 1961.
45.Kapsimalis P, Evans R, Tuckerman M: Modified autoradiographic technique for marginal penetration studies, Oral Surg Oral Med Oral Pathol Oral Radiol Endod 20:494, 1965.
46.Kuttler Y. Microscopic investigation of root apexes, J Am Dent Assoc 50:544, 1955.
47.Dang DA, Walton RE: Vertical root fracture and root distortion: effect of spreader design, J Endodon 15(7):294, 1989.
48.Berry KA et al: Nickel-titanium versus stainless-steel finger spreaders in curved canals, J Endodon 24(11):752, 1998.
49.Joyce AP et al: Photoelastic comparison of stress induced by using
stainless-steel versus nickel-titanium spreaders in vitro, J Endodon 24(11):714, 1998.
50.Allison DA, Michelich RJ, Walton RE: The influence of master cone adaptation on the quality of the apical seal, J Endodon 7(2):61, 1981.

Chapter Seven Obturation |
11 5 |
51.Pitts DL, Matheny HE, Nicholls JI: An in vitro study of spreader loads required to cause vertical root fracture during lateral con-
densation, J Endodon 9(12):544, 1983.
52.Brayton SM, Davis SR, Goldman M: Gutta-percha root canal fillings. An in vitro analysis. Part 1, Oral Surg Oral Med Oral Patbol Oral Radiol Endod 35:226, 1973.
53.Keane KM, Harrington GW. The use of a chloroform-softened
gutta-percha master cone and its effect on the apical seal, J Endodon 10(2):57, 1984.
54.McDonald MN, Vire DE: Chloroform in the endodontic operatory, J Endodon 18(6):301, 1992.
55.Margelos J, Verdelis K, Eliades G: Chloroform uptake by guttapercha and assessment of its concentration in air during the chlo- roform-dip technique, J Endodon 22(10):547, 1996.
56.Liewehr FR, Kulild JC, Primack PD: Improved density of gutta-
percha after warm lateral condensation, J Endodon 19(10):489, 1993.
57.Liewehr FR, Kulild JC, Primack PD: Obturation of a C-shaped canal using an improved method of warm lateral condensation, J Endodon 19(9):474, 1993.
58.Nelson EA, Liewehr FR, West LA: Increased density of guttapercha using a controlled heat instrument with lateral condensation, J Endodon 26:748, 2000.
59.Baumgardner KR, Krell KV: Ultrasonic condensation of gutta-
percha: an in vitro dye penetration and scanning electron microscopic study, J Endodon 16(6):253, 1990.
60.DuLac KA et al: Comparison of the obturation of lateral canals by six techniques, J Endodon 25(5):376, 1999.
61.Wolcott J et al: Effect of two obturation techniques on the filling of lateral canals and the main canal, J Endodon 23(10):632, 1997.
62.Wollard RR et al: Scanning electron microscopic examination of root canal filling materials, J Endodon 2(4):98, 1976.
63.Ruddle CJ: Three-dimensional obturation: the rationale and application of warm gutta-percha with vertical condensation. In Cohen S, Burns RC, editors: Pathways of the pulp, ed 6, St Louis, 1994, Mosby.
64.Eriksson AR, Albbrektsson T: Temperature threshold levels for heat-induced bone tissue injury; a vital microscopic study in the rabbit, J Prostbet Dent 50:101, 1983.
65.Lee FS, Van Cura JE, BeGole E: A comparison of root surface temperatures using different obturation heat sources, J Endodon 24(9):617, 1998.
66.Silver GK, Love RM, Parton DG: Comparison of two vertical condensation obturation techniques: Touch `n Heat modified and System B, Int Endod J 32(4):287, 1999.
67.Hand RE, Hugel EE Tsaknis PJ: Effects of a warm gutta percha technique on the lateral periodontium, Oral Surg Oral Med Oral Patbol Oral Radiol Endod 36:872, 1973.
68.Marciano J, Michailesco PM: Dental gutta-percha: chemical composition, x-ray identification, enthalpic studies, and clinical implications, J Endodon 15(4):149, 1989.
69.Weller RN, Koch KA: In vitro radicular temperatures produced by injectable thermoplasticized gutta-percha, Int Endod J 28(2):86, 1995.
70.Floren JW et al: Changes in root surface temperatures with in vitro use of the System B HeatSource, J Endodon 25(9):593, 1999.
71.Gutmann JL: Adaptation of injected thermoplasticized guttapercha in the absence of the dentinal smear layer, Int Endod J 26(2):87, 1993.
72.Behrend GD, Cutler CW, Gutmann JL: An in-vitro study of smear layer removal and microbial leakage along root-canal fillings, Int Endod J 29(2):99, 1996.
73.Glickman GN, Gutmann JL: Contemporary perspectives on canal obturation, Dent Clin North Am 36:327, 1992.
74.Rybicki R, Zillich R: Apical sealing ability of Thermafil following immediate and delayed post space preparations, J Endodon 20(2):64, 1994.
75.Saunders WP et al: An assessment of the plastic Thermafil obturation technique. Part 3. The effect of post space preparation on the apical seal, Int Endod J 26(3):184, 1993.
76.Torabinejad M, Ung B, Kettering JD: In vitro bacterial penetra-
tion of coronally unsealed endodontically treated teeth, J Endodon 16(12):566, 1990.
77.Saunders WP, Saunders EM: Assessment of leakage in the restored pulp chamber of endodontically treated multirooted teeth, Int En-
dod J 23(1):28, 1990.
78.Barrieshi KM, Walton RE, Johnson WT: Coronal leakage of mixed anaerobic bacteria after obturation and post space preparation,
Oral Surg Oral Med Oral Pathol Oral Radiol Endod 84:310,
1997.
79.Chailertvanitkul P et al: An evaluation of microbial coronal leakage in the restored pulp chamber of root-canal treated multirooted teeth, Int Endod J 30(5):318, 1997.
80.Roane JB, Dryden JA, Grimes EW: Incidence of postoperative pain after singleand multiple-visit endodontic procedures, Oral Surg Oral Med Oral Patbol Oral Radiol Endod 55:68, 1983.
81.Sjogren U et al: Influence of infection at the time of root filling on the outcome of endodontic treatment of teeth with apical periodontitis lerratum appears in Int Endod J 31(2):148, 1998.], Int Endod J 30(5):297, 1997.
82.Katebzadeh N, Hupp J, Trope M: Histological periapical repair after obturation of infected root canals in dogs, J Endodon 25(5):364, 1999.
83.Trope M, Delano EO, Orstavik D: Endodontic treatment of teeth with apical periodontitis: single vs. multivisit treatment, J Endodon 25(5):345, 1999.
84.Sjogren U et al: The antimicrobial effect of calcium hydroxide as a short-term intracanal dressing, Int Endod J 24(3):119, 1991.

11 8 |
Color Atlas o f Endodontics |
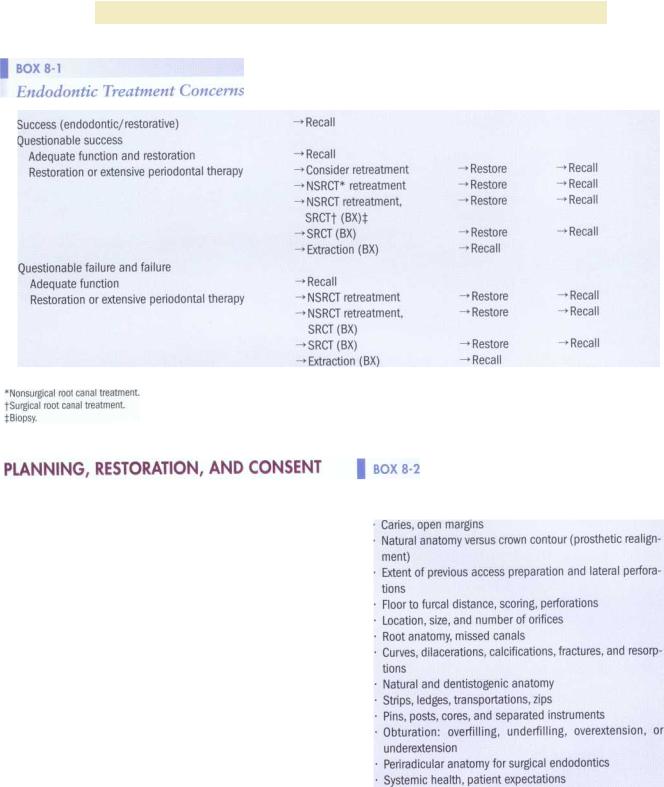
Successful retreatment depends on accurate diagnosis and identification of the etiology of failure. The clinician begins by recording the patient's chief complaint and pertinent history. The causes of failure can almost always be found by looking for a source of microorganisms and nutrients (persistent or recurrent) associated with the root canal system. A thorough clinical and periodontal examination should be performed. At this time the type, angulation, and number of subsequent radiographs are determined. All sinus tracts and pockets greater than 6.0 mm should be traced on these films. Usually a bite-wing and several periapical radiographs are taken. The resulting information (Box 8-2) is then combined and synthesized to produce a mental three-dimensional reconstruction of the tooth. As the clinician performs the evaluation, he or she forms an impression that attempts to differentiate between previously inadequate treatment and treatment compromised by clinical limitations. When possible, the dentist who performed the original treatment should be contacted. Their records and radiographs may provide a valued perspective on the nature of the problem and the quality of care provided. Restorative dentists should also be involved at this time in anticipation of their role in retreatment.
As endodontic retreatment is considered, so too is the ability to restore the tooth after retreatment. Interdisciplinary treatment planning is as important as endodontic diagnosis. Realistically, almost any tooth can be retreated, but restoring it to biologic health and function may not always be possible. This treatment planning process focuses on periodontal conditions and remaining tooth structure
Endodontic Considerations
*Each canal system in a multicanaled tooth must be considered separately.
(Boxes 8-3 and 8-4). Occlusal and orthodontic considerations may also influence the decision process (Box 8-5). With the new diagnosis, the clinician forms an impression as to how retreatment and restoration will benefit the patient.
What are the endodontic expectations to:
1.Improve the original debridement and canal shape.

Chapter Eight |
Retreatment |
119 |
|
|
is more successful. Treatment, which sometimes seems |
||
|
tedious and time-consuming, presents an exciting chal- |
||
|
lenge to the retreating dentist. The operator should never |
||
|
underestimate the potential difficulty of the procedure. |
||
|
If doubt exists regarding professional ability, armamen- |
||
|
tarium, time apportionment, expectations, or compen- |
||
|
sation, referral to |
an experienced colleague is |
|
|
indicated. |
|
|
|
After giving initial consent to treatment the patient |
||
|
must remain an informed partner as the prognosis |
||
|
evolves during retreatment. A mid-treatment complica |
||
|
tion may arise or the outcome may be less than antici- |
||
|
pated. A surgical approach or extraction may be neces- |
||
|
sary. In all instances, ongoing forthright communication |
||
|
with the patient is essential. This intimate communica- |
||
|
tion must also be maintained with the restoring dentist. |
||
BOX 8-4 |
After endodontic treatment the outcome must be ap- |
||
Prosthetic Considerations |
praised; the tooth must be restored and then evaluated |
||
on recall to confirm success. Root canal treatment is |
|||
|
|||
Crown-root ratio |
never complete until the tooth is restored to function. |
||
|
|
||
Root width, depth, and proximity |
CORC>NAL DISASSEMBLY: REGAINING |
||
Amount and quality of remaining tooth structure |
|||
Ability to place an adequate ferrule or margins |
ACCESS TO THE CHAMBER FLOOR |
||
Occlusal load and function |
With a plan in place, retreatment procedures may com- |
||
Floor to furcal distance, perforations (repairs) |
|||
mence. A common finding on initiation of retreatment |
|||
Relationship to the entire restorative picture |
|||
procedures is that the original access preparation was |
|||
|
|||
|
too small and restrictive. If maximal straight-line access |
||
|
was not achieved, it probably contributed to subsequent |
||
BOX 8-5 |
deficiencies in instrumentation, debridement, and obtu- |
||
ration. Physically and visually restricted access prepara- |
|||
Orthodontic Considerations |
tions make the search for additional canals more diffi- |
||
|
cult. These considerations frequently lead to the removal |
||
Patient goals, desires, esthetics |
of existing restorations. If a new restoration is planned |
||
or a temporary restoration is already in place, this pro- |
|||
Overall control of inflammatory dental disease |
|||
cedure should be relatively uncomplicated. If a fracture is |
|||
Occlusal stability: function and parafunction |
|||
suspected, the clinician should remove the entire restora- |
|||
Periodontal disease and tooth position |
|||
tion, apply dye stain, transilluminate, and view with |
|||
Abutment inclination |
|||
magnification. Active caries must always be removed, |
|||
Potential pontic or implant spaces |
|||
and faulty, leaking restorations should be replaced or re- |
|||
|
|||
|
paired. If the existing restoration is to be maintained, |
||
|
consideration must be given to its removal or careful, |
||
2. Debride newly accessed and contaminated regions |
nondestructive penetration (often without a rubber dam |
||
so the clinician can observe prosthetic realignment). Oc- |
|||
of the canal system. |
|||
casionally the existing restoration can be removed and |
|||
3. Improve on the radicular filling, restoration, and |
|||
then temporarily replaced for esthetics or function after |
|||
function. |
|||
treatment (Box 8-6). |
|
||
Recently, critical abutments compromised in many |
|
||
Beneath the coronal restoration the operator should |
|||
respects have been considered for extraction and implant |
anticipate a filling, core material, or a post and core com- |
||
placement. The decision to retreat should also embrace |
bination. With adequate provisional access, core and filling |
||
the patient's financial and emotional considerations. |
materials can be rapidly removed with burs. If canal filling |
||
After pretreatment assessment and diagnosis the fo- |
materials such as carriers, silver cones, or posts extend into |
||
cus shifts to the operator, patient, and restoring dentist. |
the chamber and core material, the clinician should at- |
||
For the operator, each retreatment procedure is unique, |
tempt to work around them, preserving their coronal ex- |
||
frequently testing his or her limits of ingenuity, flexibility, |
tensions. Methods to achieve this include changing the -bur- |
||
and persistence. Rather than a single magic "silver bul- |
cutting direction (Figure 8-1) and isolating posts by |
||
let" treatment, a deliberate, logical, stepwise approach |
ultrasonics (Figure 8-2). Material on the walls and floor |
||

120 |
Color Atlas o f Endodontics |
FIGURE 8-1 Bur-cutting directions.
FIGURE 8-2 Post isolated using ultrasonics.
should be chipped free with ultrasonics, magnification, illumination, and preferably microscopy.
Careful observation and particular care are necessary to detect the presence of titanium alloy posts and carriers.2 Their radiopacity is similar to that of most radicular filling materials. Clinically their dull gray color usually distinguishes them from surrounding materials.
As access is reestablished, microscopy and its attendant illumination permit visualization of anatomic landmarks and identification and location of the root canals. The "map" on a chamber floor or the color of the dentin further assists in localization of the canal orifices. Localization may be followed by occlusal access modifications for better straight-line access. Unless a post or radicular filling material is obviously loose or completely blocking exploration, the clinician should not attempt to remove it. This phase of retreatment should be limited to identification of orifices and exposure of the chamber floor. Copious irrigation and aspiration are invaluable. Organic material in an undiscovered orifice often demonstrates a "bubble trail" on the chamber floor as the sodium hypochlorite breaks down the tissues and effervesces.
Cast posts, cast interlocking posts, and Richmond crowns are initially exposed in a similar manner, with the clinician using a bur to remove coronal or core struc-
ture until the tooth-metal interface can be visualized near the orifice for each canal.
POST REMOVAL
In 1926, Kells3 suggested using two strong magnets to remove cemented posts. Present techniques have given clinicians a far greater advantage. The clinician must consider all the factors that significantly influence post retention-length, shape, surface characteristics, cementation media, and active or passive placement-before attempting post removal. Large post diameters, likelihood of fracture, and the risk of removing too much tooth structure are other notable concerns. Occasionally, when a post seems adequate but difficult to remove and the endodontics for that root is questionable, the post may be retained and a surgical approach considered.
Pretreatment radiographs from various angles help identify posts that are close to or actually perforating a root. Sound practice frequently dictates the evaluation of a post with an apex locator before removal. After removal the clinician can use transillumination, microscopy, and paper points to evaluate the post space.4,5 Even when perforation repairs are possible, structural losses may have excessively weakened the root, predisposing it to fracture.

Chapter Eight Retreatment |
121 |
FIGURE 8-3 The clinician can use Steiglitz forceps to engage the |
FIGURE 8-4 Troughing cement around post. |
post while applying ultrasonics. |
|
Unless the post is obviously loose, reduction of post retention should follow post isolation .6 Ultrasonic vibration can be applied to the coronal extension of the post. Vibration applied in this manner has been shown to reduce post retention substantially and facilitate removal. If the post shows signs of disintegration when touched by ultrasonic tips, the clinician can clamp the post with a hemostat or Steiglitz and vibrate on the forceps (Figure 8-3). The first motion detected is usually rotational. A gentle drawing force on the hemostat, with continued ultrasonic vibration, should complete the removal process. Troughing the cement line around posts may also help reduce retention (Figure 8-4). Because canals are not perfectly round and no post fits precisely, a cement line or space that small, delicate ultrasonic tips can penetrate should be evident with magnification (Figure 8-5). When using these smaller ultrasonic tips, the clinician should lower the power setting to minimize instrument breakage. A primary objective is to preserve as much sound dentin as possible. Small hand files with solvents may also be used adjacent to recalcitrant posts. These files can be ultrasonically energized . 7 If ultrasonics and discrete troughing fail to dislodge a post, a variety of post removal devices may be used (Figure 8-6). These devices generally work using principles similar to that of a corkscrew. The post is engaged and pulled from the fulcrum, the tooth (Figure 8-7). When the use of a removal system is anticipated, reduction and tapping (threading) of the post should be accomplished before any signs of mobility occur.
4.Prepare the post, reducing it to fit the coinciding tap size.
5.Tap the post in a counterclockwise (preferred) or clockwise direction, depending on the system
6.Remove the threading device, place a padded ring on the tap, and thread it back onto the post.
7.Place the extractor, engaging the tap between the padded ring and tap knob.
8.Activate removal device and turn removal knob or extractor clockwise in combination with ultrasonics delivered directly to the device.
9.Remove post, completing the first step of nonsurgical retreatment.
Occasionally clinicians must alternate between ultrasonically activating this assembly and incrementally increasing the drawing force. They must be patient and try to avoid excess tension that can lead to root fractures. Repeated, deeper troughing may also be necessary to further weaken and break cement bonds. If magnification and visualization are adequate, drilling a post out with a small, high-speed, long-shank round bur can be a tedious but effective last resort.
As radicular disassembly progresses, the clinician can cover other open canal orifices with cotton, especially when modifying the access preparation through a restoration. This will help minimize debris from becoming an additional canal obstacle.
THE REMOVAL OF RADICULAR FILLING MATERIAL OR OBSTRUCTIONS
The following basic principles must be considered as radicular filling materials are removed:
1.The hardness or consistency of a nonmetallic filling or the ability to remove an intracanal material cannot be determined radiographically.