- •Contents
- •What Is C#?
- •C# Versus Other Programming Languages
- •Preparing to Program
- •The Program Development Cycle
- •Your First C# Program
- •Types of C# Programs
- •Summary
- •Workshop
- •C# Applications
- •Basic Parts of a C# Application
- •Structure of a C# Application
- •Analysis of Listing 2.1
- •Object-Oriented Programming (OOP)
- •Displaying Basic Information
- •Summary
- •Workshop
- •Variables
- •Using Variables
- •Understanding Your Computer’s Memory
- •C# Data Types
- •Numeric Variable Types
- •Literals Versus Variables
- •Constants
- •Reference Types
- •Summary
- •Workshop
- •Types of Operators
- •Punctuators
- •The Basic Assignment Operator
- •Mathematical/Arithmetic Operators
- •Relational Operators
- •Logical Bitwise Operators
- •Type Operators
- •The sizeof Operator
- •The Conditional Operator
- •Understanding Operator Precedence
- •Converting Data Types
- •Understanding Operator Promotion
- •For Those Brave Enough
- •Summary
- •Workshop
- •Controlling Program Flow
- •Using Selection Statements
- •Using Iteration Statements
- •Using goto
- •Nesting Flow
- •Summary
- •Workshop
- •Introduction
- •Abstraction and Encapsulation
- •An Interactive Hello World! Program
- •Basic Elements of Hello.cs
- •A Few Fundamental Observations
- •Summary
- •Review Questions
- •Programming Exercises
- •Introduction
- •Essential Elements of SimpleCalculator.cs
- •A Closer Look at SimpleCalculator.cs
- •Simplifying Your Code with Methods
- •Summary
- •Review Questions
- •Programming Exercises
- •Introduction
- •Lexical Structure
- •Some Thoughts on Elevator Simulations
- •Concepts, Goals and Solutions in an Elevator Simulation Program: Collecting Valuable Statistics for Evaluating an Elevator System
- •A Deeper Analysis of SimpleElevatorSimulation.cs
- •Class Relationships and UML
- •Summary
- •Review Questions
- •Programming Exercises
- •The Hello Windows Forms Application
- •Creating and Using an Event Handler
- •Defining the Border Style of the Form
- •Adding a Menu
- •Adding a Menu Shortcut
- •Handling Events from Menus
- •Dialogs
- •Creating Dialogs
- •Using Controls
- •Data Binding Strategies
- •Data Binding Sources
- •Simple Binding
- •Simple Binding to a DataSet
- •Complex Binding of Controls to Data
- •Binding Controls to Databases Using ADO.NET
- •Creating a Database Viewer with Visual Studio and ADO.NET
- •Resources in .NET
- •Localization Nuts and Bolts
- •.NET Resource Management Classes
- •Creating Text Resources
- •Using Visual Studio.NET for Internationalization
- •Image Resources
- •Using Image Lists
- •Programmatic Access to Resources
- •Reading and Writing RESX XML Files
- •The Basic Principles of GDI+
- •The Graphics Object
- •Graphics Coordinates
- •Drawing Lines and Simple Shapes
- •Using Gradient Pens and Brushes
- •Textured Pens and Brushes
- •Tidying up Your Lines with Endcaps
- •Curves and Paths
- •The GraphicsPath Object
- •Clipping with Paths and Regions
- •Transformations
- •Alpha Blending
- •Alpha Blending of Images
- •Other Color Space Manipulations
- •Using the Properties and Property Attributes
- •Demonstration Application: FormPaint.exe
- •Why Use Web Services?
- •Implementing Your First Web Service
- •Testing the Web Service
- •Implementing the Web Service Client
- •Understanding How Web Services Work
- •Summary
- •Workshop
- •How Do Web References Work?
- •What Is UDDI?
- •Summary
- •Workshop
- •Passing Parameters and Web Services
- •Accessing Data with Web Services
- •Summary
- •Workshop
- •Managing State in Web Services
- •Dealing with Slow Services
- •Workshop
- •Creating New Threads
- •Synchronization
- •Summary
- •The String Class
- •The StringBuilder Class
- •String Formatting
- •Regular Expressions
- •Summary
- •Discovering Program Information
- •Dynamically Activating Code
- •Reflection.Emit
- •Summary
- •Simple Debugging
- •Conditional Debugging
- •Runtime Tracing
- •Making Assertions
- •Summary

Windows Forms
336
PART III
LISTING 3.5.1 Continued
64:
65:static void Main()
66:{
67:Application.Run(new drawlines());
68:}
69:};
Compile Listing 3.5.1 by using the following command line:
csc /t:winexe drawlines.cs
Lines 53–62 set up the application by creating a timer and by adding the OnPaint handler to the Paint event list. It also adds an event handler for the SizeChanged event, so that we can detect when a new background needs painting.
Lines 10–13 are a simple Tick event handler that just invalidates the window. And lines 15–29 are the paint handler that creates a pen and draws a line between two random coordinates onscreen.
Lines 31–43 paint the background for us. The reason that it’s done this way is so that the invalidation of the screen doesn’t paint over the lines already drawn. You can take this out if you like to see what happens. It illustrates how a brush fills a rectangle.
Using Gradient Pens and Brushes
Pens and brushes have come a long way in a short time. GDI+ allows you to have lines and filled areas that show a gradient or sweep of colors. Modifying the code in Listing 3.5.1 will allow us to use the gradient pens or gradient fills instead of solid lines or colors.
To fill the background of the window is simple enough, we just need to specify a gradient fill brush. The LinearGradientBrush object is a member of the System.Drawing.Drawing2d namespace. Drawing a gradient fill on a line is very simple, because one of the overloads allows you to specify two Point objects, each at opposite corners of a rectangle.
Listing 3.5.2 is a selective listing of the two sections you need to change in the example from Listing 3.5.1. It contains only the modified routines OnPaint and OnPaintBackground. Remember, though, to add the declaration
Using System.Drawing.Drwing2D;
to your source also.

GDI+: The .NET Graphics Interface
CHAPTER 3.5
LISTING 3.5.2 DrawLines2.cs: The Modified Line and Fill Code for DrawLines.cs
1:
2:public void OnPaint(object sender, PaintEventArgs e)
3:{
4:// the current graphics object for
5:// this window is in the PaintEventArgs
6:
7: Random r=new Random(); 8:
9:Color cA=Color.FromArgb(r.Next(255),r.Next(255),r.Next(255));
10:Color cB=Color.FromArgb(r.Next(255),r.Next(255),r.Next(255));
11:Point pA=new Point(r.Next(this.ClientSize.Width),
12: r.Next(this.ClientSize.Height));
13:Point pB=new Point(r.Next(this.ClientSize.Width),
14: r.Next(this.ClientSize.Height));
15:LinearGradientBrush brush = new LinearGradientBrush(pA,pB,cA,cB);
16:Pen p=new Pen(brush,(float)r.NextDouble()*10);
17:e.Graphics.DrawLine(p,pA,pB);
18:p.Dispose();
19: } 20:
21:protected override void OnPaintBackground(PaintEventArgs e)
22:{
23:// When we resize or on the first time run
24:// we’ll paint the background, otherwise
25:// it will be left so the lines build up
26:if(BackgroundDirty)
27:{
28:BackgroundDirty = false;
29:LinearGradientBrush gb=
30:new LinearGradientBrush(this.ClientRectangle,
31: |
Color.Navy, |
32: |
Color.Aquamarine, |
33: |
90); |
34:e.Graphics.FillRectangle(gb,this.ClientRectangle);
35:gb.Dispose();
36:}
37: 38: }
337
3.5
T GDI+:RAPHICSGNTERFACEI . HE NET
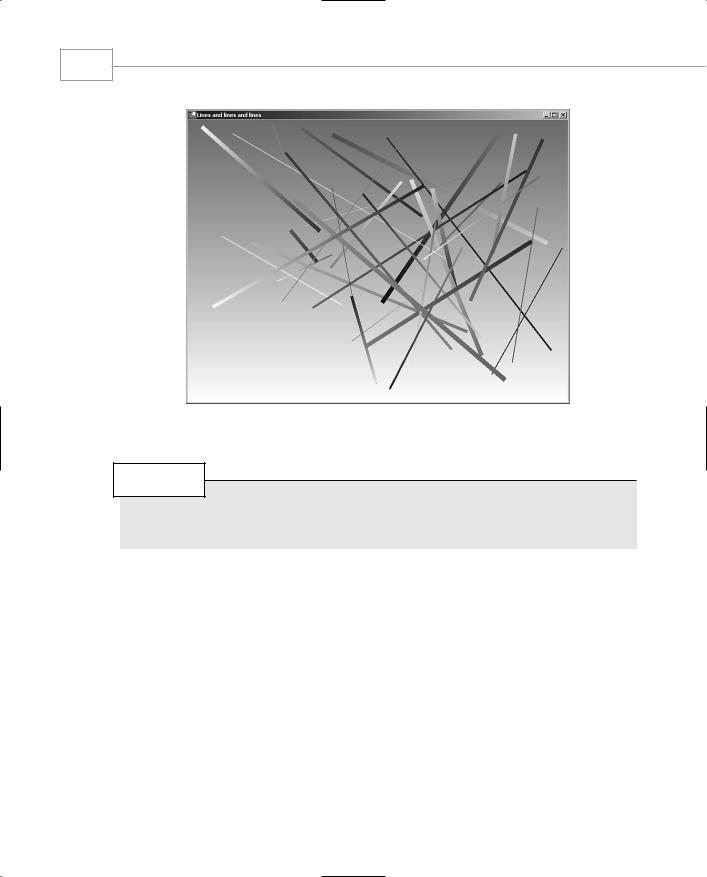
Figure 3.5.1 shows the application running in all it’s garish glory.

Windows Forms
338
PART III
FIGURE 3.5.1
The modified DrawLines program.
NOTE
You might notice that the pen itself uses a brush for filling its internal color. You can also use a hatch brush or a pattern brush to draw a line. This is very powerful indeed.
Textured Pens and Brushes
You saw in the previous example that a pen can be given a brush with which to paint the line. Brushes can be solid, gradients, textures, or hatch patterns. A textured brush can be used to draw lines that are painted with a bitmap image. To accomplish this, you can load in a bitmap from a file or a resource, create a brush with it, pass the brush to a pen, and finally draw your lines with the pen. The following snippet of code shows this process:
Image i=Image.FromFile(“stone.bmp”); TextureBrush b= new TextureBrush(i); Pen p=new Pen(b,10); e.Graphics.DrawLine(p,0,0,100,100); p.Dispose();
As you can see, a ridiculously simple thing to do.

GDI+: The .NET Graphics Interface
339
CHAPTER 3.5
Tidying up Your Lines with Endcaps
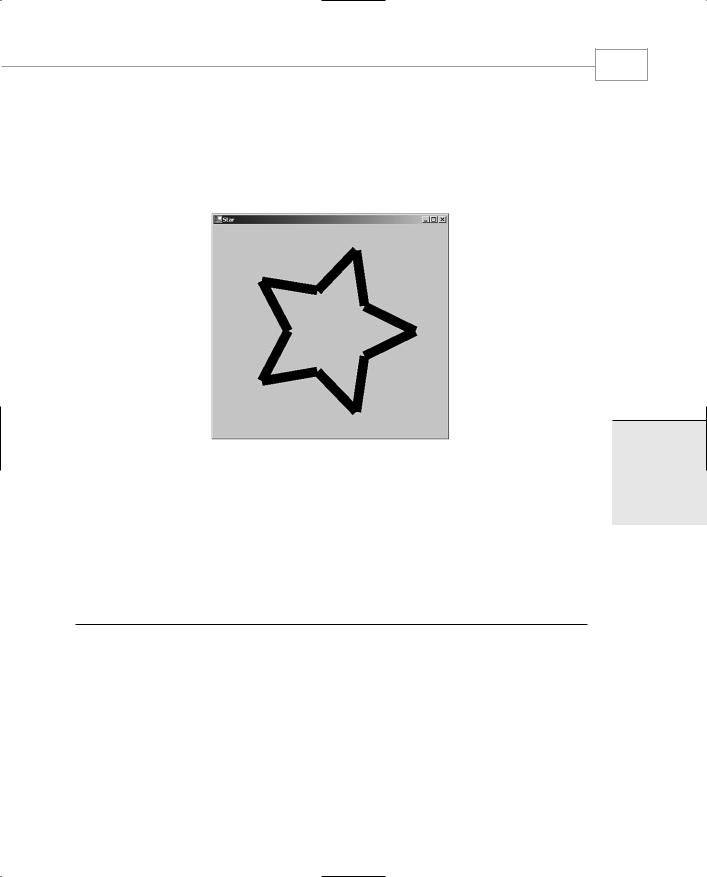
The line segments shown in Figure 3.5.1 have ends that are cut squarely and might not be good for drawing polygons. Figure 3.5.2 shows how wide lines with square ends look when used to draw a simple star.
FIGURE 3.5.2
Flat end caps used in a polygon.
As you can see, the flat end caps make a mess of the shape where the lines join. To tidy this up, we can specify a rounded end cap for the lines. Pens have two properties, StartCap and EndCap, that can be set to draw specialized ends on your lines. In Listing 3.5.3, we show the program that draws the star and allows you to turn end caps on or off with a button on the form.
LISTING 3.5.3 DrawStar.cs: The Line Cap Example
1:using System;
2:using System.Drawing;
3:using System.Drawing.Drawing2D;
4:using System.Windows.Forms;
5:
6:class drawstar : System.Windows.Forms.Form
7:{
8:Button button1;
9:
10: bool EndCap;
3.5
T GDI+:RAPHICSGNTERFACEI . HE NET

Windows Forms
340
PART III
LISTING 3.5.3 Continued
11:
12:public void OnPaint(object sender, PaintEventArgs e)
13:{
14:Pen pen=new Pen(Color.Black,(float)20.0);
15:if(EndCap)
16:{
17:pen.StartCap=LineCap.Round;
18:pen.EndCap=LineCap.Round;
19:}
20:
21:float r36 = (float)(36.0 * 3.1415926 / 180);
22:Point Center=new Point(this.ClientRectangle.Width/2,
23: |
this.ClientRectangle.Height/2); |
24:float Pointsize = (float)0.8*Math.Min(Center.X,Center.Y);
25:for(int i=0; i<10; i++)
26:{
27:float d1=(i & 1)==1 ? Pointsize / 2 : Pointsize;
28:float d2=(i & 1)==0 ? Pointsize / 2 : Pointsize;
29:e.Graphics.DrawLine(pen,
30:new Point((int)(d1*Math.Cos(r36*i))+Center.X,
31: (int)(d1*Math.Sin(r36*i))+Center.Y),
32:new Point((int)(d2*Math.Cos(r36*(i+1)))+Center.X,
33: (int)(d2*Math.Sin(r36*(i+1))+Center.Y)));
34:}
35:pen.Dispose();
36:}
37:
38:public void OnSizeChanged(object sender, EventArgs e)
39:{
40:Invalidate();
41:}
42:
43:public void OnClickedButton1(object sender, EventArgs e)
44:{
45:EndCap = !EndCap;
46:Invalidate();
47:}
48:
49:public drawstar()
50:{
51:this.Paint+=new PaintEventHandler(OnPaint);
52:this.Text=”Star”;
53:this.SizeChanged+=new EventHandler(OnSizeChanged);
