

- •Contents
- •What Is C#?
- •C# Versus Other Programming Languages
- •Preparing to Program
- •The Program Development Cycle
- •Your First C# Program
- •Types of C# Programs
- •Summary
- •Workshop
- •C# Applications
- •Basic Parts of a C# Application
- •Structure of a C# Application
- •Analysis of Listing 2.1
- •Object-Oriented Programming (OOP)
- •Displaying Basic Information
- •Summary
- •Workshop
- •Variables
- •Using Variables
- •Understanding Your Computer’s Memory
- •C# Data Types
- •Numeric Variable Types
- •Literals Versus Variables
- •Constants
- •Reference Types
- •Summary
- •Workshop
- •Types of Operators
- •Punctuators
- •The Basic Assignment Operator
- •Mathematical/Arithmetic Operators
- •Relational Operators
- •Logical Bitwise Operators
- •Type Operators
- •The sizeof Operator
- •The Conditional Operator
- •Understanding Operator Precedence
- •Converting Data Types
- •Understanding Operator Promotion
- •For Those Brave Enough
- •Summary
- •Workshop
- •Controlling Program Flow
- •Using Selection Statements
- •Using Iteration Statements
- •Using goto
- •Nesting Flow
- •Summary
- •Workshop
- •Introduction
- •Abstraction and Encapsulation
- •An Interactive Hello World! Program
- •Basic Elements of Hello.cs
- •A Few Fundamental Observations
- •Summary
- •Review Questions
- •Programming Exercises
- •Introduction
- •Essential Elements of SimpleCalculator.cs
- •A Closer Look at SimpleCalculator.cs
- •Simplifying Your Code with Methods
- •Summary
- •Review Questions
- •Programming Exercises
- •Introduction
- •Lexical Structure
- •Some Thoughts on Elevator Simulations
- •Concepts, Goals and Solutions in an Elevator Simulation Program: Collecting Valuable Statistics for Evaluating an Elevator System
- •A Deeper Analysis of SimpleElevatorSimulation.cs
- •Class Relationships and UML
- •Summary
- •Review Questions
- •Programming Exercises
- •The Hello Windows Forms Application
- •Creating and Using an Event Handler
- •Defining the Border Style of the Form
- •Adding a Menu
- •Adding a Menu Shortcut
- •Handling Events from Menus
- •Dialogs
- •Creating Dialogs
- •Using Controls
- •Data Binding Strategies
- •Data Binding Sources
- •Simple Binding
- •Simple Binding to a DataSet
- •Complex Binding of Controls to Data
- •Binding Controls to Databases Using ADO.NET
- •Creating a Database Viewer with Visual Studio and ADO.NET
- •Resources in .NET
- •Localization Nuts and Bolts
- •.NET Resource Management Classes
- •Creating Text Resources
- •Using Visual Studio.NET for Internationalization
- •Image Resources
- •Using Image Lists
- •Programmatic Access to Resources
- •Reading and Writing RESX XML Files
- •The Basic Principles of GDI+
- •The Graphics Object
- •Graphics Coordinates
- •Drawing Lines and Simple Shapes
- •Using Gradient Pens and Brushes
- •Textured Pens and Brushes
- •Tidying up Your Lines with Endcaps
- •Curves and Paths
- •The GraphicsPath Object
- •Clipping with Paths and Regions
- •Transformations
- •Alpha Blending
- •Alpha Blending of Images
- •Other Color Space Manipulations
- •Using the Properties and Property Attributes
- •Demonstration Application: FormPaint.exe
- •Why Use Web Services?
- •Implementing Your First Web Service
- •Testing the Web Service
- •Implementing the Web Service Client
- •Understanding How Web Services Work
- •Summary
- •Workshop
- •How Do Web References Work?
- •What Is UDDI?
- •Summary
- •Workshop
- •Passing Parameters and Web Services
- •Accessing Data with Web Services
- •Summary
- •Workshop
- •Managing State in Web Services
- •Dealing with Slow Services
- •Workshop
- •Creating New Threads
- •Synchronization
- •Summary
- •The String Class
- •The StringBuilder Class
- •String Formatting
- •Regular Expressions
- •Summary
- •Discovering Program Information
- •Dynamically Activating Code
- •Reflection.Emit
- •Summary
- •Simple Debugging
- •Conditional Debugging
- •Runtime Tracing
- •Making Assertions
- •Summary

Data Bound Controls
293
CHAPTER 3.3
So far, you have seen data binding to DataSets and DataTables created on-the-fly by the listing examples. A good real world example will be to show complex binding to an existing database.
The objects we have been using to store and manipulate the data are parts of the ADO.NET framework. This system allows high level interaction with database tables from many different database providers. ADO.NET can be used in conjunction with OleDB, SQL, and other database drivers. Take a look now at an example of complex bound database usage.
Binding Controls to Databases Using ADO.NET
ADO.NET employs a disconnected database model that uses data tables on the client machine to cache information while it is viewed or manipulated. Even when the database is stored on the same machine as the editing program, ADO.NET will copy a snapshot of data into a DataSet and pass changes back to the database later.
This model is used to allow better scaling of the database application over a network because it obviates the need for many, simultaneous, open connections to the database.
Data tables are very structured and hierarchical. This makes XML an ideal medium for transmitting and storing data. Indeed, when ADO makes a connection to a database, the information will be transported as XML. This means that your software can take advantage of intranet and Internet data stores just as easily as it can local databases.
It is important to note that transporting large amounts of data to and from databases becomes more demanding as the database becomes more disconnected from the client. Modern n-tier systems often employ many databases in different geographical locations and Web services to provide data on demand to many clients. This means that your client application should try to use small chunks of data that can be refreshed quickly and with as little strain as possible on network bandwidth. For this reason, many modern data systems employ a messaging architecture that deals with data transactions at a very granular level. It often has been the responsibility of the application programmer to devise and manage schemes for such transactions, but the high level abilities of ADO.NET hide much of that pain from you and allow you to be more productive with data.
Visual StudioVisual StudioData is copied to or from DataSet by a DataAdapter. ADO.NET provides two main DataAdapter types, the OleDBDataAdapter that connects DataSets to OLE DB data providers and the SqlDataAdapter, targeting SQL server connections. Both of these data adapter classes use a set of Command objects to perform selects, updates, inserts, and deletes in the databases to which they connect. The Select command gets data from the data source. The Update, Delete, and Insert commands all change the data source based on changes made to the DataSet.
3.3
OUNDB ATAD
ONTROLSC

Windows Forms
294
PART III
Filling a DataSet with information from a database is fairly simple. The steps to perform are shown in the code snippet that follows:
1:System.Data.OleDb.OleDbConnection connection =
2:new System.Data.OleDb.OleDbConnection();
3:connection.ConnectionString=
4:@”Provider=Microsoft.Jet.OLEDB.4.0;”+
5:@”Data Source=northwind.mdb; “;
6:System.Data.OleDb.OleDbCommand SelectCommand=
7:new System.Data.OleDb.OleDbCommand(“SELECT * FROM Customers”);
8:SelectCommand.Connection=connection;
9:System.Data.DataSet ds=new System.Data.DataSet(“Customer Table”);
10:ds.Tables.Add(“Customers”);
11:System.Data.OleDb.OleDbDataAdapter adapter =
12:new System.Data.OleDb.OleDbDataAdapter(SelectCommand);
13:adapter.Fill(ds);
14:Console.WriteLine(ds.GetXml());
This snippet assumes that the NortWind database northwind.mdb is available in the local directory.
Lines 1–5 create an OleDbConnection and set the connection string.
Lines 6 and 7 create the SelectCommand and populate the select string with a valid query.
Line 8 associates the database connection with the select command, while lines 9 and 10 create a DataSet object and add one table to it.
Lines 11 and 12 create a data adapter and add the select command. Line 13 fills the data set from the adapter and finally, to prove it actually did something, the last line dumps the whole northwing customer table from the DataSet as XML.
From the point of view of your own productivity, you will most likely perform such an operation using the Visual Studio.NET IDE to create the application. Databinding using Visual Studio generates some enormous blocks of code and does a very comprehensive job of connecting up your database. We have generally avoided using Visual Studio until now because the layout of applications created in this manner is not easily read and there are sometimes dire consequences when you edit the code generated by the studio. In this case, however, a good exercise will be to do a complete walk through of a database viewer using the IDE and then examine the resulting application to see what it does.
Creating a Database Viewer with Visual Studio and ADO.NET
Follow these steps carefully to create the application.

Data Bound Controls
295
CHAPTER 3.3
1.Create a new Windows Forms project, and call it DBBind.
2.Drag a DataGrid from the toolbox and position it on the form. Select the DataGrid properties and set the Dock property to Fill by clicking the center button in the UI editor that pops up for the Dock property.
3.From the toolbar, select an OleDbDataAdapter from the Data tab. When you place it on the form, you’ll see the Data Adapter Configuration Wizard dialog.
4.On the first page of the wizard, select the Northwind database. You may need to click New Connection, select Microsoft Jet 4.0 OLE DB Provider in the Provider tab, press Next, and then browse for northwind.mdb. When you find it, or another database with which you are familiar, press the Test Connection button to ensure that the database is useable. Press OK on the New Connection dialog and press Next on the wizard.
5.Select the radio button marked Use SQL Statements. Press Next.
6.Type in a query that you know or select the query builder to create querys from the tables in the connected database. For our example, we used the query builder, added the Customers table from NorthWind, selected the check box marked All Columns on the
table shown, and pressed OK on the query builder dialog.
7.Pressing Next shows you the successful creation of the adapter and the connection, and you can click the Finish button. At this point, you will have a form with two objects, an
OleDbDataAdapter and an OleDbConnection in the icon tray.
8.Select the OleDbDataAdapter in the icon tray. Below the property browser, you will see a link that reads Generate DataSet. Click this link to create a dataset. Simply click OK on the following dialog; the default values are good. Now you’ll have three icons in the tray.
9.Select the DataGrid on the form again and edit the DataSource property using the dropdown combo box provided. You will see several data sources. If you have followed along and used the NorthWind database, select the dataSet11.Customers choice. When you do this, you’ll see the DataGrid on the form begin to display all the column headers for the database.
10.The final step is a manual one. You need to edit the constructor of the class to add the Fill command. Add the following line of code after the InitializeComponent call in the class constructor;
this.oleDbDataAdapter1.Fill(this.dataSet11);
Now you can build and run the program by pressing F5.
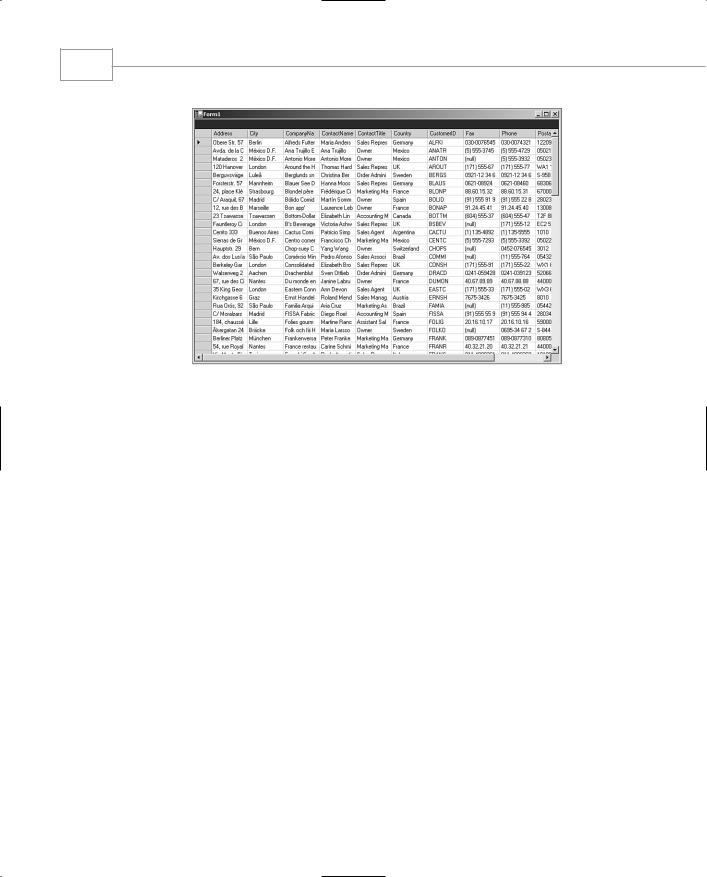
You will see the application shown in Figure 3.3.4, which will allow you to browse, order, edit, and generally muck-about with the NorthWind Customers table.
3.3
OUNDB ATAD
ONTROLSC
Windows Forms
296
PART III
FIGURE 3.3.4
Complex DataBinding of the DataGrid to a database.
As an education, go back into the Visual Studio editor again and find the InitializeComponent method. It will probably be folded away in a little region and you’ll have to expand it. Take a look at the code added by the DataAdapter wizard to set up the OleDataAdapter connection and the four datbase command objects.
As performing the walk through will generate the code for you, we won’t list it here and save a small forest or two. You can clearly see that the wizards and helpers in ADO.NET really save your fingers.
Summary
In this chapter, we looked at the basic principals of data binding in .NET and saw how the power of the .NET controls can work for us to create a very productive environment. We saw how simple binding works for single data items and single controls. We then saw how complex binding works for the DataGrid both in isolation with a locally created data table and using a full database through ADO.NET.
We’re keeping the focus on Windows Forms now as we continue with Chapter 3.4, “Windows Forms Example Application (Scribble. NET),” which deals with more component usage, including the use of resources as a means of decorating your GUI elements.

Windows Forms Example
Application (Scribble .NET)
IN THIS CHAPTER
• |
Resources in .NET |
298 |
• |
Localization Nuts and Bolts 298 |
|
• |
.NET Resource Management |
|
|
Classes 299 |
|
• |
Creating Text Resources 301 |
|
• |
Using Visual Studio.NET for |
|
|
Internationalization 308 |
|
• |
Image Resources |
310 |
• |
Using Image Lists |
311 |
•Programmatic Access to Resources 315
• Reading and Writing RESX XML Files 321
CHAPTER
3.4