


Windows Forms
190
PART III
Windows Forms is the .NET replacement for MFC. Unlike the MFC library, which was a thin(ish) wrapper on the Win32 API, Windows Forms is a totally object-oriented, hierarchical answer to Windows development under .NET.
Despite its “Forms” epithet, the layout of components is not done with a resource file as is the case in MFC dialogs and form windows. Every component is a concrete instance of a class. Placement of the components and control of their properties are accomplished by programming them via their methods and accessors. The drag-and-drop tools used to define a Windows Form are actually maintaining the source code that initializes, places, and allows interaction with a target application.
Resource files are used by Windows Forms for tasks such as placing images on the form or storing localized text, but not in the familiar format that has been used by Windows since the 1980s. As you might expect, the new resource file format is an XML file. We’ll examine resources in more detail in Chapter 3.4, “Windows Forms Example Application (Scribble
.NET).”
Windows Forms layout can be done by dragging components from a tool palette onto a form. You can use VS.NET for this or alternatively, if you really want the whole hands-on experience, you can lay out your forms by coding the objects directly in C#, VB, managed C++, or any of the .NET languages. To give you the benefit of understanding what really goes on in a Windows Form, we won’t be dealing with any of the design tools early in this section. Rather, we will do as much as possible by hand and then, when you understand the basics, move on to using the drag-and-drop tools.
User interaction in Windows Forms is accomplished through events. The components provide event sources, such as mouse movement, position, and button clicks, and then you wire the events to handlers. These are functions called by a standard form of delegate, which means there are no message maps of which to keep track.
The Hello Windows Forms Application
Listing 3.1.1 is a simple Windows Forms application that displays the text “Hello Windows Forms!” in a label on the main form.
LISTING 3.1.1 HWF.cs: The Hello Windows Forms Application
// HWF.cs
namespace HelloWindowsFormsNamespace {
using System;
using System.Drawing;
using System.ComponentModel; using System.WinForms;
Introduction to Windows Forms
CHAPTER 3.1
LISTING 3.1.1 Continued
public class HelloWindowsForms : System.WinForms.Form
{
//Label 1 displays the text message “Hello Windows Forms!” private System.WinForms.Label label1;
//The constructor is where all initialization happens.
//Forms created with the designer have an InitializeComponent() method. public HelloWindowsForms()
{
this.label1 = new System.WinForms.Label();
label1.Location = new System.Drawing.Point(8, 8); label1.Text = “Hello Windows Forms!”;
label1.Size = new System.Drawing.Size(408, 48);
label1.Font = new System.Drawing.Font(“Microsoft Sans Serif”, 24f); label1.TabIndex = 0;
label1.TextAlign = System.WinForms.HorizontalAlignment.Center;
this.Text = “Hello World”; this.MaximizeBox = false;
this.AutoScaleBaseSize = new System.Drawing.Size(5, 13); this.BorderStyle = System.WinForms.FormBorderStyle.FixedDialog; this.MinimizeBox = false;
this.ClientSize = new System.Drawing.Size(426, 55); this.Controls.Add(label1);
}
// This main function instantiates a new form and runs it. public static void Main(string[] args)
{
Application.Run(new HelloWindowsForms());
}
}
} // end of namespace
You can see that the class HelloWindowsForms contains a simple label component, label1. It has only two methods: a static Main method that creates and runs an instance of the
HelloWindowsForms class and a constructor in which all of the component initialization occurs.
This shows the minimum functionality and minimum complication of the Windows Forms system. Programs designed and maintained by VS.NET or WinDes.exe have some added functions and data members that detract from the simplicity of this example, but are necessary for the RAD environments to keep track of the form design.
191
3.1
TO NTRODUCTIONI
ORMSF INDOWSW
Windows Forms
192
PART III
To build the executable, we have prepared a small batch file that creates a Windows executable and references all the correct library DLLs. Using this batch file will allow you to stay away from the Visual Studio build environment for a while—because it hides too much of the important information—and concentrate on the actual functionality. Listing 3.1.2 shows build.bat.
LISTING 3.1.2 build.bat
csc /t:winexe /r:Microsoft.win32.Interop.dll, system.dll,system.configuration.dll, system.data.dll,system.diagnostics.dll, system.drawing.dll,
system.winforms.dll /out:%1.exe %1.cs
%2 %3 %4 %5 %6 %7 %8 %9
build.bat is available with the software that accompanies this book, but if you want to type it in yourself, make sure that it’s all on the same line and there are no spaces between the libraries named in the /r: reference directive. To use build.bat, simply type build followed by the name of the .cs file to compile. For example
build HWF
will compile the HWF.cs file and create HWF.exe.
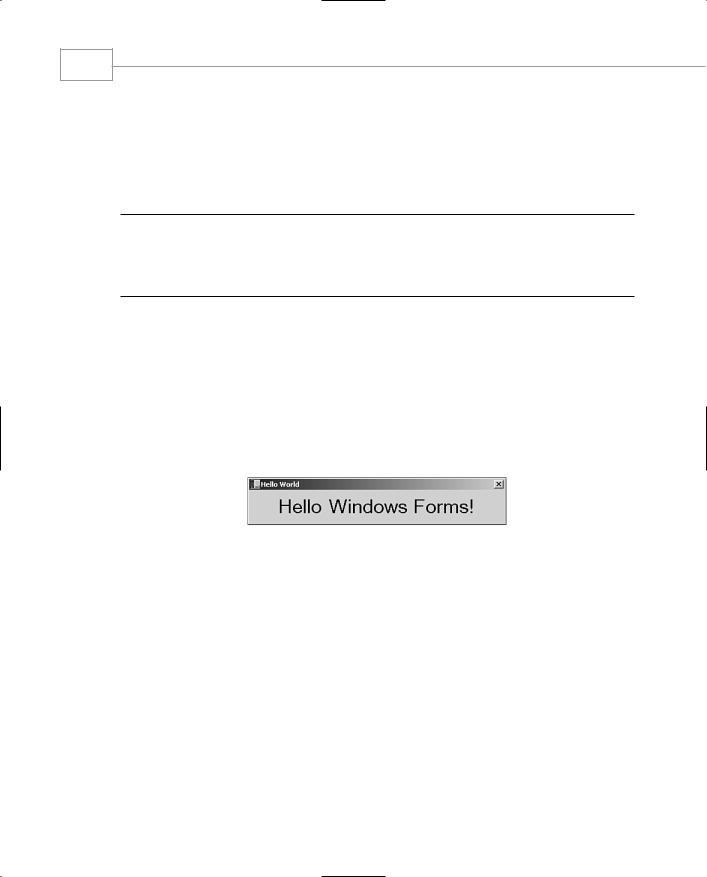
Running the hwf.exe program will produce a form shown in Figure 3.1.1.
FIGURE 3.1.1
The Hello Windows Forms Application.
Creating and Using an Event Handler
If you’re familiar with Windows C development, you will understand the idea of handling messages as they arrive by the action of the WndProc switch statement. If you have been working with MFC, you will know that messages are routed through the message map of your application. Under .NET the message routing system is provided by delegates. Your application will define event handlers that are called through a delegate whenever a message arrives. Button clicks for example, can be handled by using a generic EventHandler delegate. Other types of events, such as mouse events or timer events, are serviced through specific handlers that have their own delegate signatures.
Introduction to Windows Forms
193
CHAPTER 3.1
Adding a button to the Windows Forms application is simple. You can add a button member to the class, initialize it in the constructor, and place it in the controls collection.
When this is done, you can wire up an event that is trapped whenever the button is clicked. Events sent through the system are hooked to event handlers of a specific signature by a multicast delegate that is declared especially for this purpose. Your event handlers must all have the following method signature:
void EventMethodName(Object sender, EventArgs e);
Event handlers are added to the control’s event sources with the += operator and removed with the -= operator, so events can be modified dynamically at runtime. Because events are multicast, you can add more than one handler at a time to the same event.
Listing 3.1.3 shows the modified file HWFButton.cs.
LISTING 3.1.3 HWFButton.cs: Hello Windows Forms with a Simple Button Handler
// HWFButton.cs
namespace HelloWindowsFormsNamespace {
using System;
using System.Drawing;
using System.ComponentModel; using System.WinForms;
public class HelloWindowsForms : System.WinForms.Form
{
//Label 1 displays the text message “Hello Windows Forms!” private System.WinForms.Label label1;
//Adding a button member allows us to place a button on the panel. private System.WinForms.Button button1;
//The constructor is where all initialization happens.
//Forms created with the designer have an InitializeComponent() method. public HelloWindowsForms()
{
this.label1 = new System.WinForms.Label();
label1.Location = new System.Drawing.Point(8, 8); label1.Text = “Hello Windows Forms!”;
label1.Size = new System.Drawing.Size(408, 48);
3.1
TO NTRODUCTIONI
ORMSF INDOWSW

Windows Forms
194
PART III
LISTING 3.1.3 Continued
label1.Font = new System.Drawing.Font(“Microsoft Sans Serif”, 24f); label1.TabIndex = 0;
label1.TextAlign = System.WinForms.HorizontalAlignment.Center;
this.button1=new System.WinForms.Button();
button1.Location=new System.Drawing.Point(8,58); button1.Size = new System.Drawing.Size(408,25); button1.Text = “Click Me!”;
button1.TabIndex = 1;
button1.Click += new EventHandler(OnButton1Clicked);
this.Text = “Hello World”; this.MaximizeBox = false;
this.AutoScaleBaseSize = new System.Drawing.Size(5, 13); this.BorderStyle = System.WinForms.FormBorderStyle.FixedDialog; this.MinimizeBox = false;
this.ClientSize = new System.Drawing.Size(426, 85);
this.Controls.Add(label1);
this.Controls.Add(button1);
}
void OnButton1Clicked(Object sender,EventArgs e)
{
if(this.label1.Text == “Hello Windows Forms!”) this.label1.Text = “You Clicked?”;
else
this.label1.Text = “Hello Windows Forms!”;
}
// This main function instantiates a new form and runs it. public static void Main(string[] args)
{
Application.Run(new HelloWindowsForms());
}
}
} // end of namespace
Type in Listing 3.1.3 and build it with the build batch file. Running the sample will show a window that has the same message and a clickable button. The button handler simply swaps the text in the label control to verify that the handler worked.