- •Contents
- •What Is C#?
- •C# Versus Other Programming Languages
- •Preparing to Program
- •The Program Development Cycle
- •Your First C# Program
- •Types of C# Programs
- •Summary
- •Workshop
- •C# Applications
- •Basic Parts of a C# Application
- •Structure of a C# Application
- •Analysis of Listing 2.1
- •Object-Oriented Programming (OOP)
- •Displaying Basic Information
- •Summary
- •Workshop
- •Variables
- •Using Variables
- •Understanding Your Computer’s Memory
- •C# Data Types
- •Numeric Variable Types
- •Literals Versus Variables
- •Constants
- •Reference Types
- •Summary
- •Workshop
- •Types of Operators
- •Punctuators
- •The Basic Assignment Operator
- •Mathematical/Arithmetic Operators
- •Relational Operators
- •Logical Bitwise Operators
- •Type Operators
- •The sizeof Operator
- •The Conditional Operator
- •Understanding Operator Precedence
- •Converting Data Types
- •Understanding Operator Promotion
- •For Those Brave Enough
- •Summary
- •Workshop
- •Controlling Program Flow
- •Using Selection Statements
- •Using Iteration Statements
- •Using goto
- •Nesting Flow
- •Summary
- •Workshop
- •Introduction
- •Abstraction and Encapsulation
- •An Interactive Hello World! Program
- •Basic Elements of Hello.cs
- •A Few Fundamental Observations
- •Summary
- •Review Questions
- •Programming Exercises
- •Introduction
- •Essential Elements of SimpleCalculator.cs
- •A Closer Look at SimpleCalculator.cs
- •Simplifying Your Code with Methods
- •Summary
- •Review Questions
- •Programming Exercises
- •Introduction
- •Lexical Structure
- •Some Thoughts on Elevator Simulations
- •Concepts, Goals and Solutions in an Elevator Simulation Program: Collecting Valuable Statistics for Evaluating an Elevator System
- •A Deeper Analysis of SimpleElevatorSimulation.cs
- •Class Relationships and UML
- •Summary
- •Review Questions
- •Programming Exercises
- •The Hello Windows Forms Application
- •Creating and Using an Event Handler
- •Defining the Border Style of the Form
- •Adding a Menu
- •Adding a Menu Shortcut
- •Handling Events from Menus
- •Dialogs
- •Creating Dialogs
- •Using Controls
- •Data Binding Strategies
- •Data Binding Sources
- •Simple Binding
- •Simple Binding to a DataSet
- •Complex Binding of Controls to Data
- •Binding Controls to Databases Using ADO.NET
- •Creating a Database Viewer with Visual Studio and ADO.NET
- •Resources in .NET
- •Localization Nuts and Bolts
- •.NET Resource Management Classes
- •Creating Text Resources
- •Using Visual Studio.NET for Internationalization
- •Image Resources
- •Using Image Lists
- •Programmatic Access to Resources
- •Reading and Writing RESX XML Files
- •The Basic Principles of GDI+
- •The Graphics Object
- •Graphics Coordinates
- •Drawing Lines and Simple Shapes
- •Using Gradient Pens and Brushes
- •Textured Pens and Brushes
- •Tidying up Your Lines with Endcaps
- •Curves and Paths
- •The GraphicsPath Object
- •Clipping with Paths and Regions
- •Transformations
- •Alpha Blending
- •Alpha Blending of Images
- •Other Color Space Manipulations
- •Using the Properties and Property Attributes
- •Demonstration Application: FormPaint.exe
- •Why Use Web Services?
- •Implementing Your First Web Service
- •Testing the Web Service
- •Implementing the Web Service Client
- •Understanding How Web Services Work
- •Summary
- •Workshop
- •How Do Web References Work?
- •What Is UDDI?
- •Summary
- •Workshop
- •Passing Parameters and Web Services
- •Accessing Data with Web Services
- •Summary
- •Workshop
- •Managing State in Web Services
- •Dealing with Slow Services
- •Workshop
- •Creating New Threads
- •Synchronization
- •Summary
- •The String Class
- •The StringBuilder Class
- •String Formatting
- •Regular Expressions
- •Summary
- •Discovering Program Information
- •Dynamically Activating Code
- •Reflection.Emit
- •Summary
- •Simple Debugging
- •Conditional Debugging
- •Runtime Tracing
- •Making Assertions
- •Summary
Introduction to Windows Forms
195
CHAPTER 3.1
NOTE
Note that the code in Listing 3.1.3 uses the fully qualified name for the components and methods:
button1.Size = new System.Drawing.Size(408,25);
This longhand form is not always necessary. You could abbreviate the line above to
button1.Size = new Size(408,25);
Layout tools will always give you the longhand version because they never get tired of typing.
Generally, if the object you’re creating is in a namespace you declared you were using, you can use the shorthand.
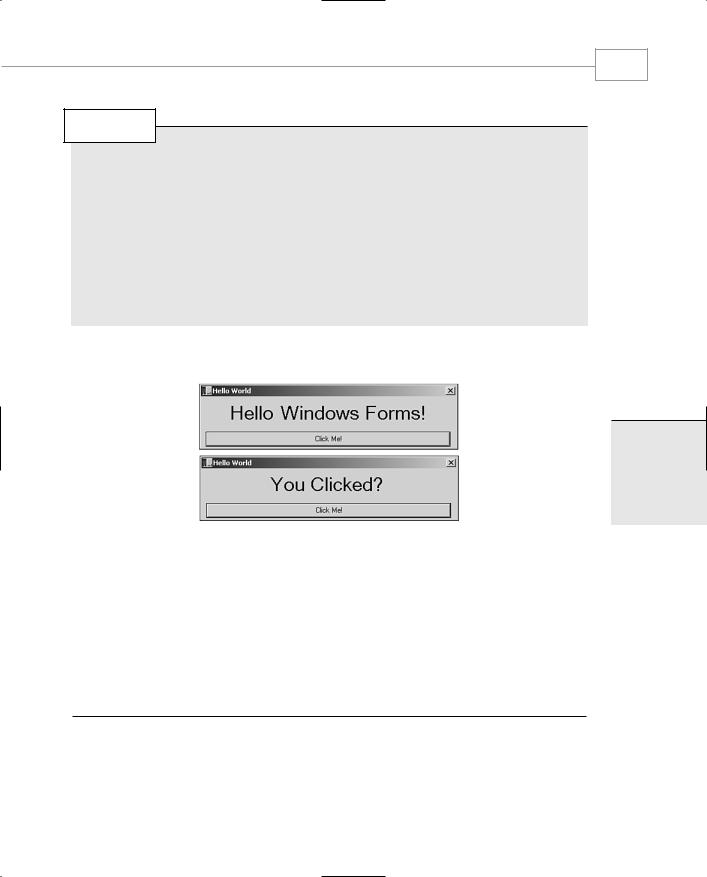
When you run the file, you will see the application shown in Figure 3.1.2.
3.1
TO NTRODUCTIONI
ORMSF INDOWSW
FIGURE 3.1.2
Using a simple Click Handler.
Defining the Border Style of the Form
The previous examples are both simple, fixed-size forms that have no minimize or restore button. The border style of the form object controls how a form is shown and if it can be resized.
Listing 3.1.4 shows a very simple Windows Forms application with a sizable client area.
LISTING 3.1.4 resize.cs: A Simple Resizable Windows Forms Application
using System;
using System.Drawing;
using System.ComponentModel; using System.WinForms;
Windows Forms
196
PART III
LISTING 3.1.4 Continued
public class SizeApp : System.WinForms.Form
{
public |
SizeApp() |
{ |
|
this.Text = “SizeApp”; this.MaximizeBox = true;
this.BorderStyle = FormBorderStyle.Sizable;
}
static void Main()
{
Application.Run(new SizeApp());
}
}
Building and running this application will result in a resizable application that can also be minimized to the taskbar and restored in the normal way.
Adding a Menu
A Windows application without a menu is a rare thing. A Windows Forms application is no exception. Like the button and label you saw earlier, the menu component can be added to
the Menu member of the main application, and events from the menu items can be hooked to handlers.
Menus under .NET come in two forms. MainMenu is applied to a form to provide the main user interface menu, and ContextMenu is used to respond to right mouse clicks. In both cases, the individual items within the menus are objects of type MenuItem. A menu is constructed as a hierarchy of parent and child objects. The main menu owns the individual drop-downs, which in turn own their menu items.
A typical menu creation sequence is seen in Listing 3.1.5.
LISTING 3.1.5 Constructing a Menu
MainMenu menu = new MainMenu();
MenuItem filemenu = new MenuItem(); filemenu.Text = “File”; menu.MenuItems.Add(filemenu);
MenuItem open = new MenuItem(); open.Text = “Open”; filemenu.MenuItems.Add(open);
Introduction to Windows Forms
197
CHAPTER 3.1
LISTING 3.1.5 Continued
MenuItem save= new MenuItem(); save.Text = “Save”; filemenu.MenuItems.Add(save);
MenuItem exit= new MenuItem(); exit.Text = “Exit”; filemenu.MenuItems.Add(exit);
MenuItem editmenu = new MenuItem(); editmenu.Text = “Edit”;
menu.MenuItems.Add(editmenu);
MenuItem cut= new MenuItem(); cut.Text = “Cut”; editmenu.MenuItems.Add(cut);
MenuItem copy = new MenuItem(); copy.Text = “Copy”; editmenu.MenuItems.Add(copy);
MenuItem paste = new MenuItem(); paste.Text = “Paste”; editmenu.MenuItems.Add(paste);
this.Menu = menu;
The indentation in Listing 3.1.5 illustrates the hierarchy of the menus.
Figure 3.1.3 shows a simple resizable application with a menu added.
3.1
TO NTRODUCTIONI
ORMSF INDOWSW
FIGURE 3.1.3
A simple resizable application with a menu.
Windows Forms
198
PART III
Adding a Menu Shortcut
Placing an ampersand before a character in the menu text will automatically give the menu item an underscore when the Alt key is pressed. The key combination of Alt+F followed by O can be used to invoke the menu handler as if the menu were selected with the mouse.
A direct key combination might also be added to the menu item by using one of the predefined Shortcut enumerations. The File, Open menu item handler can be made to fire in response to a Ctrl+O keypress by adding the shortcut, as shown in Listing 3.1.6.
LISTING 3.1.6 Adding a Shortcut to the File, Open MenuItem
MenuItem filemenu = new MenuItem(); filemenu.Text = “&File”; menu.MenuItems.Add(filemenu);
MenuItem open = new MenuItem(); open.Text = “&Open”; filemenu.MenuItems.Add(open); open.Shortcut = Shortcut.CtrlO; open.ShowShortcut = true;
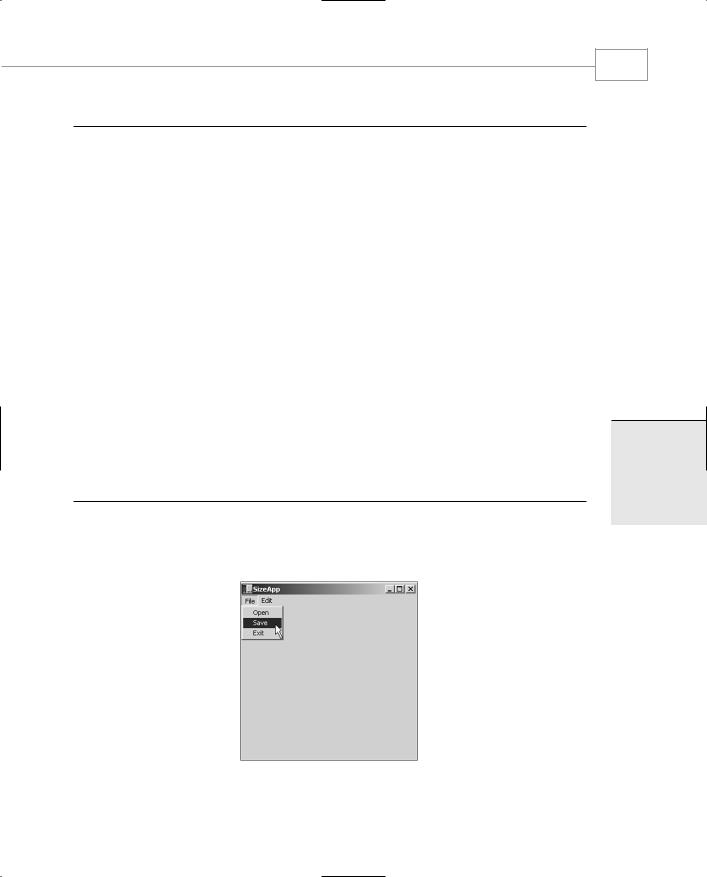
When you press the Alt key, the F in the File menu is underlined. You can press F to pop up the menu and press O to invoke the menu’s function, as shown in Figure 3.1.4.
FIGURE 3.1.4
Menu shortcuts in action.
Note how the Open menu is appended with the shortcut key press combination Ctrl+O by the
MenuItem.ShowShortcut property setting.