

Microsoft ASP .NET Professional Projects - Premier Press
.pdf1.Start Visual Studio.NET.
2.Select File/New/Project.
3.Select Visual C# Projects from the left pane and ASP.NET web services from the right pane. Figure 31.1 shows VS.NET at this stage. (In the Release Candidate version of Visual Studio.NET one can append the project name—CsharpdbService at Location. i.e. http://localhost/CSharpdbService. The Name field is disabled and will automatically display the project name one typed in.)
Figure 31.1: Creating a new C# ASP.NET web service.
4.Type in CSharpdbService for the name.
5.Visual Studio.NET generates a new solution, which creates a reference folder and four files. The Web.config is an XML file, which contains various configuration options (for example, session timeout interval), and which controls the web service at runtime. The file CSharpdbService.vsdisco is an XML file used for dynamic discovery of web services by clients. This means that when you want to use this service in another project, you navigate to this file and VS.NET adds a reference to the service for you. The file Global.asax is where projectwide event handlers (such as ApplicationStart and
ApplicationEnd) reside.
6.Right -click on Service1.asmx and select Open With and then Source Code(Text) Editor (or navigate to the application directory and open the file in Notepad). You will note that this file makes a callout to code that resides in another file (Service1.asmx.cs) as follows:
7.<%@ WebService Language="c#" Codebehind="Service1.asmx.cs" Class="CSharpdbService.Service1" %>
At this stage, you have all the pieces of the web service in place and you just need to code the web services (asmx) file.
Scripting the Web Service
In this section, I will create the web service called dbService. This web service will have two methods, Populate and RunSql, as described in the following steps.
1.Delete the default Service1.asmx file and add a new web service file by right-clicking the project name and choosing Add/Add web service. You can call this web service dbService.asmx.
2.A web service template form is created which includes several namespaces. The following namespaces are included in dbService.asmx.cs:
3.using System;
4.using System.Collections;
5.using System.ComponentModel;
6.using System.Data;
7.using System.Diagnostics;
8.using System.Web;
using System.Web.Services;
Because you need to interact with databases, you will import the namespaces for either the SQL or OleDb Managed Provider. I have chosen to work with the OleDb Managed Provider because I want to keep the dbService web service as generic as possible. Using SQL Managed Provider would limit its use to Microsoft SQL Server databases. You will need to import the OleDb Managed Provider namespace as follows:
using System.Data.OleDb;
The web service is created in the namespace CSharpdbService as shown:
namespace CSharpdbService
{
//all the code goes here
}
The class is called dbService and it inherits from System.Web.Services.WebService. The inheritance is indicated by the use of the colon (:) before the base class, as shown in the following line:
public class dbService : System.Web.Services.WebService dbService has a field called connStr, which you must declare with a private scope as follows:
private String connStr;
The dbService class has a constructor that has no parameters. A constructor is a method that has the same name as the class. Each class has a default constructor, which does not accept any parameters. A class is free to add more constructors that may accept parameters. In the constructor, the connection string is set to the private field connStr as follows:
public dbService()
{
InitializeComponent();
connStr = "Provider=SQLOLEDB; Data Source=(local); ";
connStr = connStr+" Initial Catalog=PUBS;User ID=sa;Password=";
}
9.Two Web Methods need to be created within the body of the dbService class. A Web Method is created like a normal C# method; however, it is preceded by the attribute [WebMethod].
The first method is called Populate and it is used to send a SELECT SQL query to the database and receive the results back in a DataSet. This DataSet can then be used to bind a bound control like the DataGrid. Here is the listing of this method:
[WebMethod]
public DataSet Populate(string SQL)
{
//for queries that return data
//and for binding controls
OleDbConnection myConnection = new OleDbConnection(connStr);
OleDbDataAdapter myCommand = new OleDbDataAdapter(SQL, myConnection);
DataSet ds = new DataSet();
myCommand.Fill(ds, "vTable");
return ds;
}
§ The second method is called RunSQL, which is used to apply an action query to the database. An action query, as you know, is a SQL query, such as insert, delete, or update, which performs an action against a database and does not return any data. This method accepts a valid SQL insert, delete, or update query and applies it to the database. Here is the code for this method:
§[WebMethod]
§public String RunSQL( string vsql)
§{
§try
§{
§OleDbConnection myConnection = new OleDbConnection(connStr);
§OleDbCommand mycommand = new OleDbCommand(vsql,myConnection);
§myConnection.Open();
§mycommand.ExecuteNonQuery();
§myConnection.Close();
§return("OK");
§
§}
§catch(Exception e)
§{
§string ret = "Exception: " + e.ToString() ;
§return ret;
§}
}
Your web service is now ready. You can test it by right-clicking the web service asmx file (dbService.asmx) in the Solution Explorer and selecting Set As Start Page. Now press F5 to build and display the web service test page as shown in Figure 31.2.
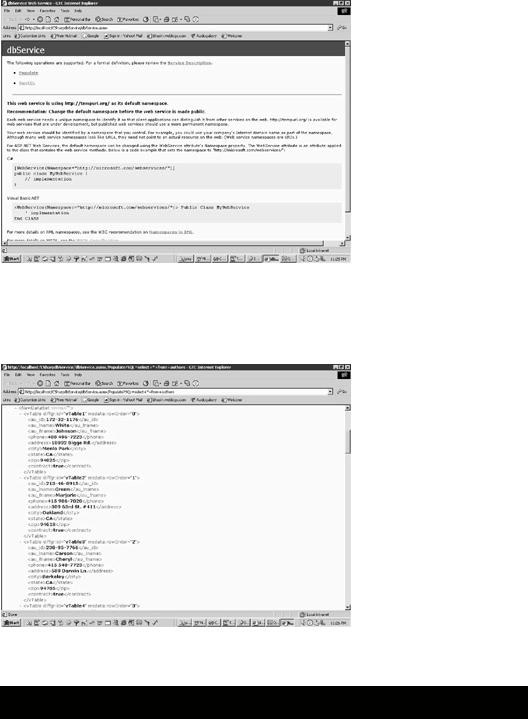
Figure 31.2: The test page for the web service.
Now, click on the method Populate. In the page that appears provide the parameter value:
Select * from authors
When you click on the invoke button, all the records from the authors table are displayed in XML format as shown in Figure 31.3.
Figure 31.3: The Populate method returns database rows as XML.
Here is the complete code listing of the web service: dbService.asmx
using System;
using System.Collections;
using System.ComponentModel;
using System.Data;
using System.Diagnostics;
using System.Web;

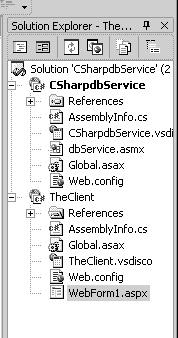
You will see both the projects in the Solution Explorer, as shown in Figure 31.5.
Figure 31.5: The two projects displayed in the Solution Explorer.
4.Right -click on the aspx form called WebForm1.aspx, which was created by default, and mark it as the startup page by selecting Set as Start Page. You also need to mark the project TheClient as the startup project. To do this right-click on the project name in the Solution Explorer and select Set as StartUp Project.
5.Right -click on an empty portion of the form and select Properties. Make sure that the Page Layout property is GridLayout. With GridLayout, you are able to drag the controls and position them visually on the form. Drag one DropDownList control, two Label controls, one DataGrid control, and two Button controls onto the form. Right-click on each of the buttons to bring up their Properties page and give them IDs of Populate and RunSql. The first label control is used to give a descriptive title to the form. The second label is given an ID of messages. Bring up the property pages for the DropDownList control (right-click on it and select Properties). Locate the items property and click on the three dots (ellipsis) beside it to bring up the ListItem Collection Editor. Click on the Add button located at the bottom of this panel. You need to add a few SELECT SQL queries in the Value input box. For example, you can enter the following queries:
6.Select * from authors
7.Select * from titles
8.Select * from publishers
Select * from pub_info where pub_id = "9999"
The user will select one of these SELECT query statements from the dropdown list, which will be passed to the Populate method of the web service. The web service will return a DataSet, which will be used to bind the DataGrid.
I have beautified the Web page by right -clicking on an empty portion of the form and selecting Properties. This brings up the Document Property Pages window, from where I selected the Color and Margins tab. I clicked on the three dots (ellipsis) appearing next to the BackGround color box and visually selected a background color for the form. This was the color #ffcc99.
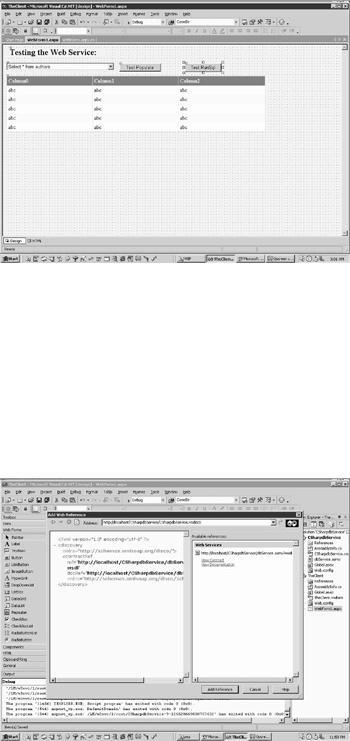
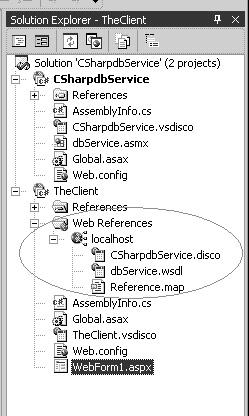
Figure 31.8: Reference to web service in the Solutions Explorer.
10.Now add a few lines of code to make it all work. First declare and instantiate the web service as follows:
private localhost.dbService mydbService = new localhost.dbService();
§ Now code the click event of Button1. Please note that the click events of the two buttons must appear after the InitializeComponent() method as the delegates for the click events for these buttons are created in this method. If you place these events before the InitializeComponent() method, they will not fire.
§private void Populate_Click(object sender, System.EventArgs e)
§{
§DataSet ds = new DataSet();
§String s = DropDownList1.SelectedItem.ToString();
§ds = mydbService.Populate(s);
§DataGrid1.DataSource=ds;
§DataGrid1.DataBind();
}
§ This tests the Populate method. The user-selected SELECT query is sent to the Populate method of the web service. A DataSet is returned which is used to bind the DataGrid.
§The web form after you press F5 and test the Populate method should look like the screenshot in Figure 31.9.
§To Test the RunSQL method of the web service, add the following code behind the click event of the RunSql button.
§private void RunSql_Click(object sender, System.EventArgs e)
§{
§