

Microsoft ASP .NET Professional Projects - Premier Press
.pdf<HeaderStyle BackColor="teal" ForeColor="white" Font-Bold="true"/>
<ItemStyle ForeColor="DarkSlateBlue"/>
<AlternatingItemStyle BackColor="Beige"/>
</asp:DataGrid>
</body>
</html>
Project 3 Summary
My goal in the projects described in Projects 2 and 3 was to demonstrate practically how traditional client/server products could be revamped for the Web using SOAP, web services, and the tools provided by ASP.NET. The two "hubs" of a Management Information System are the Financial Accounting System and the Inventory Management System. I developed a Web-enabled Personal Financial System in Project 1 and a Webenabled Inventory Management System in this project. The Database web service developed in Project 2 sits between both these modules and the database. In other words, both these modules talk to the database via the Database web service.
The various modules in a Management Information System can be built using any of the
.NET-compliant languages. The Personal Finance Manager could be written in Visual Basic.NET and the Inventory module in C#. Both these languages provide a rich Graphical User Interface, which users have come to accept and demand. However, beneath the hood they are both Web-enabled through the Database web service. The Database web service abstracts calls and interactions to the database. Database operations like selects, inserts, and updates are implemented as simple function calls. It is relatively simple to add more modules because we are only required to write the GUI; the database functionality is already encapsulated in the Database web service.
Project 4: The GenEditAdd Control
Chapter List
§Chapter 27: Using the GenEditAdd Control
§Chapter 28: Extending the GenEditAdd Contrtol
Project 4 Overview
The GenEditAdd control can be used to insert or update database records. The ASP.NET DataGrid does not have the capability to insert records, although it does have editing capabilities. The Edit mode of the DataGrid is quite cumbersome, because you need to code a number of events in the DataGrid for the process to work. The GenEditAdd control was developed to enhance the usefulness of the DataGrid because it can be hooked up to a DataGrid to provide both editing and insertion capabilities in a consistent manner. This control works by setting various properties, and the code generation is automated. This project is actually a sequel to the GenEditAdd control developed in Chapter 7 and that chapter is therefore essential reading before starting this project. The control developed in Chapter 7 was kept simple so that I could explain it better. I had explained there that you could set eight properties to customize the control.
These were:
1.Display: This property controls the fields that get displayed.
2.SQL: This is the SQL query for the control.
3.Where: This is the where clause. If the where clause does not exist, the control presents a new entry form; otherwise, an Edit form is displayed which is pre-filled with existing data.
4.ConnStr: The database connection string.
5.KeyField: The field name of the primary field.
6.KeyValue: The value of the primary field.
7.Procedure: The stored procedure for the Insert and Update modes.
8.ExitPage: A link back to the calling page.
This project refines and enhances the control and also adds a number of features to it. These features are:
1.DropDownLists: This is a very nifty feature. You can have a field appear as a drop-down list for a user to pick values from. You can build the drop-down list from a database table (or tables) and specify display and code fields. The display field is what is displayed to the user and the code field is what gets stored in the database. For example, you could display an employee name (a char field) to the user and store an employee id (a numeric field) based on the user selection. The best part is that it maintains state. When a record is selected for editing, the drop-down list shows the value that was actually stored in that field. The ASP.NET DropDownList cannot do that and you have to do some programming to make that happen.
2.Required Fields: GenEditAdd makes use of the ASP.NET RequiredField validation control to enforce input in required fields. Further it makes use of the validation summary control to give summary error information.
3.Editable Fields: You can tell GenEditAdd which fields are editable fields. Editable fields display textboxes to accept user input while noneditable fields display labels that cannot be edited.
4.Field Names: You can set the field name to display against the input fields. If no name is specified, the raw field name from the database is used.
5.InsertProcedure: This is the database-stored procedure that is called in the Insert mode.
6.UpdateProcedure: This is the database-stored procedure that gets
called in the Update mode.
The InsertProcedure and the UpdateProcedure properties replace the single Procedure property in the Chapter 7 implementation of GenEditAdd. This was done because I realized that you might want to use separate procedures for inserts and updates even though I personally use a single procedure for both.
Chapter 27: Using the GenEditAdd Control
This chapter gets you started with using the GenEditAdd control. I will not deal with any theory here; I leave that for subsequent chapters. I will provide instructions to enable you to use this control in your projects. The complete source code for this control can be found on the Project 4 samples folder on the book’s Web site at www.premierpressbooks.com/downloads.asp.
Compiling the Control
I have provided a .bat file, which will compile the GenEditAdd control to a DLL. Place this bat file along with the script file of the control (GenEditAdd.vb) in an application folder and execute it. Make sure that the bat file points to your bin folder; if not, modify the outdir variable in the bat file. Successful execution should place the GenEditAdd.dll in the bin folder of your application.

The Config File
The Config file is the link between the DataGrid and the GenEditAdd control. Here you set all the properties of the control except the property KeyValue (which is passed to it from the DataGrid) and the Where property (which is built dynamically based on the KeyValue property). Here is a sample config file:
config_master.aspx
<%@ Register TagPrefix="Hersh" Namespace="Generic" Assembly="GenEditAdd"%>
<html>
<script language="VB" runat="server">
Sub page_load(sender As Object, e As EventArgs)
if NOT (isPostBack)
Dim s As string
Dim sql As string
Dim ls_CodeValue As string
ls_CodeValue = Request.QueryString("code_value")
'— these properties discussed in chapter 7
SQL = "Select * from masters"
Gen.sql = SQL
if cint(ls_codeValue) = 0 then
Gen.Where = ""
else
Gen.where= " Where code_value =" + ls_CodeValue
end if
Gen.display = "111110"
Gen.KeyField = "code_value"
Gen.KeyValue = ls_codeValue
Gen.ExitPage = "masters.aspx"
'—New properties developed in project 3
Gen.Insertprocedure = "p_masters"
Gen.Updateprocedure = "p_masters"

Gen.RequiredFields = "0100000"
Gen.editable = "1110100"
s= "code_category;code_value;code_display;Select * from groups;"
Gen.DropDown = s
Gen.FieldNames ="id;Account Name; Group;Type; Closing Bal;Opening Bal;"
end if
End Sub
</script>
<body>
<form runat = "server" >
<Hersh:GenEditAdd id = "Gen" runat=server
ConnStr = "Provider=SQLOLEDB; Data Source=(local);
Initial Catalog=ASPNET;User ID=sa;" />
</form>
</body>
</html>
Note that the code_value variable (which is actually the KeyValue property) is passed to this page from the calling page that hosts the DataGrid. The DataGrid will pass a valid primary key or a value of zero to the config page. A valid primary key tells GenEditAdd that the Edit mode is expected and the Where property is dynamically built. A primary key value of zero tells GenEditAdd that the user wants to add a new record and the Where property of the control is set to a blank string.
Hooking GenEditAdd to a DataGrid
The DataGrid requires two hyperlink columns, one for the Add mode and the other for the Edit mode. Th ese hyperlinks navigate to the config file and pass on a code_value of 0 in case of the Add mode or a valid primary key in case of the Edit mode. This is shown in the following extract from the web form masters.aspx (I will deal with this form later in this chapter):
The GenEditAdd hyperlinks in masters.aspx
<property name="Columns">
<asp:HyperLinkColumn Text="Edit" DataNavigateUrlField="code_value"
DataNavigateUrlFormatString="config_masters.aspx?code_value={0}"/>

<asp:HyperLinkColumn Text="Add" DataNavigateUrlField="code_value"
DataNavigateUrlFormatString="config_masters.aspx?code_value=0"/>
......................................................
......................................................
</property>
And that’s all you need to do to get the GenEditAdd control up and running. Table 27.1 provides a quick reference guide to the GenEditAdd control.
Table 27.1: GenEditAdd Quick Reference
Property
SQL
Where
Display
KeyField
KeyValue
Exit Page
ConnStr
DropDown
Description
The SQL query (without the where clause).
Example: Gen.SQL = "Select * from Masters"
The where clause. This is also the toggle between the Edit and Add modes; if a where clause exists, GenEditAdd displays the Edit mode, else it displays the Add mode.
Example: ls_CodeValue =
Request.QueryString("code_value") If cint(ls_codeValue) = 0 Then Gen.Where = ""
Else
Gen.where= " Where code_value =" + ls_CodeValue
End If
This is a string of 0s and 1s. A 0 means don’t show a field and a 1 means show it. For example, the setting 011 will hide the first field and display the next two fields.
The primary key field name.
The primary key value.
The URL of the web form to exit (return) to from the config web form. Typically this web form will be the web form on which the DataGrid resides. When you click on the Add or Edit links on the web form that hosts the DataGrid, you are directed to the config web form, on which the GenEditAdd control resides. After finishing adding or modifying a record, you would want to return back to the DataGrid web form. The ExitPage property builds a hyperlink on the top of the config web form. Clicking on that allows you to navigate back to the calling web form.
The connection string. For example:
ConnStr = "Provider=SQLOLEDB; Data Source=(local);
Initial _ Catalog=ASPNET;User ID=sa;"
Builds any number of DropDown list columns. Each

Table 27.1: GenEditAdd Quick Reference
Property |
|
Description |
|
|
|
Required Field
DropDown requires you to specify four properties. Each property is specified as a string, and a semicolon separates each property. Thus if you want to create two DropDowns, you would have eight properties (four for each DropDown), each property separated by a semicolon. The four properties are as follows (the order is important):
1.The name of the field that should have a DropDown.
2.The code field: This is the field of the DropDown that gets stored in the database; for example, a numeric employee code.
3.The display field: This is the DropDown list field that is displayed to the user; for example, a descriptive employee name.
4.The SQL statement. This is the SQL clause that populates the DropDown list. It should include a display and a code column (that is, it should fetch at least two columns unless the display and code columns are the same).
Example:
Dim s As string 'This is dropdown 1 s=
"code_category;code_value;code_display;Sele ct * _
from groups;"
'This is dropdown 2 s=s +
"code_display;code_display;code_display;Sel ect * _
from masters;" Gen.DropDown = s
This will create two DropDown lists as follows:
DropDown List 1: is attached to the code_category field. The code field is the code_value field of the groups’ table and the display field is the code_display field of the groups’ table. The SQL statement is Select * from groups. I am displaying a DropDown list to help users select groups. The user sees the descriptive group name (code_display from groups table) but the numeric code (code_value) is stored in the code_category field.
DropDown List 2: This list is attached to the code_display column. I want to display what I want to save. In other words the display and code fields are same. This DropDown list displays all records from the masters table.
This is a string of zeros and ones. A zero implies that a field is not a required field, whereas a one means that it is. The user must make an entry in a required field. If this field is left blank, an error message is displayed. The errors will also be displayed in a ValidationSummary control. The record will not be saved unless all required fields are filled.

Table 27.1: GenEditAdd Quick Reference
Property |
|
Description |
|
|
|
|
|
Example: |
|
|
Gen.RequiredFields = "0100000" |
|
|
The second field is a required field in the above example. |
|
|
|
Editable Field |
|
This is also a string of zeros and ones. A one means that |
|
|
|
|
|
the field can be edited, and a zero means that a field can |
|
|
only be displayed and cannot be edited by the user. |
|
|
Example: |
|
|
Gen.editable = "1110100" |
|
|
The first, second, third, and fi fth fields can be edited by the |
|
|
user in this example. |
|
|
|
Field Names |
|
This is a string that specifies the field names to be |
|
|
|
|
|
displayed against columns of the form. Semicolons |
|
|
separate the field names. If this property is not specified, |
|
|
the raw database column names are used as the column |
|
|
labels. For example: |
|
|
Gen.FieldNames ="id;Account Name; |
|
|
Group;Type; Closing |
|
|
Bal;Opening Bal;" |
|
|
|
InsertProcedure |
|
The database-stored procedure that is called in the |
|
|
Insert mode. |
|
|
|
UpdateProcedure |
|
The database-stored procedure that is called in the |
|
|
Update mode. |
An Example
I will hook up the GenEditAdd control to a DataGrid and use it to insert and update records to the masters table. The config file (config_masters.aspx) was listed earlier in this chapter .The code extract required to set up the DataGrid in the calling web form (masters.aspx) is as follows:
Extract from Masters.aspx hooking a DataGrid to GenEditAdd
<asp:DataGrid id="Grid1" runat="server"
AutoGenerateColumns="false"
BackColor="White"
BorderWidth="1px" BorderStyle="Solid" BorderColor="Tan"
CellPadding="2" CellSpacing="0"
Font-Name="Verdana" Font-Size="8pt"
OnDeleteCommand = "Grid1_delete"
DataKeyField="code_value">
<Columns>
<asp:HyperLinkColumn Text="Edit" DataNavigateUrlField="code_value"

DataNavigateUrlFormatString="config_masters.aspx?code_value={0}"/> <asp:HyperLinkColumn Text="Add" DataNavigateUrlField="code_value"
DataNavigateUrlFormatString="config_masters.aspx?code_value=0"/> <asp:ButtonColumn Text="Delete" CommandName="Delete" HeaderText="Delete"/> <asp:BoundColumn HeaderText="Account" DataField="code_display">
<HeaderStyle Width="150px"></HeaderStyle> </asp:BoundColumn>
<asp:BoundColumn HeaderText="Group" DataField="category"> <HeaderStyle Width="150px"></HeaderStyle>
</asp:BoundColumn>
<asp:BoundColumn HeaderText="Type" DataField="type"> <HeaderStyle Width="150px"></HeaderStyle>
</asp:BoundColumn>
<asp:BoundColumn HeaderText="Opening" DataField="opening"> <HeaderStyle Width="150px"></HeaderStyle>
</asp:BoundColumn>
<asp:BoundColumn HeaderText="Closing" DataField="closing"> <HeaderStyle Width="50px"></HeaderStyle>
</asp:BoundColumn>
</Columns>
<HeaderStyle BackColor="DarkRed" ForeColor="White" Font-Bold="true" > </HeaderStyle>
<ItemStyle ForeColor="DarkSlateBlue"> </ItemStyle>
<AlternatingItemstyle BackColor="Beige">
</AlternatingItemstyle>
</asp:DataGrid>
Figure 27.1 shows what the masters.aspx looks like.
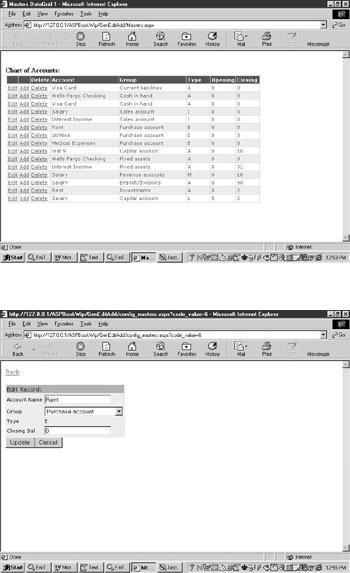
Figure 27.1: Masters.aspx with edit, add, and delete links.
When you click on the Edit link, the GenEditAdd displays in the Edit mode, as shown in Figure 27.2.
Figure 27.2: GenEditAdd in the Edit mode allows modification of records.
Note that GenEditAdd populates itself with the record details from the database. The DropDown list is populated from the groups table and scrolls down to the correct group associated with the record. Clicking on the Back URL will take you back to the calling page.
When you click on the Add link on the DataGrid, GenEditAdd is activated in the Insert mode, enabling you to add new records. (See Figure 27.3. )
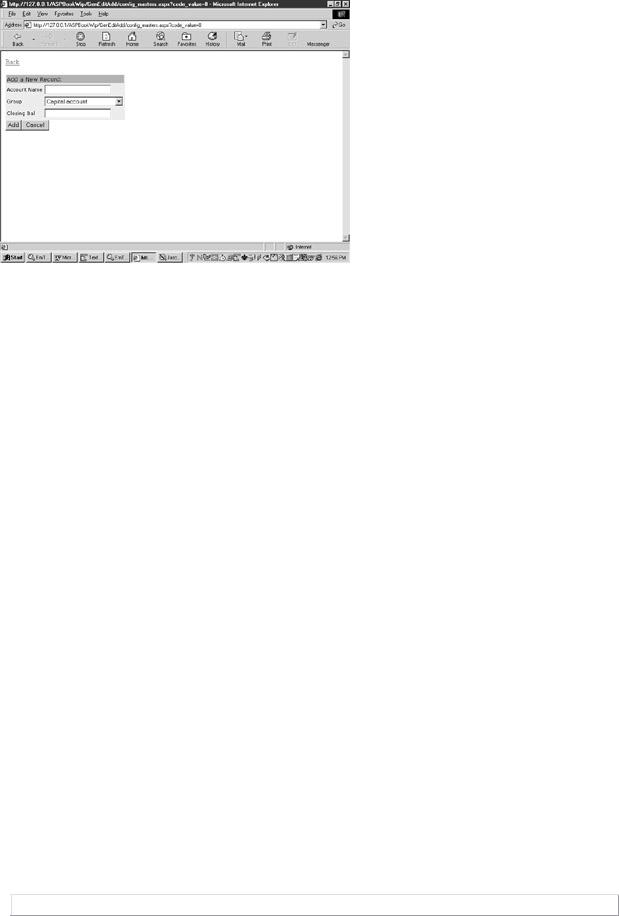
Figure 27.3: The Add mode of GenEditAdd allows insertion of new records.
Chapter 28: Extending the GenEditAdd Control
The foundation of the GenEditAdd control was laid in Chapter 7, "Custom Controls." This project develops the control further and incorporates functionality like drop-down lists, required field validation, specifying read-only fields, and providing descriptive field names to input columns. Chapter 7 should be read before starting this project.
Drop-down List Columns
The GenEditAdd control has the capability of rendering any column as a drop-down list column. The control must know four things for each drop-down list column that it must render:
§The DDLColumn. This is the name of the database field that has to be rendered as a drop-down list column on the form.
§The CodeField.This is the field whose value will be stored in the database.
§The DisplayField. This is the field that the user will see.
§The DDLSQL. This is the SQL query that will select the records for the dropdown list.
I will call these four properties "sub-properties" of the main property DropDown. The property DropDown is specified by the user as a string, with each of the above subproperties separated by a semicolon. The syntax for the property DropDown is:
DropDown = DDLColumn; CodeField; DisplayField; DDLSQL. These sub-properties should be specified in exactly this order.
If you want to create two drop-downs, you would have eight sub-properties (four for each), separated by a semicolon. For example:
Dim s As string
'First drop-down list
s= "code_category;code_value;code_display;Select * from groups;"
'second drop-down list
s=s + "code_display;code_display;code_display;Select * from masters;"
Gen.DropDown = s
Table 28.1 lists the four sub-properties of each drop-down list column passed to the GenEditControl's property DropDown in the above example.
Table 28.1: The Four Drop-Down List Sub-properties