

Microsoft ASP .NET Professional Projects - Premier Press
.pdfFor j = 0 To UBound(strChar)
If Len(strChar(j)) = 0 Then
Else
s = CStr(strChar(j))
If count = 1 then
DDLColumn(idx) = s
Elseif count = 2 then
CodeField(idx) = s
Elseif count = 3 then
DisplayField(idx) = s
Elseif count = 4 then
DDLSql(idx) = s count = 0
idx = idx + 1 End If
count = count + 1 End If
Next
End Function
Function GetDDLIndex(vDDLColumn as string) as integer 'Pass in the column where a drop-down list must appear
'this function returns the row where its details are
'stored in the array
Dim i As integer, vKey As integer
For i= 0 to UBound(DDlColumn)
If DDlColumn(i) = vDDLColumn
vKey = i
End if
Next
Return vKey
End Function
Function IsDropDown(vDDLColumn as string) as boolean Dim i As integer, vflag As integer
vFlag = -1
For i= 0 to UBound(DDlColumn)
If DDlColumn(i) = vDDLColumn
vflag = 1 End if
Next
If vFlag = 1 then
Return True
Else
Return False
End If
End Function
'--------Drop Down Functions end--------
Function ParseFieldNames()
'This function parses the FieldNames property Dim strChar As Object
Dim s As String
Dim j As Integer
Dim count As Integer
If len(FieldNames) <1 then
Exit function
End If
strChar = Split(FieldNames, ";") For j = 0 To UBound(strChar)
If Len(strChar(j)) = 0 Then
Else
s = CStr(strChar(j))
FieldNamesArray(j) = s
End If
Next
End Function
End Class
End Namespace
Project 4 Summary
The GenEditAdd is a very useful control that you can hook up to a DataGrid control and use to edit and insert records. You can replace the built-in editing functionality of a DataGrid with this control. To use the editing functionality of the DataGrid, you need to code a number of events. This is not required in the GenEditAdd control. You set a number of properties of the GenEditAdd control and it carries out inserts and updates in an automatic manner. The insert mode is not available in the DataGrid and the insert functionality has to be handled outside of the DataGrid. Not so in the GenEditAdd control; the edit and insert modes work off the same control in a consistent and similar fashion. This is not all; you can specify drop-down list columns, read-only columns, required-entry columns, and add user-defined column names. The drop-down lists created by the control can access any database table to populate themselves. Further, unlike the ASP.NET DropDownList control, this control maintains state and scrolls down the correct record that matches the value of the field it is attached to. When the user is finished with the insert or update, GenEditAdd calls the appropriate stored procedure to effect the insert or update.
Project 5: Visual Studio.NET
Chapter List
§Chapter 29: Displaying Database Data Using a Strongly-Typed DataSet
§Chapter 30: Writing CRUD Applications with Visual Studio.NET
§Chapter 31: Creating a Web Service Using Visual Studio.NET
Project 5 Overview
Visual Studio brings a set of development tools that enables developers to rapidly build Weband Windows-based applications in a consistent manner. It is an integrated development environment which enables you to develop applications using a variety of languages, such as Visual Basic, C#, ASP.NET, and so on. Regardless of the chosen language, there is only one environment to understand and use. Visual Studio enhances and extends the functionality originally found in Visual InterDev and applications can be built rapidly using drag-and-drop features. The IDE provides powerful debugging features that work across languages, processes, and stored procedures.
In this part, which comprises three chapters, I discuss the important features of Visual Studio. In Chapter 29, you will begin with an overview of the important features of Visual Studio.NET, focusing on the various wizards, tools, and components available. Then you will build a database web form using a Typed DataSet and utilizing the drag-and-drop features of Visual Studio.NET. In Chapter 30, you will implement CRUD (create-read- update-delete) functionality in the web form. At the end of Project 5, you will develop and consume web services with Visual Studio.NET.
Chapter 29: Displaying Database Data Using a
Strongly-Typed DataSet
Overview
In this chapter, I show you how to bind a DataGrid to a Strongly-Typed DataSet and in the process introduce you to various tools, wizards, and components provided by Visual Studio.NET for database interaction.
A strongly-typed DataSet is a DataSet that is created by Visual Studio.NET. The developer does not write any code for the DataSet and just drags and drops a DataSet object from the Visual Studio.NET ToolBox. A DataSet created in this way binds more closely to the .NET framework than a DataSet scripted manually. The typed DataSet benefits from the syntax completion features of Visual Studio.NET, which can lead to more productive development. A typed DataSet is sub-classed from the base DataSet class and has a schema file (an .XSD file) that describes the structures of the tables the DataSet contains. This schema contains the table and column names, the data types, and information about the constraints on the data. An untyped DataSet, on the other hand, does not have a corresponding schema. Visual Studio.NET automatically generates this schema.
The sample walk-through that follows is a Web Application, written in C#, which displays the data from the authors table of the PUBS database in a DataGrid.
Creating the C# Web Application
Visual Studio.Net organizes application development using the concept of Solutions and Projects. A Solution can have one or more Projects and a Project is a folder that holds together all the objects that make up an application. In this step, I will create a C# ASP.NET Web project. Here are the steps to do it:
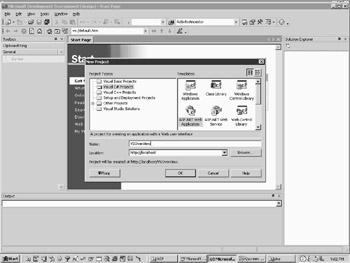
§Create a new Web application by either clicking on the New Project button on the Start Page or by selecting File/New/Project.
§Select Visual C# Projects on the left pane and ASP.NET Web Application on the right as shown in Figure 29.1. You can call this
project "VSOverView."
Figure 29.1: Creating a new ASP.NET Web Application.

Exploring the Application Folder
VS will create an application folder called VSOverView in the wwwroot folder. It will also create an IIS virtual directory. You can see this by going to the Control Panel, selecting Administrative Tools, and then Personal Web Manager. Click on the
Advanced button of the Personal Web Manager and you will see a new virtual directory called VSOverView as shown in Figure 29.2.
Figure 29.2: VS will create a Virtual Directory in IIS.
Exploring the Generated Files
Now take a look at the ASP.NET Web Application created by VS (Visual Studio). Your screen will look like the screen shot displayed in Figure 29.3.
Figure 29.3: The blank project created by VS.
On the right-top side of the screen, you will see the Solution Explorer. You will note that VS has created a Global.asax file, a Web.Config file, and a default web form called WebForm1.aspx. The Global.asax file handles "application level" logic through application events like Application_Start, Application_End, Session_Start, and Session_End, to name a few. This file was discussed in Chapter 10, "ASP.NET Applications." The web.config file is the file that stores configuration data for the application. Located in the root of an application folder and applicable to all the subfolders in the application folder, this file contains the error, security, compilation, debugging, session, and globalization information. This file was also discussed in Chapter 10. The web form WebForm1.aspx is provided as a template that we can use to create a new web form. Note that at the bottom of the work area of the screen (the white
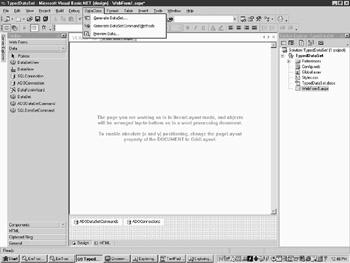
area), there are two tabs called Design and HTML. You are initially in the Design view. The Design view allows you to drag and drop controls from the Toolbar onto the form. It also allows you to visually position the controls with your mouse.
Web pages generated by VS make use of Code Behind files. If you browse to the VSOverView application folder in wwwroot, you will be able to see the Code Behind file WebForm1.aspx.cs.
To view the Code Behind file in VS, you can adopt either of the following approaches: §From the Project menu, select Show All Files. Then in the Solution
Explorer, you will see a plus sign against the web form WebForm1.aspx. If you click on the plus sign, you will see the Code Behind file.
§In the Solution Explorer, right at the top there is a set of icons. Locate the icon that displays the tool-tip Show All Files and click on it.
§Right -click on the web form WebForm1.aspx and select View Code.
Within the Code Behind please note that various namespaces are already imported. During development, you might create a number of web forms. To view a web form in the browser, right-click on the form name and select View in the Browser. To set a web form as the default form that opens in the browser each time you build and run the application, right -click on the web form in the Solution Explorer and select Set as Start Page.
Exploring the Project Properties
Right -click on the project name in the Solution Explorer. The Property Pages window for the application displays as shown in Figure 29.4.
Figure 29.4: The Project Properties.
You can specify the namespace of your project in the Default Namespace box. This, by default, is your application name. If you change the namespace here, the namespace change will not be automatically applied to already created forms. You must manually make the namespace change to all the pre-created web forms, else you will get compilation errors. Any new web form will be created in the specified namespace.
At this stage give a meaningful name to the WebForm1.aspx. Call it TypedDataSet.aspx by right-clicking it in the Solution Explorer and selecting Rename. At this stage if you open the Code Behind file and note the class name and the constructor name, you will see that even though you changed the name of the form to TypedDataSet, the Code Behind file still refers to WebForm1. If you do not fix this, you will get build errors later on when you add components to the form. To fix this, in the Code Behind file, change the class name and the constructor name to be TypedDataSet and you should be ready to
go. You can do a find and replace or now that I have made my point, just delete and recreate the web form with the new name.
A constructor is a method that has the same name as the class name. This is the first method that gets fired when a class is initiated (a web form is a class). A default constructor, which has no parameters is associated by default with a class. You can, however, provide additional constructors that accept parameters.
Database Interaction
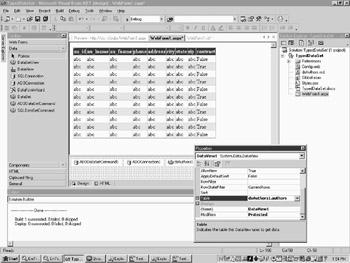
In this section, I will show you how to connect to a database, populate a DataAdapter, and use it to fill a DataSet. I will use the authors table of the PUBS database for the demonstration. I will show you two alternative methods of connecting to the database and populating the DataAdapter.
All the components that interact with the database are to be found in the Data section of the toolbox. To use any component, all you have to do is to drag and drop them onto a web form. Figure 29.5 shows the components that are available for database interaction.
Figure 29.5: The Data section of the toolbox.
Creating a Connection and a DataAdapter
I will use the SQL Managed Provider to interact with the database. As you might remember, the SQLConnection is used to connect with the database. A SQL Select Query is applied against this connection to fill the SqlDataAdapter with database data. As I promised, I will show you two methods to achieve this.
Creating a SQLConnection and a SqlDataAdapter - Method #1
This method of creating a SQLConnection and a SqlDataAdapter involves dragging and dropping a SqlDataAdapter from the Data tab of the toolbox onto the web form and completing a number of wizards. This is how to do it:
1. From the Data tab of the toolbox, drag and drop a SqlDataAdapter onto the web form. The DataAdapter Configuration wizard starts which you will use to create the connection and command. Click on next and you will see the Choose your Data Connection window. Click on the New Connection button and you will see the Data Link Properties window.
2. The window should be filled out as shown in Figure 29.6.
Set the server name, username, and password in this pane. If you left the pubs database at its default setting, the username/password would be

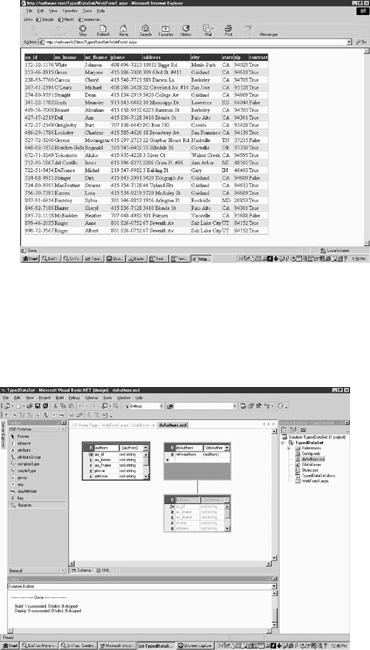
Figure 29.8: Typing in a SQL query in the Generate the SQL Statement window.
§You can also use this window to graphically build a SQL query. To do this, click on the button captioned Query Builder. This will display a query builder tool as shown in Figure 29.9. This is a Microsoft Access type query builder tool that you can use to select and join multiple tables and then drag and drop column names to build the query. I leave it up to you to explore it in detail.
Figure 29.9: The Query builder allows you to graphically build queries.
§Finally hit Next and then Finish after you are satisfied with your Select query.
§A SqlDataAdapter and a SqlConnection will appear at the bottom of the web form as shown in Figure 29.10. These will be called SqlDataAdapter1 and SqlConnection1.
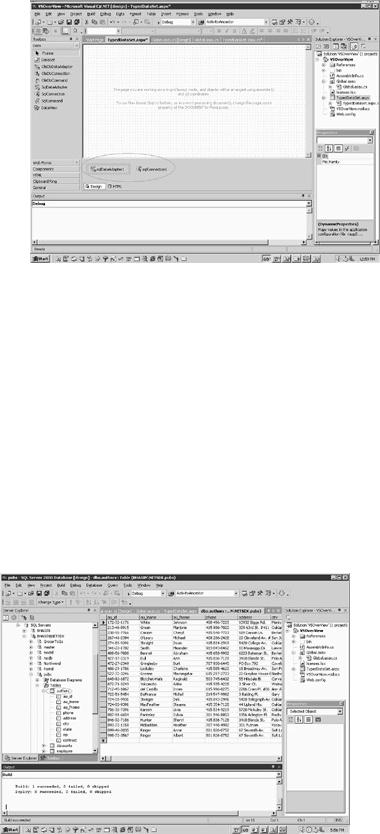
Figure 29.10: The SqlDataAdapter and SqlConnection created in VS.
This is the outcome that we sought in this first method of creating a SqlDataAdapter and SqlConnection with Visual Studio. Now we examine method #2.
Creating a SqlConnection and a SqlDataAdapter - Method #2
I am now going to show you another method of creating a SqlConnection and SqlDataAdapter that is much quicker than method #1. You need to start with a clean slate, so add a new web form to the project and call it TypedDataSet2.aspx. Since you will need to vi ew this form in the browser, set this form as the start-up page by rightclicking the form in the Solution Explorer and selecting Set as Start Page.
The Server Explorer
The Server Explorer is a database explorer that shows the various database objects like tables, triggers, and stored procedures. It is accessed from the View/Server Explorer menu option or the shortcut Ctrl-Alt-S. The Server Explorer is shown in Figure 29.11. You can use it to manipulate database tables. I leave it to you to explore it in detail.
Figure 29.11: The Server Explorer allows you to explore and manipulate database objects. Now all that you have to do to create the SqlConnection and the SqlDataAdapter is to drag and drop the authors table from the Server Explorer onto the form (you can refer to Figure 29.11 to locate the table in the Server Explorer). The resultant form looks the same as in Figure 29.10 and has both a SqlConnection and a SqlDataAdapter called SqlConnection1 and SqlDataAdapter1 respectively.