

Microsoft ASP .NET Professional Projects - Premier Press
.pdf@opening = 0, @closing =0
*/
DECLARE @flag integer
IF isnull(@code_value,0) = 0 --INSERT--
BEGIN
Insert into stock_master(code_display,rate,uom,opening,closing) Values(@code_display,@rate,@uom,isnull(@opening,0),isnull(@closing,0))
IF @@ERROR != 0
Begin
GOTO doerror
End
END
ELSE
--UPDATE__ BEGIN
Update stock_master
Set code_display = @code_display, rate = @rate,
uom = @uom, opening =@opening, closing =@closing
Where code_value =@code_value
IF @@ERROR != 0
Begin
GOTO doerror

End
END
SELECT 0
GOTO doreturn
doerror:
Return - 100
doreturn:
RETURN 0
GO
This stored procedure accepts four input parameters. These correspond to the number of columns displayed by the DataGrid. The DataGrid just gathers the information the user enters and passes it on to this stored procedure. Delegating database interaction to a stored procedure has a number of advantages over executing a SQL query directly from a DataGrid. The stored procedure resides in the database as compiled code and is thus more efficient than a query. I can use temporary tables to simplify my scripting logic. Stored procedures enable me to update multiple tables with ease. The most important advantage is that it completely encapsulates the insert and update logic. If I need to modify this logic, I do not need to change any code in the DataGrid, thus the code maintenance becomes easier. This stored procedure has two modes: Insert and Update. The procedure first checks for the code_value. If the code_value passed to it is Null, it builds an insert statement with the passed parameters. Otherwise, it updates the record having the primary key equal to the passed code_value.
The Inventory Masters Web Form
The Inventory Masters web form is the form that adds, updates, and deletes rows to the stock_masters table. This form makes a call to the stored procedure p_stock_masters to insert or update inventory records. Figure 24.1 shows what this looks like.
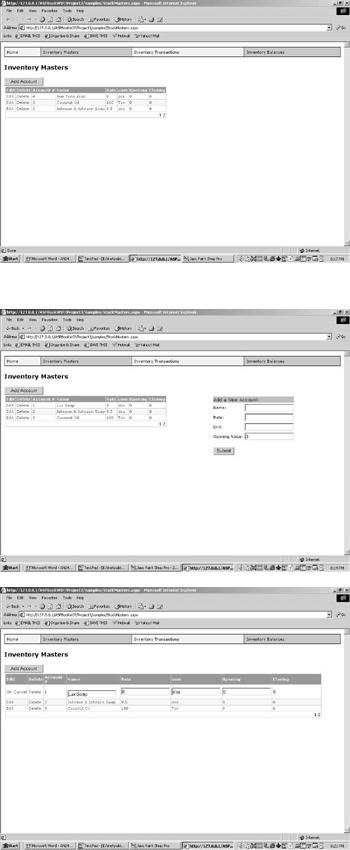
Figure 24.1: The Inventory Masters web form.
Figure 24.2 shows the Inventory Masters web form in Add mode. Figure 24.3 shows the Inventory Masters web form in Edit mode.
Figure 24.2: The Inventory Masters web form in the Add mode.
Figure 24.3: The Inventory Masters web form in the Edit mode.
The web form StockMasters.aspx, and its Code-Behind form StockMasters.vb, contain the required code. The site navigation for this project is handled by the navigation user control discussed in Chapter 6, "User Controls." It is registered at the top of the StockMasters.aspx web page as follows:
<%@ Register TagPrefix="Hersh" TagName="nav" Src="nav.ascx" %>
This user control is initiated within the Web page as follows: <!------ Navigation Start------------->
<Hersh:nav id="menu" runat = server vGridlines = Both
vBorderColor = "Black" vCellPadding = 7 />
<!------ Navigation Ends------------->
A DataGrid on the web form handles the display and editing of the records from the stock_master table as follows:
<asp:DataGrid id="Grid1" runat="server" AutoGenerateColumns="false" BackColor="White"
BorderWidth="1px" BorderStyle="Solid" BorderColor="Tan"
CellPadding="2" CellSpacing="0"
Font-Name="Verdana" Font-Size="8pt"
OnEditCommand="Grid1_Edit"
OnCancelCommand="Grid1_Cancel"
OnUpdateCommand="Grid1_Update"
OnDeleteCommand = "Grid1_delete"
DataKeyField="code_value"
AllowPaging="True"
PageSize="20" PagerStyle-Mode="NumericPages" PagerStyle-HorizontalAlign="Right" PagerStyle-NextPageText="Next" PagerStyle-PrevPageText="Prev" OnPageIndexChanged="MyDataGrid_Page" AllowSorting="true" OnSortCommand="MyDataGrid_Sort" <Columns>
<asp:EditCommandColumn
EditText="Edit"
CancelText="Cancel"
UpdateText="OK"
ItemStyle-Wrap="false"
HeaderText="Edit"
HeaderStyle-Wrap="false"/>
<asp:ButtonColumn Text="Delete" CommandName="Delete" HeaderText="Delete"/>
<asp:BoundColumn HeaderText="Account #" ReadOnly="true" DataField="code_value"
SortExpression="code_value" />
<asp:TemplateColumn HeaderText="Name" SortExpression="code_display"> <ItemTemplate>
<asp:Label Text='<%# Container.DataItem("code_display") %>' runat="server"/>
</ItemTemplate>
<EditItemTemplate> <asp:RequiredFieldValidator runat=server
controltovalidate=edit_Name errormessage="Name is required.">*
</asp:RequiredFieldValidator> <asp:TextBox id="edit_name"
Text='<%# Container.DataItem("code_display") %>' runat="server"/>
</EditItemTemplate>
</asp:TemplateColumn>
<asp:TemplateColumn HeaderText="Rate" SortExpression="rate" > <ItemTemplate>
<asp:Label Text='<%# Container.DataItem("rate") %>' runat="server" /> </ItemTemplate>
<EditItemTemplate>
<asp:TextBox id="edit_rate" Text='<%# Container.DataItem("rate") %>' runat="server"/>
</EditItemTemplate>
</asp:TemplateColumn>
<asp:TemplateColumn HeaderText="uom" SortExpression="uom" > <ItemTemplate>
<asp:Label Text='<%# Container.DataItem("uom") %>' runat="server"/> </ItemTemplate>
<EditItemTemplate>
<asp:TextBox id="edit_uom" Text='<%# Container.DataItem("uom") %>' runat="server"/>
</EditItemTemplate>
</asp:TemplateColumn>
<asp:TemplateColumn HeaderText="Opening" > <ItemTemplate>
<asp:Label Text='<%# Container.DataItem("opening") %>' runat="server"/> </ItemTemplate>
<EditItemTemplate> <asp:TextBox id="edit_opening"
Text='<%# Container.DataItem("opening") %>'
runat="server"/>
</EditItemTemplate>
</asp:TemplateColumn>
<asp:TemplateColumn HeaderText="Closing" >
<ItemTemplate>
<asp:Label Text='<%# Container.DataItem("closing") %>' runat="server"/>
</ItemTemplate>
<EditItemTemplate>
<asp:TextBox id="edit_closing" BorderStyle="None" Readonly="True"
Text='<%# Container.DataItem("closing") %>'
runat="server"/>
</EditItemTemplate>
</asp:TemplateColumn>
</Columns>
<HeaderStyle BackColor="Gray" ForeColor="White" Font-Bold="true"/>
<ItemStyle ForeColor="DarkSlateBlue"/>
<AlternatingItemStyle BackColor="Beige"/>
</asp:DataGrid>
The EditCommandColumn is the ASP.NET generated column, which creates the Edit, OK, and Cancel link buttons. It is created as follows:
<asp:EditCommandColumn
EditText="Edit"
CancelText="Cancel"
UpdateText="OK"
ItemStyle-Wrap="false"
HeaderText="Edit"
HeaderStyle-Wrap="false"/>
I have specified three commands in the DataGrid that correspond to these buttons. These are the following:
OnEditCommand="Grid1_Edit"
OnCancelCommand="Grid1_Cancel"
OnUpdateCommand="Grid1_Update"
When the Edit link is clicked, the Grid1_Edit function is fired. This event contains the following code:
Sub Grid1_E dit(Sender As Object, E As DataGridCommandEventArgs)
Grid1.EditItemIndex = E.Item.ItemIndex
ReBind()
End Sub
The DataGrid needs to be told which row is being edited. This is done by setting the EditItemIndex property of the DataGrid to the index of the button that was clicked in the above code snippet. Clicking on the Cancel button fires the Grid1_Cancel function. This function simply sets the EditItemIndex property of the DataGrid to –1, as in the following script:
Sub Grid1_Cancel(Sender As Object, E As DataGridCommandEventArgs)
Grid1.EditItemIndex = -1
ReBind()
End Sub

Note that in both the cases, I call the ReBind function. This function rebinds the DataGrid to the data source so that the DataGrid is updated with the changes that the user makes. The Inventory Master web form makes use of the populate function of the SQLService web service to bind to a DataGrid. This function is passed the SQL Query, and the connection string and a DataSet is received back from it. The default view of this DataSet is used to bind the DataGrid.
The ReBind Function
Sub RunSql(vSQL as string)
Dim ConnStr As String
Dim SQL As String
ConnStr = "Provider=SQLOLEDB; Data Source=(local); "
ConnStr = ConnStr+" Initial Catalog=ASPNET;User ID=sa;"
Dim t As New NameSpaceHersh.SQLService
Dim s As string
s = t.RunSQL(ConnStr,vSQL)
Grid1.EditItemIndex = -1
if s <> "Success" then
Message.Text = s
Message.Style("color") = "red"
end if
response.write (vsql)
Rebind
End Sub
The Sub Grid1_update handles the Update logic. This function is fired when the grid is in the Edit mode. A SQL query string is built dynamically, which calls the p_stock_masters stored procedure with a document number. (Remember, we call the procedure with a null document number to effect an insert and pass it a valid document number to effect an update.)
Grid1_update
Sub Grid1_Update(sender As Object, e As DataGridCommandEventArgs)
Dim sql As string
Dim code_display As String

Dim rate As String
Dim uom As String
Dim opening As String
Dim closing As String
Dim myTextBox As TextBox
'This is the key value:
'Retrieved from the DataKey, since it's a read only field
Dim code_value as string = Grid1.DataKeys.Item(E.Item.ItemIndex).ToString
myTextBox = E.Item.FindControl("edit_name")
code_display = mytextbox.text
myTextBox = E.Item.FindControl("edit_rate")
rate = mytextbox.text
myTextBox = E.Item.FindControl("edit_uom")
uom = mytextbox.text
myTextBox = E.Item.FindControl("edit_opening")
opening = mytextbox.text
myTextBox = E.Item.FindControl("edit_closing")
closing = mytextbox.text
'Now execute stored procedure
sql = "Execute p_Stock_master @code_value ="
sql = sql+code_value+", @code_display = '"+code_display+"',@rate="
sql = sql+rate+", @uom='"+uom +"' ,@opening ="+opening+",@closing="+closing
RunSql(sql)
End Sub
This SQL string is passed on to the function RunSQL that does the actual work of executing the SQL statement. Note that I extract the primary key (code_value) and pass it on to the procedure. The existence of a valid code_value tells the procedure to issue an update statement. If you pass it a null code_value, it will issue an insert statement.

Adding Records
Three textboxes and one button have been added to the form. These controls reside on a panel with the id AddPanel. In the aspx form, I have added HTML comments to show where the section begins and ends.
Insert Logic in the Form
|
|
|
------<! |
--------insert row logic |
> |
<asp:Panel id="AddPanel" runat="server" Visible="false">
<table style="font: 8pt verdana">
<tr> <td colspan="2" bgcolor="#aaaadd" style="font:10pt verdana">
Add a New Account:</td></tr>
<tr>
<td nowrap>Name: </td>
<td><asp:TextBox id="acode_display" runat="server" /></td>
<td> <asp:RequiredFieldValidator runat=server
controltovalidate=acode_display
errormessage="Name is required.">*
</asp:RequiredFieldValidator>
</td>
</tr>
<tr>
<td nowrap>Rate: </td>
<td><asp:TextBox id="arate" runat="server" /></td>
</tr>
<tr>
<td nowrap>Unit: </td>
<td><asp:TextBox id="auom" runat="server" /></td>
</tr>
<tr>
<td nowrap>Opening Value: </td>
<td><asp:TextBox id="aopening" value = "0" runat="server" /></td>
</tr>

<tr>
<td style="padding-top:15">
<asp:Button id="SubmitDetailsBtn" text="Submit"
onclick="add_Click" runat="server" />
</td>
</tr>
</table>
</asp:Panel>
<!------------ |
Insert Logic ends |
--------> |
|
|
|
A button (id = AddShow) displays with the caption Add Account on the web form. Clicking on this button fires the add_show Sub. This Sub simply sets the visible property of the panel to true. Once the panel is visible, all the controls on the panel also become visible. At this point, all the textboxes are ready for accepting user input. The insert logic is handled by the function add_click. It builds a SQL string by extracting the text properties of various textboxes. The following is the Sub:
The add_click Sub
Sub add_click(Source As Object, E As EventArgs)
Dim sql As string
if acode_display.text = "" then
response.write("Incomplete information")
exit sub
end if
SQL = "Execute p_stock_master @code_value=NULL,@code_display='"
SQL = SQL+ acode_display.text + "',@rate="
SQL = SQL+arate.Text+",@uom="+auom.text+",@opening="+aopening.text
RunSql(sql)
'reset values
acode_display.text = ""
aopening.text = ""
arate.text = ""