

Microsoft ASP .NET Professional Projects - Premier Press
.pdf<ItemTemplate>
<asp:Label runat="server" Text='<%# DataBinder.Eval (Container, "DataItem.code_display") %>'></asp:Label>
</ItemTemplate>
<EditItemTemplate>
<asp:TextBox ID="editCode_Display" runat="server"
Text='<%# DataBinder.Eval(Container, "DataItem.code_display") %>'></asp:TextBox>
</EditItemTemplate>
</asp:TemplateColumn>
<asp:TemplateColumn HeaderText="rate"> <ItemTemplate>
<asp:Label runat="server" Text='<%# DataBinder.Eval (Container, "DataItem.rate") %>'></asp:Label>
</ItemTemplate>
<EditItemTemplate>
<asp:TextBox id="editRate" runat="server"
Text='<%# DataBinder.Eval(Container, "DataItem.rate") %>'></asp:TextBox> </EditItemTemplate>
</asp:TemplateColumn>
<asp:TemplateColumn HeaderText="uom"> <ItemTemplate>
<asp:Label runat="server" Text='<%# DataBinder.Eval (Container, "DataItem.uom") %>'></asp:Label>
</ItemTemplate>
<EditItemTemplate>
<asp:TextBox id="editUom" runat="server"
Text='<%# DataBinder.Eval(Container, "DataItem.uom") %>'></asp:TextBox> </EditItemTemplate>
</asp:TemplateColumn>
<asp:BoundColumn DataField="closing" ReadOnly="True" HeaderText="closing">
</asp:BoundColumn>
<asp:TemplateColumn HeaderText="opening"> <ItemTemplate>
<asp:Label runat="server" Text='<%# DataBinder.Eval (Container, "DataItem.opening") %>'></asp:Label>
</ItemTemplate>
<EditItemTemplate>
<asp:TextBox ID="editOpening" runat="server"
Text='<%# DataBinder.Eval(Container, "DataItem.opening") %>'>
</asp:TextBox>
</EditItemTemplate>
</asp:TemplateColumn>
</Columns>
If you run the web form at this time, you will note that each column appears twice in the DataGrid. This is because the DataGrid is auto-generating columns, in addition to the Template columns we have created. You can do this either by setting the AutoGenerateColumns property of the DataGrid to False or by unchecking the
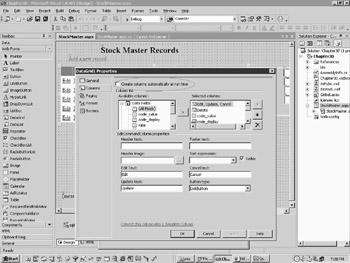
Create columns automatically at run time check box in the Property Builder as shown in Figure 30.8.
Figure 30.8: Setting the AutoGenerateColumn attribute to False.
If you look at the generated HTML in the HTML view, you will note that the attribute AutoGenerateColumns="False" has been inserted within the DataGrid element tag as follows:
<asp:datagrid id="DataGrid1"
------------------------
------------------------
AutoGenerateColumns="False">
The Add Panel
The functionality to insert new rows to the stock_master table is provided by a number of TextBox controls and Label controls residing on a Panel control. The reason why we have these controls on a Panel control is that we can show or hide all the TextBox controls and Label controls just by setting the Visible property of the Panel to True or
False.
Drag and drop a Panel control from the ToolBox onto the web form. Right-click on the Panel control and select Properties. Give it an ID of AddPanel and set the Visible property to False.
Now, drag and drop four Label controls and four TextBox controls on the Panel. These should line up one under the other. To line them within the Panel, drag and drop the first TextBox and Label. Then right-click and copy the label and paste it one line below. Stretch the second label with your mouse until it lines up with the Label on the top. Now copy and paste the TextBox so that it sits next to the label on the second line. Repeat this process for all the Label and TextBox controls you need on the Panel. You need to

follow this process in order to line up the components. The TextBox controls will be of similar size, however the Label sizes can vary, depending on the caption you want to display, hence you need to stretch the Label controls so that they line up under each other. You can use your mouse or CRTL -arrows to move the controls and SHIFT-arrows to size them.
Give the four TextBox controls IDs of AddCode_Display, AddRate, AddUom, and AddOpening respectively. You can do this by right clicking on each of them and selecting Properties and then ID.
Add a Button Control onto the Panel. Give it the ID of SaveNew. Double-click on it to create a method skeleton, which will look like this:
private void SaveNew_Click(object sender, System.EventArgs e)
{
}
We will code this method later. I have also added a blank label before the Button Control in order to position it in the center of the form.
Specifying the DataGrid Command Methods
Specify the OnEditCommand, OnCancelCommand, OnUpdateCommand, and the
OnDeleteCommand within the DataGrid element tag. These attributes of the DataGrid specify the method that will fire when the user clicks on the Edit, Cancel, Update, or Delete hyperlinks in the DataGrid. You will have to open the form in HTML view and manually add these attributes within the DataGrid element tag as follows:
<asp:datagrid id="DataGrid1"
------------------------
-------------------------
OnEditCommand="Grid1_Edit"
OnCancelCommand="Grid1_Cancel"
OnUpdateCommand="Grid1_Update"
OnDeleteCommand="Grid1_Delete" >
Methods
In this step, you will code some methods for the web form. Open the Code Behind file (StockMaster.aspx.cs) and add the following methods.
The Bind() method will populate the DataSet using the Fill method of the DataAdapter. It will also bind the DataGrid to the DataSet as follows:
The Bind Method
public void Bind()
{
sqlDataAdapter1.Fill(dsStock1);
DataGrid1.DataSource=dsStock1;
DataGrid1.DataBind();
if (AddPanel.Visible==true)
{AddPanel.Visible=false;}
}
The Bind method is called in the Page_Load event as follows:
private void Page_Load(object sender, System.EventArgs e)
{
if (! IsPostBack)
{
Bind();
}
}
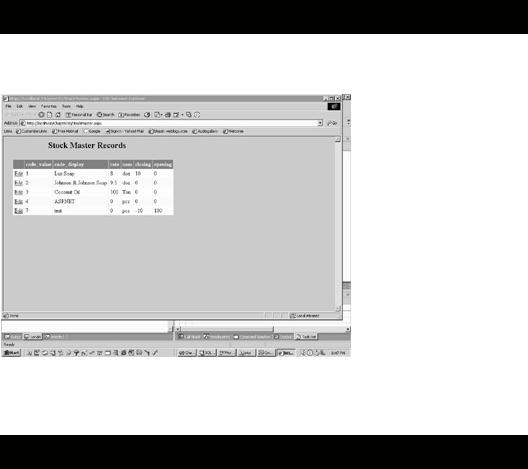
If you build and run the web form (by pressing CTRL-F5), you will see the form displayed in the browser as shown in Figure 30.9.
Figure 30.9: The Stock Master form displaying data.
The Grid1_Edit method fires when the user clicks on the Edit LinkButton. It sets the EditItemIndex of the DataGrid to the clicked row and calls the Bind method as follows:
Grid1_Edit
public void Grid1_Edit(Object sender, DataGridCommandEventArgs e)
{
DataGrid1.EditItemIndex = e.Item.ItemIndex;
Bind();


extracts the primary key by looking at the DataKey property of the clicked row. Then it uses the FindControl method of a control to locate its ID within the DataGrid. The returned object is cast to a TextBox and its Text property extracted as shown below. A SQL update query is built using the extracted Text properties of the TextBox controls, which is then handed over to the RunSql method for the actual execution. Finally the EditItemIndex is set to –1 and the Bind method called to refresh the DataGrid.
Grid1_Update
public void Grid1_Update(Object sender, DataGridCommandEventArgs e)
{
TextBox t;
//This is the primary key
int Key=(int)DataGrid1.DataKeys[(int)e.Item.ItemIndex];
String code_value = " code_value =" + Key.ToString() ;
t = (TextBox) e.Item.FindControl("editCode_Display");
String code_display = " code_display = '" + t.Text.Trim() + "'," ;
t = (TextBox) e.Item.FindControl("editRate");
String rate = " rate = " + t.Text.Trim() + "," ;
t = (TextBox) e.Item.FindControl("editUom");
String uom = " uom ='" + t.Text.Trim() + "'," ;
t = (TextBox) e.Item.FindControl("editOpening");
String opening = " opening = " + t.Text.Trim() ;
String s = " Update stock_master Set";
s += code_display +rate +uom ;
s += opening ;
s += " Where " + code_value;
RunSql(s);

DataGrid1.EditItemIndex = -1;
Bind();
}
This method will be used to execute SQL insert, update, and delete commands.
RunSql
public String RunSql( string vsql)
{
try
{
SqlCommand mycommand = new SqlCommand(vsql,sqlConnection1);
sqlConnection1.Open();
mycommand.ExecuteNonQuery();
sqlConnection1.Close();
}
catch(Exception e)
{
string ret = "Exception: " + e.ToString() ;
messages.Text=ret;
}
return("OK");
}
The Add_Click event fires when the user clicks on the Add LinkButton. This event initializes the TextBox controls with default values and displays them by setting the
Visible property of the AddPanel to True.
Add_Click

private void Add_Click(object sender, System.EventArgs e)
{
AddPanel.Visible=true;
AddCode_Display.Text= "";
AddRate.Text= "0";
AddUom.Text= "";
AddClosing.Text= "0";
}
The SaveNew_Click event fires when the user clicks on the SaveNew button that resides on the AddPanel. This event first sets a default value to any TextBox control not filled in by the user. It then builds a SQL Execute query call to the stored procedure p_stock_master and passes it the required parameters by extracting the Text properties of the various TextBox controls. This procedure was discussed in Chapter 24 (Inventory Masters) and if you remember, to insert a new record, you pass it a NULL code_value. This Execute query is handed over to the RunSql method that handles the actual execution. Finally the EditItemIndex is set to –1 and the Bind method is called to refresh the DataGrid.
SaveNew_Click
private void SaveNew_Click(object sender, System.EventArgs e)
{
if (AddCode_Display.Text.Length == 0)
{ messages.Text="Sorry - Account Name cannot be blank";
return ;
}
if (AddRate.Text.Length == 0)
{AddRate.Text= "0";}
if (AddUom.Text.Length == 0)
{AddUom.Text= "";}
if (AddClosing.Text.Length == 0)
