

Microsoft ASP .NET Professional Projects - Premier Press
.pdfExploring the Code Generated for the SqlConnection and SqlDataAdapter
If you right-click on the SqlConnection1 and select Properties, the property page for this object displays as shown in Figure 29.12. Note that the Name and the ConnectionString can be modified in this window and this tool enables you to modify property settings through property pages like Visual Basic 6.
Figure 29.12: The Properties page for the SqlConnection.
Similarly you can view the property pages for the SqlDataAdapter as shown in Figure 29.13.
Figure 29.13: TheProperty Page for the SqlDataAdapter.
Now let’s take a look at the code that was generated. Bring up the Code Behind file in VS and expand all nodes (click on the plus sign before various methods and the sign will become minus. You will now be able to see all the code of that method). Note the #region and the #endregion tags. Code enclosed within these tags allows you to specify a block of code that you can expand or collapse. You can also browse to the application folder and open the Code Behind file TypedDataSet.aspx.cs in a text editor to view the generated code.
Various namespaces are imported in the Code Behind file as follows:
using System;
using System.Collections;
using System.ComponentModel;
using System.Data;
using System.Drawing;
using System.Web;
using System.Web.SessionState; using System.Web.UI;
using System.Web.UI.WebControls;
using System.Web.UI.HtmlControls;
A class called TypedDataSet, which inherits from System.Web.UI.Page is created in the VSOverView namespace as follows:
namespace VSOverView
{
public class TypedDataSet : System.Web.UI.Page
{
//A lot of code here
}
}
Four Command objects are declared as follows: [code]
protected System.Data.SqlClient.SqlCommand sqlSelectCommand1; protected System.Data.SqlClient.SqlCommand sqlInsertCommand1; protected System.Data.SqlClient.SqlCommand sqlUpdateCommand1; protected System.Data.SqlClient.SqlCommand sqlDeleteCommand1;
A SqlConnection is declared as follows:
protected System.Data.SqlClient.SqlConnection sqlConnection1;
A SqlDataAdapter is declared as follows:
protected System.Data.SqlClient.SqlDataAdapter sqlDataAdapter1;
An instance of all these objects in creating using the new keyword in the
InitializeComponent method as follows:
this.sqlSelectCommand1 = new System.Data.SqlClient.SqlCommand(); this.sqlInsertCommand1 = new System.Data.SqlClient.SqlCommand(); this.sqlUpdateCommand1 = new System.Data.SqlClient.SqlCommand(); this.sqlDeleteCommand1 = new System.Data.SqlClient.SqlCommand(); this.sqlConnection1 = new System.Data.SqlClient.SqlConnection(); this.sqlDataAdapter1 = new System.Data.SqlClient.SqlDataAdapter();
In the same method, the SqlConnection is set as follows: // sqlConnection1
this.sqlConnection1.ConnectionString = "data source=BHASIN\\NETSDK; initial catalog=pubs;integrated security=SSPI;persist " +
"security info=True;workstation id=BHASIN;packet size=4096";
The DataAdapter is associated with a select, insert, update, and delete Command object as follows:
this.sqlDataAdapter1.DeleteCommand = this.sqlDeleteCommand1; this.sqlDataAdapter1.InsertCommand = this.sqlInsertCommand1; this.sqlDataAdapter1.SelectCommand = this.sqlSelectCommand1;
this.sqlDataAdapter1.UpdateCommand = this.sqlUpdateCommand1;
Now for each of these Command objects, the following properties are set:
§The CommandText property
§The Connection property and
§The Parameters collection
Though there is a lot of code, it is basically very simple. Most of the code involves setting the parameters collection. Each field of the database table is added as a parameter to the parameters collection of the Command object and an insert, update, or delete query is built which includes all of these fields. I have explained this technique in relation to calling a stored procedure with a Command object in Chapter 3 (Using ADO.NET in the
.NET Framework) which you might like to refer to now.
It might be proper to talk about the relevance of these four commands here and also bring the DataSet into picture. In ADO 2.x, if you needed to perform a select, insert, update, or delete all in one method, four ADODB command objects would be required. In ADO.NET there are still four commands but all are linked to a single DataAdapter object. The DataAdapter uses any of these four command objects as appropriate.
I will incorporate the DataSet in the next section but this is an appropriate juncture to discuss it. As you may recall a DataAdapter sits between the DataSet and the database. The DataSet in turn may be bound to a list control like a DataGrid. The user interacts with the DataGrid and may change database data. Since the DataSet is bound to the DataGrid, any changes to the DataGrid are also made to the DataSet. You could provide a save button on the DataGrid that the user could click if he wanted to save changes to the database. These changes could be inserts, updates, or deletes to database rows. This button would call the update() method of the DataAdapter. The update() method checks the DataSet for all inserts, updates, and deletes and calls the appropriate update, delete, or insert command as appropriate. Note that the update() method of the DataAdapter performs the entire insert, update, and delete activities, in one go (and not just the update activity, as its name seems to indicate).
Finally the TableMapping property provides friendly names to refer to the database column names. Here the name and the friendly names are the same. For example the TableMapping for the au_id field is as follows:
new System.Data.Common.DataColumnMapping("au_id", "au_id").
This property links the names of the database columns in the DataSet with the database. Thus, if you have a very long database column name, you can refer to it with a short alias in the DataTable.
DataSet
In this step, I will create a Strongly Typed DataSet using the drag-and-drop features of Visual Studio.Net. I will add some code to populate the DataAdapter and the DataSet and then bind a DataGrid to the DataSet. Here are the steps to do it.
1.Select the Generate Dataset menu option from the Data menu.
2.The Generate DataSet dialog box appears as shown in Figure 29.14. Call the DataSet dsAuthors and ensure that the box that says
Add this DataSet to the designer is checked.
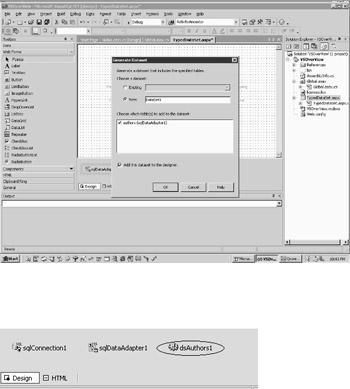
Figure 29.14: The Generate DataSet dialog box.
3.An instance of the DataSet called dsAuthors1 appears at the bottom of the form and the object dsAuthors.xsd displays in the Solution Explorer. This is shown in Figure 29.15.
Figure 29.15: An instance of the DataSet is created. by VS.
If you note the code generated in the Code Behind file at this stage, you will observe the following:
A protected variable dsAuthors1 of type dsAuthors is declared as follows:
protected VSOverView.dsAuthors dsAuthors1;
An instance of dsAuthors called dsAuthors1 is created using the new keyword as follows:
this.dsAuthors1 = new VSOverView.dsAuthors();
The DataSetName, Locale, and Namespace properties for dsAuthors1 is set as follows:
// dsAuthors1
this.dsAuthors1.DataSetName = "dsAuthors";
this.dsAuthors1.Locale = new System.Globalization.CultureInfo("en-US");
this.dsAuthors1.Namespace = "http://www.tempuri.org/dsAuthors.xsd";
4.Now drag and drop a DataGrid from the Web Forms Toolbox onto the web form. In the next step, I will bind this DataGrid to the DataSet.
5.In this step, create the Bind() method which will populate the DataSet using the Fill method of the DataAdapter and bind the DataGrid to the DataSet as follows:
6.public void Bind()
7.{
8.sqlDataAdapter1.Fill(dsAuthors1);
9.DataGrid1.DataSource=dsAuthors1;
}
Finally call the Bind method in the Page_Load event as follows:
private void Page_Load(object sender, System.EventArgs e)
{
if (! IsPostBack)
{
Bind();
}
}
Visual Studio.NET has wizards to build methods and properties, which I leave to you to explore. Typing Ctrl+Shift+C or selecting View/Class View will bring up the Class View window. This view lets you explore the methods, properties, and fields of the class. If you right-click on the class name and select Add, you will be able to access wizards that help you create a method, property, indexer, or field.
10. Build and run the form by pressing F5.
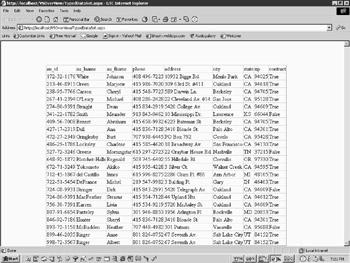
Figure 29.16 is the screenshot of the resulting output.
Figure 29.16: The final output.
You will appreciate that Visual Studio.NET allowed us to present database data in a DataGrid with only a few lines of code. As a RAD tool, Visual Studio.NET handles well. The code it generates is elegant and concise and using it could cut down your development time quite a bit.
Chapter 30: Writing CRUD Applications with Visual Studio.NET
CRUD is the acronym for Create-Read-Update-Delete, which are the four basic functions of database interaction. Visual Studio.NET goes beyond building pretty screens and nifty graphical user interfaces. As you will see in this chapter, you can use Visual Studio.NET to build a powerful database application that has functionality to select, insert, update, and delete database data.
In this chapter, I will build a web form which will display records from the stock_master table. This form, which will be built using Visual Studio.NET will provide functionality for the addition, modification, and deletion of database data.
Create a New C# ASP.NET Web Application
As always, you need to create a new ASP.NET Web application. I have chosen C# as my scripting language. Here are the steps to create the new application.
1.Create a new Web application by either clicking on the New Project button on the StartPage or by selecting File/New/Project.
2.Select Visual C# Projects on the left pane and ASP.NET Web Application on the right. I have called this project Chapter30. Delete the WebForm1.aspx that is created. Add a new web form and call it StockMaster.aspx.
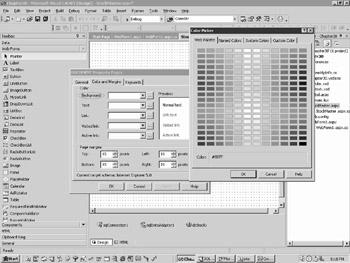
3.Select a BackGround color for StockMaster.aspx by right -clicking on a blank portion of the web form and selecting a Background color from the
Color and Margins tab of the Document Property Page as shown in Figure 30.1. I have selected the color #99cc99.
Figure 30.1: Setting the BackGround color of the web form.
4.Add the SqlClient namespace to the Code Behind file. Visual Studio.Net automatically adds all the required namespaces except for the Sql Managed provider. Add this namespace as follows:
5.using System.Data.SqlClient;
The namespace section will now look like this: using System;
using System.Collections;
using System.ComponentModel; using System.Data;
using System.Drawing; using System.Web;
using System.Web.SessionState; using System.Web.UI;
using System.Web.UI.WebControls; using System.Web.UI.HtmlControls; using System.Data.SqlClient;
The Data Components
Now, add a SqlConnection, a SqlDataAdapter, and a DataSet as follows.
1.Create the SqlConnection and the SqlDataAdapter by dragging and dropping the stock_master table of the ASPNET sample database (installation instructions can be found in Appendix A) from the Server Explorer onto the form. The Server Explorer will show the stock_master table as shown in Figure 30.2.
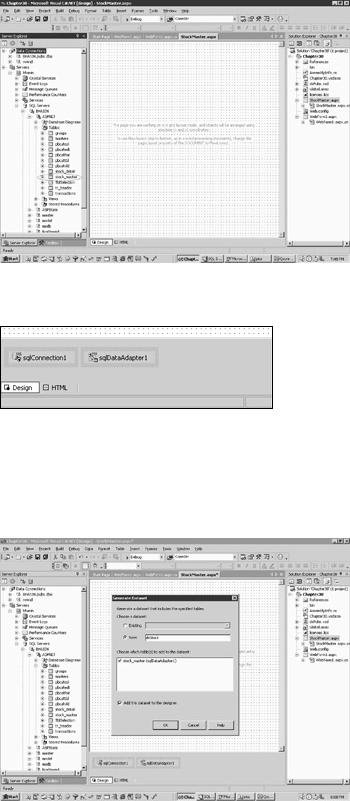
Figure 30.2: The stock_detail table in the Server Explorer.
The resultant form has a SqlConnection and a SqlDataAdapter called
SqlConnection1 and SqlDataAdapter1 respectively as shown in Figure 30.3.
Figure 30.3. The SqlConnection and SqlDataAdapter generated by Visual Studio.
2.Select the Generate Dataset menu option from the Data menu (you
have to be in the design mode to see this option) or Select Generate DataSet from the property page of the SqlDataAdapter.
The Generate DataSet dialog box appears as shown in Figure 30.4. Call the DataSet dsStock and ensure that the box that says Add this DataSet to the designer is checked.
Figure 30.4: Generating the DataSet.
§ An instance of the DataSet called dsStock1 appears at the bottom of the form and the object dsStock.xsd displays in the Solution Explorer.
The DataGrid
Add a DataGrid to the web form, which will act as the main user interface. To do this, drag and drop a DataGrid from the Web Forms Toolbox onto the web form.
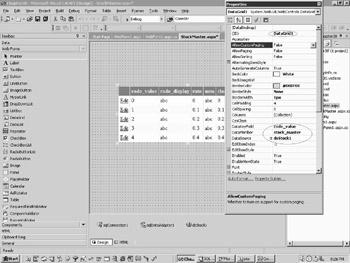
You must now set a number of properties (attributes) for the DataGrid. To do this, rightclick on the DataGrid and select Properties. The property page for the DataGrid will appear as shown in Figure 30.5.
Beautify the DataGrid by clicking on the AutoFormat hyperlink at the bottom of the property page and selecting Classic2. Now set the DataGrid properties as detailed below:
§DataSource= dsStock1
§DataMember = stock_master
§DataKeyField = code_value
These selections are shown in Figure 30.5 and are circled in red.
Figure 30.5: Setting the Properties of the DataGrid.
Now switch to HTML view and note that the DataSource, DataMembers, and DataKeyField attributes are added to the DataGrid element tag as follows:
<asp:datagrid id="DataGrid1"
------------------------------------
------------------------------------
DataSource="<%# dsStock %>"
DataMember="stock_master"
DataKeyField="code_value">
Selecting DataGrid Columns
If you do not already have the property page open, do so by right clicking (in the Design View) on the DataGrid and selecting Properties. Click on the hyperlink called Property Builder (this appears at the bottom of the Property page). Click on Columns. Select all the columns by clicking on All Fields in the Available Columns list box and then clicking the forward arrow (>). This is shown in Figure 30.6.
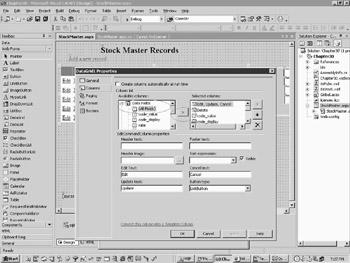
Figure 30.6: Selecting the columns of the DataGrid.
If you view the form in the HTML view, you will note that the <Columns> element tag is generated as follows:
<Columns>
<asp:EditCommandColumn ButtonType="LinkButton"
UpdateText="Update" CancelText="Cancel" EditText="Edit">
</asp:EditCommandColumn>
<asp:BoundColumn DataField="code_value" HeaderText="code_value">
</asp:BoundColumn>
<asp:BoundColumn DataField="code_display" HeaderText="code_display">
</asp:BoundColumn>
<asp:BoundColumn DataField="rate" HeaderText="rate">
</asp:BoundColumn>
<asp:BoundColumn DataField="uom" HeaderText="uom">
</asp:BoundColumn>
<asp:BoundColumn DataField="closing" HeaderText="closing">
</asp:BoundColumn>
<asp:BoundColumn DataField="opening" HeaderText="opening">
</asp:BoundColumn>
</Columns>
Make the closing column read-only, as this column is updated automatically by a trigger on the stock_detail table. Also make the code_value column read-only, as this is the primary key column. To do this, in the HTML view, start typing, and Visual Studio.NET will try to auto-complete the tag by providing tag selections in a drop-down list. The closing and the code_value columns should look like this:
<asp:BoundColumn DataField="closing" HeaderText="closing" ReadOnly=True>
</asp:BoundColumn>
<asp:BoundColumn DataField="code_value" ReadOnly="True"
HeaderText="code_value">
</asp:BoundColumn>
Adding the Add, Edit, and Delete Hyperlinks
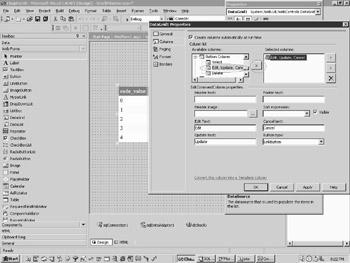
Now create the Edit, Update, and Cancel Button Columns (the Update and Cancel hyperlinks appear in the Update mode of the DataGrid). To do this, scroll down in the Available Columns box till you see Button Columns. Expand this list and you will see the option Edit, Update, Cancel as shown in Figure 30.7.
Figure 30.7: Selecting the Edit,Update,Cancel buttons.
Click the Add Button (the forward arrow). This will create an Edit hyperlink. If you view the web form in HTML view, you will note that the EditCommandColumn tags have been created with the UpdateText, the CancelText, and the EditText attribut es. If you remember, these are the hyperlink captions that display with the appropriate update, cancel, or edit hyperlink. The Edit hyperlink displays initially in the DataGrid. When you click on it, the DataGrid displays in the Edit mode and the Update and Cancel hyperlinks display at this stage.
<asp:EditCommandColumn ButtonType="LinkButton"
UpdateText="Update"
CancelText="Cancel"
EditText="Edit">
</asp:EditCommandColumn>
Add a Delete Button in the same way as you added the Edit, Update, and Cancel Button Column. This Button Column selection will appear below the Edit, Update, and Cancel Button Column in the Available Column list. This is how the Delete ButtonColumn will look like in the HTML view:
<asp:ButtonColumn Text="Delete" CommandName="Delete">
</asp:ButtonColumn>
Now you have two hyperlinks in the DataGrid called Edit and Delete. If they are not beside each other, you can move them around using the up and down arrow, or remove them from the list by using the cross.
Drag and drop a LinkButton control from the ToolBox onto the web form. Place it over the DataGrid and under the page title. Right -click on it and select Properties. Set the following properties:
§ID = Add
§Text = Add a new record
§ToolTip = Add a new inventory master
Now, double-click on the LinkButton control. A blank method skeleton in the Code Behind file is created which is called Add_Click. We will code this method later. The skeleton created is as follows:
private void Add_Click(object sender, System.EventArgs e)
{