


Chapter 18
Mastering Your Final Track
In This Chapter
\Enhancing the mix with EQ \Controlling dynamics with compression
\Reaching competitive loudness with limiting \Using audio references to improve your mix
After a track has been mixed, a mastering stage puts the final polish on the track. The level is matched to reference levels, and if needed, EQ
and dynamics processing is applied. In the case of an album project, the mastering stage can include making global refinements and song sequencing and cataloging.
For professional situations, the best practice is to hire someone to master your track. Someone with a fresh set of ears and nothing but the best equipment can raise the level of your mix and turn it into a golden master. Sometimes, just sending a signal through a high-end compressor or EQ can improve the sound. Other times, a mastering engineer will need to adjust the sound to compensate for a poorly tuned room. If the project warrants it, let go and let your work be improved.
However, not all projects need outside mastering. Sometimes it’s not practical to pay for a mastering service. You might be under a deadline that forces you to do it yourself, or you might want to avoid extra expenses when the project budget is low. Logic Pro gives you the tools you need to master your own music. You can even be the fresh set of ears that masters someone else’s mix.
In this chapter, you discover how to enhance your mix, boost the volume to competitive levels, and support your mastering choices with reference audio.
Fine-Tuning EQ
Ask mastering engineers if they put EQ before or after compression and they’ll tell you that it depends, leaving you more confused than before. I think it’s safe to say that both alternatives can work just fine. If you’re making
318 Part V: Mixing, Mastering, and Sharing Your Music
only subtle changes, the EQ and compressor shouldn’t affect each other too much. If your EQ is inserted before the compressor and you make extreme EQ changes, the compressor behavior can be affected. In that case, you might want to put the EQ after the compressor. Sometimes, cutting unwanted frequencies before the compressor can help you do a better job of compressing. Beginners should put the EQ before the compressor when they master their track, and keep the changes subtle.
\Your mastering effects chain is commonly used on the stereo output channel strip. That way, all the audio in your project will be affected by the plug-ins. If
you’ve imported multiple audio tracks into your project for mastering, as in the case of an entire album, you may want separate control over each track’s mastering effects chain. In this case, you would put the effects on the individual track’s channel strip, not the stereo output. More details are given in the “Matching levels to other recorded material” section, later in the chapter.
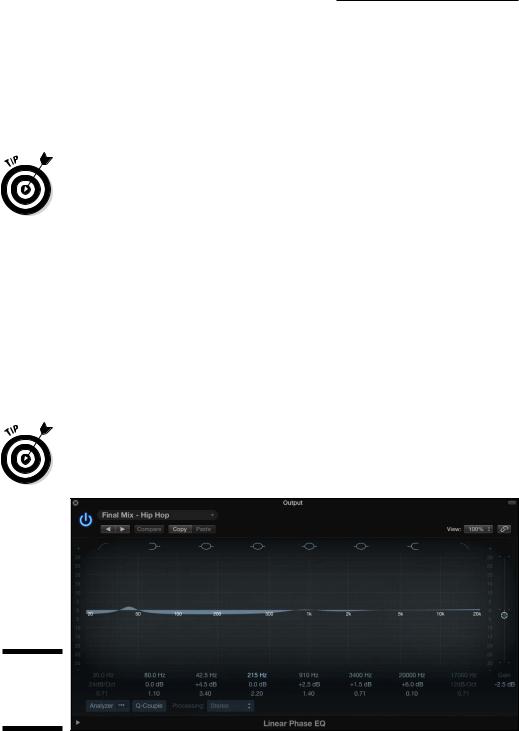
Using Linear Phase EQ
Linear Phase EQ, shown in Figure 18-1, has the same controls as Channel EQ, which is described in Chapter 16. Linear Phase EQ works best in mastering situations because it keeps the stereo audio in phase even under extreme levels of gain, which requires more processing power. Linear Phase EQ doesn’t work well on single tracks because it introduces latency that can affect the timing of the signal relative to the other tracks. The higher processing and latency makes this EQ ideal for mastering single stereo tracks.
\Linear Phase EQ shares settings with Channel EQ. You can switch between the
two plug-ins and they will retain the current settings.
Figure 18-1:
The Linear
Phase EQ
plug-in.
\\
Chapter 18: Mastering Your Final Track 319
|
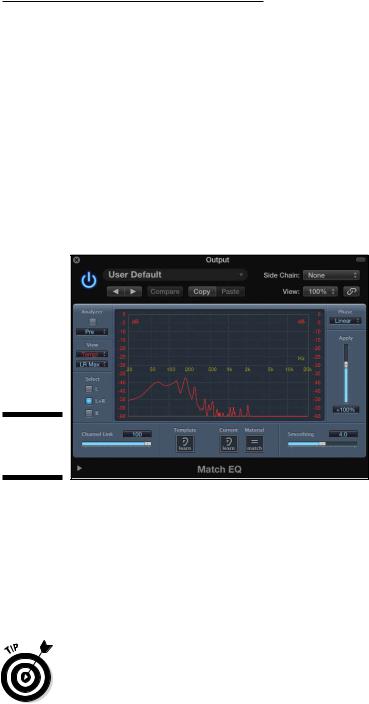
Matching a reference mix with Match EQ |
|
Match EQ (described in Chapter 16) is a great tool to help you get a specific |
|
sound. You can manipulate your audio only so far after your mix is com- |
|
pleted, but the mastering phase is a great time to analyze the frequency con- |
|
tent of your mix and compare it to a reference mix. You can even adjust your |
|
mix to capture more frequencies similar to the reference mix. To analyze a |
|
reference audio file using Match EQ, follow these steps: |
\ |
1.\ Drag the reference audio file onto the Template Learn button. |
\ |
The audio is analyzed and a frequency curve is added to the graphic dis- |
|
play, as shown in Figure 18-2. |
Figure 18-2:
The Match
EQ plug-in.
\\
\2.\ Drag the current audio file that’s being mastered onto the Current
|
Learn button. |
\ |
The audio is analyzed, and a frequency curve is added to the graphic |
|
display. |
\3.\ Click the Material Match button to apply a match EQ curve to the
|
audio. |
\ |
4.\ Drag the Apply slider to adjust the level of the match EQ. |
\ |
Don’t expect miracles with Match EQ. I’ve heard it produce amazing and horri- |
|
ble results. At the very least, the graphic display will enlighten you to the dif- |
|
ference in EQ between the audio you’re mastering and the reference audio. |
320 Part V: Mixing, Mastering, and Sharing Your Music
Adding Multiband Compression
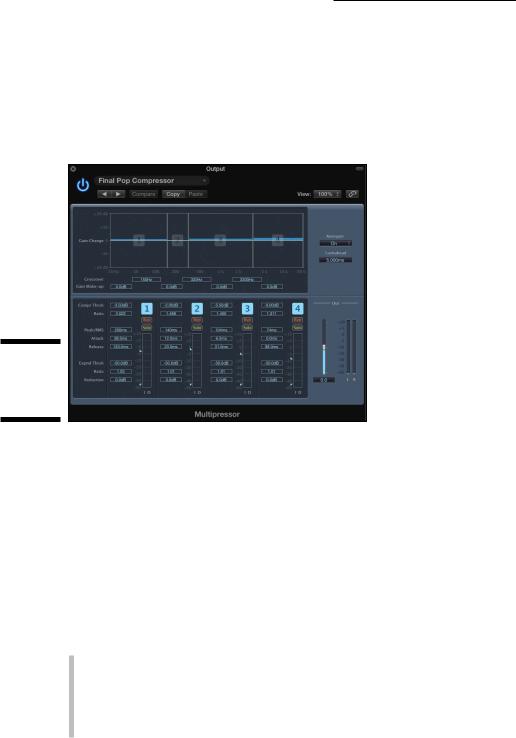
Multiband compression allows you to separate frequency bands and compress them independently. (For the details on compression, see Chapter 16.) Logic Pro comes with a plug-in called Multipressor, shown in Figure 18-3, which can compress up to four different frequency bands.
Figure 18-3:
The Multi
pressor
plug-in.
\\
Multiband compression can produce subtle or extreme results. Your main goal is to raise the overall level without negatively affecting the balance of the mix. You also want the volume level to match the music in your marketplace. Multipressor has many presets that will help you achieve these goals.
Using Multipressor
You can insert Multipressor on a channel strip by clicking an effects slot and choosing Dynamics Multipressor. Many of its parameters are similar to the Compressor plug-in described in Chapter 16. Here’s a description of the parameters that are unique to the Multipressor plug-in:
\\Gain Change: Drag the horizontal bars in the graphic display up or
down to raise or lower, respectively, the gain of that particular frequency band. You can adjust the gain also by using the Gain Make-Up fields.
You raise the gain after a signal has been compressed because, as you reduce the level of the peaks via compression, you can raise the overall level to get the signal louder.