

Chapter 13
Arranging Your Music
In This Chapter
\Arranging tracks and regions in the tracks area \Making global changes to your arrangement \Arranging techniques to create interest \Creating groove templates to enhance timing
When you arrange music, you’re organizing instruments and parts until they sound and feel good and capture your listener’s attention. Logic
Pro gives you a structured and flexible environment to make your arranging skills develop and blossom. You get instant feedback on your changes and tools to make improvements quickly. With Logic Pro as your arranging partner, you’ll find that it does most of the work, leaving you to enjoy the results.
In this chapter, you discover how to make your grooves feel better and tighter. You learn how to systematically build an arrangement that will keep your listeners interested. And you find efficient ways to enhance your arrangement and create parts that stick.
Working in the Tracks Area
After all your tracks are recorded, it’s time to arrange them. You’ll do most of your arranging work with regions in the tracks area, deciding which regions to play, and when and where to play them.
Recording much more material than you need to build a well-organized arrangement is a common practice. Expert arrangers will tell you that a big part of arranging is deciding what not to play. With Logic Pro’s visual tracks area, you should have no challenges organizing your regions into pleasing patterns that stimulate and entertain.

206 Part IV: Arranging and Editing Your Project
\ |
|
You must select Show Advanced Tools in the Advanced Preferences pane to get |
|
|
the most out of Logic Pro X and the information in this chapter. Choose Logic |
|
|
Pro X Preferences Advanced Tools and then select Show Advanced Tools. |
|
|
Using the ruler
The ruler is the place your eyes look when you need to know where you are in the project. The ruler shows you the position of the playhead and regions in the tracks area, and it quickly lets you know how much of the project you’re seeing in the main window. You use the ruler also to guide you as you move regions in your arrangement.
In Chapter 2, you find out how to set the ruler to display bars and beats or clock time from the General pane of Project Settings (Option-P). But you can have the best of both worlds and view bars and beats as well as clock time by displaying the secondary ruler. To show the secondary ruler, choose View Secondary Ruler (Control-Option- -R) on the tracks area menu bar. A second ruler will appear showing either bars and beats or clock time, depending on your current selection in the project preferences.
A third ruler that’s useful to have available is the marquee ruler. Choose View Marquee Ruler on the tracks area menu bar. A small band of empty space, called the marquee strip, will appear below the main ruler. The marquee ruler shows the location of the currently selected regions. You can drag the marquee selection forward or backward in your project or adjust the edges of your selection.
By default, the marquee tool is set as your -click tool. This means you can quickly make selections using the marquee tool by -dragging across the regions you want to select. The marquee tool is also great for setting the playback position because playback always begins from the left side of your marquee selection. If your cursor is at the bottom of the main window, it can be faster to make a quick marquee selection to set the playback position instead of moving your cursor to the top of the tracks area and clicking in the ruler to set the playback position.
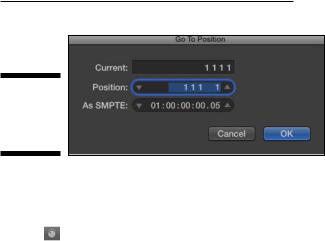
\An advanced and precise way to navigate your project is to use the Go to Position dialog, shown in Figure 13-1. Press / or choose Navigate Go
To Position. When the dialog opens, type the bar number and click OK or press Return. This method is my preferred way of navigating Logic Pro because the key commands are so much faster than using a trackpad or mouse.
Chapter 13: Arranging Your Music 207
Figure 13-1:
The Go to
Position
dialog.
\\
Scrubbing the arrangement
\\ You can drag your cursor along the ruler to audition your project, a process known as scrubbing. Scrubbing is useful when you need to find a precise spot for an edit. In the transport, click the pause icon (shown in the margin). If the pause icon isn’t visible, customize the control bar as described in Chapter 3, and select Pause on the transport menu. Drag your cursor along the bottom part of the ruler, forward or backward, and the playhead will scrub the audio and MIDI at the speed of your cursor.
Sometimes, you might not want your MIDI regions to scrub with your audio. To scrub only audio in the tracks area, choose File Project Settings MIDI, click the General tab, and deselect the Scrubbing with Audio in Tracks Area check box. If an audio region is selected in the tracks area, only the selected audio will be scrubbed.
Although not enabled by default, you can set up key commands to Scrub Rewind and Scrub Forward in your project. You find out how to create key commands in Chapter 3.
Investigating the region inspector
The inspector has a lot of arranging power. And because a lot of arranging is done with regions, the region inspector area is a great arranging tool. Display the inspector (I) and click the disclosure triangle to display the region inspector area, which is shown in Figure 13-2. When you select a region or multiple regions in the tracks area, the region inspector is updated based on the selection. If
you want to select all the regions and edit them simultaneously using the region inspector, click the track header, and all the regions on the track will be selected. Then you can edit them as a group from the inspector.

208 Part IV: Arranging and Editing Your Project
Figure 13-2:
The region inspector.
\\
The parameters available in the region inspector depend on the type of selected track. All region inspectors have an additional disclosure triangle to hide and show more parameters. The benefit of editing the regions in the inspector is that the edits are nondestructive. You can always go back to the region’s original state by undoing the inspector changes.
Here’s a description of some of the available parameters:
\\Mute: Mute the selected regions.
\\Loop: Loop the selected regions indefinitely or until they reach the next
region on the track.
\\Quantize: Correct the timing of notes. Choose the quantize value on the
pop-up menu and all your notes will snap to the nearest division.
\\Q-Swing: Determine the amount of shuffle feel to add to your quantize
value. A setting between 50% and 75% will give you a natural swing feel.
\\Transpose: Change the value in the Transpose field to transpose MIDI
regions and Apple loops.
\\Gain: Raise or lower the volume of audio regions and Apple loops. The
main downside of using the Gain field to lower the volume of regions is that the audio waveform gets smaller in the tracks area and audio editors. It’s better to use this Gain parameter to raise the level of tracks that are recorded too low.

Chapter 13: Arranging Your Music 209
\\Delay: Adjust the timing of your regions. A great use for the Delay field is
with orchestral choir patches. Because choir patches have a slow attack time, delaying the region by a negative value pulls the region forward in the project. You can get a natural timing of the choir with the rest of the tracks by adjusting the delay to compensate for the slow attack. If you want a region to have a laid-back feel, the Delay setting is perfect for this kind of experimentation.
\\Fade In/Out: Fade in and out audio regions. By using the region inspec-
tor, you can quickly fade multiple tracks, such as drums, simultaneously. You often need to fade into the beginning of audio regions to minimize room noise that’s present before the part begins. For example, you may need to remove room noise from live drums. With the region inspector, you can select an entire group of drum tracks and fade them in and out.
Investigating the track inspector
Below the region inspector is the track inspector, as shown in Figure 13-3. You use the track inspector to edit the currently selected track. To edit multiple tracks simultaneously, first select them by Shift-clicking the track headers.
Figure 13-3:
The track inspector.
\\
\ |
|
You can select a region without selecting the track that the region is on, so |
|
|
make sure that you select the track and not just a region on the track. |
|
|
|
|
|
|
Similar to the region inspector, the track inspector shows you different parameters depending on the type of track selected. Here’s a description of some of the parameters available:
\\Icon: Control-click the track icon to choose an icon on the pop-up menu,
as shown in Figure 13-4.
\\Channel: Display the channel strip type and number. The channel
parameter is for reference only and isn’t editable.