

98 Part II: Digital Recording and Using Prerecorded Media
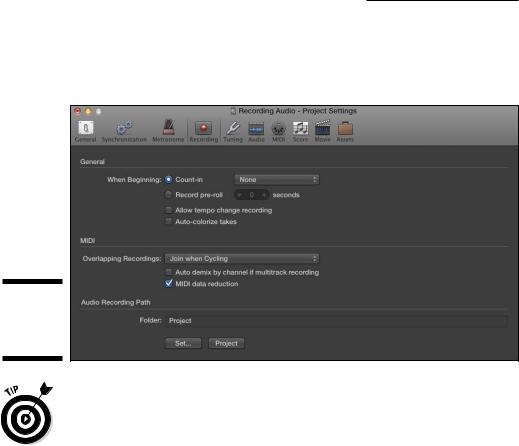
If you want to adjust the number of bars that the metronome counts in before recording, choose File Project Settings Recording and select the number of bars or beats you want on the drop-down menu, as shown in Figure 6-5.
Figure 6-5:
The recording Project Settings.
\ |
If you’re recording a slower song, select the Division check box to give your- |
|
self more clicks to reference the time. And if you’re recording a drummer, |
|
you’ll be a recording session hero. |
Recording Your First Audio Take
In the recording world, a single recording is called a take. Recording a good take is like capturing something special and elusive. Logic Pro helps you capture the moment quickly and easily.
With your track selected and record enabled, you can begin recording as follows:
\1.\ Place the playhead where you want to begin recording.
\2.\ Press R or click the record icon in the control bar transport, as shown
in Figure 6-6.
\ |
3.\ Wait for the count-in and then start playing. |

Chapter 6: Recording Audio |
99 |
\4.\ When you’re finished, click the stop icon on the transport or press the
|
spacebar. |
\ |
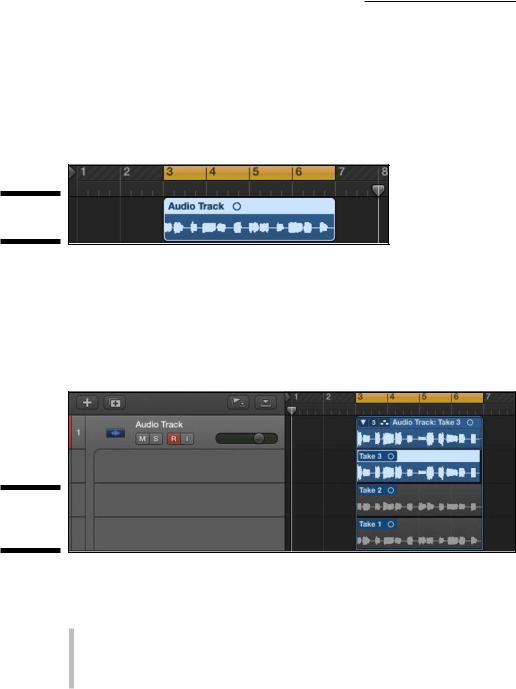
A new audio region will fill the area where you began and stopped |
|
recording, as shown in Figure 6-7. |
Figure 6-6:
The control bar transport.
Figure 6-7:
A recoded audio region.
To play back what you just recorded, place the playhead at the beginning of your newly recorded region and then click the play icon on the transport or press the spacebar. When you’re finished listening to your new recording, press the spacebar again and the project will stop playing.
Recording Multiple Takes in Cycle Mode
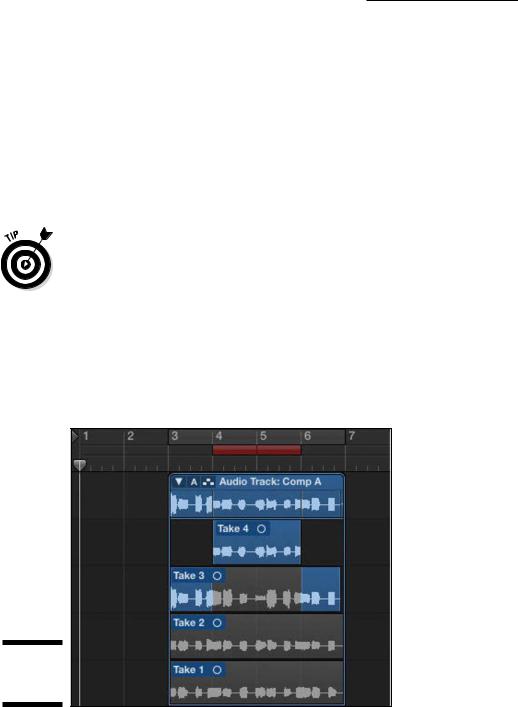
You can record additional recordings, or takes, on a track that already contains audio regions. A take folder is created to contain the original and new takes. In cycle mode, new lanes are created each time the cycle passes.
100 Part II: Digital Recording and Using Prerecorded Media
When cycle mode is enabled, playback or recording begins at the left locator and repeats when it reaches the right locator. To set up cycle mode, set the left and right locators by dragging from left to right in the upper half of the ruler in the tracks area. The cycle area will be displayed as a yellow strip in the upper half of the ruler, as shown in Figure 6-8. You can turn cycle mode on and off by pressing C or clicking the cycle icon in the control bar (refer to Figure 6-6).
Figure 6-8:
Cycle mode.
\\
To record in cycle mode, turn on cycle mode and begin recording as you did previously. After the second take is recorded, a take folder is created in the cycle area, as shown in Figure 6-9, and new lanes are added with each pass through the cycle. This is a great way to get several takes that you can edit into a perfect (or close to perfect) take. You learn how to edit your takes in Chapter 14.
Figure 6-9:
An audio take folder.
A key to using cycle mode is setting locators. You can set locators in many ways. Here are a few useful locator commands:
\\Choose Navigate Set Locators by Selection ( -U) to set the locators
according to the regions you’ve selected.
\\Choose Navigate Auto Set Locators Enable Auto Set Locators to auto-
matically follow your region selection or marquee tool selections.

Chapter 6: Recording Audio 101
\\Set the locators manually in the control bar LCD if you have Locators
(Left/Right) selected in the Customize Control Bar and Display options (see Chapter 3 for details).
\Open the Key Commands window (Option-K) and type locators in the search bar. You’ll find dozens of key commands. After you browse the available loca-
tor key commands, you’ll have an idea of what you can do and how important locators are to a speedy workflow.
Recording Multiple Inputs
You aren’t limited to recording one track at a time. You can record multiple tracks by record-enabling several tracks at once and following the same steps as recording a single take. You can also create multiple takes on multiple tracks at once. Say that three times fast.
To record multiple tracks at once, set each track to the correct input, as you did previously. When all track inputs are set correctly, you can begin recording. You can even record multiple takes on multiple inputs at the same time. The number of tracks you can record at one time depends on your hardware and computer power.
Punching In and Punching Out
Replacing just a portion of a track is called punch recording. You play the track, punch in and record the new part, and then punch out when you’re done. It’s like punching the work clock for a bar or two. Play, punch in, punch out, and play again.
The first way to set up punch recording is to do it on-the-fly, as the track is playing, as follows:
\1.\ Choose Record Allow Quick Punch-In.
\ |
This is the default setting. |
\2.\ Choose Record Record Button Options Record/Record Toggle.
\ |
The settings of both the record icon and the record key command are |
|
updated so that clicking the record icon or using the key command |
|
toggles the record state on or off, while continuing to play. |
102 Part II: Digital Recording and Using Prerecorded Media
\ |
3.\ Press the spacebar to play your project. |
\4.\ At the point where you want to begin recording (punch in), press R.
\5.\ At the point where you want to stop recording (punch out), press R
again.
\ |
Your project continues playing but no longer records. |
While your project is playing, you won’t be able to hear the input of the selected track until you begin recording. This setting is the default and is useful if you need to hear the recorded track to time the punch in. After you begin recording, you’ll be able to hear the input. But if you want to listen to the input during playback as well as during recording, turn off Auto Input Monitoring on the Record menu.
\If you want to listen to the input of tracks that are not record-enabled, click
the track’s input monitoring icon (refer to Figure 6-2).
|
When you need more precision in your punch recording, you can preprogram |
|
the punch in and punch out points. This technique is called autopunch record- |
|
ing. To begin autopunch recording, follow these steps: |
\ |
1.\ Click the autopunch icon in the control bar (refer to Figure 6-3). |
\ |
If you don’t see the icon, customize the control bar. A second ruler is |
|
shown at the top of the tracks area, as shown in Figure 6-10. |
Figure 6-10:
Autopunch
mode.
\\