

Chapter 16: Mixing Your Project 297
Adjusting the EQ of Your Tracks
EQs (equalizers) are used to adjust the frequencies of your tracks. You might need to correct audio sources, such as microphones, recording environments, or instrument sounds. You can use EQ also to enhance the tone of a track and make it fit in the context of the entire mix. Several types of EQs are available, such as graphic EQ, parametric EQ, and lowor high-shelf EQ. In this section, you will learn how to use EQ to adjust the sound of your mix.
\There’s no right way to EQ your tracks. Different genres of music handle frequencies differently, and a wide range of acceptable EQ exists even within a
genre. Because there’s no perfect amount of bass or treble, if it sounds good to you and your listeners, it’s good.
Adding Channel EQ
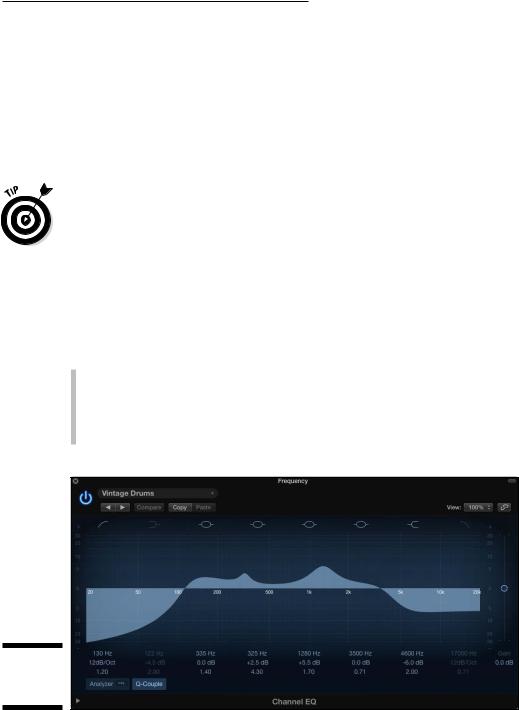
Logic Pro Channel EQ is a plug-in that also has a special place on the channel strip to display the EQ curve and quickly access the EQ controls. You can add the Channel EQ plug-in to a track in the following ways:
\\Double-click the EQ display on the channel strip. The Channel EQ plug-in
is added to the first available insert effects slot, and the plug-in interface opens, as shown in Figure 16-10.
\\Choose EQ Channel EQ from the channel strips effects slot, just as you
would add any other insert effect.
Figure 16-10:
The Channel
EQ plug-in.
\\

298 Part V: Mixing, Mastering, and Sharing Your Music
Channel EQ is capable of adjusting eight frequency bands simultaneously. You can turn any of the bands on or off by clicking the colored buttons at the top of the interface. Bands 1 and 8 are low-pass and high-pass filters, respectively. Bands 2 and 7 are low-shelving and high-shelving filters, respectively. Bands 3 through 6 are parametric bell filters. You can adjust the boost or cut of each band by dragging the frequency handle in the graphic display, dragging the values of the fields below the graphic display, or double-clicking the fields and entering the value directly. Here’s a description of the values:
\\Frequency: The top value adjusts the center frequency of the band.
\\Gain/Slope: The center value adjusts the level of boost or cut of the fre-
quency band. In the case of the low-pass and high-pass filters, the value adjusts the slope of the filter.
\\Q factor: The bottom value adjusts the frequency range that’s affected,
known as resonance or Q factor. Higher values lead to narrower frequency ranges.
You can adjust the gain of the entire track with the Gain slider on the right side of the interface. Click the Analyzer button below the frequency display to turn the Channel EQ analyzer on or off. Inside the Analyzer button is a Pre/Post button that toggles the analyzer display of the frequency curve before and after the EQ. This feature is useful when you want to see both the frequency content of the track (pre) and how the EQ is affecting the track (post). The Q-Couple button connects the frequency gain with the Q factor so that the resonance band narrows as you increase the boost or cut of the frequency.
|
Using match EQ |
|
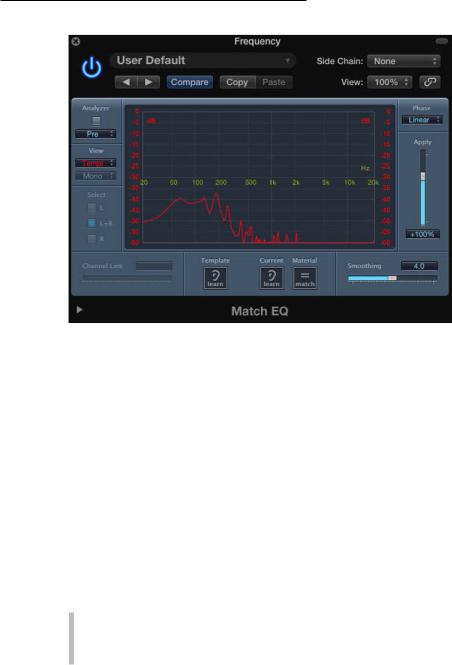
Logic Pro comes with several EQ plug-ins, and one of the more magical EQs |
|
is Match EQ, shown in Figure 16-11. It allows you to grab the frequency spec- |
|
trum of one audio track and apply it to another. You can use it on individual |
|
tracks, groups of tracks, or even your stereo output. It can’t take a folk song |
|
and make it sound like a heavy metal song, but it has many practical uses, |
|
especially for beginners. |
|
To match the EQ of one track to another, follow these steps: |
\ |
1.\ Add the Match EQ plug-in on the track to which the EQ is to be applied. |
\ |
The track with the Match EQ plug-in is the track that will be modified by |
|
the frequency curve of a different track. |
\2.\ On the Side Chain menu in the plug-in header, select the track to use
as a template.
Chapter 16: Mixing Your Project 299
|
|
|
|
|
|
|
|
|
|
|
Figure 16-11: |
|
|
|
|
The |
|
|
|
|
match EQ. |
|
|
|
\ |
|
\ |
|
|
|
||||
\ |
|
|
3.\ Click the Template Learn icon at the bottom of the plug-in interface. |
|
\ |
|
|
Learn mode turns on so you can create a template from the track selected |
|
|
|
|
on the Side Chain menu. |
|
\4.\ Play the project until the frequency curve stabilizes in the graphic
display.
\ |
5.\ Click the Template Learn icon to turn off learn mode. |
\6.\ Click the Material Match icon.
\ |
The new match EQ curve is added to the graphic display and applied to |
|
the current track. |
|
You can adjust the frequency curve by dragging the curve in the graphic dis- |
|
play. You can also adjust how much of the curve is applied to the track with |
|
the Apply slider on the right side of the interface. Drag the Smoothing slider |
|
to smooth the filter curve. Here are a couple more uses for Match EQ: |
\\Match the EQ of vocals recorded on a different day: The voice is a
dynamic instrument and often changes from day to day, causing issues if you track a vocal on different days. You can use Match EQ to remove the differences and create a consistent vocal sound.

300 Part V: Mixing, Mastering, and Sharing Your Music
\\Reverse-match conflicting tracks: If you have a track that’s conflicting
with another, drag the Apply slider to a negative value, which will invert the frequency curve and remove the conflicting frequencies. This trick is especially useful on bass guitar and kick drum, which frequently fight for space in the low end.
Adding Depth with Reverb and Delay
You accomplish the illusion of depth in your mix through the use of reverb and delay. Reverbs are designed to simulate acoustic spaces. Aside from using actual acoustic spaces, many different techniques have been used to create reverb effects. Logic Pro can re-create them all.
Mechanical and digital reverbs have distinct sounds and have become classic studio accessories. Plates and spring reverbs are classic mechanical reverbs. A plate reverb is a metal plate that vibrates when audio signals are sent into it. A pickup on the plate records the signal to get a shimmery reverb. Spring reverbs are common in guitar amps and have a spring that bounces and
gets picked up and mixed into the output. An impulse response is a digital algorithm that’s created by sending a sound into the space, recording what comes back, and analyzing the difference to replicate it. Impulse responses are realistic and more adjustable than an acoustic space.
\ |
If you want an intimate sound, it should be dry and up close, with less chance |
|
to bounce around. But if it’s a huge sound you want, you might want it to |
|
bounce through an arena or echo across mountaintops. |
Delays are reproductions of the original signal that are delayed. A tape delay uses actual electromagnetic tape to record the signal and play it back, which adds its own character. Digital delays provide exact copies of the original sound. The delayed signal can also be altered with filters or other processing to add interest.
You can use short delays to create a double-tracking effect, as if you had recorded the signal twice. Delays set to around 50 milliseconds can also simulate a small space. Sometimes, delays are preferable to reverbs for simulating acoustic spaces because they take up less room in the mix. You can get the famous slapback echo of Elvis and others with delays between 65 and 150 milliseconds. You can also tempo match multiple delays (multitap) at different parts of the beat for interesting rhythmic effects.
Chapter 16: Mixing Your Project 301
\The Haas effect, also known as the precedence effect, is a binaural psychoacoustic effect that makes your audio signal sound as if it’s coming from out-
side the speakers. Add a 30-millisecond delay panned opposite to the original signal for ultra-wide stereo signals. This technique is useful when you’re running out of room in the stereo spectrum of your mix.
Using Space Designer
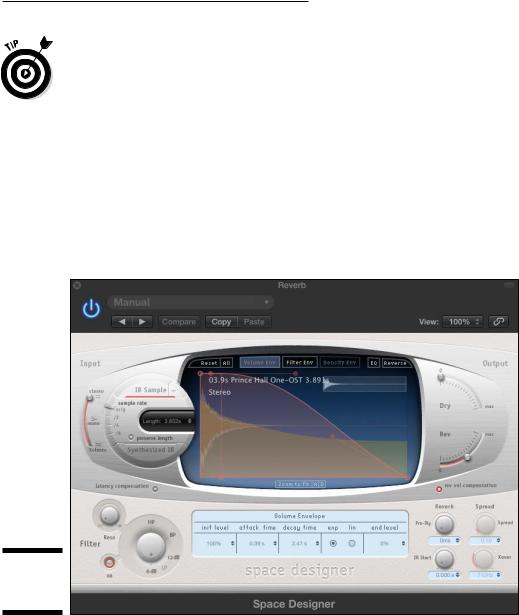
The Space Designer plug-in, shown in Figure 16-12, is a convolution reverb. It convolves, or combines, the audio signal with an impulse response to simulate acoustic environments. Space Designer can create any space, such as inside a cabinet, a plastic or cardboard box, or an opera house. Space Designer also has a synthetic impulse response to create unique effects.
Figure 16-12:
Space
Designer.
Space Designer is most often used on auxiliary tracks and used as an effects send because it is processor intensive. That way, you can send several instrument tracks to the same Space Designer plug-in on the auxiliary track.

302 Part V: Mixing, Mastering, and Sharing Your Music
Space Designer comes with many presets that you can access on the preset menu at the top of the plug-in. You can adjust the presets within the plug-in interface. Here’s a description of the Space Designer interface:
\\Impulse response parameters: The round area on the left side of the
interface is where you adjust the impulse response parameters. Click the IR Sample button or Synthesized IR button to switch between the impulse response samples and synthesized impulse response. Drag the Sample Rate slider to adjust the sample rate. Drag or enter a value in the Length field to determine the length of the impulse response. The Preserve Length button locks the length as you change the sample rate.
\\Main display with button bar: The center display and button bar is
where you edit the envelope or EQ curve. You change the view mode of the main display in the button bar at the top of the display.
\\Envelope and EQ parameters: You can edit the envelope and EQ in the
main display or numerically in the parameter bar below the display. The parameters you can adjust depend on the view mode of the main display.
\\Global parameters: On the right side of the interface is the output sec-
tion. Drag the slider to adjust the output levels. The input slider to the left of the impulse response parameters sets how to process stereo or surround signals. Below the main display are two buttons that turn on or off the latency compensation and reverb volume compensation features. The knobs at the bottom right of the interface adjust the reverb pre-delay and start point of all impulse response types, and the stereo spread and crossover frequency of the synthesized impulse responses.
\\Filter parameters: The knobs at the bottom left of the interface adjust
the filter type and resonance.
\Use less reverb, if at all, on tracks with a lot of low end, such as bass guitar and kick drum tracks. Adding a lot of low end to your reverb can muddy
your mix and leave less room for the instruments themselves. Stick to using reverb on instruments that benefit from depth, such as vocals and snare. Not every track in your mix needs to have reverb. And because your listeners can perceive only two or three levels of depth at a time, you can create distinct groups of depth: close (dry), near (a little reverb), and far (the most reverb).
Using Delay Designer
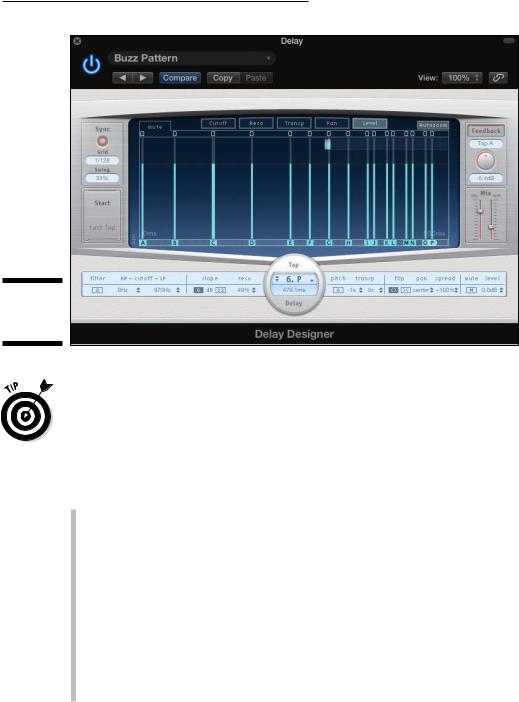
Delay Designer, shown in Figure 16-13, is a multitap delay that can have up to 26 individual taps (delays). Each tap can have a distinct sound, such as changes in the volume level, pan, filter, and even the pitch of the delay. It’s the most advanced delay that comes installed in Logic Pro X.
Chapter 16: Mixing Your Project 303
Figure 16-13:
Delay
Designer.
\If you need a simple delay, try one of the many other delays in Logic Pro, such as the Stereo Delay or Tape Delay, which are simple to use and sound great.
Delay Designer is a processor-intensive delay and unnecessary for most basic delay needs.
Delay Designer comes with presets that include everything from basic to warped delays. The presets are great starting places for designing your own delays. Here’s a description of the Delay Designer interface:
\\Sync section and tap pads: On the left side of the interface, you can
create taps in real time with the tap pads. Click the Start button to begin. The Start button changes to the Tap button, which you click every time you want to record a tap. Click the Last Tap button to end. Click the Sync button to sync Delay Designer to the project tempo. Adjust the sync settings with the Grid resolution and Swing fields.
\\Main display: In middle of the interface is the main display, where you
adjust the taps. Click the view mode buttons at the top of the display to change the displayed parameters. Click the toggle buttons at the top of each tap to turn tap parameters on or off. Each tap has a bright bar or dot that you can drag to change the level of the selected parameter. At the bottom of each tap is an identification letter that you can drag back and forth through time. You can copy taps by Option-dragging them.