

Chapter 8: Adding Media to Your Project 123
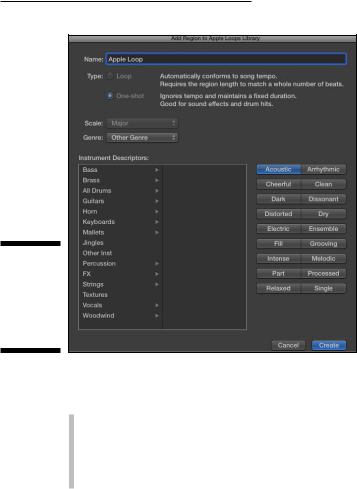
Figure 8-3:
The Add Region to Apple Loops Library window.
\\
You can create the following:
\\Loop: A loop will follow the project tempo. Loops are great for regions
you want to repeat again and again.
\\One-shot: A one-shot will not follow the tempo and will play until the
region completes. One-shots are great for sound effects or sounds that don’t have rhythmic content.
You can also choose the scale, genre, and instrument descriptors. Click the
Create button and your Apple loop will be added to the loop browser.
Adding Prerecorded Audio to Your Project
If you have audio files on your hard drive that you want to bring into your project, Logic Pro makes the process a breeze. In most cases, adding audio files to your project is a simple drag-and-drop process from Finder or from one of the Logic Pro browsers to an empty audio track.
124 Part II: Digital Recording and Using Prerecorded Media
Using the browsers to find audio files
To open the Logic Pro browsers, choose View Show Browsers or press F. The browsers open to the right of the tracks area, as shown in Figure 8-4.
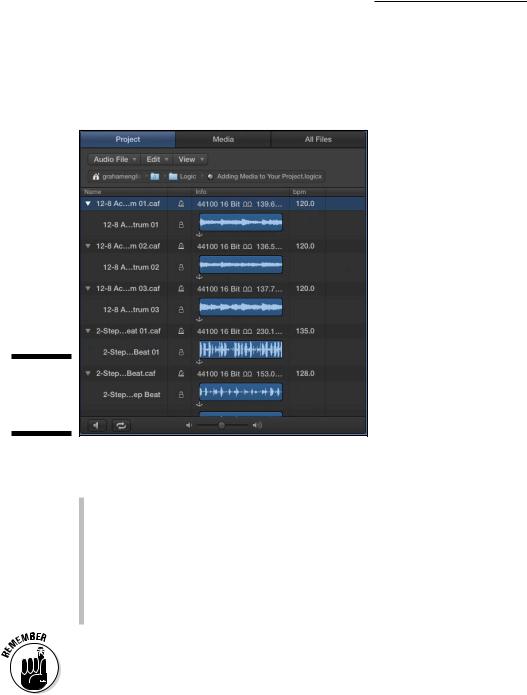
Figure 8-4:
The project audio browser.
\\
Logic Pro gives you three browsers for adding media to your project:
\\Project audio browser: Add or remove files that are already in your
project.
\\Media browser: Import audio and video into your project from the
system -wide media browser. You can also import GarageBand projects from the media browser.
\\All files browser: Import files from anywhere on your hard drive as
well as import settings from other Logic Pro projects. (For details, see Chapter 2.)
\ |
|
Show Advanced Tools must be enabled to view the project audio browser and |
|
|
all files browser. Choose Logic Pro X Preferences Advanced Tools, and |
|
|
select Show Advanced Tools. |
|
|
Chapter 8: Adding Media to Your Project 125
Adding audio to your project
All the audio you record or import into your project will show up in the project audio browser. Click the Project tab in the browser window to see all the audio that’s been collected in your project (refer to Figure 8-4).
At the top of the project audio browser are three menus:
\\Audio File: Add audio files from anywhere on your computer. You can
delete, back up, and move files. You can also convert audio files to different formats or convert selected regions to independent audio files on this menu.
\\Edit: Cut, copy, paste, and delete audio files. You can also select all,
used, or unused files on this menu. The project browser has its own undo history, which you can access on this menu.
\\View: Sort, show, hide, or group your audio files in the browser.
The file list has the following four columns:
\\Name: Displays the file name with a disclosure triangle next to it. Click
the disclosure triangle to display all the regions that use the audio file. Clicking a region will select the region in the tracks area. You can doubleclick the file and region name to rename them.
\\Icon: Displays icons that tell you whether the file or region is time-
stamped, follows the project tempo, contains tempo information, or is missing.
\\Info: Displays sample rate, bit depth, input format, and file size. It also
displays a waveform with an anchor icon. You can drag the icon to edit the absolute start time of the region. Click the center of the waveform to audition the audio file.
\\bpm: Displays the tempo of the audio file if the file contains tempo
information.
You can audition these files by clicking the play icon at the bottom left of the browser. Click the play icon again to stop. Click the loop icon to repeat the audio file after you click the play icon. A volume slider adjusts the volume of the audio file you’re auditioning.
You can drag the audio files and regions to existing audio tracks or to an empty area in the tracks area or track list, where a track will be created to contain the region.
126 Part II: Digital Recording and Using Prerecorded Media
Adding audio from the media browser
The second tab in the Browser window is the media browser. The media browser displays media created by other Mac applications such as iMovie, GarageBand, iTunes, or Logic Pro. If you want to import content from your iTunes library, which I do all the time to add reference tracks to my project, use the media browser.
At the top of the media browser are the following two tabs:
\\Audio: Import songs from your iTunes library and GarageBand projects.
\\Movies: Import movies from your Movies folder, iMovie projects, and
Final Cut Pro projects.
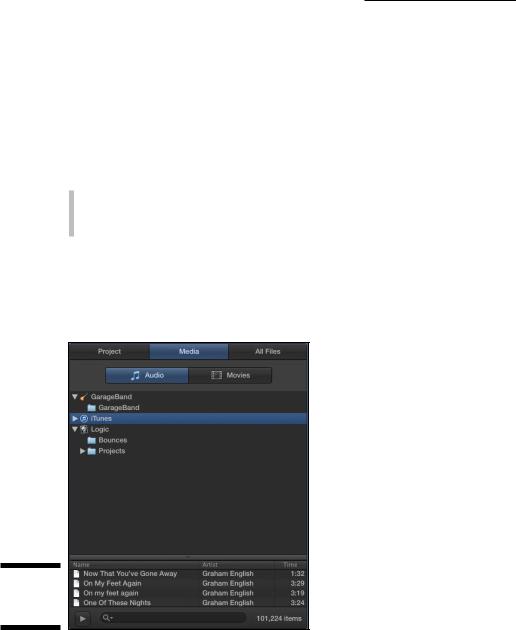
Below the tabs are the media libraries available on your computer. Selecting a library updates the results list at the bottom of the browser, as shown in Figure 8-5. At the bottom of the window are a play icon and a search field to find and audition your media.
Figure 8-5:
The media browser.
\\
To add media from the media browser, drag the media to an existing audio track or to an empty area in the tracks area or track list, where a track will be created to contain the region.

Chapter 8: Adding Media to Your Project 127
Adding audio from the all files browser
The third tab in the browser window is the all files browser. If you want to add audio, MIDI, or movies from your computer, you would do it from this browser, as shown in Figure 8-6. The all files browser is like the Finder app.
Figure 8-6:
The all files browser.
\\
Here’s a description of the elements in the all files browser:
\\Back and forward icons: Use these icons to navigate backward or for-
ward, respectively, in your browsing history.
\\Computer, home, and projects icons: These three icons will take you
to your Macintosh HD, user home directory, or Logic Pro projects directory, respectively.
\\List and column view icons: These icons display your files in list view
or column view, respectively.
\\File path selector: The file path is displayed in this area and is clickable
so that you can navigate up the file hierarchy.
\\Search field: Use the search field to find files in your current folder.
The plus icon to the right of the search field allows you to add up to 10 search filters.
\\Results list: Your current search results are displayed in this area. You
can sort the three columns — Name, Date, and Size — by clicking the column headers.