


Chapter 5
Introduction to Digital
Audio and MIDI
In This Chapter
\Understanding the fundamentals of digital audio \Getting high-quality audio from Logic Pro \Setting up audio and MIDI preferences \Connecting your audio and MIDI hardware
Even though Logic Pro does a great job of giving you exactly what you need, understanding the basics of digital audio and MIDI are still impor-
tant for making high-quality recordings. One of the first steps you take with a project is defining your project’s audio settings. These settings can have a big effect on the sound quality of your recordings. Your project’s audio settings can also affect compatibility with your hardware and other audio systems.
In this chapter, you find out how to set up Logic Pro to get the best sound quality. You discover how to connect your audio and MIDI devices and avoid common pitfalls. You also choose the recording audio file type that’s right for the job
Understanding Digital Audio
So what’s the big difference between digital and analog audio anyway? In analog recording, a representation (an analog) of the sound source is reproduced on a physical medium, such as records or tape. In digital recording, multiple measurements are taken of the sound source and stored digitally as binary code, or 1s and 0s. The process of measuring and recording digital audio is called sampling.

80 |
Part II: Digital Recording and Using Prerecorded Media |
The sample rate is how often a slice of audio is turned into a digit each second. The higher the sample rate, the higher the audio fidelity. You want high-quality audio even if your goal is to mangle and distort it. The noise you introduce into your audio should be a choice, not the result of a misunderstanding.
You also want a wide dynamic range, which is the ratio of loudest to quietest sound. Dynamic range is measured in decibels, or dB. CDs have a dynamic range of about 90 dB. Logic Pro is capable of 24-bit recording and has a dynamic range of around 125 dB. You’ll be pleased that Logic Pro is capable of recording audio at and exceeding industry standards, depending on your hardware capabilities.
In this section, you find out how to set your project’s sample rate and bit depth, and you choose the best audio file type for your project. This knowledge will ensure high sound quality and compatibility.
Acoustics 101
Ready to get out your calculus textbooks and start plotting sine waves? You’re not? Phew. Me neither. But it’s important to define some audio terms so you understand the choices you make as you record digital audio.
After you understand some basic acoustic theory, you’ll be able to identify how the choices you make in Logic Pro affect what you hear. Without getting too technical and long-winded, let’s define some aspects of sound:
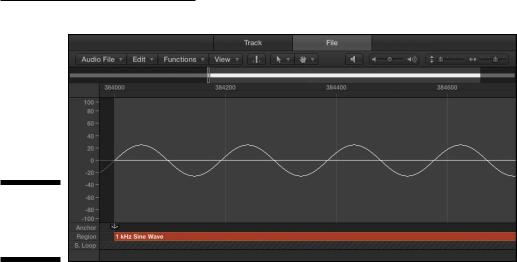
\\Frequency is the number of cycles completed by a sound wave in one
second, as shown in Figure 5-1. Frequency is measured in Hertz (Hz).
\\Wavelength is the distance traveled over one cycle of a sound wave.
\\Period is the duration of a sound wave cycle in time and is inversely pro-
portional to frequency. The lower the frequency, the longer the period.
Here’s why understanding some audio fundamentals is important. Audio has to travel through the atmosphere to get to you so you can perceive it. A low E string on a bass guitar has a frequency of 41.2 Hz and takes about 27 feet to complete a full cycle. Bass frequencies travel far, so you can hear the low boom of a loud car stereo coming a mile away. But bass doesn’t always sound good in a small space because it can’t complete a full wavelength without hitting a wall and bouncing around the room. And before you know it, all those bass frequencies pile on each other and multiply, causing room modes. Room modes are frequencies that can be too loud or too quiet based on how sound reacts to the room’s dimensions.
Chapter 5: Introduction to Digital Audio and MIDI |
81 |
Figure 5-1:
A sine wave in the audio file editor.
\\
Knowing a little bit about audio will enable you to make adjustments to your sound to improve its quality. Knowing what frequency is and that every sound is made up of multiple frequencies will help you as you record and mix your audio. In the upcoming sections, I keep the technical information to a minimum and the discussion as practical as the subject will allow.
Set your sample rate
Setting your project sample rate is one of the first things you should do before you begin recording audio. If your project consists only of software instruments and MIDI, you can change the sample rate at any time. But when audio is included in your project, changing the sample rate will require your audio to be converted to the new sample rate.
Logic Pro is capable of converting your audio to any sample rate, but this processing introduces the potential for degradation. Strive to capture clear recordings that need little processing. Beginning your project with the correct sample rate will help you achieve this goal.
If you must change the sample rate, downsampling (converting the sample rate from high to low) is preferable to upsampling. So start your projects with as high a sample rate as your hardware will allow or the project requires. The downsides of very high sample rates are larger file sizes and additional hardware processing. Your computer can’t hold as many tracks or effects plug-ins on a project with a higher sample rate.
82 |
Part II: Digital Recording and Using Prerecorded Media |
To set your sample rate:
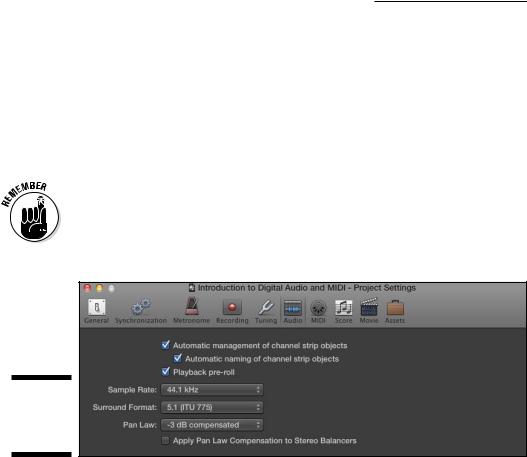
\1.\ Choose File Project Settings Audio.
\ |
|
The Project Settings window opens to the Audio pane, as shown in |
|
|
Figure 5-2. |
\ |
|
2.\ In the Sample Rate drop-down list, select the sample rate. |
\ |
|
Logic Pro supports the following sample rates: 44.1, 48, 88.2, 96, 176.4, |
|
|
and 192 kHz. |
\ |
|
CD audio uses a sample rate of 44.1 kHz and is ideal for most situations. |
|
|
For video production, 48 kHz is common. Higher sample rates are usu- |
|
|
ally reserved for audiophile recordings, such as classical music and DVD |
|
|
audio. However, as hardware and processing power improves, higher |
|
|
|
|
|
sample rates may become more common. |
Figure 5-2:
Audio project settings.
Determine your bit depth
Bit depth is the number of bits of information in each sample. A higher bit depth equals higher resolution for each sample. The default Logic Pro setting is 24-bit recording. If you turn off 24-bit recording, Logic Pro will record in
16 bit. Similar to your sample rate, the only downsides of using a higher bit depth are that it takes up more drive space and uses more processing power.
To turn on or off 24-bit recording:
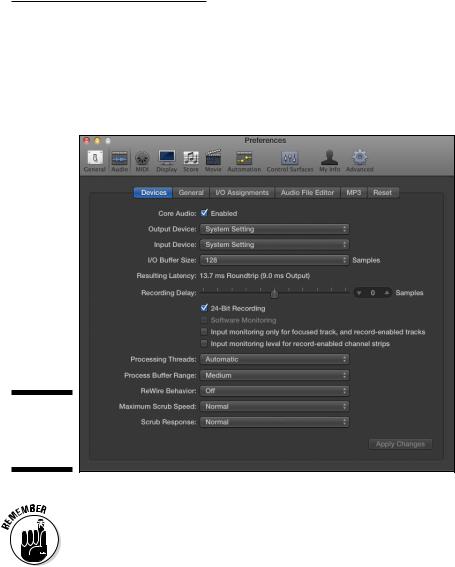
\1.\ Choose Logic Pro Preferences Audio.
\ |
The Preferences window opens to the Audio pane. |
\ |
2.\ Click the Devices tab, as shown in Figure 5-3. |
Chapter 5: Introduction to Digital Audio and MIDI |
83 |
\3.\ Select the Core Audio check box.
\4.\ In the middle of the screen, select or deselect the 24-Bit Recording
option.
\ |
When 24-bit recording is not selected, Logic Pro records in 16 bit. |
Figure 5-3:
The Devices
tab of Audio
Preferences.
\\
\ |
|
Bit depth is different than bit rate, which is the number of bits of information |
|
|
processed each second, as opposed to each sample. When exporting your |
|
|
project to lossy audio formats such as MP3, higher bit rates equal higher qual- |
|
|
ity sound. You choose a bit rate when you export your audio in Chapter 19. |
|
|
Choosing audio file types
When Logic Pro records audio, it creates an audio file on your hard drive. Different file types have different advantages. All recording file formats are lossless, so they have the same sound quality. The major difference in the recording file type is the recording duration.
84 |
Part II: Digital Recording and Using Prerecorded Media |
Logic Pro can record audio in the following file types:
\\AIFF: 4 GB size limit. AIFF has a stereo-file time limit between 20 minutes
and 3 hours and 15 minutes, depending on bit depth and sample rate. AIFF is the default Mac lossless audio file type. All Macs and most other operating systems can read AIFF files.
\\WAVE: 4 GB size limit. WAVE has a stereo-file time limit between 40 min-
utes and 13 hours and 30 minutes, depending on bit depth and sample rate. This file type is the default audio file type in Windows operating systems. To be nice to a Windows user, it can’t hurt to use the WAVE file type. WAVE also has a longer recording duration, which gives it an advantage over AIFF.
\\CAF: No size limit. CAF has a time limit of hundreds of years, if you can
call that a limit. Apple loops and sound effects installed with Logic Pro use the CAF file type.
To choose the recording file type for your audio recordings, follow these steps:
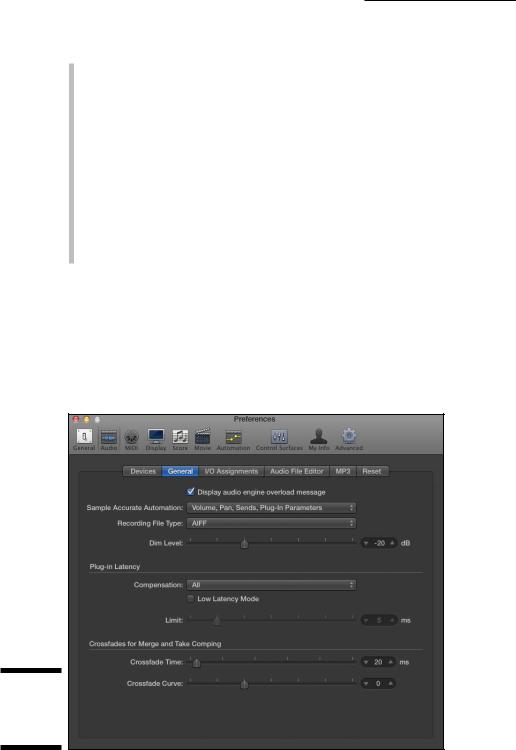
\1.\ Choose Logic Pro Preferences Audio.
\2.\ Click the General tab.
\3.\ On the Recording File Type drop-down menu, make a selection, as
shown in Figure 5-4.
Figure 5-4:
The General
tab of Audio
Preferences.
\\