

194 Part III: Making Music with Virtual Instruments
Building an Orchestral Template
|
Logic Pro X comes with an enormous selection of sampled orchestral instru- |
|
ments. These sophisticated samples are available as patches in the library. |
|
Most of the patches include the Space Designer plug-in, which recreates |
|
acoustic environments, so you have exceptional control over the sound of |
|
your orchestra. |
|
Note: You may already have an orchestral template installed with Logic Pro X. |
|
For many users, the orchestral template isn’t included in the installation, even |
|
when they download the additional content (as you discover later in this sec- |
|
tion). I want to teach you how to create an orchestral template so that you can |
|
create your own personalized template and be encouraged to experiment with |
|
the orchestra. This template, along with a video guide, is available at http:// |
|
logicstudiotraining.com/lpxfordummies. |
|
Setting up an orchestral template will save you time when inspiration strikes. |
|
Create the template once and then use it over and over again. To begin, |
|
create a new empty project: |
\ |
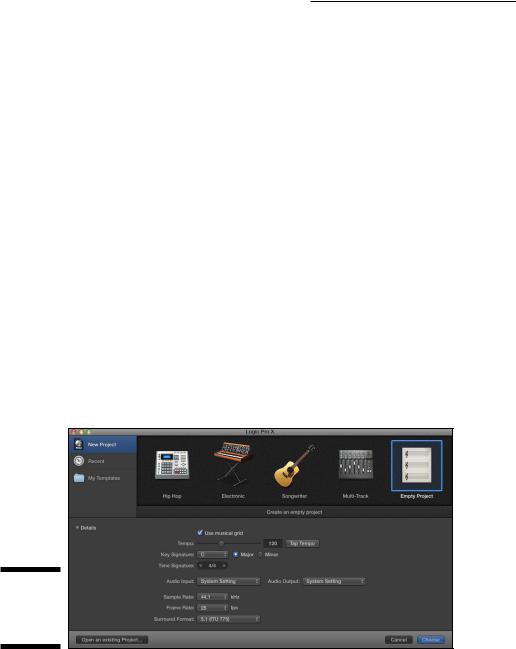
1.\ Choose File New from Template ( -N). |
\ |
The template chooser window opens, as shown in Figure 12-1. |
\2.\ In the template chooser, select the Empty Project template.
Figure 12-1:
The template chooser.
\\
|
|
Chapter 12: Conducting a Virtual Orchestra 195 |
|
|
|
\ |
3.\ In the Details area, select the project settings you want. |
|
\ |
If the Details area is closed, click the disclosure triangle to reveal the |
|
|
project settings. |
|
\4.\ Click the Choose button.
\ |
The new tracks dialog appears. |
\5.\ Select the Software Instrument option and enter the number of tracks
you want to create.
\ |
For this example, enter 32 in the number of tracks field. You’ll be able to |
|
fit a full orchestra on 32 tracks with a few tracks to spare. |
\6.\ Click the Create button.
\ |
The main window of your new project opens. |
Choosing your orchestral instruments
Orchestras come in lots of shapes and sizes. The Logic Pro orchestral patches can deliver the most common variations. And of course you’re not limited to using acoustic samples exclusively. You can mix an orchestra with electronic instruments or a rock band, for example.
\ |
|
You must download additional content to take advantage of orchestral patches. |
|
|
Choose Logic Pro X Download Additional Content. Select the Orchestral and |
|
|
Piano check boxes in the Additional Content window, as shown in Figure 12-2, |
|
|
and click Install. After your patches have finished installing, you can find them |
|
|
|
|
|
in the library by choosing View Show Library (Y). |
Figure 12-2:
The Additional Content window.
\\

196 Part III: Making Music with Virtual Instruments
Before you load your tracks with patches, decide on the orchestra you want. Following is a list of common orchestrations with their patch names:
\\Full orchestra: A full orchestra consists of woodwinds, brass, per-
cussion, harp, piano, and strings. You can load the following patch names: Piccolo, Flutes, Oboe, English Horn, Clarinets, Bassoon Solo, French Horns, Trumpets, Trombones, Tuba, Timpani, Orchestral Kit, Glockenspiel, Harp, Grand Piano, Violins 1, Violins 2, Violas, Cellos, and Basses.
\\String orchestra: A string orchestra consists of strings, harp, piano, and
percussion. You can load the following patch names: Violins 1, Violins 2, Violas, Cellos, Basses, Harp, Grand Piano, Timpani, and Orchestral Kit.
\\Concert band: A concert band consists of woodwinds, brass, harp,
piano, and percussion. You can load the following patch names: Piccolo, Flutes, Oboe, English Horn, Clarinets, Bassoon Solo, Saxophone, French Horns, Trumpets, Trombones, Tuba, Glockenspiel, Harp, Grand Piano, Timpani, and Orchestral Kit.
\Logic Pro X comes with several different grand piano patches, so you can choose between a Yamaha, a Boesendorfer, or a Steinway grand piano. Many
orchestral patches also have solo patches in addition to the ensemble patches, such as the French Horn, Clarinet, and Flute. And if you don’t want to work with individual instruments and would rather compose with full sections, you can use the Full Brass and Full Strings patch as well as several genre-specific patches such as Romance Strings, Cinema Strings, and Pop Strings.
Choosing appropriate staff styles
Staff styles are used to store information about how a region should be displayed in the score editor. Orchestral instruments are traditionally associated with a specific clef type and transposition, for example. Choosing a staff style allows you to quickly adjust how a region or entire track will look.
The orchestral patches in your library already have the appropriate staff style saved with the patch. However, you can easily change the staff style of a track by following these steps:
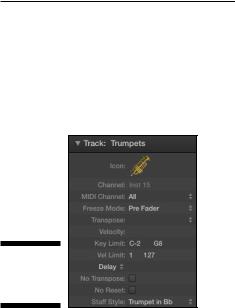
\1.\ Select the track.
\ |
2.\ Open the inspector by choosing View Show Inspector (I). |
\ |
The inspector opens on the left side of the main window. |
Chapter 12: Conducting a Virtual Orchestra 197
\3.\ Open the track inspector pane, shown in Figure 12-3, by clicking the
disclosure triangle.
\ |
4.\ In the Staff Style drop-down list, select the style. |
\ |
The track will use the new staff style in the score editor. |
Figure 12-3:
The track inspector.
\\
A great example of when you might want to change the staff style is with the Trumpets patch. The staff style that loads with the Trumpets patch is transposed for Bb trumpet, which means the trumpet notation is transposed up two semitones. If you compose and orchestrate in the score editor, you might want to switch between the instrument’s staff style to a style with no transposition. You can compose more quickly when you don’t have to continually do the mental transposition in the score editor. To edit the staff style, simply follow these steps:
\1.\ Select the track.
\2.\ Choose View Show Editor (E).
\ |
The editor window opens at the bottom of the tracks area. |
\ |
3.\ Click the Score tab to display the score editor. |
\ |
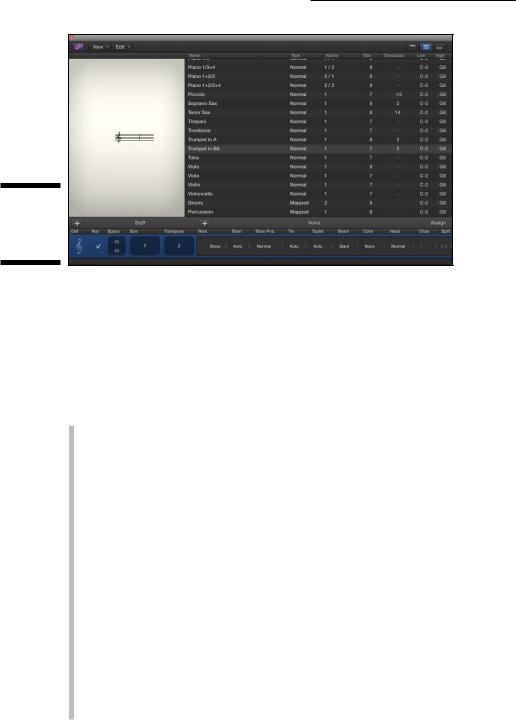
4.\ On the score editor menu, choose Layout Show Staff Styles. |
\ |
The staff styles window opens, as shown in Figure 12-4. |
\ |
5.\ In the Transpose field, drag your cursor up or down to change the value. |
\ |
The score editor instantly updates to the new transposition for all tracks |
|
that use the same staff style. |
198 Part III: Making Music with Virtual Instruments
Figure 12-4:
The staff styles window.
\\
Saving your orchestral template
With all your patches loaded, you could save your project as a template by choosing File Save as Template. But there’s more you can do to make this template a composer’s playground. Because your work as a composer is made up of many different tasks, you can create screensets dedicated to specific workflows. Here are some screenset ideas to help you compose faster:
\\Choose instruments and input parts. In the beginning of a project, you
spend a lot of time auditioning different instrument patches. Open the library (Y) to make patch selections fast. The tracks area will already be open, enabling you to record new regions and select tracks. If you also open the editor (E), you’ll be able to quickly input notes into the piano roll, score, or step editor.
\\Perform parts with smart controls. When you record, you need to cap-
ture your best performance. Open the smart controls (B) to have immediate control over the different articulations of these orchestral patches.
\ |
\Set the project key and tempo. If you’re composing to video, you need |
|
regular access to the global tracks to time your music to the video. |
|
Open the score editor in a new window ( -5) and display the global |
|
tracks (G). This view gives you a score for referencing your music and |
|
the global tracks for inputting tempo and key changes (for details, see |
|
Chapter 4). |
\ |
\View the score editor in linear view. See the entire score scroll in |
|
front of you. Open the score editor in a new window ( -5), and choose |
|
View View Mode Linear View on the score editor menu. Input notes in |
|
the score editor by using the pencil tool. |
Chapter 12: Conducting a Virtual Orchestra 199
\\Edit MIDI. Adjusting note lengths and velocities is fast and easy in the
piano roll editor. A giant piano roll editor in the tracks area makes MIDI editing simple. (To find out how to edit MIDI, see Chapter 15.)
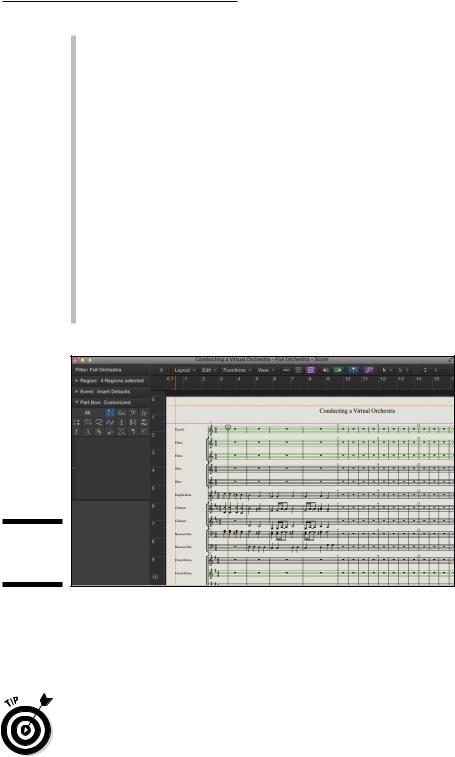
\\Engrave music. Similar to linear view, the score editor looks beautiful
in page view, as shown in Figure 12-5. Open the score editor in a new window and select View View Mode Page View. From this view, you can add ornaments and text from the part box in the inspector (I) and print your score for the musicians and conductor.
\ |
\Produce the final mix. You adjust the levels of the individual instru- |
|
ments in the mixer. Open the mixer in a new window ( -2) and make it |
|
as big as you can. You learn all about the mixer in Chapter 16. |
\\View video. If you have a video imported into your project, choose
View Show Movie Window. Watch the movie and play what you see.
Sound simple? Logic Pro does its best to make it so.
\ |
\Use project notes. If you work with a team, documenting your work |
|
is a must. Open the project notes by choosing View Show Note Pads |
|
(Option- -P). In the project notes, create a log of important changes, |
|
instructions, lyrics, or anything else you want to remember later. |
Figure 12-5:
Score editor page view.
\\
When you have these screensets set up the way you like, choose Lock on the screenset menu. After the screensets are locked, you can make changes to the view as much as you like but your original settings will be recalled when you choose the screenset.
\You’ve already learned how to save your project as a template, but you can also save your entire orchestra as a patch. First, select all the tracks and
create a summing track stack (as described in Chapter 4). Save the track stack as a patch, and you’ll be able to load your orchestra into any project.