

ppl_03_e2
.pdfID: 3658
Customer: Oleg Ostapenko E-mail: ostapenko2002@yahoo.com
Customer: Oleg Ostapenko E-mail: ostapenko2002@yahoo.com
CHAPTER 12: FLIGHT PLANNING
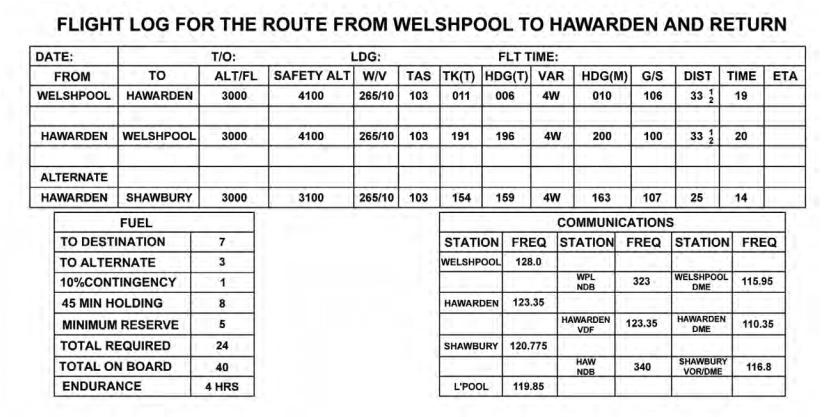
Figure 12.16 A completed Flight Plan.
227

Order: 6026
Customer: Oleg Ostapenko E-mail: ostapenko2002@yahoo.com
Customer: Oleg Ostapenko E-mail: ostapenko2002@yahoo.com
CHAPTER 12: FLIGHT PLANNING QUESTIONS
Representative PPL - type questions to test your theoretical knowledge of Flight Planning.
The following task is based on a visual navigation flight that you are planning to make from Welshpool (EGCW) to Hawarden (EGNR) and return. You plan to make Shawbury your en-route alternate.
Carry out the necessary planning for the intended flight, based on the tasks listed below, and check your answers against the completed Flight Log on Page 230.
You plan to fly at 3000 feet. You obtain wind information by accessing Met Office Form 214, (The Spot Wind Chart), on the Met Office web site. The box relevant to the area in which your flight will take place is reproduced below
5230N 0230W
24 |
340 |
35 |
-28 |
18 |
335 |
35 |
-15 |
10 |
335 |
30 |
-10 |
05 |
275 |
20 |
00 |
02 |
260 |
05 |
+06 |
01 |
255 |
05 |
+09 |
The Regional Pressure Setting for the area of your planned flight is 1013 millibars
You have elected to fly the route at an Indicated Airspeed of 100kts
Your aircraft consumes fuel at a rate of 10 US gallons per hour
Draw your planned route on your own ICAO 1:500 000 chart of Southern England and Wales, choosing suitable en-route visual check points; then carry on with your flight planning, to include a diversion route from Hawarden to Shawbury, for the return leg.
1.Interpolate the data from the Spot Wind Chart box, in order to extract the wind speed and direction, and outside air temperature, for 3000 feet, and use that information to complete your Flight Log. Compare the values with the solution, given on Page 230, in order to calculate your headings and true airspeed.
2.Measure the true track angle of your desired tracks.
3.Measure the distance of each leg.
4.Identify a suitable visual check point along your desired track.
5.Choose a safety altitude.
6.Identify appropriate frequencies of aerodromes adjacent to your route, including the most relevant radio navigation aids.
7.Calculate your True Airspeed at 3000 feet.
228

ID: 3658
Customer: Oleg Ostapenko E-mail: ostapenko2002@yahoo.com
Customer: Oleg Ostapenko E-mail: ostapenko2002@yahoo.com
CHAPTER 12: FLIGHT PLANNING QUESTIONS
8.Calculate the True Heading for each leg.
9.Calculate the Magnetic Heading for each leg. (Assume a local Magnetic Variation of 4° West.)
10.Calculate the groundspeed for each leg.
11.Calculate the leg times.
12.Calculate times at your visual check point, from both Welshpool and Hawarden.
13.Calculate the fuel required for each leg and consider Contingency Fuel,HoldingFuelandMinimum(landing)ReserveFuelrequirements. (All fuel requirements should be rounded up to the nearest whole US gallon.)
The solutions to these tasks are on Page 230.
229
OstapenkoE-mail:ostapenko2002@yahoo.comWind at 3 000 feet: 265º/10Answerknots;to TaskOutside1: |
Air Temperature at 3 000 feet: +4ºC. |
Oleg |
|
groundspeed: of 103 knots,Answeryou towillTask 3 Identify suitable visual check points along your desired track |
|
Customer: |
|
require no more than 20 minutes to fly each leg, you need only one visual check point, close to the mid track position. The railway line passing through the small town of Chirk would serve this purpose. Chirk is 19 miles from Welshpool which is just over midway, on the northerly route. The town is 14½ miles from Hawarden. There is also a Roman aqueduct in Chirk which would be a unique ground feature, and, therefore, excellent for a ground fix.
On the northerly leg, Answerat a calculatedto Taskground11: speed of 106 knots, you should reach Chirk 11 minutes after leaving overhead
Welshpool. On the return leg, at a calculated groundspeed of 100 knots, you would reach Chirk just under 9 minutes after setting course from Hawarden.
230

Customer: Oleg Ostapenko E-mail: ostapenko2002@yahoo.com
231
Customer: Oleg Ostapenko E-mail: ostapenko2002@yahoo.com
232

Customer: Oleg Ostapenko E-mail: ostapenko2002@yahoo.com
CHAPTER 13
PRACTICAL NAVIGATION
233

Order: 6026
Customer: Oleg Ostapenko E-mail: ostapenko2002@yahoo.com
Customer: Oleg Ostapenko E-mail: ostapenko2002@yahoo.com
CHAPTER 13: PRACTICAL NAVIGATION
234

ID: 3658
Customer: Oleg Ostapenko E-mail: ostapenko2002@yahoo.com
Customer: Oleg Ostapenko E-mail: ostapenko2002@yahoo.com
CHAPTER 13: PRACTICAL NAVIGATION
NAVIGATION AROUND THE ROUTE.
In this chapter, we examine how you would navigate around the route for which you have just completed the flight planning. If you have not done so already, mark up your own 1:500 000 chart for the route along the lines of the teaching given in the previous chapter, and consult it when appropriate as you work your way through the chapter.
Before going out to your aircraft, you should check that you have all the navigation and personal equipment that you require for the flight:
•Your marked-up chart and relevant airfield maps.
•The flight log.
•Pen/pencil or chinagraph, protractor, ruler and navigation computer.
•Stopwatch and chronometer displaying accurate time.
•Checklists for your aircraft.
•Headset for yourself and any passengers.
•Any other personal items you may require.
In the aircraft, check the compass deviation card to see if there are any corrections to be applied to your planned magnetic headings in order to obtain a compass heading.
DEPARTURE PROCEDURES.
After take-off, there are two commonly used departure procedures for setting heading. You should decide which of these departure procedures you are going to use, during the flight planning stage.
Overhead Departure.
The overhead departure is a sound and reliable procedure to use, especially on your early cross country flights. The overhead departure technique involves climbing to the planned altitude and then setting heading from directly overhead the airfield, as shown in Figure 13.1a.
When using this procedure, you must ensure that when you arrive overhead the airfield you are at your planned altitude, on the correct heading and at the correct speed. You should start your stopwatch as you pass overhead the airfield.
You should already be on heading as you make your run-in to the airfield overhead, and choose a lead out feature on track to confirm that your heading is correct. By ensuring that you are tracking to the lead out feature, any inaccuracy in the forecast wind and, as a consequence of that, in your calculated compass heading can be established at the very beginning of the first leg.
235

Order: 6026
Customer: Oleg Ostapenko E-mail: ostapenko2002@yahoo.com
Customer: Oleg Ostapenko E-mail: ostapenko2002@yahoo.com
CHAPTER 13: PRACTICAL NAVIGATION
Using the
overhead departure
procedure, ensure that as you arrive overhead the airfield, you are on speed, on heading and at the correct altitude.
If possible,
choose a leadout feature
which is prominently visible and on your planned track. The lead-out feature can reveal,
at the very beginning of the first leg, whether the forecast wind and your calculated compass heading are correct.
Figure 13.1a Overhead Departure.
A good check to follow before you set off on track is a check frequently used in the Royal Air Force called the HAT check.
H HEADING to fly, and that compass and DI are synchronised.
AAIRSPEED - ALTITUDE - Check that you are at your planned airspeed, and at your planned altitude on the correct altimeter setting.
TTIME - Zero your stopwatch; when overhead the start or turning point, turn onto heading and start the timer.
Always carry
out your HAT checks at the
start of your route, at each turning point, and regularly throughout the flight.
When steady on heading, repeat HAT, this time checking:
HCheck heading correct as per log, and check feature(s) in correct relative positions (gross error check).
A Check altitude and airspeed correct.
TCheck timer is running, work back to find leg start time and log it. Note time for next event.
The overhead departure technique may also be adopted with respect to a remote starting point from above a prominent ground feature, in the vicinity of your aerodrome. If you use a remote starting point, the track line on your chart will, of course, have to
originate from that point.
En-Route Departure.
The en-route departure is slightly more complicated than the overhead departure but it gets you on track and clear of the airfield more quickly. (See Figure 13.1b.)
236