

Practical Database Programming With Java
.pdf5.1 Overview of the NetBeans IDE 6.8 159
of NetBeans IDE. Alternatively, you might create a module to provide an additional editor feature.
The NetBeans platform offers reusable services common to desktop applications, allowing developers to focus on the logic specific to their application. Among the features of the platform are:
•User interface management (e.g., menus and toolbars)
•User settings management
•Storage management (saving and loading any kind of data)
•Window management
•Wizard framework (supports step-by-step dialogs)
•NetBeans Visual Library
Let’s take a look at the second part of a NetBeans project, the NetBeans open source IDE.
5.1.2 The NetBeans Open Source IDE
The NetBeans IDE is an open-source integrated development environment, and it supports development of all Java application types, such as Java Standard Edition (Java SE), including JavaFX, Java Mobile Edition (Java ME), Web, Enterprise JavaBean (EJB), and mobile applications, out of the box. Among other features are an Ant-based project system, Maven support, refactorings, and version control.
All the functions of the IDE are provided by modules. Each module provides a well-defined function, such as support for the Java language, editing, or support for the Concurrent Versions System (CVS) versioning system, and Java Subversion (SVN). NetBeans contains all the modules needed for Java development in a single download, allowing the user to start working immediately. Modules also allow NetBeans to be extended. New features, such as support for other programming languages, can be added by installing additional modules. For instance, Sun Studio, Sun Java Studio
Enterprise, and Sun Java Studio Creator from Sun Microsystems are all based on the NetBeans IDE.
Three main modules included in the NetBeans IDE and most often used are shown in Table 5.3.
Users can choose to download NetBeans IDE bundles tailored to specific development needs.
Users can also download and install all other features at a later date directly through the NetBeans IDE. A complete set of bundles that can be used by users when they download and install NetBeans IDE onto their computers is shown below:
•NetBeans Base IDE
•Java SE, JavaFX
•Web & Java EE
•Java ME
•Ruby

160 Chapter 5 |
Introduction to NetBeans IDE |
Table 5.3. Three main modules included in the NetBeans IDE 6.8 |
|
|
|
Module Name |
Functions |
|
|
NetBeans Profiler |
This is a tool for the monitoring of Java applications: It helps you |
|
find memory leaks and optimize speed. Formerly downloaded |
|
separately, it is integrated into the core IDE since version 6.0. |
|
The Profiler is based on a Sun Laboratories research project that |
|
was named JFluid. That research uncovered specific techniques |
|
that can be used to lower the overhead of profiling a Java |
|
application. One of those techniques is dynamic bytecode |
|
instrumentation, which is particularly useful for profiling large |
|
Java applications. Using dynamic bytecode instrumentation and |
|
additional algorithms, the NetBeans Profiler is able to obtain |
|
runtime information on applications that are too large or complex |
|
for other profilers. NetBeans also support Profiling Points that let |
|
you profile precise points of execution and measure execution |
|
time. |
GUI design tool |
The GUI design tool enables developers to prototype and design |
|
Swing GUIs by dragging and positioning GUI components. |
|
The GUI builder also has built-in support for JSR 296 (Swing |
|
Application Framework) and JSR 295 (Beans Binding |
|
technology). |
NetBeans |
This module provides extended support for Javascript, Ajax, and |
JavaScript Editor |
Cascading Style Sheets (CSS). |
|
JavaScript editor features comprise syntax highlighting, refactoring, |
|
code completion for native objects and functions, generation of |
JavaScript class skeletons, generation of Ajax callbacks from a template, and automatic browser compatibility checks.
CSS editor features comprise code completion for styles names, quick navigation through the navigator panel, displaying the CSS rule declaration in a List View and file structure in a Tree View, sorting the outline view by name, type or declaration order (List & Tree), creating rule declarations (Tree only), refactoring a part of a rule name (Tree only).
•C/C++
•PHP (Version 6.5 and later)
•GlassFish
•Apache Tomcat
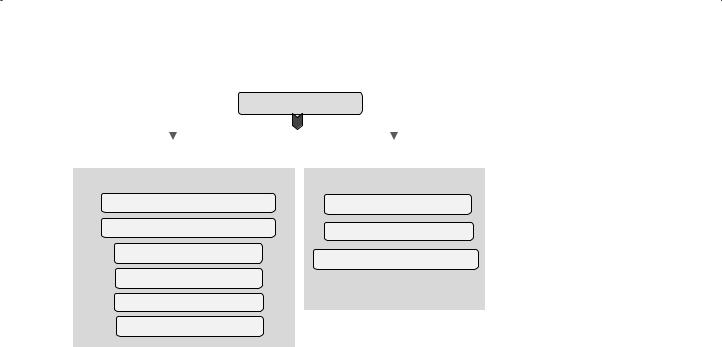
Figure 5.1 shows a typical structure and architecture of the NetBeans IDE 6.8. Now that we have had a clear picture and understanding about the NetBeans
IDE 6.8, next we need to download, install, and configure the NetBeans 6.8 in our computers.
|
|
|
5.2 Installing and Configuring the NetBeans IDE 6.8 161 |
||||
|
|
NetBeans IDE 6.8 |
|||||
|
|
|
|
|
|
|
|
|
|
|
|
|
|
|
|
|
|
|
|
|
|
|
|
|
NetBeans Open-Source IDE |
|
|
NetBeans Platform |
|
||
|
|
|
|
|
|
|
|
|
Modules |
|
|
Modules |
|
||
|
User Interface Management |
|
|
NetBeans Profiler |
|||
User settings Management |
GUI Design Tools |
|
|
Storage Management |
NetBeans JavaScript Editor |
|
|
Window Management |
|
Wizard Framework |
|
NetBeans Visual Library |
|
Figure 5.1. A typical structure of the NetBeans IDE 6.8.
5.2 INSTALLING AND CONFIGURING THE NETBEANS IDE 6.8
To download and install the NetBeans IDE 6.8, go to the website:
http://java.sun.com/javase/downloads/widget/jdk_netbeans.jsp
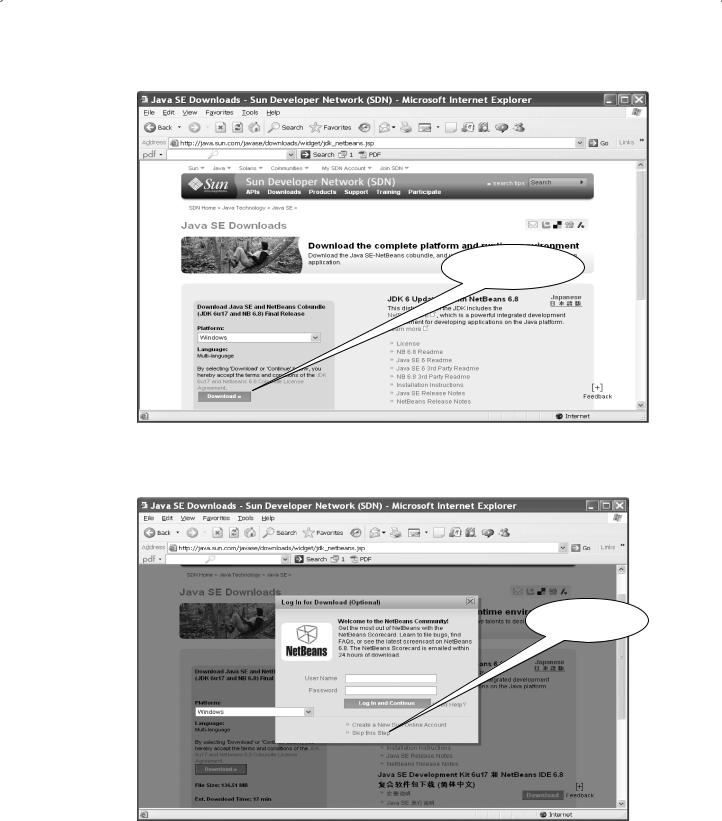
On the opened java.sun/javase/downloads homepage, click on the Download button to begin this download process, which is shown in Figure 5.2.
On the next page, which is a login and registration page, click on the Skip this Step link to continue this download process, which is shown in Figure 5.3.
Click on the Run button to begin to download this NetBeans IDE 6.8, and then click on the Run button to begin to install the NetBeans IDE 6.8 to your machine.
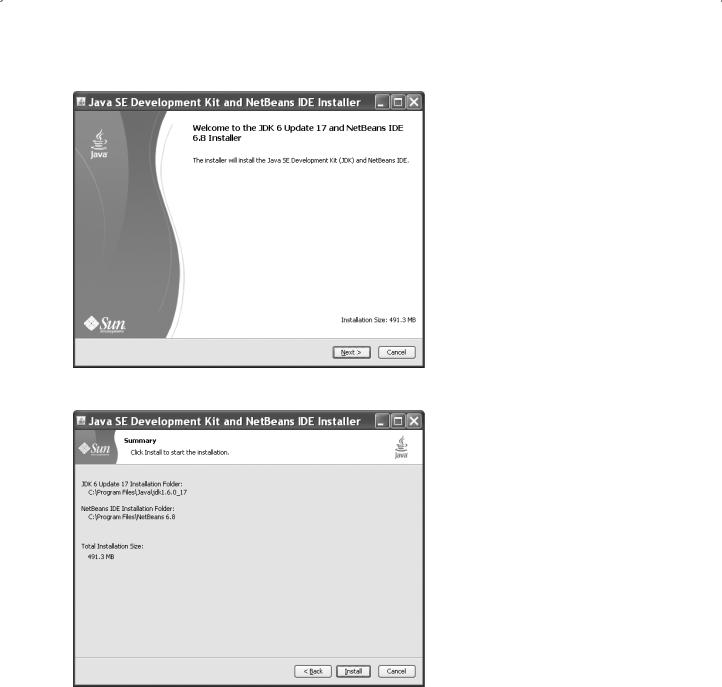
When the Java SE Development Kit and NetBeans IDE Installer appears, click on the Next to continue the installation, as shown in Figure 5.4.
Confirm that both Java JDK 1.6.0_17 and NetBeans 6.8 will be installed to the correct folders in your machine, and then click on the Install button to begin this installation, as shown in Figure 5.5.
Follow the instructions on the following dialog boxes to complete this installation, and click on the Finish button to complete this installation process when it is done.
Next, we need to configure the installed NetBeans IDE 6.8 to make it our desired development environment.
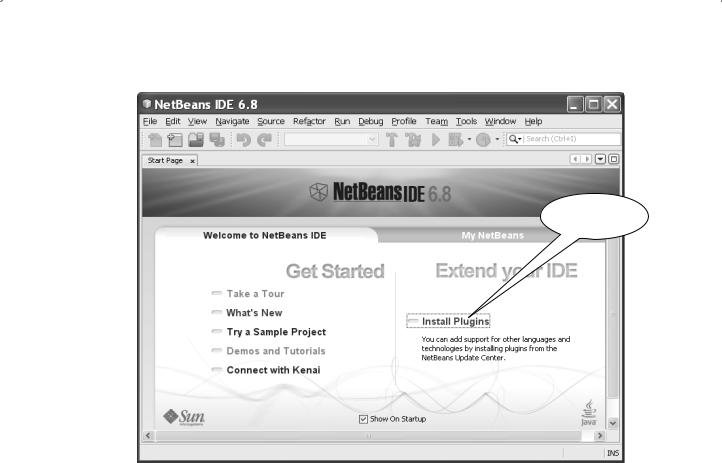
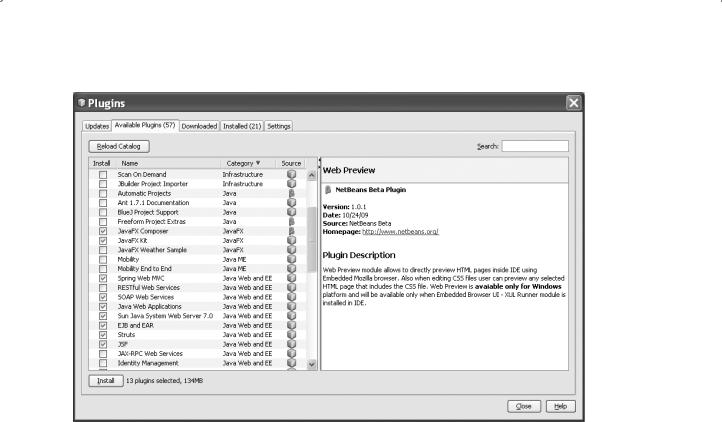
To launch the installed NetBeans IDE 6.8, double click on the NetBeans 6.8 icon from the desktop and click on the Install Plugins item to install some necessary Web components used in the Java Web Applications, as shown in Figure 5.6.
As the Plugins dialog box appears, select the desired components by checking them one by one. The following components are needed for our projects:
162 Chapter 5 Introduction to NetBeans IDE
Click on Download button to begin…
Figure 5.2. The opened java.sun/javase/downloads home page.
Click on Skip this
Step link
Figure 5.3. The login and registration page.
5.2 Installing and Configuring the NetBeans IDE 6.8 163
Figure 5.4. The Java SE Development Kit and NetBeans IDE Installer dialog—1.
Figure 5.5. The Java SE Development Kit and NetBeans IDE Installer dialog—2.
•NetBeans API Documentation
•Module Manager
•Groovy and Grails
•JavaFX Composer
•JavaFX Kit
•Spring Web MVC
164 Chapter 5 Introduction to NetBeans IDE
Click on Install
Plugins item
Figure 5.6. The launched NetBeans IDE 6.8.
•SOAP Web Services
•Java Web applications
•Sun Java System Web Server 7.0
•EJB and EAR
•Struts
•JSF
•Web preview
Your finished Plugins dialog box should match one that is shown in Figure 5.7. Click on the Install button to install these plug-ins into the NetBeans 6.8.
Follow the instructions on the following dialog boxes to complete this installation. Now that we have installed and configured the NetBeans IDE 6.8, next, we need to
explorer it to find all useful features we will use to build our professional database applications in this integrated development environment.
5.3 EXPLORING NETBEANS IDE 6.8
By using NetBeans IDE 6.8, the developers can design and build Java related applications with different categories that are shown below:
5.3 Exploring NetBeans IDE 6.8 165
Figure 5.7. The finished Plugins window.
•Java applications
•JavaFX applications
•Java Web applications
•Java Enterprise applications
•Maven applications
•Grails applications
•NetBeans modules
To get a clear picture and detailed description about this IDE, first, let’s have a work through overview for this product and its functionalities.
5.3.1 An Overview of NetBeans IDE 6.8 GUI
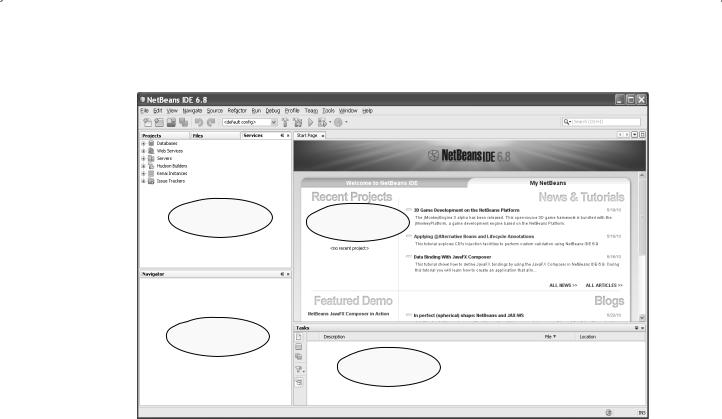
When you launch for first time the NetBeans IDE 6.8, a main menu and some default windows are displayed, as shown in Figure 5.8.
Thefirst window or pane located at the upper-left corner is called Projects|Files|Services window, which contains three different kinds of items:
1.All opened projects
2.All created files
3.All database services
166 Chapter 5 Introduction to NetBeans IDE
Projects|Files| |
Start Page |
|
Services window |
||
Window |
||
|
Navigator
Window
Task
Window
Figure 5.8. The opened NetBeans IDE 6.8.
These three different items can be displayed and switched by clicking on the corresponded tab on the top of this window.
The second window located at the lower-left corner is called Navigator window that contains all components to enable users to scan and go through all different objects or parts of a file. In fact, the Navigator window provides structured views of the file you are working with and lets you quickly navigate between different parts of the file.
The Tasks window is located at the bottom and it is mainly used to list all methods in your projects and allow you to enter the codes into those methods at any time when you building your project.
The Start Page is a main window when the IDE is opened and this window displays all recent projects you developed. All updated news and tutorials related to the NetBeans will also be displayed in this window.
Refer to Figure 5.8; among all menu items, the following items are special items with the specific functionalities in the NetBeans IDE:
•Navigate: the NetBeans Navigator is used to navigate to any object, file, type of objects, and symbol you created and built in your projects. With the name of each object or file, you can navigate to any of them at the development stage. Another important property of using the Navigate menu item is to enable you to inspect any member and hierarchy of those members defined in your project. In fact, the Inspect submenu item is used to inspect the members and hierarchy of any Java class in a convenient popup window that displays base classes, derived classes, and interfaces. Use filters to control the level of detail that is displayed.
•Source: the NetBeans Source is used to facilitate your source coding development by allowing you to insert codes, fix codes, fix Imports, show method parameters, shift and move codes in your projects.

5.3 Exploring NetBeans IDE 6.8 167
•Refactor: the NetBeans Refactor allows you to restructure code in your project without breaking it. For example, when you rename an identifier or move a class to another package, you do not need to use Search and Replace; instead, the IDE can identify and update all occurrences instantly.
•Profile: the NetBeans Profiler is a tool for the monitoring of Java applications. It helps you find memory leaks and optimize speed. The Profiler is based on a Sun Laboratories research project that was named JFluid. That research uncovered specific techniques that can be used to lower the overhead of profiling a Java application. One of those techniques is dynamic bytecode instrumentation, which is particularly useful for profiling large Java applications. Using dynamic bytecode instrumentation and additional algorithms, the NetBeans Profiler is able to obtain runtime information on applications that are too large or complex for other profilers. NetBeans also support Profiling Points that let you profile precise points of execution and measure execution time.
•Team: the NetBeans Team provides the source code management and connected developer services to enable developers to perform the following functions:
•Source code management (Subversion, Mercurial, CVS)
•Local file history
•Integrated Connected Developer features for projects hosted on http://Kenai.com:
9 Source code management (Subversion, Mercurial, and Git)
9 Issue tracking (Jira and Bugzilla)
9 Team wiki, forums, mailing lists
9 Document and downloads hosting
In the NetBeans IDE, you always work inside of a project. In addition to source files, an IDE project contains metadata about what belongs on the Classpath, how to build and run the project, and so on. The IDE stores project information in a project folder, which includes an Ant build script and properties file that control the building and running settings, and a project.xml file that maps Ant targets to IDE commands.
The Apache Ant is a Java-based building tool used to standardize and automate building and running environments for development. The IDE’s project system is based directly on Ant. All of the project commands, like Clean and Build Project and Debug, call targets in the project’s Ant script. You can therefore build and run your project outside the IDE exactly as it is built and run inside the IDE.
It is not necessary to know Ant to work with the IDE. You can set all the basic compilation and runtime options in the project’s Project Properties dialog box, and the IDE automatically updates your project’s Ant script. If you are familiar with Ant, you can customize a standard project’s Ant script or write your own Ant script for a project.
Now let’s have a closer look at different components and tools in NetBeans IDE 6.8 to help us to create, build, and run our desired Java application projects.
5.3.2 Build a New Java Project
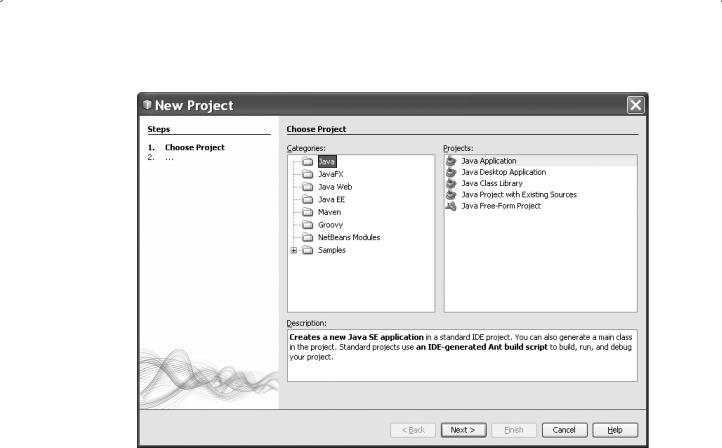
To create a new project under the NetBeans IDE 6.8, go to File|New Project menu item.
A New Project wizard is displayed and shown in Figure 5.9.
168 Chapter 5 Introduction to NetBeans IDE
Figure 5.9. The opened create New Project dialog box.
The NetBeans IDE allows you to create and build different projects based on different categories by selecting the right template for your project and completing the remaining wizard steps. First, let’s take care of creating a new Java project.
Under the Java category, the IDE contains the following standard project templates for Java desktop and Web applications:
•Java Application: Creates a skeleton Java Standard Edition (SE) project with a main class.
•Java Desktop Application: Creates an application based on the Swing Application Framework. Skeletons are offered for a basic desktop application and a database application that makes use of the Beans Binding and Java Persistence API (JPA) libraries.
• Java Class Library: Creates a skeleton Java class library without a main class.
•Java Project with Existing Sources: Creates a Java SE project based on your own Java sources.
•Java Free-Form Project: The free-form templates enable you to use an existing Ant script for a project but require manual configuration.
Let’s give a more detailed discussion for each of these projects one by one.
5.3.2.1 Build a Java Application Project
On the opened New Project wizard, select the Java from the Categories pane and click on the Java Application node from the Projects pane to create a new Java