

Practical Database Programming With Java
.pdf2.9 Create Microsoft Access Sample Database 37
Figure 2.14. The Design view of the Faculty table.
from the View tool on the Toolbar. Enter Faculty into the Table Name box of the pop-up dialog as the name for this new table, and click the OK button.
Seven columns are included in this table; they are: faculty_id, faculty_name, office, phone, college, title, and email. The data types for all columns in this table are Text, since all of them are string variables. You can redefine the length of each Text string by modifying the Field Size in the Field Properties pane located below of the table, which is shown in Figure 2.14. The default length for each text string is 255.
Now you need to assign the primary key for this table. As we discussed in the last section, you do not need to do this in Office 2007 Access, since the first column, faculty_id, has been selected as the Primary key by default. Click the Save tool on the Toolbar to save this table. The finished Design View of the Faculty table is shown in Figure 2.14.
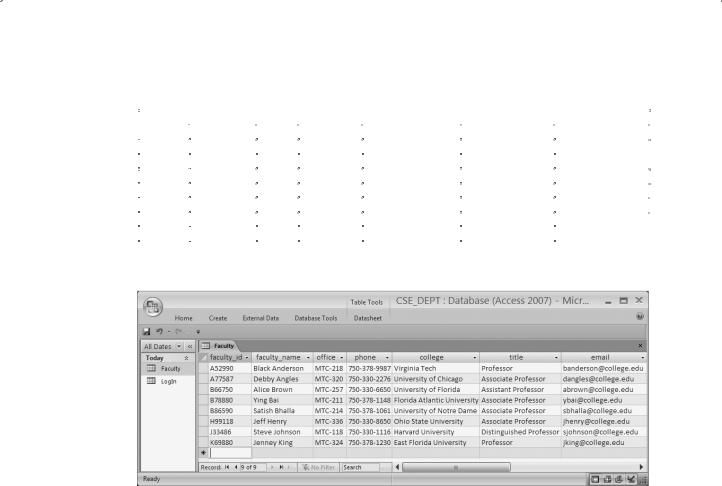
Now open the DataSheet view of the Faculty table by clicking the Home menu item, and then the drop-down arrow of the View tool, and select the Datasheet View item. Enter the data that is shown in Table 2.14 into this opened Faculty table. The finished Faculty table should match one that is shown in Figure 2.15.
2.9.3 Create the Other Tables
In a similar way, you need to create the following three tables: Course, Student, and
StudentCourse. Select the course_id, student_id, and s_course_id columns as
38 |
Chapter 2 Introduction to Databases |
|
|
||||
Table 2.14. The data in the Faculty table |
|
|
|
||||
|
|
|
|
|
|
|
|
faculty_id |
faculty_name |
office |
phone |
college |
title |
||
A52990 |
Black Anderson |
MTC-218 |
750-378-9987 |
Virginia Tech |
Professor |
banderson@college.edu |
|
A77587 |
Debby Angles |
MTC-320 |
750-330-2276 |
University of Chicago |
Associate Professor |
dangles@college.edu |
|
B66750 |
Alice Brown |
MTC-257 |
750-330-6650 |
University of Florida |
Assistant Professor |
abrown@college.edu |
|
B78880 |
Ying Bai |
MTC-211 |
750-378-1148 |
Florida Atlantic University |
Associate Professor |
ybai@college.edu |
|
B86590 |
Satish Bhalla |
MTC-214 |
750-378-1061 |
University of Notre Dame |
Associate Professor |
sbhalla@college.edu |
|
H99118 |
Jeff Henry |
MTC-336 |
750-330-8650 |
Ohio State University |
Associate Professor |
jhenry@college.edu |
|
J33486 |
Steve Johnson |
MTC-118 |
750-330-1116 |
Harvard University |
Distinguished Professor |
sjohnson@college.edu |
|
K69880 |
Jenney King |
MTC-324 |
750-378-1230 |
East Florida University |
Professor |
jking@college.edu |
|
|
|
|
|
|
|
|
|
Figure 2.15. The completed Faculty table.
the primary key for the Course, Student, and StudentCourse tables (refer to Tables 2.15–2.17). For the data type selections, follow the directions below:
The data type selections for the Course table:
•course_id—Text
•credit—Number
•enrolment—Number
•All other columns—Text
The data type selections for the Student table:
•student_id—Text
•credits—Number
•All other columns—Text
The data type selections for the StudentCourse table:
•s_course_id—Number
•credit—Number
•All other columns—Text

2.9 Create Microsoft Access Sample Database 39
Table 2.15. The data in the Course table
course_id |
|
course |
credit |
classroom |
|
schedule |
enrollment |
faculty_id |
|
|
|
|
|
|
|||||||
CSC-131A |
|
Computers in Society |
3 |
TC-109 |
|
M-W-F: 9:00-9:55 AM |
28 |
A52990 |
|
|
CSC-131B |
|
Computers in Society |
3 |
TC-114 |
|
M-W-F: 9:00-9:55 AM |
20 |
B66750 |
|
|
CSC-131C |
|
Computers in Society |
3 |
TC-109 |
|
T-H: 11:00-12:25 PM |
25 |
A52990 |
|
|
|
|
|
|
|||||||
CSC-131D |
|
Computers in Society |
3 |
TC-109 |
|
M-W-F: 9:00-9:55 AM |
30 |
B86590 |
|
|
CSC-131E |
|
Computers in Society |
3 |
TC-301 |
|
M-W-F: 1:00-1:55 PM |
25 |
B66750 |
|
|
CSC-131I |
|
Computers in Society |
3 |
TC-109 |
|
T-H: 1:00-2:25 PM |
32 |
A52990 |
|
|
CSC-132A |
|
Introduction to Programming |
3 |
TC-303 |
|
M-W-F: 9:00-9:55 AM |
21 |
J33486 |
|
|
CSC-132B |
|
Introduction to Programming |
3 |
TC-302 |
|
T-H: 1:00-2:25 PM |
21 |
B78880 |
|
|
CSC-230 |
|
Algorithms & Structures |
3 |
TC-301 |
|
M-W-F: 1:00-1:55 PM |
20 |
A77587 |
|
|
CSC-232A |
|
Programming I |
3 |
TC-305 |
|
T-H: 11:00-12:25 PM |
28 |
B66750 |
|
|
CSC-232B |
|
Programming I |
3 |
TC-303 |
|
T-H: 11:00-12:25 PM |
17 |
A77587 |
|
|
CSC-233A |
|
Introduction to Algorithms |
3 |
TC-302 |
|
M-W-F: 9:00-9:55 AM |
18 |
H99118 |
|
|
CSC-233B |
|
Introduction to Algorithms |
3 |
TC-302 |
|
M-W-F: 11:00-11:55 AM |
19 |
K69880 |
|
|
CSC-234A |
|
Data Structure & Algorithms |
3 |
TC-302 |
|
M-W-F: 9:00-9:55 AM |
25 |
B78880 |
|
|
CSC-234B |
|
Data Structure & Algorithms |
3 |
TC-114 |
|
T-H: 11:00-12:25 PM |
15 |
J33486 |
|
|
CSC-242 |
|
Programming II |
3 |
TC-303 |
|
T-H: 1:00-2:25 PM |
18 |
A52990 |
|
|
CSC-320 |
|
Object Oriented Programming |
3 |
TC-301 |
|
T-H: 1:00-2:25 PM |
22 |
B66750 |
|
|
CSC-331 |
|
Applications Programming |
3 |
TC-109 |
|
T-H: 11:00-12:25 PM |
28 |
H99118 |
|
|
CSC-333A |
|
Computer Arch & Algorithms |
3 |
TC-301 |
|
M-W-F: 10:00-10:55 AM |
22 |
A77587 |
|
|
CSC-333B |
|
Computer Arch & Algorithms |
3 |
TC-302 |
|
T-H: 11:00-12:25 PM |
15 |
A77587 |
|
|
CSC-335 |
|
Internet Programming |
3 |
TC-303 |
|
M-W-F: 1:00-1:55 PM |
25 |
B66750 |
|
|
CSC-432 |
|
Discrete Algorithms |
3 |
TC-206 |
|
T-H: 11:00-12:25 PM |
20 |
B86590 |
|
|
CSC-439 |
|
Database Systems |
3 |
TC-206 |
|
M-W-F: 1:00-1:55 PM |
18 |
B86590 |
|
|
CSE-138A |
|
Introduction to CSE |
3 |
TC-301 |
|
T-H: 1:00-2:25 PM |
15 |
A52990 |
|
|
CSE-138B |
|
Introduction to CSE |
3 |
TC-109 |
|
T-H: 1:00-2:25 PM |
35 |
J33486 |
|
|
CSE-330 |
|
Digital Logic Circuits |
3 |
TC-305 |
|
M-W-F: 9:00-9:55 AM |
26 |
K69880 |
|
|
CSE-332 |
|
Foundations of Semiconductors |
3 |
TC-305 |
|
T-H: 1:00-2:25 PM |
24 |
K69880 |
|
|
CSE-334 |
|
Elec Measurement & Design |
3 |
TC-212 |
|
T-H: 11:00-12:25 PM |
25 |
H99118 |
|
|
CSE-430 |
|
Bioinformatics in Computer |
3 |
TC-206 |
|
Thu: 9:30-11:00 AM |
16 |
B86590 |
|
|
CSE-432 |
|
Analog Circuits Design |
3 |
TC-309 |
|
M-W-F: 2:00-2:55 PM |
18 |
K69880 |
|
|
CSE-433 |
|
Digital Signal Processing |
3 |
TC-206 |
|
T-H: 2:00-3:25 PM |
18 |
H99118 |
|
|
CSE-434 |
|
Advanced Electronics Systems |
3 |
TC-213 |
|
M-W-F: 1:00-1:55 PM |
26 |
B78880 |
|
|
CSE-436 |
|
Automatic Control and Design |
3 |
TC-305 |
|
M-W-F: 10:00-10:55 AM |
29 |
J33486 |
|
|
CSE-437 |
|
Operating Systems |
3 |
TC-303 |
|
T-H: 1:00-2:25 PM |
17 |
A77587 |
|
|
CSE-438 |
|
Advd Logic & Microprocessor |
3 |
TC-213 |
|
M-W-F: 11:00-11:55 AM |
35 |
B78880 |
|
|
CSE-439 |
|
Special Topics in CSE |
3 |
TC-206 |
|
M-W-F: 10:00-10:55 AM |
22 |
J33486 |
|
|
Enter the data that are shown in Tables 2.15–2.17 into each associated table, and save each table as Course, Student, and StudentCourse, respectively.
The finished Course table is shown in Figure 2.16. The completed Student and StudentCourse tables are shown in Figures 2.17 and 2.18.
2.9.4 Create Relationships among Tables
All five tables are completed, and now we need to set up the relationships between these
five tables by using the primary and foreign keys. Go to the Database Tools|

40 Chapter 2 Introduction to Databases
Table 2.16. The data in the Student table
student_id |
student_name |
|
gpa |
credits |
major |
schoolYear |
|
A78835 |
Andrew Woods |
3.26 |
108 |
Computer Science |
Senior |
awoods@college.edu |
|
A97850 |
Ashly Jade |
|
3.57 |
116 |
Information System Engineering |
Junior |
ajade@college.edu |
B92996 |
Blue Valley |
|
3.52 |
102 |
Computer Science |
Senior |
bvalley@college.edu |
H10210 |
Holes Smith |
|
3.87 |
78 |
Computer Engineering |
Sophomore |
hsmith@college.edu |
J77896 |
Erica Johnson |
|
3.95 |
127 |
Computer Science |
Senior |
ejohnson@college.edu |
Table 2.17. The data in the StudentCourse table
s_course_id |
student_id |
course_id |
|
credit |
major |
|
1000 |
H10210 |
CSC-131D |
3 |
CE |
|
|
1001 |
B92996 |
CSC-132A |
|
3 |
CS/IS |
|
1002 |
J77896 |
CSC-335 |
|
3 |
CS/IS |
|
|
|
|||||
1003 |
A78835 |
CSC-331 |
|
3 |
CE |
|
1004 |
H10210 |
CSC-234B |
|
3 |
CE |
|
1005 |
J77896 |
CSC-234A |
3 |
CS/IS |
|
|
1006 |
B92996 |
CSC-233A |
3 |
CS/IS |
|
|
1007 |
A78835 |
CSC-132A |
|
3 |
CE |
|
1008 |
A78835 |
CSE-432 |
|
3 |
CE |
|
1009 |
A78835 |
CSE-434 |
|
3 |
CE |
|
|
|
|||||
1010 |
J77896 |
CSC-439 |
|
3 |
CS/IS |
|
1011 |
H10210 |
CSC-132A |
|
3 |
CE |
|
1012 |
H10210 |
CSC-331 |
|
3 |
CE |
|
1013 |
A78835 |
CSC-335 |
|
3 |
CE |
|
|
|
|||||
1014 |
A78835 |
CSE-438 |
|
3 |
CE |
|
1015 |
J77896 |
CSC-432 |
|
3 |
CS/IS |
|
1016 |
A97850 |
CSC-132B |
|
3 |
ISE |
|
1017 |
A97850 |
CSC-234A |
|
3 |
ISE |
|
1018 |
A97850 |
CSC-331 |
|
3 |
ISE |
|
1019 |
A97850 |
CSC-335 |
|
3 |
ISE |
|
1020 |
J77896 |
CSE-439 |
|
3 |
CS/IS |
|
1021 |
B92996 |
CSC-230 |
|
3 |
CS/IS |
|
1022 |
A78835 |
CSE-332 |
|
3 |
CE |
|
|
|
|||||
1023 |
B92996 |
CSE-430 |
|
3 |
CE |
|
1024 |
J77896 |
CSC-333A |
|
3 |
CS/IS |
|
1025 |
H10210 |
CSE-433 |
|
3 |
CE |
|
1026 |
H10210 |
CSE-334 |
|
3 |
CE |
|
1027 |
B92996 |
CSC-131C |
|
3 |
CS/IS |
|
1028 |
B92996 |
CSC-439 |
|
3 |
CS/IS |
|

2.9 Create Microsoft Access Sample Database 41
Figure 2.16. The completed Course table.
Figure 2.17. The completed Student table
Relationships menu item to open the Show Table dialog. Keep the default tab Tables selected, and select all five tables by pressing and holding the Shift key on the keyboard and clicking the last table—StudentCourse. Click the Add button, and then the Close button to close this dialog box.All five tables are added and displayed in the Relationships dialog box. The relationships we want to add are shown in Figure 2.19.
The P.K and F.K. in Figure 2.19 represent the Primary and Foreign keys, respectively. For example, the faculty_id in the Faculty table is a primary key, and it can be

42 Chapter 2 Introduction to Databases
Figure 2.18. The completed StudentCourse table.
|
LogIn Table |
|
one-to-many |
P.K. |
|
Faculty Table |
|
|
|||||||||||||||
P.K. |
|
|
F.K. |
F.K. |
|
|
|
|
|
|
|
|
|
|
|
|
|||||||
user_name |
pass_word |
faculty_id |
student_id |
|
|
|
|
faculty_id |
|
name |
|
office |
college |
||||||||||
|
|
|
|
|
|
|
|
|
|
|
|
|
|
|
|
|
|
|
|
|
|
|
|
|
|
|
|
|
|
|
|
|
|
|
|
|
|
|
|
|
|
|
|
|
|
|
|
|
|
|
|
|
|
|
|
|
|
|
|
|
|
|
|
|
|
|
|
|
|
|
|
one-to-many |
|
|
|
|
|
|
|
one-to-many |
|
Course Table |
|
|
|||||||||||
P.K. |
Student Table |
|
|
|
|
|
|
P.K. |
|
|
|
F.K. |
|
|
|||||||||
student_id |
|
name |
|
major |
|
gpa |
|
|
|
course_id |
|
|
course |
faculty_id |
|
credits |
|
||||||
|
|
|
|
|
|
|
|
|
many-to-many |
|
|
|
|
|
|
|
|
|
|
|
|||
|
|
|
|
|
|
|
|
|
|
|
|
|
|
|
|
|
|
|
|
||||
|
|
|
|
|
|
|
|
|
|
|
|
|
|
|
|
|
|
|
|||||
|
|
|
|
|
|
|
|
|
|
|
|
|
|
|
|
|
|
|
|
|
|
|
|
one-to-many |
|
|
|
StudentCourse Table |
|
one-to-many |
|
|
|||||||||||||||
|
|
|
|
|
|
P.K. |
F.K. |
F.K. |
|
|
|
|
|
|
|
|
|
|
|||||
|
|
|
|
|
s_course_id |
student_id |
course_id |
|
|
|
|
|
|
|
|
|
|
||||||
Figure 2.19. |
|
|
|
|
|
|
|
|
|
|
|
|
|
|
|
|
|
|
|
|
|
|
|
|
|
|
|
|
|
|
|
|
|
|
|
|
|
|
|
|
|
|
|
|
|
||
|
|
|
|
|
|
|
|
|
|
|
|
|
|
|
|
|
|
|
|
|
|
||
Relationships between tables. |
|
|
|
|
|
|
|
|
|
|
|
|
|
|
|
||||||||

2.9 Create Microsoft Access Sample Database 43
Figure 2.20. Edit Relationships dialog box.
connected with the faculty_id that is a foreign key in the LogIn table. The relationship between these two tables are one-to-many, since the unique primary key faculty_id in the Faculty table can be connected to multiple foreign key that is faculty_id located in the LogIn table.
To set this relationship between these two tables, click faculty_id from the Faculty table and drag to the faculty_id in the LogIn table. The Edit Relationships dialog box is displayed, which is shown in Figure 2.20.
Select the Enforce Referential Integrity checkbox to set up this reference integrity between these two fields. Also check the following two checkboxes:
•Cascade Update Related Fields
•Cascade Delete Related Records
The purpose of checking these two checkboxes is that all fields or records in the cascaded or child tables will be updated or deleted when the related fields or records in the parent tables are updated or deleted. This will greatly simplify the updating and deleting operations for a given relational database that contains a lot of related tables. Refer to Chapters 6 and 7 for more detailed discussions about the data updating and deleting actions.
Click the Create button to create this relationship. In the similar way, you can create all other relationships between these five tables. One point you need to remember when you perform this dragging operation is that always starting this drag from the Primary key in the parent table and ending it with the Foreign key in the child table. As shown in
Figure 2.20, the table located in the left of the Edit Relationships dialog is considered as the parent table, and the right of this dialog is the child table. Therefore, the faculty_id in the left is the Primary key, and the faculty_id in the right is the Foreign key, respectively.
The finished relationships dialog should match the one that is shown in Figure 2.21.

44 Chapter 2 Introduction to Databases
Figure 2.21. The completed relationships for tables.
 During the process of creating relationships between tables, sometimes, an error message may be displayed to indicate that some of tables are used by other users and are not locked to allow you to perform this relationship creation. In that case, just save your current result, close your database, and exit the Access. This error will be solved when you restart Access and open your database again. The reason for that is because some tables are considered to be used by you when you finished creating those tables and continue to perform the creating of the relationships between them.
A completed Microsoft Access 2007 database file CSE_DEPT.accdb can be found from the folder Database\Access that is located at the Wiley ftp site. Refer to Appendix G if you want to use this sample database in your applications.
2.10 CREATE MICROSOFT SQL SERVER 2008 SAMPLE DATABASE
After you finished the installation of SQL Server 2008 Management Studio (refer to Appendix D), you can begin to use it to connect to the server and build your database.
To start, go to Start|All Programs|Microsoft SQL Server 2008 and select SQL Server Management Studio. A connection dialog is opened, as shown in Figure 2.22.
Your computer name followed by your server name should be displayed in the Server name: box. In this case, it is SMART\SQL2008EXPRESS. The Windows NT default

2.10 Create Microsoft SQL Server 2008 Sample Database 45
Figure 2.22. Connect to the SQL Server 2008.
Figure 2.23. The opened server management studio.
security engine is used by selecting the Windows Authentication method from the Authentication box. The User name box contains the name you entered when you register for your computer. Click the Connect button to connect your client to your server.
The server management studio is opened when this connection is completed, which is shown in Figure 2.23.
To create a new database, right click on the Databases folder from the Object Explorer window, and select the New Database item from the popup menu. Enter CSE_DEPT into the Database name box in the New Database dialog as the name of our

46 Chapter 2 Introduction to Databases
Figure 2.24. The new table window.
database, keep all other settings unchanged, and then click the OK button. You can find that a new database named CSE_DEPT is created, and it is located under the Database folder in the Object Explorer window.
Then you need to create data tables. For this sample database, you need to create five data tables: LogIn, Faculty, Course, Student, and StudentCourse. Expand the CSE_DEPT database folder by clicking the plus symbol next to it. Right click on the Tables folder and select the New Table item; a new table window is displayed, which is shown in Figure 2.24.
2.10.1 Create the LogIn Table
A default data table named dbo.Table_1 is created, as shown in Figure 2.24. Three columns are displayed in this new table: Column Name, Data Type, and Allow Nulls, which allows you to enter the name, the data type, and check mark for each column. You can check the checkbox if you allow that column to be empty, otherwise do not check it if you want that column to must contain a valid data. Generally, for the column that has been selected to work as the primary key, you should not check for the checkbox associated with that column.
The first table is the LogIn table, which has four columns with the following column names: user_name, pass_word, faculty_id, and student_id. Enter those four names into four Column Names columns. The data types for these four columns are all nvarchar(50), which means that this is a varied char type with a maximum letters of 50. Enter those data types into each Data Type column. The first column user_name is selected as the primary key, so leave the checkbox blank for that column and check other three checkboxes.
To make the first column user_name as a primary key, click on the first row and then go to the Toolbar and select the Primary Key (displayed as a key) tool. In this way, a symbol of primary key is displayed on the left of this row, which is shown in Figure 2.24.
Before we can continue to finish this LogIn table, we need first to save and name this table. Go to File|Save Table_1 and enter the LogIn as the name for this new table.