

Practical Database Programming With Java
.pdf5.3 Exploring NetBeans IDE 6.8 209
Figure 5.45. The finished Customer Template for the Desktop Form.
Figure 5.46. The finished design scene for project JavaFXDeskApp.
section. Your finished Customize Template dialog box should match one that is shown in Figure 5.45.
Click on the OK button to close this setup.
Perform the following operations to complete this design scene development:
1. Add two labels as indicators for two Textboxes to this Desktop Form. Go to the Palette window and drag the Label item and place it into the Desktop Form.
2.Go to the Properties window and change the Text of this newly added label to SQL.
3.Perform a similar operation to add the second label and set its Text property to Column.
4.Add two TextBoxes into this Form and place each of them in the next to each label, as shown in Figure 5.46.
210Chapter 5 Introduction to NetBeans IDE
5.Change the names for both TextBoxes by entering txtQuery and txtColumn into the Identifier field in the Properties window of each Text Box.
6.Add two Button controls into this Form by dragging them one by one and place them into this scene, as shown in Figure 5.46.
7.Change the names of two buttons by entering QueryButton and ExitButton into the Identifier field in the Properties window of each button.
8.Change the captions of two buttons by entering Query and Exit into the Text field in the Properties window of each button.
In this way, we complete the building of our design scene for this project. Next, let’s develop the codes for two buttons to access our connected data source and perform our desired data query.
5.3.3.5.5 Develop Codes for the Project The function of this project is: as the project runs, users can perform any data query by entering a SQL statement into the SQL
TextBox, and then users also need to enter a column name into the Column TextBox to enable the application to know which column the users want to query. When the user clicks on the Query button, the query result will be returned and displayed in the ListView box. Click on the Exit button so you can exit the project.
The coding job we need to do is for two buttons; the QueryButton and the ExitButton. First, let’s do the coding for the QueryButton control.
Select the QueryButton control and in its property sheet, click on the pen icon next to the Action property and let it generate an empty function. Enter the codes that are shown in Figure 5.47 into this empty function.
Let’s have a closer look at this piece of codes to see how it works.
A.First, a script integer variable i is created, and it is used as a loop counter later to retrieve each record from the selected column.
function QueryButtonAction(): Void { //TODO
Avar i = 0;
Bvar ds = jdbcDataSource;
Cds.query = txtQuery.text;
Dds.fetchData();
Evar rs = ds.getRecordSet();
Fwhile(rs.hasNext())
{
Gvar r = rs.current(); var s:String;
Hs = r.getString(txtColumn.text);
IlistView.items[i]= s;
Ji++;
Kprintln("{s}");
Lrs.next();
}
}
Figure 5.47. The coding for the QueryButton function.

5.3 Exploring NetBeans IDE 6.8 211
B.A script object variable ds is created, and the configured data source jdbcDataSource is assigned to this object.
C.The query variable defined in the JDBC Data Source, DbDataSource, is initialized with the content of the TextBox txtQuery, which is a SQL statement and entered by the user as the project runs. The text property of the TextBox txtQuery is used to get the query string from this TextBox.
D.The fetchData() function defined in the DataSource class (refer to Table 5.8) is executed to perform this data query by running the SQL statement. The query result is stored in a RecordSet object.
E.The getRecordSet() function defined in the DataSource class is executed to pick up the returned query result and assigned to the script variable rs.
F.A while loop is used to scan the whole RecordSet to pick up each record from that RecordSet object one by one. The hasNext()method, which returns a true if more records available in the RecordSet and false if no more available record in the RecordSet object, is used as the condition variable.
G.The current() method is used to pick up the current row pointed by the cursor in the RecordSet and assign it to the script variable r.
H.The getString() method is utilized to pick up the selected column, which is the content of the TextBox txtColumn and entered by the user as the project runs. The selected column is assigned to a script variable s that is a String variable.
I.The selected column is also assigned to the ListView object with the loop counter i as the index of the ListView control.To add a value to a ListView control, the items[] property must be used.
J.The loop counter is increased by one to point to the next position in the ListView control.
K.The query result is also displayed in the Output window by calling the JavaFX function println(). The point to be noted is that you have to use curly braces to cover the displayed string in JavaFX, otherwise, you would get a compiling error.
L.Finally, the next() method is used to move the cursor in the RecordSet to the next position to point to the next row.
The coding for the QueryButton control is complete. Next, let’s do the coding for the ExitButton control. Open its empty method and enter one line of code into this method, as shown in Figure 5.48.
By calling the System.exit() method defined in the java.lang package, we can exit the project.
At this point, we have finished the coding for our project. Now we are ready to run our project to test the data query function from the CUSTOMER table.
However, before we can run our project, we need to confirm that the JDBC Data Source has been added to the same classpath as our project located. To do that checking,
function ExitButtonAction(): Void { //TODO java.lang.System.exit(0);
}
Figure 5.48. The coding for the ExitButton control.

212 Chapter 5 Introduction to NetBeans IDE
Figure 5.49. The finished Add JAR/Folder dialog box.
right click on our project JavaFXDeskApp from the Projects window and click on the
Properties item to open the Project Properties window.
On the opened Project Properties window, click on the Libraries node and click on the Add JAR/Folder button to open the Add JAR/Folder dialog box. From the Look in combo box, browse to the default folder where all Java libraries are located in your computer, which generally should be C:\Program Files\Sun\JavaDB\lib. Select top two JAR files, derby.jar and derbyclient.jar by clicking on them, and click on the Open button to add them into our project classpath as shown in Figure 5.49.
Make sure to check the Build Projects on Classpath checkbox and then click on the OK button to complete this step.
Now let’s run our project to test the data query function.
5.3.3.5.6 Run the JavaFX Desktop Business Project Now click on the Clean and Build Main Project button to compile and build our project. If everything is fine, click on the Run Main Project button to run the project. The running status of our project is shown in Figure 5.50.
Enter select * from CUSTOMER into the SQL TextBox as the SQL query statement, and NAME into the Column TextBox as the query column. Then click on the Query button to perform this query. Immediately, you can find that the query result is returned and displayed in the ListView control, which is shown in Figure 5.50.
The query result is also displayed in the Output window, as shown in Figure 5.51.
You can try to enter different query statements and different column names to test this project, such as the WHERE clause and some limitations. The point is that you may get some running exceptions when you try to get the CREDIT_LIMIT column. The key issue is that you can only get those columns that have a String data type from this data source since we used a getString() method in line H in our coding (refer to Fig. 5.47) to pick

5.3 Exploring NetBeans IDE 6.8 213
Figure 5.50. The running result of the project.
Figure 5.51. The running result displayed in the Output window.
up the query result. However, the data type for the CREDIT_LIMIT column in the
CUSTOMER table is an integer. If you want to fix this kind of error to avoid this exception, you need to figure out how to distinguish between the columns that have either String or Integer data type, and use a different fetch method, such as getString() and get(column_name) method, to pick up the query result.
Click on the Exit button to exit the project.
Yes, our project is very successful! Wait a moment, here is a problem or bug that may be found when a careful developer builds and runs this project.
 Note: The bug is that only 12 customer names were queried and displayed when running this project. The trick is that inside the while loop, when it detects the next record in the RecordSet is null, which means that no more record available in the RecordSet, the loop is exited even the current cursor points to a valid record and that record cannot be queried and displayed.

214 Chapter 5 Introduction to NetBeans IDE
How to fix this bug and make the project run correctly to query and display all 13 entities from the CUSTOMER table? We leave this as a homework for students.
A complete JavaFX Desktop Business project JavaFXDeskApp can be found from the folder DBProjects\Chapter 5 that is located at the Wiley ftp site (refer to Figure 1.2 in Chapter 1). You can download this project and run it in your computer. However, you need to perform the following two jobs after you download this project and before you can run it in your computer:
1.Start the JavaDB Server
2.Connect to the JavaDB Sample database
Now you are ready to run the project on your computer.
5.3.3.6 Build JavaFX Mobile Business Application
Generally, there is no significant difference between a JavaFX Desktop Business application and a JavaFX Mobile Business application, and the only difference between them is the target device type the application will be applied. Both applications are built and developed in the similar design scene and components with the JavaFX script language. We will not provide a very detailed discussion for this kind of application in this section because of the similarity between these two kinds of applications. Refer to discussions in the last section, one can easily build and develop a JavaFX Mobile Business application without problem at all.
Next let’s take care of building and developing Java Web Application projects to perform data access and query between clients and application servers.
5.3.4 Build a Java Web Application Project
Java Platform, either Standard Edition (SE) or Enterprise Edition (EE), provides rich and flexible tools and components to support Web applications and Web Services developments. With Java EE, developers can build professional, multitier and portable applications that can be run at cross-platform environments with improved efficiency.
We will provide a detailed discussion about the Java Web Applications development in Chapter 8 with real project examples. Refer to that chapter to get more detailed information for building this kind of application in NetBeans IDE.
5.3.5 Build a Java Enterprise Edition Project
Java Platform, Enterprise Edition or Java EE is a widely used platform for server programming in the Java programming language.The Java EE differs from the Java Standard Edition Platform (Java SE) in that it adds libraries that provide functionality to deploy fault-tolerant, distributed, multi-tier Java software, based largely on modular components running on an application server.
Although Java EE is closely related to Java Web applications, it is so important to Java application developments, and therefore we prefer to provide a detailed discussion in this section to give readers a preintroduction about this critical component.

5.3 Exploring NetBeans IDE 6.8 215
5.3.5.1 Overview of Java Enterprise Edition 6
The aim of the Java EE platform is to provide developers with a powerful set of APIs while reducing development time, reducing application complexity, and improving application performance. The Java EE platform uses a simplified programming model. XML deployment descriptors are optional. Instead, a developer can simply enter the information as an annotation directly into a Java source file, and the Java EE server will configure the component at deployment and runtime. These annotations are generally used to embed in a program data that would otherwise be furnished in a deployment descriptor. With annotations, the specification information is put directly in your code next to the program element that it affects.
Java EE is a widely used platform containing a set of coordinated technologies that significantly reduce the cost and complexity of developing, deploying, and managing multitier, server-centric applications. Java EE builds upon the Java SE platform and provides a set of APIs for developing and running portable, robust, scalable, reliable, and secure server-side applications.
Some of the fundamental components of Java EE include:
•Enterprise JavaBeans (EJB): a managed, server-side component architecture used to encapsulate the business logic of an application. EJB technology enables rapid and simplified development of distributed, transactional, secure, and portable applications based on Java technology.
•JPA: a framework that allows developers to manage data using object-relational mapping (ORM) in applications built on the Java Platform.
5.3.5.1.1 Java EE Application Model Java EE is designed to support applications that implement enterprise services for customers, employees, suppliers, partners, and others who make demands on or contributions to the enterprise. Such applications are inherently complex, potentially accessing data from a variety of sources and distributing applications to a variety of clients.
The Java EE application model defines an architecture for implementing services as multitier applications that deliver the scalability, accessibility, and manageability needed by enterprise-level applications. This model partitions the work needed to implement a multitier service into two parts: the business and presentation logic to be implemented by the developer, and the standard system services provided by the Java EE platform. The developer can rely on the platform to provide solutions for the hard systems-level problems of developing a multitier service.
Java EE is defined by its specification. As with other Java Community Process specifications, providers must meet certain conformance requirements in order to declare their products as Java EE compliant, which is shown in Figure 5.52.
5.3.5.1.2 Distributed Multitiered Applications The Java EE platform uses a distributed multitiered application model for enterprise applications. Application logic is divided into components according to function, and the various application components that make up a Java EE application are installed on different machines depending on the tier in the multitiered Java EE environment to which the application component belongs.

216 Chapter 5 |
Introduction to NetBeans IDE |
|
|
||
|
|
Java EE Specifications |
|
||
JDBC |
RMI |
JMS |
Web Services |
XML |
|
|
Connectors |
Servlets |
Portlets |
|
|
|
|
EJB |
|
JSP |
|
Figure 5.52. Java EE Specifications. |
|
|
|
||
Java EE Application |
Client Tier |
Client Machine |
|
||
|
|
|
|||
Application Server |
|
|
|
|
|
JSP Pages |
Web Tier |
|
|
|
|
|
Java EE Server |
|
|||
|
|
|
|
||
Enterprise Beans |
Business Tier |
|
|
||
|
|
|
|
||
Database |
|
EIS Tier |
Database Server |
|
|
Figure 5.53. A multitiered Java EE application.
Figure 5.53 shows a multitiered Java EE application divided into the tiers described in the following list. The Java EE application parts shown in Figure 5.53 are presented in Java EE Components.
•Client-tier components run on the client machine.
•Web-tier components run on the Java EE server.
•Business-tier components run on the Java EE server.
•Enterprise information system (EIS)-tier software runs on the EIS server.
The enterprise information system tier handles EIS software and includes enterprise infrastructure systems, such as enterprise resource planning (ERP), mainframe transaction processing, database systems, and other legacy information systems. For example, Java EE application components might need access to enterprise information systems for database connectivity.
Although a Java EE application can consist of the three or four tiers shown in Figure 5.53, Java EE multitiered applications are generally considered to be three-tiered applications because they are distributed over three locations: client machines, the Java EE

5.3 Exploring NetBeans IDE 6.8 217
server machine, and the database or legacy machines at the back end. Three-tiered applications that run in this way extend the standard two-tiered client and server model by placing a multithreaded application server between the client application and back-end storage.
5.3.5.1.3 Java EE Components Java EE applications are made up of components. A Java EE component is a self-contained functional software unit that is assembled into a Java EE application with its related classes and files and that communicates with other components.
The Java EE specification defines the following Java EE components:
•Application clients and Applets are components that run on the client machine.
•Java Servlet, JavaServer Faces, and JavaServer Pages (JSP) technology components are web components that run on the server.
•Enterprise JavaBeans (EJB) components are business components that run on the server.
Java EE components are written in the Java programming language and are compiled in the same way as any program in the language. The difference between Java EE components and standard Java classes is that Java EE components are assembled into a Java EE application, are verified to be well formed and in compliance with the Java EE specification, and are deployed to production, where they are run and managed by the Java
EEserver.
A Web client consists of two parts:
1.Dynamic web pages containing various types of markup language (HTML, XML, and so on), which are generated by Web components running in the Web tier.
2.A Web browser, which renders the pages received from the server.
A Web client is sometimes called a thin client. Thin clients usually do not query databases, execute complex business rules, or connect to legacy applications. When you use a thin client, such heavyweight operations are off-loaded to enterprise beans executing on the Java EE server, where they can leverage the security, speed, services, and reliability of Java EE server-side technologies.
An Application client runs on a client machine and provides a way for users to handle tasks that require a richer user interface than can be provided by a markup language. It typically has a GUI created from the Swing or the Abstract Window Toolkit (AWT) API, but a command-line interface is certainly possible.
Application clients directly access enterprise beans running in the business tier. However, if application requirements warrant it, an application client can open an HTTP connection to establish communication with a Servlet running in the Web tier. Application clients written in languages other than Java can interact with Java EE servers, enabling the Java EE platform to interoperate with legacy systems, clients, and non-Java languages.
Java EE Web components are either Servlets or web pages created using JavaServer Faces technology and/or JSP technology (JSP pages). Servlets are Java programming language classes that dynamically process requests and construct responses. JSP pages are text-based documents that execute as Servlets but allow a more natural approach to
218 Chapter 5 Introduction to NetBeans IDE
creating static content. JavaServer Faces technology builds on Servlets and JSP technology, and provides a user interface component framework for Web applications.
Static HTML pages and applets are bundled with Web components during application assembly but are not considered Web components by the Java EE specification. Server-side utility classes can also be bundled with Web components, and, like HTML pages, are not considered Web components.
A Java EE application is packaged into one or more standard units for deployment to any Java EE platform-compliant system. Each unit contains:
•A functional component or components (such as an enterprise bean, webpage, servlet, or applet)
•An optional deployment descriptor that describes its content
Once a Java EE unit has been produced, it is ready to be deployed. Deployment typically involves using a platform’s deployment tool to specify location-specific information, such as a list of local users that can access it and the name of the local database. Once deployed on a local platform, the application is ready to run.
5.3.5.1.4 Java EE Packaging Applications A Java EE application is delivered in either a Java Archive (JAR) file, a Web Archive (WAR) file, or an Enterprise Archive (EAR) file. A WAR or EAR file is a standard JAR (.jar) file with a .war or .ear extension. Using JAR, WAR, and EAR files and modules makes it possible to assemble a number of different Java EE applications using some of the same components. No extra coding is needed; it is only a matter of assembling (or packaging) various Java EE modules into Java EE JAR, WAR, or EAR files.
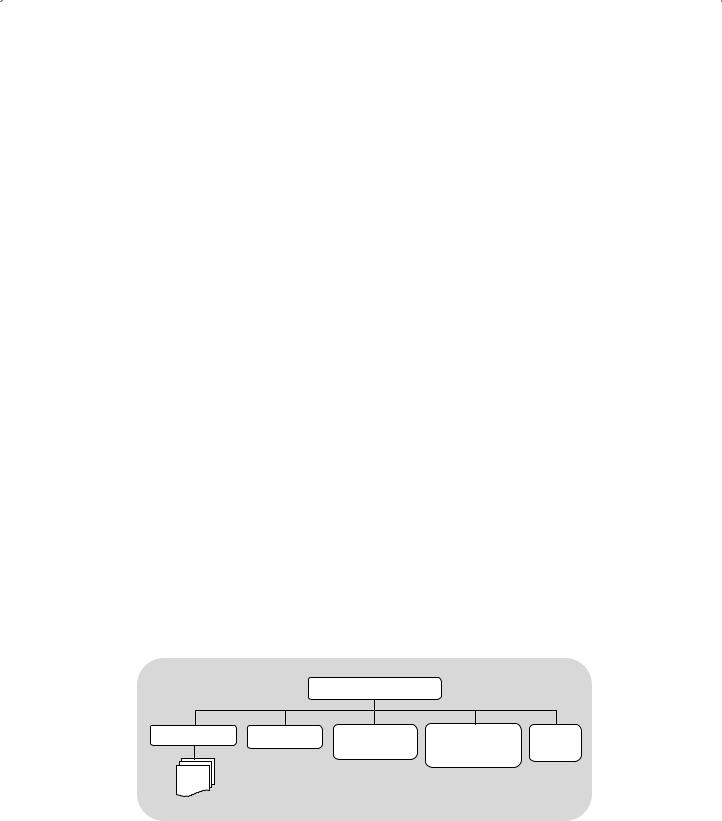
An EAR file that is shown in Figure 5.54 contains Java EE modules, and, optionally, deployment descriptors. A deployment descriptor is an XML document with an .xml extension that describes the deployment settings of an application, a module, or a component. Because deployment descriptor information is declarative, it can be changed without the need to modify the source code. At runtime, the Java EE server reads the deployment descriptor and acts upon the application, module, or component accordingly.
A Java EE module consists of one or more Java EE components for the same container type, and, optionally, one component deployment descriptor of that type. An
|
|
Assembly Root |
|
|
META-INF |
Web Module |
Application |
Resource |
EJB |
|
|
Client Module |
Adapter Module |
Module |
application.xml
Figure 5.54. EAR file structure.