

Practical Database Programming With Java
.pdf98 Chapter 3 JDBC API and JDBC Drivers
Client |
Database Server |
|
Java |
Native Database |
Database |
Application |
Libraries (CLI) |
|
JDBC Driver |
JDBC Driver |
|
(Part I) |
(Part II) |
|
Local Disk |
|
|
|
|
Network Interface
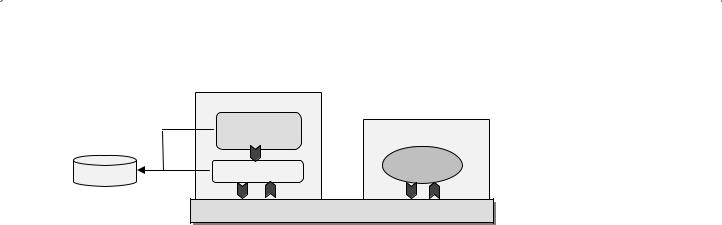
Figure 3.4. Type III Driver configuration.
For both Type I and Type II drivers, either the ODBC driver or the native CLI libraries must be installed and located on the client machine. All communications between the server processes and the JDBC driver have been through native program interface. However, in Type III driver configuration, the native CLI libraries are placed on a server and the driver uses a network protocol to facilitate communications between the application and the driver. The result of this modification is to separate the driver into two parts:
(1)a part of JDBC driver that is an all-Java portion can be downloaded to the client; and
(2)a server portion containing both another part of JDBC driver and native CLI methods. All communications between the application and the database server are 100% Java to Java. However, the communication between the database and the server is still done via a native database CLI. Figure 3.4 shows this configuration.
It can be found from Figure 3.4 that the client does not need to perform either database-specified protocol translation or a Java-to-CLI translation by using Type III drivers, and this will greatly reduce the working loads for the client machine, and the client piece of a Type III driver only needs to translate requests into the network protocol to communicate with the database server. Another advantage of using a Type III driver is that the second part of the Type III driver, which is used to communicate with the database native libraries, does not need to be downloaded to the client, and as a result of this fact, Type III drivers are not subject to the same security restrictions found as Types I and II did. Since all database-related codes reside on the server side, a large driver that is capable of connecting to many different databases can be built.
3.4.4 Type IV: Native-Protocol-All-Java Driver
Type IV drivers are totally different with any drivers we have discussed so far.These types of drivers are capable of communicating directly with the database without the need for any type of translation since they are 100% Java without using any CLI native libraries. Figure 3.5 shows a typical Type IV driver configuration.
The key issue in use of a Type IV driver is that the native database protocol will be rewritten to converts the JDBC calls into vendor specific protocol calls, and the result of this rewritten is that the driver can directly interact with the database without needing any other translations. Therefore, Type IV drivers are the fastest drivers compared with all other three-type drivers, Types I III. By using a Type IV driver, it will greatly simplify database access for applets by eliminating the need for native CLI libraries.
3.5 JDBC Standard Extension API 99
Client |
|
|
Java |
Server |
|
Application |
||
|
||
Local Disk |
|
|
JDBC Driver |
Database |
|
|
Network Interface
Figure 3.5. Type IV driver configuration.
3.5 JDBC STANDARD EXTENSION API
Besides the standard JDBC API (or core API), Sun added an extension package called JDBC 2.0 Standard Extension API to support extended database operations.This package contains the following components:
1.JDBC DataSource
2.JDBC driver-based connection pooling
3.JDBC RowSet
4.Distributed transactions
We will take a close look at these components and provide a more detailed discussion about these elements in the following sections.
3.5.1 JDBC DataSource
In Section 3.3.3.2, we have had a brief discussion about the DataSource object. Because of its specialty and advantage over JDBC drivers and DriverManagers, we will provide a more detailed discussion about this interface in this part.
As we know, the DataSource interface is introduced in the JDBC 2.0 Standard Extension API, and it is a better way to connect to a data source to perform data actions. In JDBC, a data source is a class that implements the interface javax.sql.DataSource to connect to more than one desired databases. The getConnection() method is always used to setup this connection.
As we discussed in Section 3.3.1, to establish a connection by using a JDBC driver, you need to use the DriverManager to load a desired driver and register that driver to the driver list. You also need to know exactly the driver name and the driver URLs to complete this connection. In fact, the DataSource can provide an alternative and better way to do that connection in fast and more efficient way.
The advantage of using a DataSource to perform this database connection is: a DataSource object is normally registered with a Java Naming and Directory Interface
(JNDI) naming service. This means that an application can retrieve a DataSource object by the name of that DataSource only, without needing to know the driver name, database name, and driver URLs, even without needing to register any drivers. In other words, this naming service is independent of the system configurations and databases.

100 Chapter 3 JDBC API and JDBC Drivers
Table 3.5. The most popular methods used in the Context interface
Method |
Function |
|
|
bind(string name, object obj) |
Binds a name to an object |
createSubcontext(string name) |
Creates and binds a new context |
destroySubcontext(string name) |
Destroys the named context and removes it from |
|
the namespace |
listBindings(string name) |
Enumerates the names bound in the named context, |
|
along with the objects bound to them |
lookup(string name) |
Retrieves the named object |
unbind(string name) |
Unbinds the named object |
close() |
Closes this context |
|
|
3.5.1.1 Java Naming and Directory Interface
The Java Naming and Directory Interface (JNDI) provides naming and directory functionality and service to Java applications. It is defined to be independent of any specific directory service implementation so that different directories can be accessed in a common way.
Exactly, the JNDI can be analogous to a file directory that allows users to find and work with files by name. In this way, the JNDI is used to find the DataSource using the logical name assigned to it when it is registered with the JNDI.
The association of a name with an object is called a binding process. A DataSource object stores the attributes that tell it how to connect to a database and those attributes are assigned when you bind the DataSource instance to its JNDI directory.The core JNDI interface that performs looking up, binding, unbinding, renaming objects, creating, and destroying subcontexts is the Context interface.
The Context interface represents a naming context, which consists of a set of name- to-object bindings. It contains methods for examining and updating these bindings. Table 3.5 shows some most popular methods used by this interface.
In fact, using JNDI can significantly improve the portability of a Java application by removing the need to hard code a driver name and database name, and it is very similar to a file directory to improve file accessing by overcoming the need to reference disk cylinders and sectors. To establish a valid database connection using the JNDI, the only information you need is the name of the DataSource; yes, that is all you need, and it is so simple and easy, is it not?
3.5.1.2 Deploy and Use a Basic Implementation of DataSource
In this section, we will use a piece of codes to illustrate the implementation of a DataSource object. Perform the following three operations to deploy a DataSource object:
1.Create an instance of the DataSource class.
2.Set its properties using setter methods.
3.Register it with a JNDI naming service.
3.5 JDBC Standard Extension API 101
Vendor_DataSource ds = new Vendor_DataSource();
ds.setServerName("localhost"); ds.setDatabaseName("CSE_DEPT"); ds.setDescription("CSE_DEPT Database");
Context ctx = new InitialContext(); ctx.bind("jdbc/CSE_DEPT", ds);
Figure 3.6. An example coding for the creation of a new DataSource object.
Context ctx = new InitialContext();
DataSource ds = (DataSource)ctx.lookup("jdbc/CSE_DEPT");
Connection con = ds.getConnection("myUserName", "myPassWord");
// Execute the SQL statements to perform data actions via database……
Figure 3.7. An example coding for execution of the database connection via DataSource.
The first step is to create a DataSource object, set its properties, and register it with a JNDI naming service. A DataSource object is usually created, deployed, and managed separately from the Java applications that use it. A point to be noted is that a DataSource object for a particular data source is created and deployed by a developer or system administrator, not the user. Figure 3.6 shows a piece of example codes to create a new DataSource object with some properties setting by using some setters. The class Vendor_ DataSource would most likely be supplied by a driver vendor.
In Figure 3.6, the first coding line is to create a new DataSource object based on the data source provided by the vendor. The following three lines are used to set up different properties using a setter. The last two lines are used to create an InitialContext object and to bind and register the new DataSource object ds to the logical name jdbc/CSE_ DEPT with a JNDI naming service.
The JNDI namespace consists of an initial naming context and any number of subcontexts under it. It is hierarchical, similar to the directory/file structure in many file systems, with the initial context being analogous to the root of a file system, and subcontexts being analogous to subdirectories. The root of the JNDI hierarchy is the initial context, here represented by the variable ctx. There may be many subcontexts under the initial context, one of which is jdbc, the JNDI subcontext reserved for JDBC data sources. The logical data source name may be in the subcontext jdbc, or in a subcontext under jdbc. The last element in the hierarchy is the object being registered, analogous to a file, which in this case is a logical name for a data source.
The codes shown in Figure 3.7 show how an application uses this to connect to a data source.
To get a connection using a DataSource object, create a JNDI Context instance, and use the name of the DataSource object to its lookup() method to try to find it from a JNDI subcontext jdbc. The returned DataSource object will call its getConnection() method to establish a connection to the database.

102 Chapter 3 JDBC API and JDBC Drivers
As soon as a database connection has been established, you can execute any SQL statements as you want to perform any desired data action against the connected database.
3.5.2 JDBC Driver-Based Connection Pooling
By using a DataSource object, you can easily setup a connection with your database and perform any data operation you want. Sound good! Yes, this kind of operation is good for two-tier database applications without problem. However, a problem would come if you apply this operation in a three-tier database application. The main issue is the overhead in transactions between the application server and client. If you are running in a three-tier database application, each time when you communicate between your application server and your database via a database server to perform a connection or a disconnection, there would be quite a few communication traffic running between your server and your database, and this will introduce multiple opening and closing operations to your database and greatly reduce the efficiency of the database.
To solve this overhead problem, a Connection Pooling API has been provided by JDBC Standard Extension API. The pooling implementations do not actually close connections when the client calls the close() method, but instead return the connections to a pool of available connections for other clients to use. This avoids any overhead of repeatedly opening and closing connections, and allows a large number of clients to share a small number of database connections.
The connection pooling API is an extension of the regular connection API. The working principle of using a connection pooling is: when a resource or connection is no longer needed after a task has been completed, it is not destroyed but is added into a resource pool instead, making it available when required for a subsequent operation. In other words, we can temporarily store all unused connections to a connection pool, and reuse them as soon as a new data action is required for the target database. In this way, we can greatly improve the database performance by cutting down on the number of new connections that need to be created.
The JDBC API provides a client and a server interface for connection pooling. The client interface is javax.sql.DataSource, which is what application code will typically use to acquire a pooled database connection. The server interface is javax.sql. ConnectionPoolDataSource, which is how most application servers will interface with the PostgreSQL JDBC driver. Both interfaces are defined in the JDBC 2.0 Standard Extension (also known as the JDBC 2.0 Optional Package).
The server interface for connection pooling, ConnectionPoolDataSource object, is a factory for PooledConnection objects. All Connection objects that implement this interface are registered with a JNDI naming service.
To implement a DataSource object to create pooled connections, you need to perform the following operations:
•Create a ConnectionPoolDataSource object.
•Set its properties to the data source that produced connections.
•Register ConnectionPoolDataSource object with the JNDI naming service.

3.5 JDBC Standard Extension API 103
ConnectionPoolDataSource cpds = new ConnectionPoolDataSource();
cpds.setServerName("localhost"); cpds.setDatabaseName("CSE_DEPT"); cpds.setPortNumber(5000); cpds.setDescription("CSE_DEPT Database");
Context ctx = new InitialContext(); ctx.bind("jdbc/pool/CSE_DEPT", cpds);
PooledDataSource ds = new PooledDataSource(); ds.setDescription(“CSE_DEPT database pooled connection source”); ds.setDataSourceName(“jdbc/pool/CSE_DEPT”);
Context ctx = new InitialContext(); ctx.bind(“jdbc/CSE_DEPT”, ds);
Figure 3.8. An example coding for the connection pooling DataSource.
•Create a DataSource object.
•Set properties to the DataSource object by using setter.
Figure 3.8 shows a piece of example codes to illustrate how to use the connection pooling API to create and deploy a DataSource object that an application can use to get pooled connections to the database.
The first coding line is used to create a new ConnectionPoolDataSource object, and this object is equivalent to a pool body to hold unused data sources later.
The following four lines are used to set appropriate properties to this created object. Then, in the sixth and seventh lines, the created ConnectionPoolDataSource object is registered with the JNDI naming service. The logical name associated with cpds has a subcontext pool added under the subcontext jdbc, which is similar to adding a subdirectory to another subdirectory in a file system.
Now we need to create our DataSource object implemented to work with it, or in other words, we can add this DataSource object into our pool, the ConnectionPoolDataSource object, when it is temporarily unused in an application.
The coding lines between the eighth and the tenth are used to create our DataSource object ds with the PooledDataSource class. Note in the tenth coding line, the name of the DataSource is jdbc/pool/CSE_DEPT, which is identical with the logical name of our
ConnectionPoolDataSource object we created before.
The last two coding lines are used to register our DataSource object with the JNDI naming service.
Now you can use this connection pooling for your data source object. The point is that when you finished a task to your current database, you must call the close() method from your client to inform the server that this database connection will be temporarily unused, and this will allow the Connection Pooling API to add this unused connection to the ConnectionPoolDataSource object. Later on, if you want to reuse this database, you need to use the codes shown in Figure 3.9 to get that connection from the pool.
Another situation to use a DataSource object is when you need to implement distributed transactions, which means that you need to use multiple databases synchronously in your applications. In that case, use of a DataSource object with built-in distributed transaction capabilities is the best solution.
104 Chapter 3 JDBC API and JDBC Drivers
Connection con = null; try {
con = ds.getConnection(); // use connection
}
catch(SQLException e)
{
// log error
}
finally
{
if(con != null)
try {con.close();}catch(SQLException e) {}
}
Figure 3.9. An example coding for the retrieving and reusing a connection.
3.5.3 Distributed Transactions
A distributed transaction, sometimes referred to as a global transaction, is a set of two or more related transactions that must be managed in a coordinated way. The transactions that constitute a distributed transaction might be in the same database, but more typically are in different databases and often in different locations. Each individual transaction of a distributed transaction is referred to as a transaction branch.
In the JDBC 2.0 extension API, distributed transaction functionality is built on top of connection pooling functionality, which we have discussed in the last section. This distributed transaction functionality is also built upon the open XA standard for distributed transactions. (XA is part of the X/Open standard and is not specific to Java.)
3.5.3.1 Distributed Transaction Components and Scenarios
A typical distributed transaction can be composed of the following components and scenarios:
•A distributed transaction system typically relies on an external transaction manager, such as a software component that implements standard Java Transaction API (JTA) functionality, to coordinate the individual transactions. Many vendors will offer XA-compliant JTA modules. This includes Oracle, which is developing a JTA module based on the Oracle implementation of XA.
•XA functionality is usually isolated from a client application, being implemented instead in a middle-tier environment such as an application server. In many scenarios, the application server and transaction manager will be together on the middle tier, possibly together with some of the application code as well.
•The term resource manager is often used in discussing distributed transactions. A resource manager is simply an entity that manages data or some other kind of resource. Wherever the term is used in this chapter, it refers to a database.
By definition, XA is a standard protocol that allows coordination, commitment, and recovery between transaction managers (e.g., CICS, Tuxedo, and even BEA Web Logic

3.5 JDBC Standard Extension API 105
Server) and resource managers (e.g., databases, message queuing products such as JMS or Web Sphere MQ, mainframe applications, ERP packages).
As with connection pooling API, two classes must be used for a distributed transaction:
•A XADataSource that produces XAConnections supporting distributed transactions.
•A DataSource object that is implemented to work with it.
The transaction manager is responsible for making the final decision either to commit or rollback any distributed transaction. A commit decision should lead to a successful transaction; rollback leaves the data in the database unaltered. JTA specifies standard Java interfaces between the transaction manager and the other components in a distributed transaction: the application, the application server, and the resource managers.
3.5.3.2 The Distributed Transaction Process
The transaction manager is the primary component of the distributed transaction infrastructure; however, the JDBC driver and application server components should have the following characteristics:
•The driver should implement the JDBC 2.0 API (including the Optional Package interfaces XADataSource and XAConnection) or higher and the JTA interface XAResource.
•The application server should provide a DataSource class that is implemented to interact with the distributed transaction infrastructure and a connection pooling module.
The first step of the distributed transaction process is to send a request to the transaction manager by the application. Although the final commit/rollback decision treats the transaction as a single logical unit, there can be many transaction branches involved. A transaction branch is associated with a request to each resource manager involved in the distributed transaction. Requests to three different RDBMSs, therefore, require three transaction branches. Each transaction branch must be committed or rolled back by the local resource manager. The transaction manager controls the boundaries of the transaction, and is responsible for the final decision as to whether or not the total transaction should commit or rollback. This decision is made in two phases, called the two-phase commit protocol.
In the first phase, the transaction manager polls all of the resource managers (RDBMSs) involved in the distributed transaction to see if any of them is ready to commit. If a resource manager cannot commit, it responds negatively and rolls back its particular part of the transaction so that data is not altered.
In the second phase, the transaction manager determines if any of the resource managers have responded negatively, and, if so, rolls back the whole transaction. If there are no negative responses, the translation manager commits the whole transaction, and returns the results to the application.
The DataSource implemented to produce connections for distributed transactions are almost always implemented to produce connections that are pooled as well. The
XAConnection interface extends the PooledConnection interface.
To begin a distributed transaction, a XADataSource object should be created first, and this can be done by creating a new instance of the XATransactionlDS and setting its properties. Figure 3.10 shows an example coding for a distributed transaction.
106 Chapter 3 JDBC API and JDBC Drivers
XATransactionlDS xads = new XATransactionlDS ();
xads.setServerName("localhost"); xads.setDatabaseName("CSE_DEPT"); xads.setPortNumber(5000); xads.setDescription("CSE_DEPT Database");
Context ctx = new InitialContext(); ctx.bind("jdbc/xa/CSE_DEPT", xads);
TransactionlDS ds = new TransactionlDS(); ds.setDescription(“CSE_DEPT distributed transaction connection source”); ds.setDataSourceName(“jdbc/xa/CSE_DEPT”);
Context ctx = new InitialContext(); ctx.bind(“jdbc/CSE_DEPT”, ds);
Figure 3.10. An example coding for the distributed transaction implementation.
The first coding line is used to create a new XADataSource object, and it produces XAConnections supporting distributed transactions.
The following four lines are used to set appropriate properties to this created object. Then, in the sixth and seventh lines, the created XADataSource object is registered with the JNDI naming service. The logical name associated with xads has a subcontext xa added under the subcontext jdbc, which is similar to adding a subdirectory to another
subdirectory in a file system.
Finally, the DataSource object is created to interact with xads, and other XADataSource objects are deployed.
Now that instances of the TransactionlDS and XATransactionlDS classes have been created, an application can use the DataSource to get a connection to the CSE_ DEPT database, and this connection can then be used in any distributed transactions.
3.5.4 JDBC RowSet
A JDBC RowSet object is one of the JavaBeans components with multiple supports from
JavaBeans, and it is a new feature in the java.sql package. By using the RowSet object, a database query can be performed automatically with the data source connection and a query statement creation. In this section, we will provide a brief introduction about this new feature to reduce the coding load and improve the efficiency of the data query with the help of this RowSet object. A more detailed discussion with real project examples will be given in Section 6.4.6 in Chapter 6.
3.5.4.1 Introduction to Java RowSet Object
A RowSet object contains a set of rows from a result set or some other source of tabular data, like a file or spreadsheet. Because a RowSet object follows the JavaBeans model for properties and event notification, it is a JavaBeans component that can be combined with other components in an application. As it compatible with other Beans, application developers can probably use a development tool to create a RowSet object and set its properties.

3.5 JDBC Standard Extension API 107
RowSets may have many different implementations to fill different needs. These implementations fall into two broad categories, connected and disconnected:
1.A connected RowSet is equivalent to a ResultSet, and it maintains a connection to a data source as long as the RowSet is in use.
2.A disconnected RowSet works as a DataSet in Visual Studio.NET, and it can connect to a data source to perform the data updating periodically. Most time, it is disconnected with the data source and uses a mapping memory space as a mapped database.
While a RowSet is disconnected, it does not need a JDBC driver or the full JDBC API, so its footprint is very small. Thus, a RowSet is an ideal format for sending data over a network to a thin client.
To make writing an implementation easier, the Java Software division of Sun Microsystems, Inc. plans to provide reference implementations for five different styles of RowSets in the future. Among them, two components are very popular and widely implemented in Java database applications:
1.A CachedRowSet class—a disconnected RowSet that caches its data in memory; not suitable for very large data sets, but an ideal way to provide thin Java clients, such as a Personal Digital Assistant (PDA) or Network Computer (NC), with tabular data.
2.A JDBCRowSet class—a connected RowSet that serves mainly as a thin wrapper around a ResultSet object to make a JDBC driver look like a JavaBeans component.
To effectively apply RowSet objects to perform data actions against desired databases, the following operational sequence should be adopted.
3.5.4.2 Implementation Process of a RowSet Object
Generally, the operational procedure of using a RowSet object to query data can be divided into the following four steps:
1.Set up and configure a RowSet object.
2.Register the RowSet Listeners.
3.Set input and output parameters for the query command.
4.Traverse through the result rows from the ResultSet.
The first step is used to setup and configure the static or dynamic properties of a RowSet object, such as the connection url, username, password, and running command, to allow the RowSet object to connect to the data source, pass user parameters into the data source, and perform the data query.
The second step allows users to register different Listeners for the RowSet object with different event sources. The RowSet feature supports multiple listeners to be registered with the RowSet object. Listeners can be registered using the addRowSetListener() method and unregistered through the removeRowSetListener() method. A listener should implement the javax.sql.RowSetListener interface to register itself as the RowSet listener. Three types of events are supported by the RowSet interface:
1.cursorMoved event : Generated whenever there is a cursor movement, which occurs when the next() or previous() methods are called.