

Practical Database Programming With Java
.pdf5.3 Exploring NetBeans IDE 6.8 199
import javafx.stage.Stage; import javafx.scene.Scene; import javafx.scene.text.Text; import javafx.scene.text.Font;
def images = for(i in [0..9]){Image {url: "{__DIR__}{i}.png"};}
Stage {
title: "Application title" scene: Scene {
width: 250 height: 80
content: [ ImageView {image: images[0]}
Figure 5.37. The newly added codes to the Main.fx file.
Now we are ready to develop our JavaFX Script project using the JavaFX Script programming language in the Main.fx window.
5.3.3.4.3 Develop JavaFX Script Language Codes Double click on our Main.fx project file from the Projects window to open it. Add code lines that are shown in Figure 5.37 into this file. The newly added coding lines have been highlighted in bold.
The purpose of this added coding line is to display the counting number in the single LED. As you know, to work with images in JavaFX applications, you need to use the Image and ImageView classes. The Image class loads the image from the specified location, and the ImageView class displays the image in your application. Create a variable images to display 10-digit images, 0.png 9.png.
A script for loop is used to continuously display 10 counting numbers. The location of those images is represented using a URL.
An error flag appears as soon as we added this coding line since we have not imported the associated packages to tell the compiler where those image components are located.
To fix this error and import the desired package, perform the following operations:
1. Right click in any white space in the editor and select Fix Imports from the popup menu to remove the error flag. You need to select the type of Image by double clicking the javafx.scene.image.Image line
2.Similarly, select the type of ImageView by double clicking the javafx.scene.image. ImageView line.
Two import statements have been added into the project file after you completed these two operations, which are:
import javafx.scene.image.Image;
import javafx.scene.image.ImageView;
If you run the project in this way, the number displayed in LED cannot be changed as you click on it since we need to set up a binding between each image file. On the opened Main.fx window, perform the modifications that are shown in Figure 5.38.
200 Chapter 5 Introduction to NetBeans IDE
……
import javafx.scene.text.Text; import javafx.scene.text.Font; import javafx.scene.image.Image;
import javafx.scene.image.ImageView;
Aimport javafx.scene.input.MouseEvent;
Bvar count = 0;
def images = for(i in [0..9]){Image {url: "{__DIR__}{i}.png"};}
Cvar currImg = images[count];
Stage {
title: "Application title" scene: Scene {
width: 250
Dheight: 100
Econtent: [ImageView {image: bind currImg
FonMouseClicked:
function(e: MouseEvent) { println("Click number {++count} ..."); currImg = images[count];
}
}
Text {
font : Font { size : 16
}
Gx: 65
y:30
Hcontent: "Click on the LED to Begin"
}
]
}
}
Figure 5.38. The modified codes for the Main.fx file.
Let’s take a closer look at this piece of codes to see how it works.
A.In order to set up a connection between each click on the LED and the click event, we need to import the MouseEvent package in which a mouse click event source and event listener are involved.
B.The variable count is initialized to 0 as the starting number.
C.By assigning the image with the current count number to the current image variable, the current image with the current clicking number can be displayed.
D.By enlarging this number, we can make the height of the scene a little big.
E.By using the bind control, we bind the image object with the current image object together to enable the current image to be displayed in this image object.
F.If the onMouseClicked event occurs, which means that the mouse has been clicked by the user, and the listener function will be triggered to display the current clicking number and the current digit in the current image object.

5.3 Exploring NetBeans IDE 6.8 201
(a) |
(b) |
Figure 5.39. The running status of our JavaFX Script project.
G.We move the starting point to display the content of this project horizontally to make it in the center of the script window.
H.The content is changed to work as a prompt to remind users to perform a click as the project runs.
Now we are ready to compile, build, and run our project to test its functionality. Click on the Clean and Build Main Project button to build our project.
5.3.3.4.4 Run the JavaFX Script Project After building and compiling our project, right click on the Main.fx file from the projects window and click on the Run File item to run our JavaFX Script project. A running example of our project is shown in Figure 5.39a.
Click on the LED and you can find that the number displayed in the LED will increase one by one for each clicking. The output result is also displayed in the Output window, as shown in Figure 5.39b.
Our JavaFX Script project is very successful!
Click on the Close button that is located at the upper-right corner of this window to close our project.
A complete JavaFX Script application project JavaFXScriptCounter can be found from the folder DBProjects\Chapter 5 that is located at the Wiley ftp site (refer to Figure 1.2 in Chapter 1). You can download this project from that site and run it in your computer with the following plug-in components in your NetBeans IDE:
•JavaFX Composer
•JavaFX Kit (including the JavaFX SDK)
•JavaScript Debugger
You can add those plug-in components by selecting the Tools > Plugins menu item and select the Available Plugins tab, and then checking those components.
5.3.3.5 Build a JavaFX Desktop Business Application
JavaFX Desktop Business Application is exactly based on the JavaFX Script Application template, and it uses the Standard Execution mode as the default running mode.
202 Chapter 5 |
Introduction to NetBeans IDE |
Additionally, it |
creates a design file with preset Desktop profile and a 480 × 320 |
screen-size. |
|
Relatively, the difference between a JavaFX Script Application and a JavaFX Desktop Business Application is that the former runs the application using command-line JavaFX executable with a default scene, and the latter uses a Standard Execution mode with a define view or scene. Since the JavaFX Script Application does not provide any scene or view window as the project runs, a default scene window will be provided as the project runs. However, the JavaFX Desktop Business Application provides a design file with a design view scene to allow users to design and build this scene view using the JavaFX Composer; therefore, it is more professional compared with the former.
Now let’s create a new JavaFX Desktop Business Application project.
5.3.3.5.1 Create a JavaFX Desktop Business Application Project In this JavaFX Desktop Business Application, we want to illustrate how to develop a simple but professional JavaFX Desktop application to access a JavaDB Sample database named Sample and retrieve different columns from the CUSTOMER table in the Sample database.
To access a data source from a JavaFX Desktop Business Application, one needs to use the JDBC Data Source in the JavaFX Data Sources tool in the JavaFX composer. In fact, the JavaFX Composer, which is very similar to the Java Swing component, is a visual layout or container that contains all JavaFX GUI components to enable users to build a JavaFX Desktop application with a preset design scene or view.
To create a new JavaFX Desktop Business Application project, launch the NetBeans IDE 6.8 and choose File > New Project menu item and select the JavaFX from the
Categories list and the JavaFX Desktop Business Application item from the
Projects list, and then click on the Next button to continue.
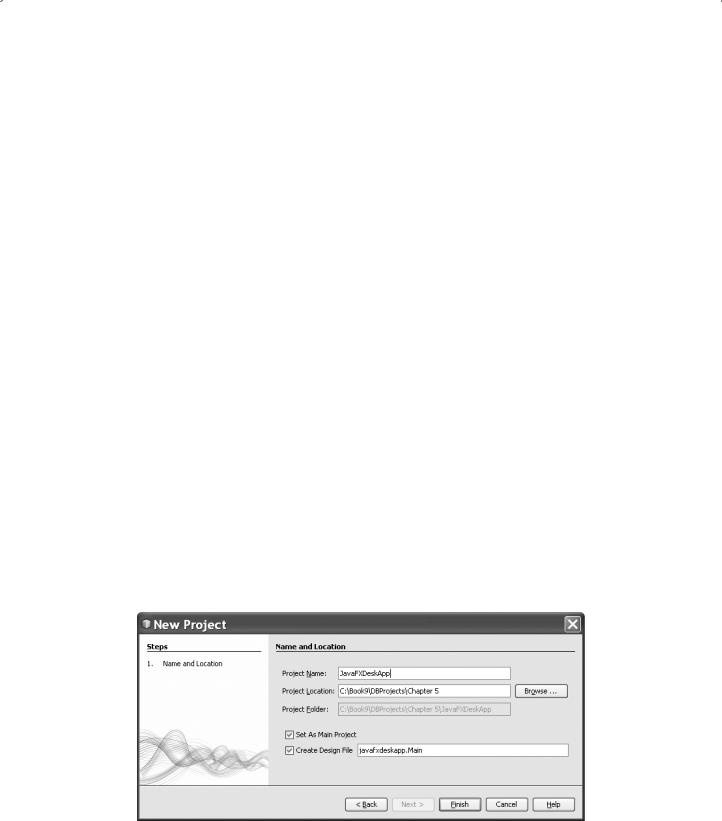
In the Name and Location page, enter JavaFXDeskDSApp into the Project Name field as the name for this project. You can set up the desired location to save this project in the Project Location field as you want. In this application, we still use our default folder, which is C:\Book9\DBProjects\Chapter 5. Keep all other settings unchanged and click on the Finish button. Your finished Name and Location page should match one that is shown in Figure 5.40.
Figure 5.40. The finished Name and Location page.

5.3 Exploring NetBeans IDE 6.8 203
Figure 5.41. The newly created JavaFX Desktop Business Application project.
As a new JavaFX Desktop Business Application is created, two new folders are created and added into the new project, the javafxdesktop and the org.netbeans. javafx.design, as shown in Figure 5.41.
The javafxdesktop is the package that contains two new files, the Main.fx and the Main_run.fx. The former is the main project file for this application, and the latter is a runtime Stage object that is used to start the scene of the project.
The org.netbeans.javafx.design is a class container that contains all GUI components related to JavaFX composer. Two files are created and added into this folder when a new JavaFX Desktop application is created: DesignState.fx and DesignStateChangeType.java.The former is used to represent a container of a single state variable in a design, and the latter is used to take care of the changing of the States in the design and the running time of the project.
A state can be considered as a set of property values of all or part GUI components located at the scene or design file at a time, and these properties can be used to describe appearances of all or part GUI component at that time interval. A JavaFX Desktop project can contain many states; each of them can have different sets of properties or appearances at a time. Additionally, the project can start with a starting state and change from one state to other states at different times. In other words, the state can be thought as a snapshot of the design view or scene at a time, and this snapshot can be changed from one to the other at a time sequence. This provides a good foundation for the animation of the JavaFX Desktop applications.
Now let’s take a global look at our new project, which is shown in Figure 5.42. Two new windows are added into our project, the States and the Design scene.
As we mentioned, the state present a set of properties of all GUI components at the design scene at a time, and a project can contain many different states. The States window allows users to add, delete, and manipulate states to the project, and the Design scene window enable users to design a user-desired GUI-like scene by adding JavaFX composer components located at the JavaFX Container at the right side of this project global view.
The white rectangular box in the Design scene window is the scene and the default size is 480 by 320, which can be found from the size field that is next to the Design button on the top of this view. If you want to change this default size, you can click on the scene

204 Chapter 5 Introduction to NetBeans IDE
Figure 5.42. The global view of our new project.
Figure 5.43. The Properties window of the scene.
icon from the Navigator window, and go to the Properties – scene - <master> window that is located at the upper-right corner of the window to change the width and height data by typing some new values into those fields, as shown in Figure 5.43.
You can also change the name and the background color of this scene. To do that, just modify the content of the Identifier field and click on the drop-down arrow from the Background Fill combo box and select your desired color from that box.
Now change the name of this scene to Customer by entering Customer to the
Identifier field.

5.3 Exploring NetBeans IDE 6.8 205
Before we can build our design scene by adding JavaFX Controls into the scene object, we need first to connect the JavaDB default sample database Sample with our NetBeans IDE. In other words, we need to connect our JavaFX Desktop Business application to a data source. Let’s have a clear and global picture about the Data Source in JavaFX composer first.
5.3.3.5.2 Data Source in JavaFX Composer To access to data coming from various sources in various formats, we have unified the data format on the client side so that it is easier for people to start using a remote data source. There are two basic aspects of each data source:
•Actual source of data (HTTP server, database, file, etc.)
•Format of data (XML, JSON, etc.)
JavaFX Composer data source framework defines a specialized DataSource class for each source of data (HttpDataSource, FileDataSource, etc.) and defines a set of parsers for each supported data format (Parsers.XML_PARSER, etc.).
When a DataSource object retries the data, it typically passes the raw stream to a Parser, which understands the format and produces a RecordSet, a common data format of JavaFX Composer. To summarize, common data source framework consists of three fundamental entities (classes):
1.DataSource: responsible for fetching raw data from the source.
2.Parser: responsible for parsing raw data and producing RecordSets and Records.
3.RecordSet: groups Records into an array, maintaining a cursor over it.
4.Record: set of (name→value) pairs holding actual data.
A Data Source object holds basic properties needed to fetch data from a source. For example, for HTTP Data Source, this is URL, Authentication method, and so on. For JDBC Data Source, this is a connection string, credentials, and SQL query. For File Data Source, this is a file path.
Refer to Table 5.6 for an overview of JavaFX Composer supported data sources.
In this section, we will concentrate on the data query using JDBC data source, DbDataSource and DataSource; therefore, let’s have a closer look at this kind of data source.
All JavaFX JDBC-related data source components are located at the package org. netbeans.javafx.datasrc, and the DbDataSource is a class stored in that package. Table 5.7 lists some popular variables defined in that class. Table 5.8 shows most popular functions defined in the DbDataSource class and the DataSource class (inherited functions).
To have a clear picture about these variables and functions defined in the JDBCrelated classes, we will use some of them to build our JavaFX Desktop Business application to access the Sample database to perform data query in the following sections. First, let’s set up our JavaDB Sample database.
5.3.3.5.3 Set Up the JavaDB Sample Database In Section 5.3.2.2.1 in this chapter, we have provided a detailed discussion about this database connection to our IDE. You

206 Chapter 5 Introduction to NetBeans IDE
Table 5.6. An overview of JavaFX Composer supported data sources
Name |
Class |
Supported Data Format |
Description |
|
|
|
|
HTTP |
HttpDataSource |
XML, JSON, LINE, |
Fetches data from HTTP and |
|
|
PROPERTIES |
HTTPS servers. Supports |
|
|
|
BASIC authentication. |
JDBC |
DbDataSource |
SQL Table |
Fetches data from a JDBC |
|
|
|
compliant database by |
|
|
|
executing an SQL query |
File |
FileDataSource |
XML, JSON, LINE, |
Reads a file on the local |
|
|
PROPERTIES |
filesystem |
JavaFx |
StorageDataSource |
XML, JSON, LINE, |
Uses javafx.io.Storage API |
Storage |
|
PROPERTIES |
to load data |
Resources |
ClasspathDataSource |
XML, JSON, LINE, |
Reads data from runtime |
|
|
PROPERTIES |
classpath using java |
|
|
|
Classloader. |
|
|
|
getResourceAsStream |
|
|
|
|
Table 5.7. Most popular variables defined in the DbDataSource class
Access |
Name |
Description |
|
|
|
Public |
connectionString |
Standard JDBC connection string (URL) |
Public |
driverParams |
Additional driver parameters or null |
Public-init |
lazyLoading |
Lazy loading is useful for large tables with lots of rows when |
|
|
fetching data at once would cause performance issues |
Public |
password |
Password for authentication purposes or null if |
|
|
authentication is not used or required |
Public |
user |
Username for authentication purposes or null if |
|
|
authentication is not used or required |
Public |
query |
SQL query to be used when fetching data |
|
|
|
may refer to that section to finish this connection. For your convenience, some key steps are listed here again to facilitate this connection.
•Open the Services window, expand the Databases node and right click on the Java DB node, and choose the Properties.
•If a default Java DB server is registered, the Java DB Installation and Database Location fields will be filled in.
•Click on the OK button to close this dialog box.
• Start the Java DB Server in the NetBeans by right clicking on the Java DB and choose the Start Server menu item. Once the server is started, Java DB Database Process tab opens in the Output window and displays a message similar the following:
Security manager installed using the Basic server security policy.
Apache Derby Network Server - 10.4.2.1 - (706043) started and ready to accept connections on port 1527 at 2010-05-24 22:38:21.187 GMT

|
|
5.3 Exploring NetBeans IDE 6.8 207 |
Table 5.8. Most popular functions defined in the DbDataSource and DataSource classes |
||
|
|
|
Access |
Name |
Description |
|
|
|
Public |
void fetchData() |
Perform data fetching operation with no |
|
|
data returned |
Public |
RecordSetMetaData |
Return RecordSetMetaData object |
|
metaData() |
|
Protected |
RecordSet |
Callback function that data source classes |
|
dataFetched(RecordSet) |
call when they successfully fetch data in |
|
|
response to fetchData() call |
Protected |
RecordSet |
Callback function that data source classes |
|
dataFetchError(exception) |
call when they fail to fetch data in |
|
|
response to fetchData() call |
Protected |
void fetchData() |
A derived class overrides this to fetch data. |
abstract |
|
When it succeeds, it calls the dataFetched() |
|
|
callback function. When it fails, it calls the |
|
|
dataFetchError callback. Derived classes |
|
|
are free to fetch data asynchronously |
public bound |
DataSource |
Filter data from this data source according |
|
getDataSource(expression) |
to the given expression |
public bound |
RecordSet getRecordSet() |
Retrieve data from this data source, and the |
|
|
returned data stored in a RecordSet |
public abstract |
RecordSetMetaData |
Return RecordSetMetaData object or null |
|
metaData() |
if data has not yet been fetched |
public |
void refresh() |
Force this data source to refetch all data |
|
|
|
•Connect to the Sample database with the steps listed below:
•Right click on the default sample database connection node jdbc:derby://localhost:1527/sample[app on APP] and choose the Connect.
•Expand that connected node, the APP and Table subnodes, and you can find all tables built under this sample database.
•Expand each table, such as the CUSTOMER table, so you can find all columns defined in that table. The primary key is highlighted with the red color.
Now let’s set up and configure the data source, the JavaDB Sample database, with our JavaFX Desktop application.
Open the design scene by clicking on it and pick up the JDBC Data Source control from the JavaFX Data Sources group from the Palette window, and place it to the design scene. Click on the OK to the message box to allow required data source files to be copied to the project.
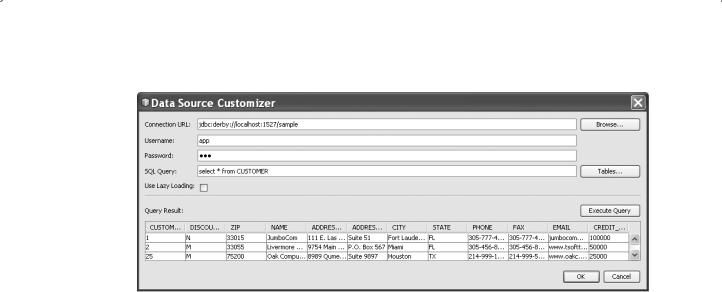
On the opened Data Source Customizer window, perform the following operations to complete this database setup and testing:
•Click on the Browse button to open the Browse Database Connections dialog box and select our connected JavaDB sample database URL jdbc:derby://localhost:1527/sample [app on APP] by clicking on it. Click on the OK to close this connection.
208 Chapter 5 Introduction to NetBeans IDE
Figure 5.44. The running result of executing a query.
•The Username and Password fields will be filled automatically by the IDE, as shown in Figure 5.44.
•You can test this database setup by executing a SQL query. To do that, click on the Create button to open all available tables in this sample database.
• On the opened Browse Tables dialog box, select the CUSTOMER table and check the Generate SELECT clause checkbox. Click on the OK button to continue.
• Click on the Execute Query button to run this query.
A sample running result is shown in Figure 5.44. Click on the OK button to close this setup process.
Now that we have finished the set up for our data source, next let’s start to build our design scene by inserting our desired JavaFX GUI components into this scene.
5.3.3.5.4 Build the Design Scene by Adding JavaFX GUI Components Double click on the Main.fx file to open its JavaFX GUI design window. Drag and place the following JavaFX Controls to the scene:
•Desktop Form
•Label
•Textbox
•ListView
•Button
Let’s do these dragging and placing operations one by one.
We need a Template to display our query results from the CUSTOMER table, since the scene is just a View window that does not contain any template, so we need to add either a Desktop Form or a Mobile Form as a template for this application.
To add a Desktop Form, go to the Palette window and drag the Desktop Form from the Templates group and place it in the scene.
In the opened Customize Template dialog box, click on the drop-down arrow for the Data Source combo box, and select the jdbcDataSource we just added in the last