

Practical Database Programming With Java
.pdf5.3 Exploring NetBeans IDE 6.8 179
Figure 5.21. The opened Java DB Server location and default database location.
Figure 5.22. The connected Sample database and tables in the Services window.
Now let’s connect to the sample database to complete this database setup.
•Right click on the default sample database connection node jdbc:derby://localhost:1527/sample[app on APP] and choose Connect.
•Expand that connected node and the APP and Table subnodes, and you can find all tables built under this sample database, as shown in Figure 5.22.
•Expand each table, such as the CUSTOMER table, and you can find all columns defined in that table. The primary key is highlighted with the red color.
Next, let’s create a new Java Desktop Application project named JavaDeskApp to connect to this database to perform data actions.
180 Chapter 5 Introduction to NetBeans IDE
5.3.2.2.2 Create the Java Desktop Application Perform the following operations to create a new Java Desktop Application project:
1. |
Choose the File > New Project menu item to open the New Project wizard. |
|
2. |
In the first panel of the wizard, expand the Java category and select the Java |
Desktop |
|
Application template, then click on the Next button. The Java |
Desktop |
|
Application template provides many basics of a visual application, including basic menu |
|
|
items and commands. |
|
3. |
In the Project Name field, type JavaDeskApp. The value of this field sets the display |
|
|
name for the project in the Projects window. |
|
4. |
In the Project Location field, enter a valid folder to store this project. In this applica- |
|
|
tion, we used C:\Book9\DBProjects\Chapter 5 folder to do that. |
|
5. |
Check the Set As Main Project checkbox. |
|
6.In the Choose Application Shell field, select the Database Application item.
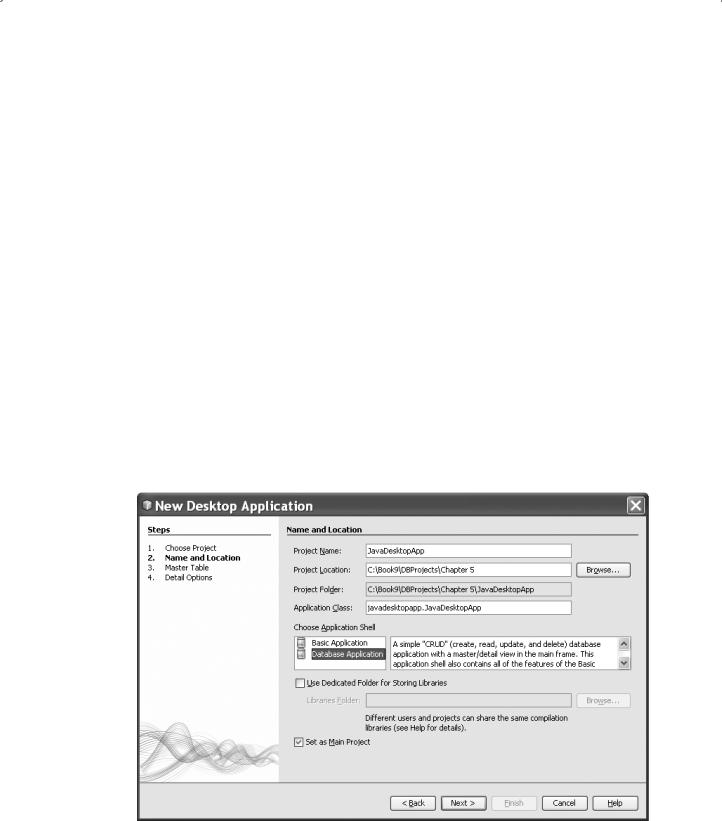
7. Click on the Next button to continue. Your finished Name and Location page should match one that is shown in Figure 5.23.
8.In the Master Table page of the wizard, select the Database Connection for the Sample database we just set up in the last section. The listing for the database should look
something like: jdbc:derby://localhost:1527/sample[app on APP].
9. After the connection to the database is established, the Database Table field should display the first table CUSTOMER, and the Columns to Include list should include
Figure 5.23. The finished Name and Location page.

5.3 Exploring NetBeans IDE 6.8 181
the names of all 12 columns for the CUSTOMER table. For now, we will use this CUSTOMER table with only seven columns in this application.
Remove the following five columns from the Columns to Include list by clicking on each of them one by one (you can hold the Ctrl key to do that): DISCOUNT_CODE, FAX, ADDRESSLINE2, EMAIL, and CREDIT_LIMIT, and click the < button to move them to the left column, Available Columns list. Then click on the Next button.
In the Detail Options panel, just keep the default settings and click on the Finish button, since we want to display these columns in a TextFields format. Your Detail Options panel should match one that is shown in Figure 5.24.
The wizard then generates a basic user interface with a table and a database connection. This might take a few seconds as the IDE generates the project and the code.
Now click on the Clean and Build Main Project button on the toolbar to compile and build our project. After this new Java Desktop Application project is created, five folders with related files are created and added into the Source Packages folder in the Projects window, which is shown in Figure 5.25.
Let’s take a closer look at these folders and related files.
The META-INF folder: this folder contains the persistence.xml file and it is used to define a connection between the database and the entity class. This file is also known as the persistence unit.
The META-INF.services folder: this folder contains the org.jdesktop.application. Application file that is a subclass inherited from the base class java.lang. Object. This class provides all necessary attributes and behaviors (fields and methods) used to build a standard Java desktop application projects.
The javadesktopapp folder has the following four files:
1.Customer.java
2.JavaDesktopAboutBox.java
Figure 5.24. The finished Detail Options page.

182 Chapter 5 Introduction to NetBeans IDE
Figure 5.25. Four new files are created and added into the Projects window.
3.JavaDesktopApp.java
4.JavaDesktopView.java
The first file Customer.java is an Entity class that is used to map all components defined the CUSTOMER table in the Sample database to the associated objects using JPA. If you open this file by double clicking on it, you can find all mapping definitions between each column and the associated object (string object for most columns), as well as the setter and getter methods used to pick up and set up for each object. All static or named queries are defined at the beginning part of this file. With the help of this Entity class and those mappings, we can directly access those objects to perform data actions with our database during the project runs.
The second file, JavaDesktopAboutBox.java, provides a default About dialog box for this project with the version, vendor, and homepage involved to give users a basic introduction to this project.
The third file, JavaDesktopApp.java, is the main program or main thread of this project that contains the main frame and skeleton of this project. Also, this file provides an entry point of this project, since the main() method is included in this file.
The last file, JavaDesktopView.java, provides a View class for this project with prebuilt GUI components, such as a JTable, a menu, seven TextFields, and four JButtons, to allow users to access and manipulate data in the connected Sample database via this GUI window as the project runs.
The javadesktopapp.resources folder: this folder contains five files:
1.JavaDesktopAboutBox.properties
2.JavaDesktopApp.properties
3.JavaDesktopView.properties
4.about.png
5.splash.png

5.3 Exploring NetBeans IDE 6.8 183
The first three files contain all physical descriptions and properties for the AboutBox, the main thread, and the View classes. The last two are image files used in the About dialog box.
The javadesktopapp.resources.busyicons folder: this folder contains all image files related to the icons used in the applications.
At this point, we have a basic Java desktop running application with a GUI that has the following features:
•Ability to view and modify values in seven columns of the Sample database.
•Basic menu items.
•Persistence of its window state between sessions.When you close the application, the window position and size are remembered. So when you reopen the application, the window opens in the same position as it was when you closed it.
•An About dialog box, which you can easily customize.
•Properties files containing the labels in the user interface. Using .properties files is a good way to keep the logic of your code separate from the text that appears in the user interface of your application. Such separation is useful for making it easier to localize your program, among other reasons.
Now let’s run our project to see how to access and modify data in the CUSTOMER table by using this Java desktop application.
5.3.2.2.3 Run the Project Click on the Run Main Project button (green arrow) on the toolbar to start our application, and an example of our running project is shown in Figure 5.26. You can enlarge this GUI window by dragging it to either left or up to enable all seven columns to be displayed.
As you can see, as the project runs, all seven columns in the CUSTOMER table are displayed in the upper part of this GUI window. If you click on any row on the table, a detailed record is displayed in the seven TextFields located at the bottom of this GUI window, as shown in Figure 5.26.
You can modify this table by adding a new record, by deleting a record and saving these modifications to the table by using three buttons. If you want to add a new record, click on the New button and a blank row will be attached to the bottom of the table to allow you to do that. When you finish adding a new record, click on the Save button to write it into the database. To delete a record, just click on that record and click on the Delete button. Click on the Save button, so you can save all modifications you have made.
Click on the Close button on the upper-right corner of this window, so you can stop and close the project.
A complete Java Desktop Application project JavaDesktopApp can be found from the folder DBProjects\Chapter 5 that is located at the Wiley ftp site (refer to Figure 1.2 in Chapter 1).
5.3.2.3 Build a Java Class Library
As we mentioned, a Java Class Library is only a skeleton Java class library without a main class, and it cannot be executed by itself; instead, it must be called or used by other Java

184 Chapter 5 Introduction to NetBeans IDE
Figure 5.26. The running status of our Java desktop application.
applications. Similar to other general libraries, a Java Class Library can be statically or dynamically bound or connected with an application and to be used as a utility class.
Since a Java class library cannot be executed by itself, we need to create a Java Application project to call or use that Java class library. Therefore, we need to create two projects to illustrate how to use a Java class library from a Java application:
•A Java Class Library project in which you will create a utility class.
•A Java Application project with a main class that implements a method from the library project’s utility class.
The function of this Java class library is simple, which is just to add two integers together and return the sum result to the Java application project, and the result will be displayed in the application project by calling some methods defined in the Java application project.
First, let’s create a Java Class Library project named SumLib().
5.3.2.3.1 Create a Java Class Library Project Perform the following operations to create this new Java Class Library project:
• Choose the File > New Project menu item. Under the Categories, select Java. Under Projects, select Java Class Library, and then click on the Next button.
• Enter SumLib into the Project Name field as the name of this class library. Change the Project Location to any directory as you want on your computer. From now on, this directory is C:\Book9\DBProjects\Chapter 5.

5.3 Exploring NetBeans IDE 6.8 185
public class SumLibClass {
public static int sumapp(String args) { int sum = 0;
String[] temp;
temp = args.split(",");
int num[] = new int[temp.length]; for(int i = 0; i < temp.length ; i++){
System.out.println(temp[i]);
num[i] = java.lang.Integer.parseInt(temp[i]); sum = sum + num[i];
}
return sum;
}
}
Figure 5.27. The coding for the class method sumapp().
•Click the Finish button. The SumLib project opens in both the Projects window and the Files window.
Next, we need to create a new Java package and our class file. The Java package is used as a container or a namespace to hold the class file.
Perform the following operations to finish this Java package and class file:
1. Right click on the SumLib project node from the Projects window and choose the New > Java Class item. Type SumLibClass as the name for the new class, type org.me.sumlib in the Package field as the package name for this class file, and click on the Finish button. The SumLibClass.java opens in the Source Editor.
2.In the opened SumLibClass.java file, place the cursor on the line after the class declaration, public class SumLibClass {.
3.Type or paste in the method code shown in Figure 5.27.
4.If the code that you pasted in is not formatted correctly, press Alt-Shift-F to reformat the entire file.
5.Go to File > Save All menu item to save this file.
This coding is simple and straightforward. The input argument to this method should be a sequence of integers separated with commas (,), which can be considered as a String entered by the user as the project runs.
Let’s have a closer look at this piece of codes to see how it works.
First, a temporary String array temp is created, and it is used to hold the split input integers. Then, the split() method is executed to separate the input argument into each separate number string. A for loop is used to display each separated number string and convert each of them to the associated integer using the parseInt() method. Since this method is defined in the java.lang.Integer package, so a full name of the method must be used. A summarization operation is performed to add all integers together and returned to the main() method in the Java application project SumApp.

186 Chapter 5 Introduction to NetBeans IDE
Now that a Java class library project has been created and a Java class file has been coded, next, we need to create our Java Application project to call or use that class library to perform a two-integer addition operation.
5.3.2.3.2 Create a Java Application Project Perform the following operations to create a new Java Application project:
• Choose the File > New Project menu item. Under Categories, select Java. Under Projects, select Java Application. Then click on the Next button.
•Enter SumApp into the Project Name field. Make sure the Project Location is set to C:\Book9\DBProjects\Chapter 5.
•Enter sumapp.Main as the main class.
•Ensure that the Set as Main Project and Create Main Class checkboxes are checked.
•Click the Finish button. The SumApp project is displayed in the Projects window and
Main.java opens in the Source Editor.
Now we have finished creating two Java projects.
After these two projects have been created, you need to add the Java class library project to the classpath of the Java application project. Then you can code the application. The library project will contain a utility class with a sumapp() method.This method takes two integers as arguments, and then generates a sum based on those integers.The SumApp project will contain a main class that calls the sumapp() method and passes the integers that are entered as arguments when the application is run.
Now let’s configure the compilation classpath in the Java application project to enable the application to know the location of the class library and execute it to perform the integer addition operation during the project runs.
5.3.2.3.3 Configure the Compilation Classpath Since the SumApp Java application is going to depend on a class in SumLib, you have to add SumLib to the classpath of SumApp. Doing so also ensures that classes in the SumApp project can refer to classes in the SumLib project without causing compilation errors. In addition, this enables you to use code completion in the SumApp project to fill in code based on the SumLib project. In the NetBeans IDE 6.8, the classpath is visually represented by the Libraries node.
Perform the following operations to add the SumLib library’s utility classes to the application SumApp project classpath:
1.In the Projects window, right click the Libraries node for the SumApp project and choose Add Project as shown in Figure 5.28.
2.Browse to C:\Book9\DBProjects\Chapter 5 and select the SumLib project folder,
as shown in Figure 5.29. The Project JAR Files pane shows the JAR files that can be added to the project. Notice that a JAR file for SumLib is listed even though you have not actually built the JAR file yet. This JAR file will get built when you build and run the SumApp project.
3. Click on the Add Project JAR Files button.
4.Now expand the Libraries node. The SumLib project’s JAR file has been added to the SumApp project’s classpath.

5.3 Exploring NetBeans IDE 6.8 187
Figure 5.28. To add the SumLib class to the classpath of the SumApp project.
Figure 5.29. The Add Project dialog box.
Before we can run our Java application project to call the Java class library, we need to add some codes to the Main.java tab in our Java application project.
5.3.2.3.4 Add Codes to the Main.java tab in the Java Application Project Now we need to add some code to Main.java. In doing so, you will see the Source Editor’s code completion and code template (abbreviation) features.
1. |
Select the Main.java tab in the Source Editor. If it isn’t already open, expand |
|
SumApp > Source Packages > sumapp in the Projects window and double |
|
click on the item Main.java. |
2. |
Inside the main() method, replace the comment //TODO code application |
|
logic here with the following: |
int result = Sum

188Chapter 5 Introduction to NetBeans IDE
3.Leave the cursor immediately after Sum. In the next step, you will use code completion to turn Sum into SumLibClass.
4.Press Ctrl-Space to open the code completion box.A short list of possible ways to complete the word appears. However, the class that you want, SumLibClass, might not be there.
5.Press Ctrl-Space again to display a longer list of possible matches. The SumLibClass should be in this list.
6.Select the SumLibClass and press the Enter key. The NetBeans IDE 6.8 fills in the rest of the class name and also automatically creates an import statement for the class.
 Note: The IDE also opens a box above the code completion box that displays Javadoc information for the selected class or package. Since there is no Javadoc information for this package, the box displays a “Cannot find Javadoc” message.
7.In the main method, type a period (.) after SumLibClass. The code completion box opens again.
8. Select the sumapp(String args) int method and press the Enter key. The IDE fills in the sumapp() method and highlights the input parameters.
9.Press the Enter key to accept the null as the parameter, and change this null to args[0]. Type a semicolon (;) at the end of this coding line. The final line should look like the following line.
int result = SumLibClass.sumapp(args[0]);
10.Press the Enter key to start a new line. Then type the following coding line.
System.out.println(“The sum = ” + result);
11.Go to the File > Save All menu item to save the file.
At this point, we are ready to run our Java application project SumApp to test its calling function to our Java library file SumLibClass.
5.3.2.3.5 Run the Application Project to Call the Java Library The output of this application program SumApp.java is based on arguments that you provide when you run the application. As arguments, you can provide two or more integers, from which the adding result of those input integers will be generated. The adding process will be executed by the Java library file sumapp() located in the SumLibClass library, and the execution result will be returned to and displayed in the main() method in the Java application project SumApp.java.
Now let’s run the application. Since this application needs arguments as inputs to the main() method, therefore we have to use an alternative way to run it. First, let’s perform the following operations to add the arguments for the IDE to use when running the application:
•Right click on the SumApp project node, choose the Properties item, and select the Run node in the dialog’s left pane. The main class should already be set to sumapp.Main.