

Practical Database Programming With Java
.pdf2.10 Create Microsoft SQL Server 2008 Sample Database 57
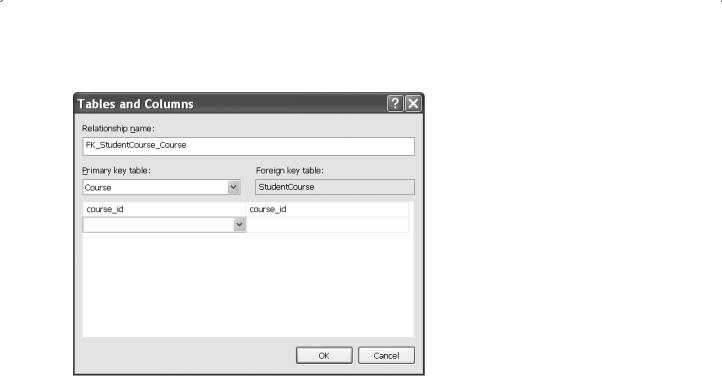
Figure 2.35. The finished Foreign Key Relationships dialog.
under this Keys folder. This is our new created foreign key that sets the relationship between our LogIn and Faculty tables. You can confirm and find this new created foreign key by right clicking on the Keys folder that is under the Faculty table.
2.10.4.2 Create Relationship between the LogIn and the Student Tables
In a similar way, you can create a foreign key for the LogIn table and set up a one-to- many relationship between the Student and the LogIn tables.
Right click on the Keys folder that is under the dbo.LogIn table and select the New Foreign Key item from the popup menu to open the Foreign Key Relationships dialog. Change the name to FK_LogIn_Student and press the Enter key from your keyboard. Go to the Tables And Columns Specification item to open the Tables and Columns dialog, then select the Student table from the Primary key table combo box and student_id from the box that is under the Primary key table combo box. Select the student_id from the box that is under the Foreign key table combo box. Your finished Tables and Columns dialog should match one that is shown in Figure 2.36.
Click the OK button to close this dialog box. Do not forget to establish the cascaded relationship for Delete Rule and Update Rule items by expanding the Table Designer and the INSERT And UPDATE Specifications items, respectively. Click the Close button to close the Foreign Key Relationships dialog box.
Go to the File|Save LogIn menu item to save this relationship. Click Yes for the following dialog box to finish saving. Now, right click on the Keys folder that is under the

58 Chapter 2 Introduction to Databases
Figure 2.36. The completed Tables and Columns dialog.
dbo.LogIn table, and select Refresh item to show our new created foreign key
FK_LogIn_Student.
2.10.4.3 Create Relationship between the Faculty and the Course Tables
The relationship between the Faculty and the Course tables is one-to-many, and the faculty_id in the Faculty table is a Primary key, and the faculty_id in the Course table is a Foreign key.
Right click on the Keys folder under the dbo.Course table from the Object Explorer window and select the New Foreign Key item from the popup menu. On the opened Foreign Key Relationships dialog, change the name of this new relationship to FK_Course_Faculty in the (Name) box and press the Enter key from the keyboard. In the opened Tables and Columns dialog box, select the Faculty table from the Primary key table combo box and select the faculty_id from the box that is just under the Primary key table combo box. Then select the faculty_id from the box that is just under the Foreign key table combo box. Your finished Tables and Columns dialog should match one that is shown in Figure 2.37.
Click the OK to close this dialog and set up the cascaded relationship for the Delete Rule and the Update Rule items, and then click the Close button to close the Foreign Key Relationships dialog box. Go to the File|Save Course menu item and click
Yes for the following dialog box to save this setting.
Now right click on the Keys folder under the dbo.Course table, and select the Refresh item. Immediately, you can find our new created relationship key
FK_Course_Faculty.

2.10 Create Microsoft SQL Server 2008 Sample Database 59
Figure 2.37. The finished Tables and Columns dialog.
2.10.4.4 Create Relationship between the Student and the StudentCourse Tables
The relationship between the Student and the StudentCourse tables is one-to-many, and the student_id in the Student table is a Primary key and the student_id in the StudentCourse table is a Foreign key.
Right click on the Keys folder under the dbo.StudentCourse table from the Object Explorer window and select the New Foreign Key item from the popup menu. On the opened Foreign Key Relationships dialog, change the name of this new relationship to FK_StudentCourse_Student in the (Name) box and press the Enter key from the keyboard. In the opened Tables and Columns dialog box, select the Student table from the Primary key table combo box, and select the student_id from the box that is just under the Primary key table combo box. Then select the student_id from the box that is just under the Foreign key table combo box. The finished Tables and Columns dialog should match one that is shown in Figure 2.38.
Click the OK button to close this dialog and set up the cascaded relationship for Delete Rule and the Update Rule items, and then click the Close button to close the
Foreign Key Relationships dialog box. Go to the File|Save StudentCourse menu item and click Yes for the following dialog box to save this relationship.
Now right click on the Keys folder under the dbo.StudentCourse table, and select the Refresh item. Immediately you can find our new created relationship key
FK_StudentCourse_Student.

60 Chapter 2 Introduction to Databases
Figure 2.38. The finished Tables and Columns dialog.
2.10.4.5 Create Relationship between the Course and the StudentCourse Tables
The relationship between the Course and the StudentCourse tables is one-to-many, and the course_id in the Course table is a Primary key and the course_id in the StudentCourse table is a Foreign key.
Right click on the Keys folder under the dbo.StudentCourse table from the Object Explorer window and select the New Foreign Key item from the popup menu. On the opened Foreign Key Relationships dialog, change the name of this new relationship to FK_StudentCourse_Course in the (Name) box and press the Enter key from the keyboard. In the opened Tables and Columns dialog box, select the Course table from the Primary key table combo box and select the course_id from the box that is just under the Primary key table combo box. Then select the course_id from the box that is just under the Foreign key table combo box. Your finished Tables and Columns dialog should match one that is shown in Figure 2.39.
Click the OK button to close this dialog and do not forget to establish a cascaded relationship for the Delete Rule and the Update Rule items, and then click the Close button to close the Foreign Key Relationships dialog box.Then go to the File|Save StudentCourse menu item and click Yes for the following dialog box to save this relationship.
Now right click on the Keys folder under the dbo.StudentCourse table, and select the Refresh item. Immediately, you can find our new created relationship key
FK_StudentCourse_Course.
At this point, we complete setting the relationships among our five data tables.
2.11 Create Oracle 10g XE Sample Database 61
Figure 2.39. The finished Tables and Columns dialog.
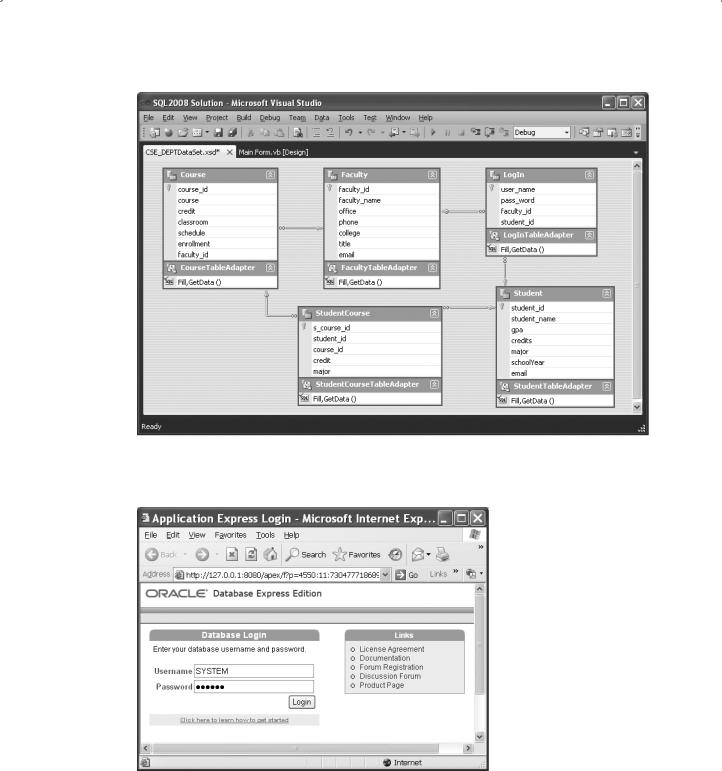
A completed Microsoft SQL Server 2008 sample database file CSE_DEPT.mdf can be found from the folder SQLServer that is located at the website: http://www.xxx.org/ bai/database. The completed relationships for these tables are shown in Figure 2.40.
2.11 CREATE ORACLE 10G XE SAMPLE DATABASE
After you download and install Oracle Database 10g XE (refer to Appendix E), you need to create a customer Oracle database. To do that, you need to start this job from the
Oracle Home page in the server. To connect your computer to your Oracle server, go to
Start|All Programs|Oracle Database 10g Express Edition|Go To Database Home Page to open the Login page, which is shown in Figure 2.41.
You can login as an Administrator by entering SYSTEM into the Username box and password you selected during your download and installation of the Oracle Database 10g XE into the Password box if you want to use the whole system. But if you want to create customer databases, you must create a new user and login as that user. We will concentrate on creating a customer database, CSE_DEPT, in this section only. If you want to work as an Administrator to create and manage all data sources, just log on yourself as an Administrator. There is no difference between the Administrator and a specific database user in creating and manipulating tables in Oracle Database 10g XE, and the only difference is that the Administrator has more control abilities than any specific database user has.
In Oracle database 10g XE, only a single database instance is allowed to be created and implemented for any database applications. To make the database simple and easy, each database object is considered as a schema, and each schema is related to a user or
62 Chapter 2 Introduction to Databases
Figure 2.40. Relationships among tables.
Figure 2.41. The opened Login page.

2.11 Create Oracle 10g XE Sample Database 63
a user account. When you create a new user and assign a new account to that user, you create a new schema. A schema is a logical container for the database objects (such as tables, views, triggers, etc.) that the user creates. The schema name is the same as the user name, and can be used to unambiguously refer to objects owned by the user.
After you download and install Oracle Database 10g XE, by default, that database contains a lot of default utility tables, and most of them are not related to our special applications. In order to specify a database for our applications, we need to create a user database or a schema to meet our specific requirements in our applications. Next, we will use the CSE_DEPT database as an example to illustrate how to create a user database in Oracle Database 10g XE.
2.11.1 Create an Oracle User Database
To create a schema or a new user database, we need to create a new user account with the following steps:
1.Log on to the Oracle Database 10g XE as the Administrator using the user ID SYSTEM and your password
2.Create a new user account using the Administration|Database Users|Create User items
3.Enter the desired Username and Password
4.Click the Create button to create a new user account
Now let’s follow these four steps to create our new user account or user database named CSE_DEPT.
Open the Oracle Database 10g XE home page, log in as an Administrator, and click the Administration button and go to Administration|Database Users|Create User. On the opened dialog box, enter“CSE_DEPT” into the Username and“reback” into the Password and the Confirm Password textboxes, respectively. Keep the “Unlocked” in the Account Status box unchanged and check the following checkboxes:
•CONNECT
•RESOURCE
•CREATE DATABASE LINK
•CREATE TABLE
•CREATE TYPE
The purpose of checking these checkboxes is to allow this new created user to be able to set up a connection (CONNECT) with this user database, use all data sources, set up database links, create tables as well as the data types as a new instance of this database is created in an application.
Your finished creating new user dialog box should match one that is shown in Figure
2.42. Click the Create button to create this new user.
After a new user is created, a new schema or a database is also created with the same name as the user’s name, CSE_DEPT. Next, we can add new data tables into this new database. To do that, first, we need to log out from the current Administrator account and

64 Chapter 2 Introduction to Databases
Figure 2.42. Create new user dialog box.
log in as our new user account CSE_DEPT. Click the Logout icon on the upper-right corner of this window and click the Login icon to open the homepage again.
Enter CSE_DEPT into the Username and reback into the Password textboxes to log in as a CSE_DEPT user.
Now we can create five data tables, such as LogIn, Faculty, Course, Student, and
StudentCourse in this CSE_DEPT user account or user database as we did in the last part. Also we need to define the constraints relationships between those five tables as we did in the last section to set up relationships between these five tables.
2.11.2 Add New Data Tables into the Oracle User Database
You need to use the Object Browser to create, access, and manipulate the data in this database via the Oracle Database 10g Express server. Now click the Object Browser icon to open the Object Browser window, which is shown in Figure 2.43.
Since we just created a new database CSE_DEPT without any table attached with this database, therefore, a blank table list is displayed under the Tables item, as shown in Figure 2.43. We need to create and add five new tables, LogIn, Faculty, Course, Student, and StudentCourse, into this new database.

2.11 Create Oracle 10g XE Sample Database 65
Figure 2.43. The opened Object Browser window.
2.11.2.1 Create the LogIn Table
Make sure that the content of the textbox in the left column is Tables, which is the default value; click the drop-down arrow of the Create button and select Tables to create our first new table, LogIn, which is shown in Figure 2.44.
A flowchart of developing the table is shown in the left pane. This means that you need to follow these five steps to finish the creation of your data table, and each step is mapped to one page. The middle pane contains the most components that allow us to create and edit our data table. Enter LogIn as the table name into the Table Name box.
The first step in the flowchart is the Columns, which means that you need to create each column based on the information of your data table, such as the Column Name, Type, Precision, Scale, and Not Null. For our LogIn table, we have four columns: user_ name, pass_word, faculty_id, and student_id. The data type for all columns is VARCHAR2(15), since this data type is flexible, and it can contain varying-length characters. The upper bound of the length is 15, which is determined by the number you entered in the Scale box, and it means that each column can contain up to 15 characters. Since the user_name is selected as the primary key for this table, check the Not Null checkbox next to this column to indicate that this column cannot contain a blank value.
Your finished first step is shown in Figure 2.44.
Click the Next button to go to the next page to assign the primary key for this table, which is shown in Figure 2.45.

Figure 2.44. Create a new table.
Figure 2.45. The second step—assign the primary key.
66