Добавил:
Опубликованный материал нарушает ваши авторские права? Сообщите нам.
Вуз: Предмет: Файл:

Beginning ActionScript 2.0 2006

.pdf
Скачиваний:
104
Добавлен:
17.08.2013
Размер:
12.47 Mб
Скачать

Chapter 24

function addNewRow()

{

var flashHandle = document[“tryItOut_externalInterface”]; var col1Value = document.forms[0].col1DataField.value; var col2Value = document.forms[0].col2DataField.value; var col3Value = document.forms[0].col3DataField.value; var rowID = document.forms[0].rowIDField.value;

flashHandle.addRow(col1Value, col2Value, col3Value, rowID);

}

The deleteRows() function calls the ActionScript reset() function to clear out all of the rows of data:

function deleteRows()

{

var flashHandle = document[“tryItOut_externalInterface”]; flashHandle.reset();

}

Now take a look at the HTML.

The Flash movie is embedded into the page as usual. The allowScriptAccess parameter is included in both the <object> and the <embed> tags. Without this, JavaScript functions will not be allowed access to call the ActionScript methods:

<object classid=”clsid:d27cdb6e-ae6d-11cf-96b8-444553540000” ; codebase=”http://fpdownload.macromedia.com/pub/shockwave/;

cabs/flash/swflash.cab#version=8,0,0,0” width=”550” height=”250” ; id=”tryItOut_externalInterface” align=”middle”>

<param name=”allowScriptAccess” value=”always” />

<param name=”movie” value=”tryItOut_externalInterface.swf” /> <param name=”quality” value=”high” />

<param name=”bgcolor” value=”#ffffff” />

<embed src=”tryItOut_externalInterface.swf” quality=”high” ; bgcolor=”#ffffff” width=”550” height=”250” ; name=”tryItOut_externalInterface” align=”middle” ; allowScriptAccess=”always” type=”application/x-shockwave-flash” ; pluginspage=”http://www.macromedia.com/go/getflashplayer” />

</object>

The HTML includes form elements to initiate the JavaScript functions. The first set provides text fields for entering column data and a button for triggering the add row call:

<b>Column 1 value:</b>

<input type=”text” name=”col1DataField” value=”Me” size=”10” /><br /> <b>Column 2 value:</b>

<input type=”text” name=”col2DataField” value=”Myself” size=”10” /><br /> <b>Column 3 value:</b>

<input type=”text” name=”col3DataField” value=”I” size=”10” /><br /> <b>Row ID:</b>

<input type=”text” name=”rowIDField” value=”row3” size=”10” /><br /> <input type=”button” value=”Add Row” onclick=”addNewRow();” /><br />

628

Putting JavaScript to Work

The pair of span tags provides a placeholder for placing the ID of the selected row:

<b>Selected row:</b> <span id=”selectedRow”></span><br />

Finally, a button allows for the user to trigger the delete row call:

<input type=”button” value=”Clear All Rows” onclick=”deleteRows();” />

Opening Browser Windows

One question that pops up frequently in the forums is how to open browser windows from a Flash movie. A couple of ways exist to do this. One is to use the getURL() function; the other is to use the ExternalInterface class. Functionally, for the purposes of window management, either technique works well.

When you try out the following examples, do not forget to disable any pop-up blockers that you have set. Many of these also block pop-up windows that originate from Flash content.

Many developers place whole sites in full-screen pop-up windows in an attempt to showcase their site in the most aesthetically pleasing way possible. Do not yield to this temptation. If you really need to place a site in a pop-up window, give users a choice and inform them that clicking the link will launch a new window. Keep in mind that full-screen windows containing Flash movies not only annoy users, but they also run more slowly.

Using getURL() to Create Pop-Up Windows

The basic way to create a new pop-up window using getURL()is the following line of ActionScript code:

getURL(“javascript:var windowHnd = window.open(‘http://www.macromedia.com/’, ;

‘newWindow’, ‘toolbar=no,address=no’);”);

The syntax is a bit messy, so let’s go through this piece-by-piece. The getURL() function just passes to the browser whatever URL you would normally type in the address bar. A URL is usually preceded by http: or by ftp:, which are protocol identifiers that tell the browser how to treat what comes after the identifier. Here you use the protocol identifier javascript:, which tells the browser that it’s not really a URL being typed, but a script.

Everything that comes next is actual JavaScript. The window.open() method is called and is passed three parameters. The first is the URL to display in the new window, next is a name for the window so that later calls can reuse the same window, and finally a comma-separated list of window features is passed. The script var windowHnd = is there to deal with an issue where the value being returned from the window.open() method can actually cause the page to disappear. Saving the returned value to a temporary variable, even though that variable is never used, prevents the returned window handle from propagating up to the browser window.

629

Chapter 24

Modify the getURL() script to make it a bit easier to work with:

var destinationURL:String = “http://www.macromedia.com/”; var windowName:String = “myWindow”;

var windowFeatures:String = “toolbar=no,address=no”;

getURL(“javascript:var windowHnd = window.open(‘“ + destinationURL + “‘,’” + ; windowName + “‘,’” + windowFeatures + “‘);”);

Now when you make changes to the destination URL, window name, or window features, there is less of a chance of accidentally introducing an error into the convoluted getURL() syntax because you will no longer have to touch the last line.

Use ExternalInterface to Create Pop-Up Windows

The other technique to create pop-up windows is to use the ExternalInterface class. Here’s how it works:

import flash.external.ExternalInterface;

ExternalInterface.call(“window.open”, “http://www.macromedia.com”, “myWindow”, ; “toolbar=no,address=no”);

Hopefully, you can see that this technique results in cleaner code. You can pull the values into their own variables to clean it up a bit more:

import flash.external.ExternalInterface;

var destinationURL:String = “http://www.macromedia.com/”; var windowName:String = “myWindow”;

var windowFeatures:String = “toolbar=no,address=no”;

ExternalInterface.call(“window.open”, destinationURL, windowName, windowFeatures);

Although this is, in fact, cleaner code, any projects you develop that require a version of the Flash player prior to version 8 will still need to use the getURL() technique.

Calling a JavaScript Wrapper Function

So far, you have been doing all the work in creating the pop-up windows directly within the call() method or the getURL() function. This is very convenient; however, occasionally there is a need to work with the browser window after it has opened, such as to reposition it or to close it. When this is the case, a means is needed to keep a reference to the opened window. This is done by a JavaScript wrapper function that calls the window.open() method and saves a handle for later use:

ActionScript

import flash.external.ExternalInterface;

var destinationURL:String = “http://www.macromedia.com/”; var windowName:String = “myWindow”;

var windowFeatures:String = “toolbar=no,address=no”;

ExternalInterface.call(“openWindow”, destinationURL, windowName, windowFeatures); // Or

630

Putting JavaScript to Work

// getURL(“javascript:openWindow(‘“ + destinationURL + “‘,’” + windowName + ;

“‘,’” + windowFeatures + “‘);”);

JavaScript

var windowHandle = null;

function openWindow(destinationURL, windowName, windowFeatures)

{

windowHandle = window.open(destinationURL, windowName, windowFeatures); windowHandle.focus();

}

The way to close a window that has already been opened is simply as follows:

ActionScript

import flash.external.ExternalInterface; ExternalInterface.call(“closeWindow”);

//Or

//getURL(“javascript:closeWindow();”);

JavaScript

function closeWindow()

{

windowHandle.close();

}

A reference to the opened window is kept as a global variable, so the closeWindow() function just needs to retrieve that window reference and call the window’s close() method.

Defining Browser Window Parameters

You can customize the appearance of a new browser window in a number of ways. These customizations are set in the list of features sent to the window.open() JavaScript method. Features that are explicitly defined in that list override the default browser behavior. Not all features need to be defined: anything not specified in the feature list will take on the browser’s default setting.

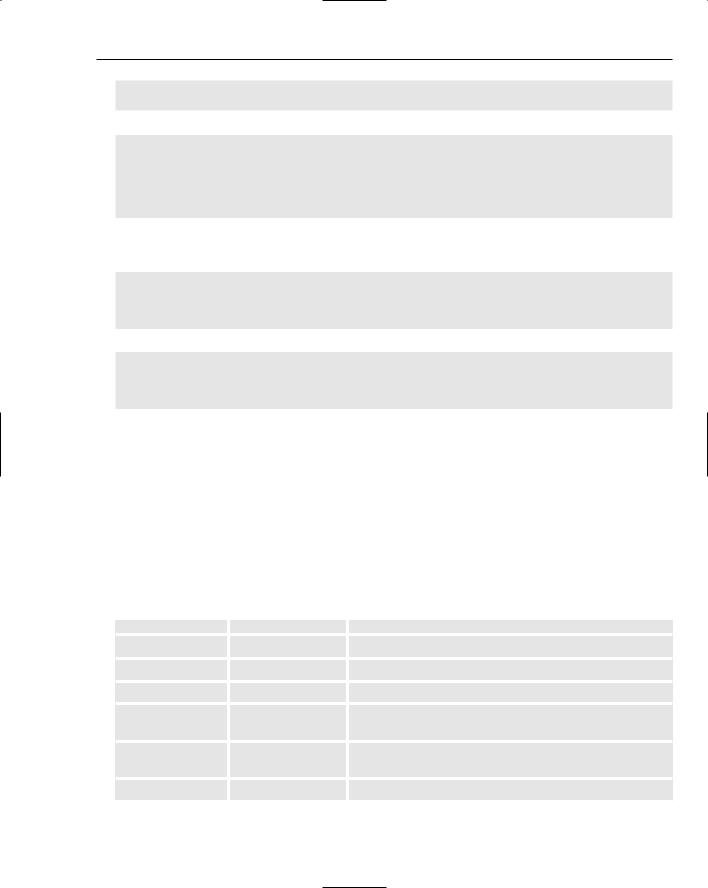
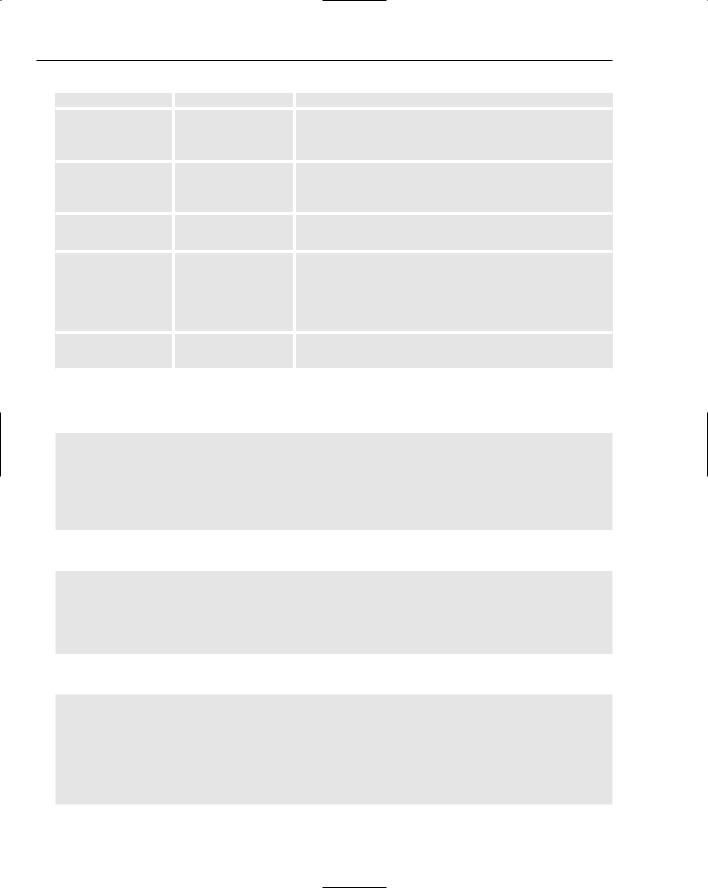
The following table describes the customization features you can use:

Feature

Possible Values

Description


status

yes|no|1|0

Sets the visibility of the bottom status bar.

toolbar

yes|no|1|0

Sets the visibility of the standard toolbar.

location

yes|no|1|0

Sets the visibility of the address bar.

menubar

yes|no|1|0

Sets the visibility of the menu bar. Has no effect with


MacOS.

directories

yes|no|1|0

Sets the visibility of the directories bar, for those


browsers who have such a bar for add-on quick links.

resizable

yes|no|1|0

Sets whether the browser window is user-resizable.


Table continued on following page

631

Chapter 24

Feature

Possible Values

Description


scrollbars

yes|no|1|0

Sets whether to show the scroll bars. If set to false, even


if the content area exceeds the size of the window, no


scroll bars will be visible.

height

Any number

Sets the height of the window. The window height is


greater than 100

defined as the height of the content area, not including


the title bar.

width

Any number

Sets the width of the window.


greater than 100


top

Any number

Sets the starting y position of the window, where 0 is


the top edge of the screen. On MacOS, the menu bar at


the top of the screen is 24 pixels high, and any value of


top that attempts to go higher will instead snap to the


bottom of the menu bar.

left

Any number

Sets the starting x position of the window, where 0 is


the left edge of the screen.

Here’s an example that creates a window with the default width and height, with no toolbar or location bar, but with the status bar visible:

import flash.external.ExternalInterface;

var destinationURL:String = “http://www.apple.com/”; var windowName:String = “myWindow”;

var windowFeatures:String = “toolbar=no,location=no,status=yes”;

ExternalInterface.call(“window.open”, destinationURL, windowName, windowFeatures);

The equivalent code using getURL() instead is almost the same:

var destinationURL:String = “http://www.apple.com/”; var windowName:String = “myWindow”;

var windowFeatures:String = “toolbar=no,location=no,status=yes”;

getURL(“javascript:var windowHnd = window.open(‘“ + destinationURL + “‘,’” + ; windowName + “‘,’” + windowFeatures + “‘);”);

Add to it, so that you set the width and height as well as the top and left positions:

import flash.external.ExternalInterface;

var destinationURL:String = “http://www.apple.com/”; var windowName:String = “myWindow”;

var windowFeatures:String = “toolbar=no,location=no,status=yes,; width=750,height=500,top=50,left=50”;

ExternalInterface.call(“window.open”, destinationURL, windowName, windowFeatures);

632

Putting JavaScript to Work

Now get the screen resolution and center the new window on the screen:

import flash.external.ExternalInterface;

var screenWidth:Number = System.capabilities.screenResolutionX; var screenHeight:Number = System.capabilities.screenResolutionY; var windowWidth:Number = 800;

var windowHeight:Number = 500;

var leftPosition:Number = screenWidth / 2 - windowWidth / 2; var topPosition:Number = screenHeight / 2 - windowHeight / 2;

var destinationURL:String = “http://www.macromedia.com/”; var windowName:String = “myWindow”;

var windowFeatures:String = “toolbar=no,location=no,status=yes”; windowFeatures += “,width=” + windowWidth + “,height=” + windowHeight windowFeatures += “,left=” + leftPosition + “,top=” + topPosition

ExternalInterface.call(“window.open”, destinationURL, windowName, windowFeatures);

Try It Out

Create a Pop-Up Window Launcher

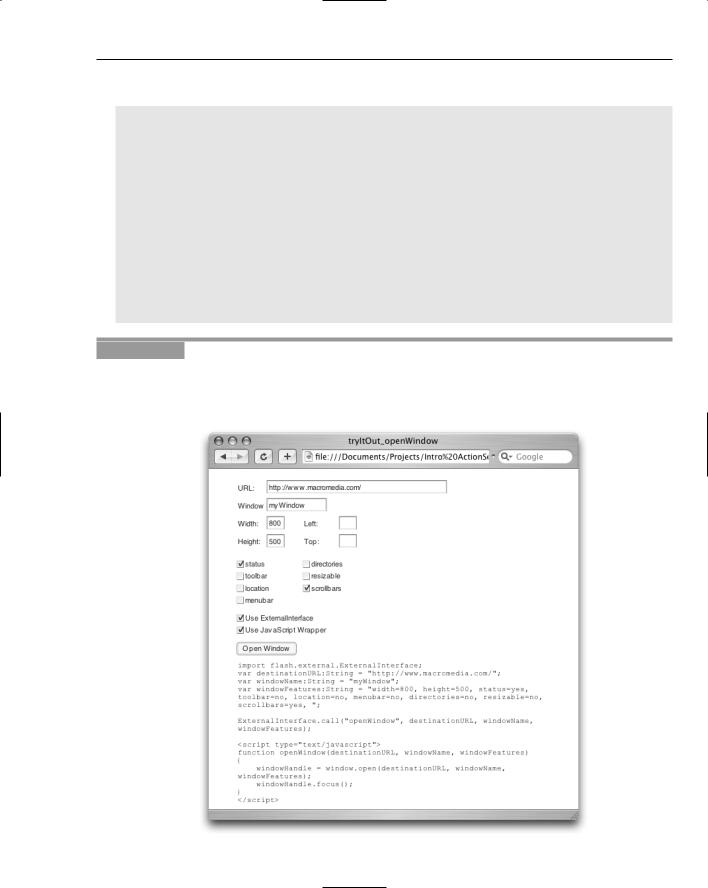
In this exercise, you see firsthand how the various techniques for opening windows work. You interact with a small Flash application that enables you to experiment with different pop-up window settings. Figure 24-5 shows what the window opener application looks like in use.

Figure 24-5

633

Chapter 24

1.Within your browser of choice, open tryItOut_openWindow.html, the window creator application, at <downloaded source root>/Chapter 24/.

2.Make sure that your browser has its pop-up blocker, if any, disabled.

3.Select the status and the scroll bars options. Take a look at the ActionScript that shows up below the Open Window button. Click the Open Window button.

4.Close the new window. Select the Use ExternalInterface checkbox. Take a look at the change in the ActionScript.

5.Create a new Macromedia Flash document and copy the ActionScript generated by the window launcher application into the Actions panel.

6.Name the file tryItOut_openWindowTest.fla and save it in a convenient location. Publish the file (File Publish).

7.Create a new browser window, find the HTML file that was just created during the publish process, and open it in the new window. A second window opens.

8.Close the new window, return to the window launcher application, and click the Use JavaScript Wrapper button.

9.Copy the ActionScript generated by the window launcher application into the Actions panel for tryItOut_openWindowTest.fla. The copied code should not include the <script> tag and its contents. Save the file and publish again.

10.Return to the launcher application, and copy the <script> tags and all of the script between them.

11.Open tryItOut_openWindowTest.html in your preferred HTML or text editor. Paste the copied code between <head> tags and save the file.

12.Open tryItOut_openWindowTest.html in a browser window. A second window opens.

How It Works

The Flash window launching application generates ActionScript and JavaScript code to match the techniques shown in the rest of this section. The text fields and checkboxes up to but not including the Use ExternalInterface checkbox enable you to specify various window properties and features. Experiment with these to get the kind of window that you want.

The Use ExternalInterface checkbox toggles between the ExternalInterface technique and the getURL() technique. The Use JavaScript Wrapper causes a JavaScript function located within the HTML to be called instead.

When any of these properties and features changes, the code listing changes to reflect the technique. Simply copy and paste the code into your working Flash file as well as your working HTML file if appropriate.

634

Putting JavaScript to Work

Summar y

This chapter spent considerable time with the security issues with Flash and how to work with them, keeping your applications, servers, and data safe.

Exercise

1.Write some ActionScript and JavaScript code that will open a window. It should provide ActionScript functions for giving focus back to an already open window and for loading a new URL into an already open window.

635

25

Uploading and

Downloading Files

A long-time bane for Flash applications has been the lack of capability to control file uploads and downloads. File uploads were generally performed using a pop-up web page that presented a standard HTML file upload component. Unfortunately, there was no easy way of informing the Flash movie when the upload had completed, progress could not be given, and it offered little control over the process. The main technique for downloading was to use getURL() to invoke the browser’s default file handling behavior for whichever file was to be downloaded. Once again, progress could not be shown, and overall control of the file was handed over to the browser.

Flash 8 introduces the FileReference class, which provides greater control over file uploads and downloads. The class makes use of file open and file save dialog boxes that are native to the operating system. It also provides access to progress and error events, so that better feedback can be given to the user.

FileReference Class Methods

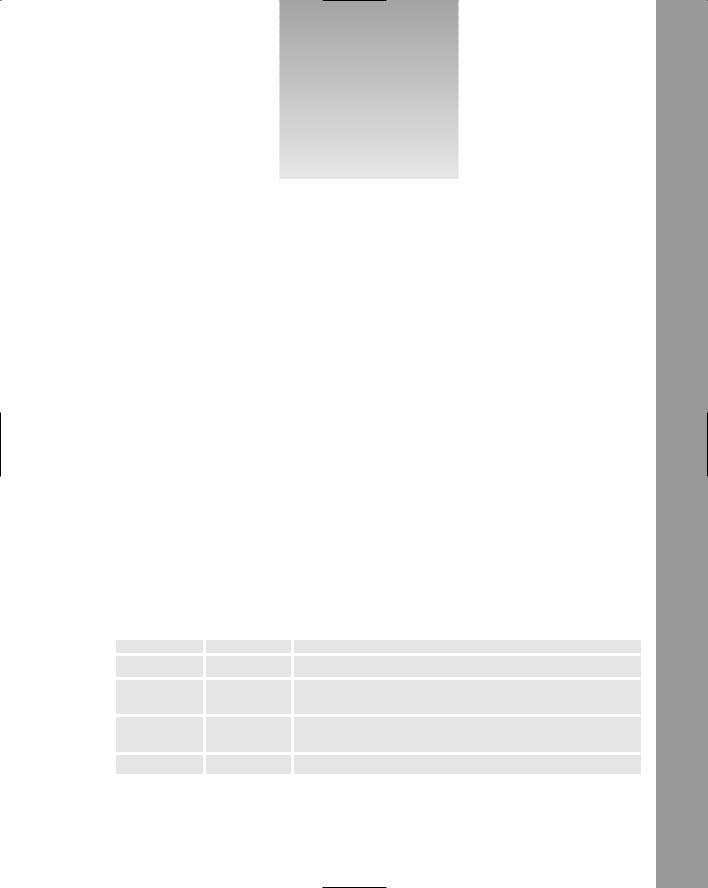
The FileReference class has four methods, which are introduced in the following table:

Method

Returns

Description


browse

A Boolean

Prompts the user to select a file to upload.

cancel

Nothing

Cancels any upload or download operation currently in


progress.

download

A Boolean

Prompts the user to select a target folder for the file to be


downloaded.

upload

A Boolean

Starts the upload of a user-selected file to the server.