

Beginning ActionScript 2.0 2006
.pdfChapter 24
The ExternalInterface call() method allows JavaScript functions to be called. The only parameters that it requires are the name of the function to call and the list of parameters to pass to that function. The call() method also passes back any value returned from the JavaScript function. Like the addCallback() method, the call() method allows for data types other than strings to be passed into and returned back from any JavaScript function.
Opening a Browser Window
This example allows for a new browser window to be opened from within a Flash movie. The ActionScript that makes that happen looks like this:
import flash.external.ExternalInterface;
this.createEmptyMovieClip(“openWindowButton”, this.getNextHighestDepth()); openWindowButton._x = 10;
openWindowButton._y = 40; openWindowButton.createTextField(“buttonLabel”, ;
getInputTextButton.getNextHighestDepth(), 0, 0, 100, 20); openWindowButton.buttonLabel.textColor = 0x0000CC; openWindowButton.buttonLabel.text = “Open Window”;
openWindowButton.onRelease = function()
{
ExternalInterface.call(“openWindow”, “http://www.macromedia.com/”, ;
“myWindow”, 700, 500);
}
Only the line in bold is needed to actually call the JavaScript openWindow() function. The rest of the code creates a button on the screen that, when clicked, calls the JavaScript function, passes it an address to display, gives the window a name for later reference, and sets a width and a height for the new window.
The corresponding HTML and JavaScript code is as follows:
<html>
<head>
<title>externalInterface</title>
<script>
function openWindow(url, windowName, width, height)
{
var myWindow = window.open(url, windowName, “width=” + width + ;
“,height=” + height + “,toolbar=false,address=false”); myWindow.focus();
}
</script>
</head>
<body bgcolor=”#ffffff”>
<object classid=”clsid:d27cdb6e-ae6d-11cf-96b8-444553540000” ; codebase=”http://fpdownload.macromedia.com/pub/shockwave/; cabs/flash/swflash.cab#version=8,0,0,0” width=”550” height=”400” ; id=”externalInterface” align=”middle”>
<param name=”allowScriptAccess” value=”always” /> <param name=”movie” value=”externalInterface.swf” /> <param name=”quality” value=”high” />
<param name=”bgcolor” value=”#ffffff” />
<embed src=”externalInterface.swf” quality=”high” bgcolor=”#ffffff” ;
618

Putting JavaScript to Work
width=”550” height=”400” name=”externalInterface” align=”middle” ; allowScriptAccess=”always” type=”application/x-shockwave-flash” ; pluginspage=”http://www.macromedia.com/go/getflashplayer” />
</object>
</body>
</html>
The script in bold shows a JavaScript function being defined, along with the four parameters set by the ActionScript call() method. The rest of the HTML just provides the standard markup structure and embeds the Flash movie into the page.
Although this HTML shows the allowScriptAccess parameter set within the <object> and <embed> tags, it is not actually needed when calling JavaScript from within the Flash movie. It is needed only when using JavaScript to call ActionScript code.
Setting and Getting Data Using ActionScript
Here’s an example that shows how to make use of JavaScript input and return values when calling JavaScript functions from within the Flash movie. First, the ActionScript code looks like the following:
import flash.external.ExternalInterface;
// Create an input field
this.createTextField(“flashInputField”, this.getNextHighestDepth(), ; 10, 10, 100, 20);
flashInputField.type = “input”; flashInputField.border = true;
// Create a button for setting the contents of the HTML form field this.createEmptyMovieClip(“setFormField”, this.getNextHighestDepth()); setFormField._x = 10;
setFormField._y = 40; setFormField.createTextField(“buttonLabel”, ;
getInputTextButton.getNextHighestDepth(), 0, 0, 100, 20); setFormField.buttonLabel.textColor = 0x0000CC; setFormField.buttonLabel.text = “Set Input Field Text”;
setFormField.onRelease = function()
{
ExternalInterface.call(“setFieldValue”, flashInputField.text);
}
// Create a button for getting the contents of the HTML form field this.createEmptyMovieClip(“getFormField”, this.getNextHighestDepth()); getFormField._x = 10;
getFormField._y = 60; getFormField.createTextField(“buttonLabel”, ;
getInputTextButton.getNextHighestDepth(), 0, 0, 100, 20); getFormField.buttonLabel.textColor = 0x0000CC; getFormField.buttonLabel.text = “Get Input Field Text”;
getFormField.onRelease = function()
{
flashInputField.text = ExternalInterface.call(“getFieldValue”);
}
619

Chapter 24
Again, most of the ActionScript code is just for laying out the interface. First, an input field is created to allow user-entered data. Next, two buttons are created. One button is to set the HTML text field value based on the value of the Flash text field, and the other button is to retrieve the value of the HTML text field and set the Flash text field to have the same content.
The HTML and JavaScript that makes this work is as follows:
<html>
<head>
<title>externalInterface</title>
<script>
function getFieldValue()
{
return document.forms[0].textField.value;
}
function setFieldValue(newValue)
{
document.forms[0].textField.value = newValue;
}
</script>
</head>
<body bgcolor=”#ffffff”>
<object classid=”clsid:d27cdb6e-ae6d-11cf-96b8-444553540000” ; codebase=”http://fpdownload.macromedia.com/pub/shockwave/; cabs/flash/swflash.cab#version=8,0,0,0” width=”550” height=”400” ; id=”externalInterface” align=”middle”>
<param name=”allowScriptAcess” value=”always” /> <param name=”movie” value=”externalInterface.swf” /> <param name=”quality” value=”high” />
<param name=”bgcolor” value=”#ffffff” />
<embed src=”externalInterface.swf” allowscriptAccess=”always” quality=”high” bgcolor=”#ffffff” ;
width=”550” height=”400” name=”externalInterface” align=”middle” ; type=”application/x-shockwave-flash” ; pluginspage=”http://www.macromedia.com/go/getflashplayer” />
</object>
<form>
<input type=”text” name=”textField” value=”startingValue” /> </form>
</body>
</html>
The two JavaScript functions here work no differently from any other JavaScript functions. setField Value()simply passes along the string from the Flash player, and getFieldValue()returns a string that is passed back into the Flash movie immediately, as if it were just another ActionScript function call.
620
Putting JavaScript to Work
Try It Out |
Controlling an Embedded Component |
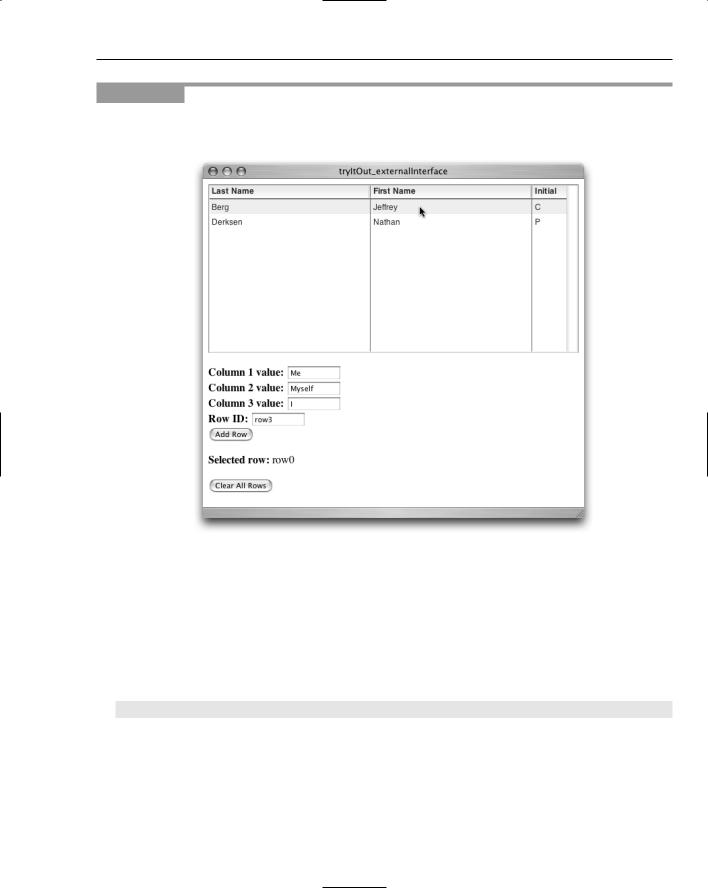
In this exercise you embed a Flash component in an HTML page and then communicate with that component using JavaScript. Figure 24-4 shows what the final result should look like.
Figure 24-4
1.Create a new Macromedia Flash document and save it as tryItOut_externalInterface.fla in an appropriate directory.
2.Open the Library panel. Open the User Interface tab of the Components panel and drag the DataGrid component to the middle of the Library panel. (If you are using Flash MX 2004, drag the component onto the stage and then delete it from the stage.)
3.Click in the keyframe for the layer, open the Actions panel, and enter the following ActionScript code:
#include “tryItOut_externalInterface.as”
621

Chapter 24
4.Save the file.
5.Create a new ActionScript document, name it tryItOut_externalInterface.as, and save it in the directory containing your Flash project file.
6.Enter the following code into the new ActionScript file:
import mx.controls.DataGrid;
import flash.external.ExternalInterface;
var g_clickFunction:String = “”;
init();
function init() : Void
{
//Create the data grid this.createClassObject(mx.controls.DataGrid, “gridInstance”, ;
this.getNextHighestDepth()); gridInstance.setSize(550, 250);
//Set up the change handler so that a JavaScript function is called
//when a row is clicked
var clickHandlerObject:Object = new Object(); clickHandlerObject.change = function(eventObject:Object)
{
ExternalInterface.call(g_clickFunction, ; eventObject.target.selectedItem.data);
}
gridInstance.addEventListener(“change”, clickHandlerObject);
//Register the functions which can be called using JavaScript ExternalInterface.addCallback(“setColumnLabels”, null, setColumnLabels); ExternalInterface.addCallback(“setColumnWidths”, null, setColumnWidths); ExternalInterface.addCallback(“addRow”, null, addRow); ExternalInterface.addCallback(“setClickHandler”, null, setClickHandler); ExternalInterface.addCallback(“reset”, null, reset);
//Advertise to the calling HTML that the component is ready ExternalInterface.call(“componentReady”, true);
}
function setColumnLabels(columnLabelArray:Array) : Void
{
for (var i=0; i < columnLabelArray.length; i++)
{
gridInstance.addColumn(“column” + i); gridInstance.getColumnAt(i).headerText = columnLabelArray[i];
}
}
function setColumnWidths(columnWidthArray:Array) : Void
{
for (var i=0; i < columnWidthArray.length; i++)
{
622

Putting JavaScript to Work
gridInstance.getColumnAt(i).width = columnWidthArray[i];
}
}
function addRow() : Void
{
var rowObject = new Object();
for (var i=0; i < arguments.length; i++)
{
if (i < arguments.length - 1)
{
rowObject[“column” + i] = arguments[i];
}
else
{
rowObject.data = arguments[i];
}
}
gridInstance.addItem(rowObject);
}
function setClickHandler(functionName:String)
{
g_clickFunction = functionName;
}
function reset() : Void
{
gridInstance.dataProvider = new Array();
}
7.Save the file and publish the project (File Publish).
8.Create a new HTML file in your favorite HTML editor or text editor, and enter the following HTML and JavaScript:
<html>
<head> <title>tryItOut_externalInterface</title> <script type=”text/javascript”>
function componentReady(isReady)
{
var flashHandle = document[“tryItOut_externalInterface”]; var columnLabels = [“Last Name”, “First Name”, “Initial”]; var columnWidths = [240, 240, 70];
flashHandle.setColumnLabels(columnLabels);
flashHandle.setColumnWidths(columnWidths);
flashHandle.setClickHandler(“rowClicked”); flashHandle.addRow(“Derksen”, “Nathan”, “P”, “row0”); flashHandle.addRow(“Jeffrey”, “Berg”, “C”, “row1”);
}
function rowClicked(rowID)
{
623

Chapter 24
var messageHandle = document.getElementById(“selectedRow”); messageHandle.innerHTML = rowID;
}
function addNewRow()
{
var flashHandle = document[“tryItOut_externalInterface”]; var col1Value = document.forms[0].col1DataField.value; var col2Value = document.forms[0].col2DataField.value; var col3Value = document.forms[0].col3DataField.value; var rowID = document.forms[0].rowIDField.value;
flashHandle.addRow(col1Value, col2Value, col3Value, rowID);
}
function deleteRows()
{
var flashHandle = document[“tryItOut_externalInterface”]; flashHandle.reset();
}
</script>
</head>
<body bgcolor=”#ffffff”>
<object classid=”clsid:d27cdb6e-ae6d-11cf-96b8-444553540000” ; codebase=”http://fpdownload.macromedia.com/pub/shockwave/;
cabs/flash/swflash.cab#version=8,0,0,0” width=”550” height=”250” ; id=”tryItOut_externalInterface” align=”middle”>
<param name=”allowScriptAccess” value=”always” />
<param name=”movie” value=”tryItOut_externalInterface.swf” /> <param name=”quality” value=”high” />
<param name=”bgcolor” value=”#ffffff” />
<embed src=”tryItOut_externalInterface.swf” quality=”high” ; bgcolor=”#ffffff” width=”550” height=”250” ; name=”tryItOut_externalInterface” align=”middle” ; allowScriptAccess=”always” type=”application/x-shockwave-flash” ; pluginspage=”http://www.macromedia.com/go/getflashplayer” />
</object><br /> <br />
<form>
<b>Column 1 value:</b>
<input type=”text” name=”col1DataField” value=”Me” size=”10” /><br /> <b>Column 2 value:</b>
<input type=”text” name=”col2DataField” value=”Myself” size=”10” /><br /> <b>Column 3 value:</b>
<input type=”text” name=”col3DataField” value=”I” size=”10” /><br /> <b>Row ID:</b>
<input type=”text” name=”rowIDField” value=”row3” size=”10” /><br /> <input type=”button” value=”Add Row” onclick=”addNewRow();” /><br /> <br />
<b>Selected row:</b> <span id=”selectedRow”></span><br /> <br />
<input type=”button” value=”Clear All Rows” onclick=”deleteRows();” /> </form>
</body>
</html>
624

Putting JavaScript to Work
9.Save the file and then open it within your web browser. Play with the table by clicking existing rows, adding new rows, and clearing the table.
How It Works
A large amount of the code and markup in this exercise is not actually directly involved in the process of communicating between the HTML page and the Flash movie. This is a good thing, because previously a significant amount of JavaScript and ActionScript was needed to pass data into an already running Flash movie. Having direct access between the two scripting environments means that the code is more focused on what is being communicated rather than how it is being communicated.
The first step involves a bit of startup code:
import mx.controls.DataGrid;
import flash.external.ExternalInterface;
var g_clickFunction:String = “”;
init();
The import statements allow you to refer to the DataGrid component and the ExternalInterface class in a shorthand manner. A timeline variable is declared for keeping track of what JavaScript function to call when a data grid row is selected. Next, the initialization function is called. Within the init() function, a data grid is placed on the stage and is resized:
// Create the data grid this.createClassObject(mx.controls.DataGrid, “gridInstance”, ;
this.getNextHighestDepth()); gridInstance.setSize(550, 250);
An event listener is set up to respond to the user clicking a data grid row. When it fires, it calls a JavaScript row handler function and passes the ID for the selected row to that function:
//Set up the change handler so that a JavaScript function is called
//when a row is clicked
var clickHandlerObject:Object = new Object(); clickHandlerObject.change = function(eventObject:Object)
{
ExternalInterface.call(g_clickFunction, ; eventObject.target.selectedItem.data);
}
gridInstance.addEventListener(“change”, clickHandlerObject);
By default, no ActionScript functions or methods can be called by JavaScript unless told otherwise. Registering the functions makes them available for external access:
// Register the functions which can be called using JavaScript ExternalInterface.addCallback(“setColumnLabels”, null, setColumnLabels); ExternalInterface.addCallback(“setColumnWidths”, null, setColumnWidths); ExternalInterface.addCallback(“addRow”, null, addRow); ExternalInterface.addCallback(“setClickHandler”, null, setClickHandler); ExternalInterface.addCallback(“reset”, null, reset);
625

Chapter 24
The JavaScript code is going to need to pass in some startup parameters; however, the Flash movie is going to be ready after the HTML has all loaded, so any attempts at calling any ActionScript functions will fail. As a result, notify the container HTML that the component is ready to receive calls from JavaScript by calling a componentReady() JavaScript function. This is a custom function that will be shown shortly:
// Advertise to the calling HTML that the component is ready ExternalInterface.call(“componentReady”, true);
That is it for the initialization ActionScript. The rest of the ActionScript defines the functions that are to be accessible externally.
The setColumnLabels() function allows the number of columns to be declared and labels to be defined for each column:
function setColumnLabels(columnLabelArray:Array) : Void
{
for (var i=0; i < columnLabelArray.length; i++)
{
gridInstance.addColumn(“column” + i); gridInstance.getColumnAt(i).headerText = columnLabelArray[i];
}
}
The setColumnWidths() function does exactly what the name describes:
function setColumnWidths(columnWidthArray:Array) : Void
{
for (var i=0; i < columnWidthArray.length; i++)
{
gridInstance.getColumnAt(i).width = columnWidthArray[i];
}
}
The addRow() function allows for a row full of data to be added to the list. It expects one parameter to be passed in for each column and then one more for a row ID. A row ID is typically needed to provide a value that can uniquely identify the row when selected. The number of columns is not fixed, so the arguments array is used to allow for a varying number of arguments to be passed in. The function loops through each argument passed in and then constructs a custom object that the DataGrid.addItem() method expects:
function addRow() : Void
{
var rowObject = new Object();
for (var i=0; i < arguments.length; i++)
{
if (i < arguments.length - 1)
{
rowObject[“column” + i] = arguments[i];
}
else
{
rowObject.data = arguments[i];
}
626

Putting JavaScript to Work
}
gridInstance.addItem(rowObject);
}
The setClickHandler() function sets the name of the JavaScript function to be called every time the user clicks a row:
function setClickHandler(functionName:String)
{
g_clickFunction = functionName;
}
The reset() function clears out the data for each row:
function reset() : Void
{
gridInstance.dataProvider = new Array();
}
That is it for the ActionScript. Next take a look at the JavaScript.
First comes the componentReady() function. This is the code that is called by the Flash movie after it has loaded to indicate it is ready. This is where initialization of the component happens. First, a handle to the Flash movie is obtained. This is what lets you access the ActionScript functions. Next, the column labels are assigned, column widths are defined, and the name of the function that will respond to row clicks is passed. Finally, a couple rows of data are added:
function componentReady(isReady)
{
var flashHandle = document[“tryItOut_externalInterface”]; var columnLabels = [“Last Name”, “First Name”, “Initial”]; var columnWidths = [240, 240, 70];
flashHandle.setColumnLabels(columnLabels);
flashHandle.setColumnWidths(columnWidths);
flashHandle.setClickHandler(“rowClicked”); flashHandle.addRow(“Derksen”, “Nathan”, “P”, “row0”); flashHandle.addRow(“Jeffrey”, “Berg”, “C”, “row1”);
}
The function that responds to the data grid change event is passed the ID of the row that the user clicked, which is then placed between a pair of <span> tags for visual feedback:
function rowClicked(rowID)
{
var messageHandle = document.getElementById(“selectedRow”); messageHandle.innerHTML = rowID;
}
The addNewRow() function is called by the Add Row button. It passes the contents of the four text fields to the addRow() ActionScript method. The first three text fields correspond to the three columns shown, and the fourth text field sets the ID to be shown when the new row is clicked:
627