

Total Gastrectomy |
4 |
|
Abstract
In this chapter, we work through the total gastrectomy procedure with D2 lymphadenectomy. Because this procedure involves dissection of the No. 11 lymph nodes in addition to the No. 14v and 12a nodes, the pancreas is preserved, while the spleen and splenic artery are removed together. Esophagojejunostomy is performed instrumentally, and Y limb anastomosis is done manually. The standard operation time is 4 h. In Chap. 5, on curative esophagectomy, we discuss dissecting the gastrosplenic ligament while preserving the spleen, although the current convention does not require dissection of the No. 10 splenic hilar lymph nodes (no need for splenectomy) for total gastrectomy with D2 lymphadenectomy.
Keywords
Total gastrectomy · D2 lymphadenectomy Roux-en-Y reconstruction
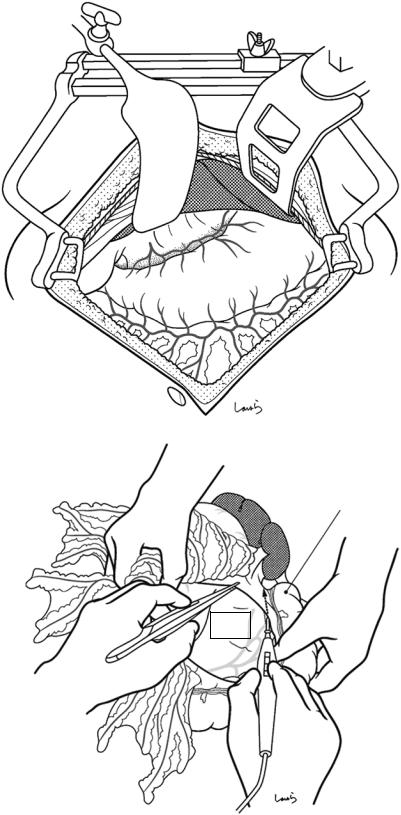
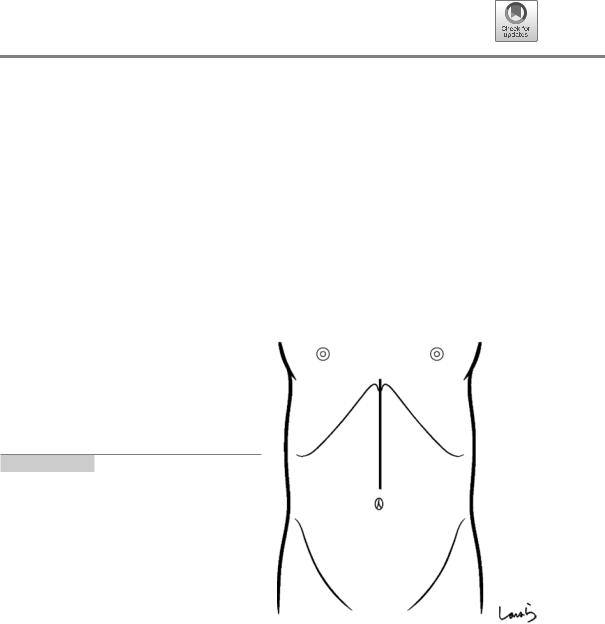
Fig. 4.1 The surgeon stands on the right side of the patient and makes an upper abdominal midline incision extending from the xiphoid process to the left of the umbilicus. The peritoneum is incised to the left of the round ligament of the liver to open the abdomen. If a large xiphoid process obstructs the operative field, we can resect it to widen the field
© Springer Nature Singapore Pte Ltd. 2020 |
91 |
H. Shinohara, Illustrated Abdominal Surgery, https://doi.org/10.1007/978-981-15-1796-9_4 |
|
92 |
4 Total Gastrectomy |
|
|
Fig. 4.2 After placing a wound retractor, the abdominal cavity is explored including the liver, the pouch of Douglas, and other structures. An Octopus retractor is applied from the right side to cranially retract the lateral segment of the liver. A rib retractor is applied to the right to secure the operative field of view in the left upper abdomen
Fig. 4.3 Following the |
|
|
same procedure |
|
|
described in Chap. 3 on |
|
|
distal gastrectomy, the |
|
|
attachment of the greater |
|
|
omentum to the |
|
|
transverse colon is |
Great |
|
incised around the |
||
omentum |
||
midpoint of the greater |
||
|
||
curvature of the stomach |
|
|
using electrocautery to |
|
|
open the omental bursa. |
|
|
The incision is |
|
|
continued toward the left |
|
|
colic flexure until the |
|
|
left lower corner of the |
|
|
omental bursa is reached |
|
L colic flexure
Omental
bursa
4 Total Gastrectomy |
93 |
|
|
a
Pancreas
L border of omental bursa
b
Connective tissue behind pancreas
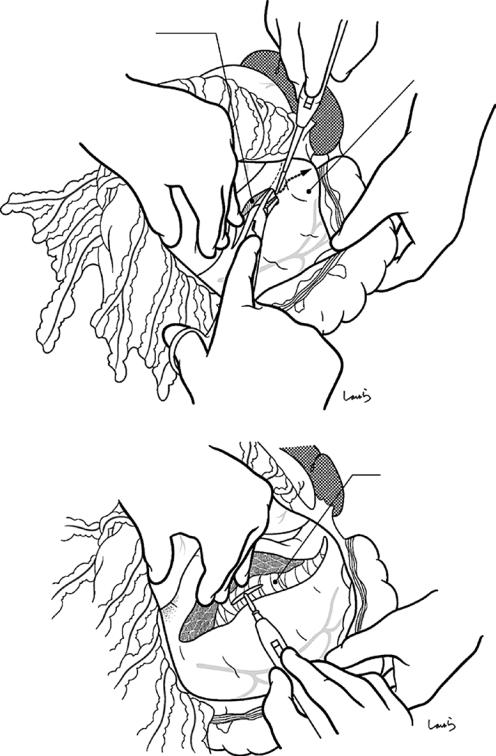
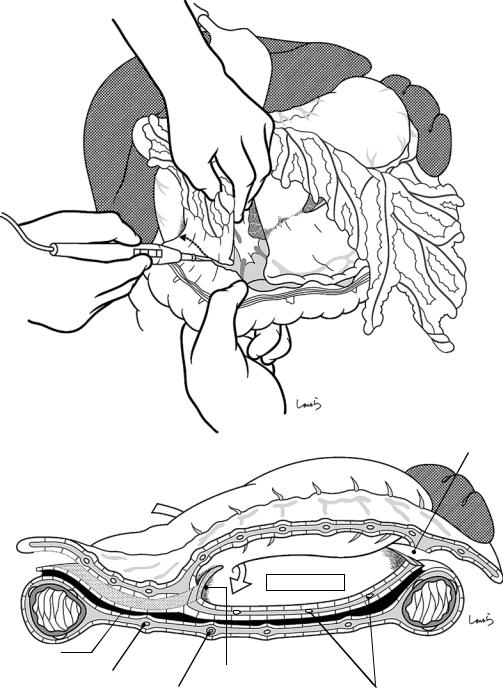
Fig. 4.4 The peritoneum of the posterior wall of the omental bursa is incised along the lower border of the pancreas (a). The pancreas is inverted and, using electrocau-
tery, the exposed cotton-like loose connective tissue behind the pancreas is dissected, as if melting it (b)

94 |
4 Total Gastrectomy |
|
|
L gastric a.
No.11 LN
Splenic a.
Splenic v.
Fusion fascia of Toldt
Transverse panc. a.
Post. epiploic a.
Great |
m |
|
|
omentu |
|
s Pancrea
Omental |
bursa |
|
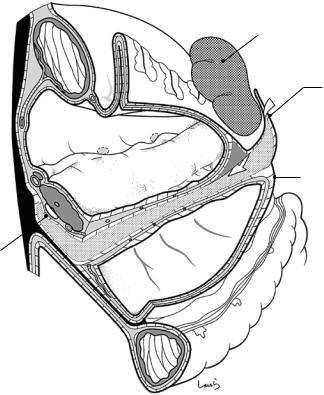
Fig. 4.5 Here we can see the dissected layers shown in Fig. 4.4. Behind the pancreas is a fascia formed by pancreatic collision with the abdominal wall and subsequent fusion of the apposed peritoneal membranes (the fusion fascia of Toldt). Here, the proper way to achieve natural layer separation is to enter the layer above the fusion fascia of Toldt, that is, the gap between the subperitoneal fascia (retropancreatic fascia) on the pancreatic side and the fusion fascia (white arrows). For pancreatic displacement, rather than dissecting unidirectionally from the splenic side, it is advisable to start the dissection from the lower border of the pancreas (Fig. 4.4a) because this makes it easier to enter the correct layer and affords a better view of the operative field
While dissecting the posterior wall of the omental bursa along the lower border of the pancreas, we may encounter
several blood vessels traveling under the peritoneum. These vessels are the posterior epiploic arteries branching from the pancreatic artery inferiorly and leading to the posterior wall of the omental bursa. They travel within the intermediate fat layer of the greater omentum shared with the pancreas and so are inevitably dissected in this step. (Incidentally, the fact that these arteries are named “epiploic” indicates that the pancreas develops from inside the greater omentum and the anterior leaf of the transverse mesocolon is identical to the greater omentum). These posterior epiploic arteries may sometimes anastomose with the middle colic artery, and blood vessels may then be encountered even when the correct layer is entered for dissection of the omental bursa. Interestingly, in rare cases, the middle colic artery branches from the transverse pancreatic artery or more proximally from the dorsal pancreatic artery
4 Total Gastrectomy |
95 |
|
|
a
 Splenocolic lig. (cut)
b
L inf. phrenic a.(esophagocardiac br.)
Ant. trunk of vagus n.
No.2 LN 
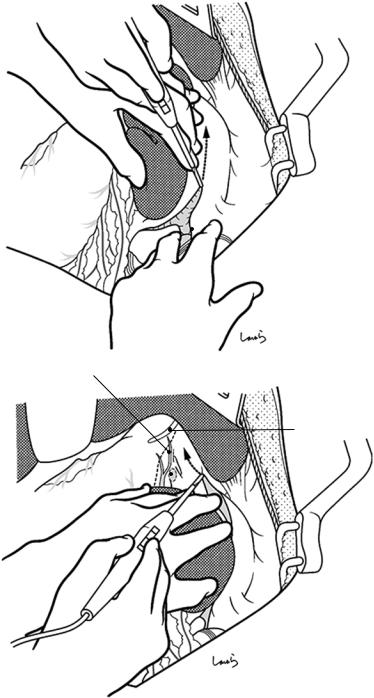
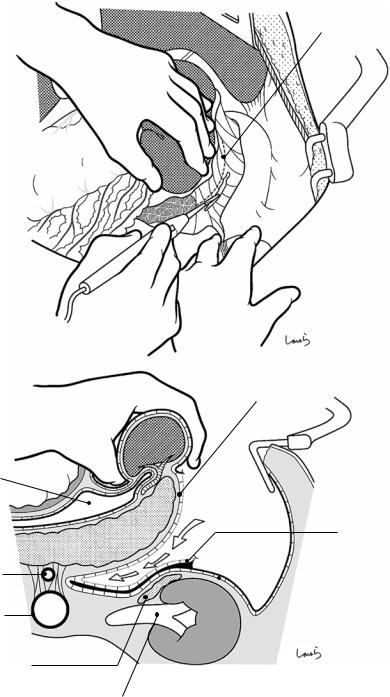
Fig. 4.6 The surgeon lifts the spleen toward him/herself with the left hand and incises the splenocolic ligament around the lower pole of the spleen (a). The retroperitoneum is incised with electrocautery following a route as close as possible to the spleen. While holding the spleen with the left hand, the surgeon should gradually extend the fingers placed on the lower border of the spleen so that the hand
does not obstruct the operative field (b). Having completed approximately the lower two-thirds of the peritoneal incision, the whole spleen is drawn caudally and the peritoneal incision is extended toward the cardia of the stomach (dotted arrow). This extended incision should pass lateral to the No. 2 lymph nodes located along the esophageal cardiac branch of the left inferior phrenic artery
96 |
4 Total Gastrectomy |
|
|
Spleen
Retroperitoneum (divided)
Splenocolic lig. (divided)
Retropancreatic fascia (connective tissue film)
Fig. 4.7 This is a schematic diagram of the procedure described in Fig. 4.6. The spleen is lifted from its lower pole, keeping the layer of the retropancreatic fascia intact, as indicated by the arrow
4 Total Gastrectomy |
97 |
|
|
a
Contour of pancreas tail
b |
Retropancreatic fascia |
(connective tissue film) |
Omental bursa
Fusion fascia of Toldt
SMA
Aorta
 Fascia of Gerota
L adrenal gland
L renal v.
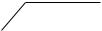
Fig. 4.8 Once liberated from the retroperitoneum, the spleen can be lifted easily. The tail of the pancreas is also lifted together with its loose connective tissue (a). By dissecting this tissue with electrocautery, we can easily enter the layer behind the pancreas without resistance and then
connect to the layer previously accessed from the lower border of the pancreas (arrows in b). A single layer of the retropancreatic fascia, with the appearance of a matted wafer, behind the pancreas indicates that we are proceeding as planned (b)
98 |
4 Total Gastrectomy |
|
|
a
Splenic v.
b
Gastropancreatic lig. 
Ant. trunk of vagus n.
No.2 LN
Esophagocardiac br.
L inf. phrenic a.
Adrenal br.
L adrenal gland
Inf. mesenteric v.
L adrenal gland
Fig. 4.9 The connective tissue attached to the anterior surface of the left adrenal gland (a, and the area is shaded in b) should be adequately dissected. Care should be taken to avoid advancing the dissection deeper because the left inferior phrenic artery also gives off a small branch to the
left adrenal gland, and this branch may be damaged and cause bleeding. This now completes the displacement of the pancreas and spleen, and they are immediately returned to their original positions
4 Total Gastrectomy |
99 |
|
|
Peritoneum on ant. surface of pancreas
R border of omental bursa
Fig. 4.10 Omental dissection proceeds by advancing from the midpoint toward the right until the right border of the omental bursa is identified, which corresponds to the folding line at which the anterior layer of the transverse mesocolon is folded back. This is incised with
Metzenbaum scissors or electrocautery. The dissection continues upward in the same direction, incising the peritoneum that covers the anterior surface of the pancreas all the way to its upper border
100 |
4 Total Gastrectomy |
|
|
L border of omental bursa (divided in Figs. 4.6 and 4.7)
Foramen of Winslow
Omental bursa
Fusion fascia
Acc. R colic v. |
R border of omental bursa |
|
|
Mid. colic a. & v. |
Post. epiploic a. |
Fig. 4.11 Heading from the right border of the omental bursa toward the right colic flexure, the omental attachment to the transverse colon is divided using electrocautery (a). By applying an appropriate amount of
countertraction, we can enter the layer above (on the omental side of) the fusion fascia that is formed by fusion between the greater omentum and the transverse mesocolon (b)
4 Total Gastrectomy |
101 |
|
|
Gastrocolic trunk of
Henle
SMV
 No.14v
Acc. R colic v.
Transverse mesocolon (fusion fascia)
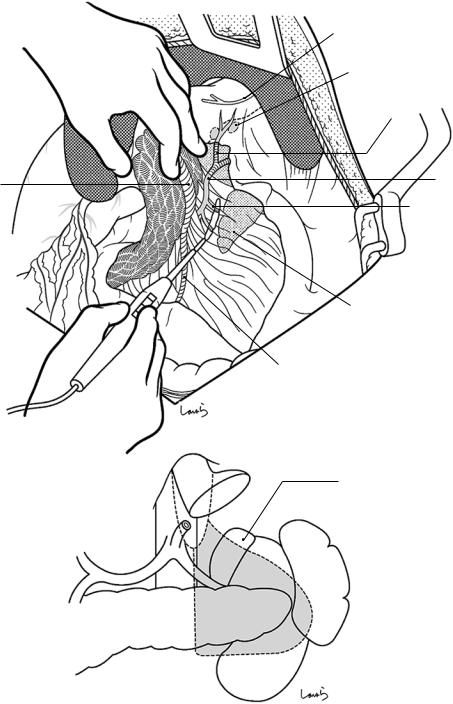
Fig. 4.12 The right transverse mesocolon needs to be dissected more deeply than for distal gastrectomy (Chap. 3) to dissect the No. 14 lymph nodes adjoining the superior mesenteric vein (SMV). By pulling the transverse colon caudally, the second assistant expands the mesoco-
lon into a fan shape, with the gastrocolic trunk of Henle as the pivot of a fan. The surgeon proceeds by dissecting the layer above the fusion fascia and, when reaching the anterior surface of pancreas, carefully incises the fusion fascia to transit to the next layer
102 |
4 Total Gastrectomy |
|
|
a
Fusion fascia of Treitz 
3 Fusion fascia between great omentum and ant. surface of duodenum
1 Fusion fascia between great omentum and transverse mesocolon
*
Fusion fascia of Toldt
2Fusion fascia between horizontal part of duodenum and transverse mesocolon
b
ASPDV  Gastrocolic trunk of Henle
Fig. 4.13 This is a schematic diagram of the latter half of the procedure described in Fig. 4.12. A sagittal cross section at the level of the descending part of the duodenum shows five fusion fascias (a). The three fusion fascias numbered , , and fail to merge at the margin of their attachment to the transverse mesocolon and form a gap containing loose connective tissue (asterisk). Once the omental dissection reaches the anterior surface of the pancreas, this gap is entered so that the transverse mesocolon can be fully peeled off the anterior surface of the pan-
R gastroepiploic v.
3Fusion fascia between great omentum and ant. surface of pancreas (mesogastrium)
1Fusion fascia between great omentum and transverse mesocolon
No.14 v.
creas. A sagittal cross section at the level of the gastrocolic trunk of Henle (the pivot of a fan) (b). In distal gastrectomy (Fig. 3.20) where we intend to go no further than dissecting the No. 6 lymph nodes, the fusion fascia is penetrated to reach the anterior surface of the pancreas. For total gastrectomy, however, we intend to dissect the No. 14 lymph nodes, so the fusion fascia on the side of the transverse mesocolon is incised and the dissection is advanced toward the SMV
4 Total Gastrectomy |
103 |
|
|
R gastroepiploic v.
No.14v LN
Henle |
|
Mid. colic v. |
|
||
|
|
Acc. R colic v.
Cutting line of fusion fascia
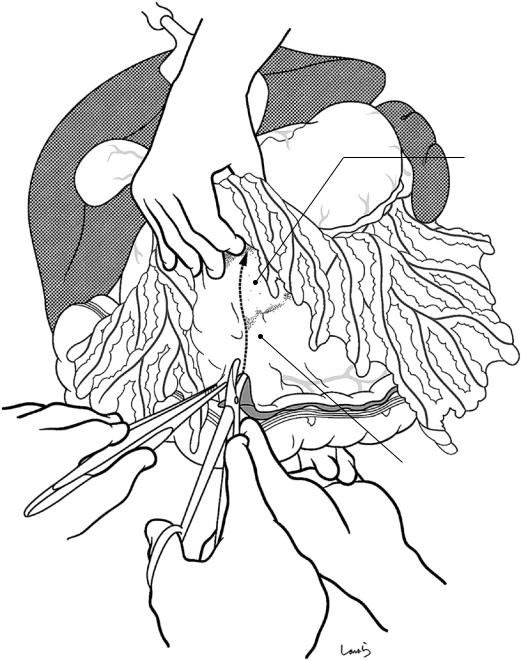
Fig. 4.14 Eventually, the bluish SMV can be seen through the membrane. By activating the electrosurgical probe or using it as a spatula, the surgeon removes the fat tissue around the SMV including the No. 14 lymph nodes and identifies the middle colic vein and the gastrocolic
trunk of Henle draining into the SMV. The space between these vessels should also be cleared completely. The second assistant should take great care when pulling the transverse colon so as to avoid tearing the exposed veins
104 |
4 Total Gastrectomy |
|
|
Fusion fascia (cut, *)
Fusion fascia (cut, *)
No.14v
Mesoduodenum
*
*
Henle
SMV
Fig. 4.15 This is a schematic diagram of the procedure for dissecting the No. 14v lymph nodes. The dissection shown in Fig. 4.13 is deepened toward the anterior aspect of the SMV. To clearly expose the root of the middle colic vein and the origin of the gastrocolic trunk of Henle from the SMV, the surrounding fat tissue with lymph nodes included should be carefully removed. The membrane held with the forceps is the mesogastrium detached from
the anterior surface of the pancreas, and the No. 14v lymph nodes attached to its tip are removed together with this membrane. Although en bloc dissection of the No. 14v and No. 6 lymph nodes can be achieved by continuing the dissection upward beyond the confluence of the anterior superior pancreaticoduodenal vein (ASPDV), it is advisable to remove these nodes separately so that they can be distinguished later
4 Total Gastrectomy |
105 |
|
|
Infrapyloric v.
*
R gastroepiploic v.
ASPDV
Fig. 4.16 Dissection of the No. 6 lymph nodes follows the same procedure as in distal gastrectomy (Chap. 3). The first assistant pulls the gastric pylorus cranially, while the second assistant pulls the transverse colon caudally to widely expose the region. Using electrocautery, the surgeon peels off the fatty connective tissue around the right gastroepiploic vein with lymph nodes included. After con-
firming that the confluence of the ASPDV has been passed, the right gastroepiploic vein is isolated with right angle dissection forceps, ligated with a 3-0 Vicryl suture, and divided. If the confluence of the infrapyloric vein is located at a lower level, only the right gastroepiploic vein may be dissected right above the confluence (asterisk) at this point and the infrapyloric vein may be dealt with separately
106 |
4 Total Gastrectomy |
|
|
R gastroepiploic v. (ligated)
R gastroepiploic v. (root)
Fig. 4.17 The next step is to expose the root of the right gastroepiploic artery. In some patients with metastasis- positive No. 6 lymph nodes, swollen lymph nodes are firmly attached to the pancreatic parenchyma and sur-
round the root of the right gastroepiploic artery. The lymph nodes are lifted from the pancreatic parenchyma as much as possible with forceps, and the intervening fibrous connective tissue is dissected with electrocautery
Infrapyloric v.
Gastroduodenal a.
Fig. 4.18 Once the root of the right gastroepiploic artery arising from the gastroduodenal artery has been exposed, the vein is divided at its root after double ligation with 3-0 Vicryl
4 Total Gastrectomy |
107 |
|
|
a
Adipose tissue including infrapyloric a.
b
Branch of infrapyloric a.
Infrapyloric a. (root)
R gastroepiploic a. (ligated)
Infrapyloric a.
Gastroduodenal a.
R gastroepiploic a. (root)
R gastroepiploic v. (ligated)
Adipose tissue including  infrapyloric a. (dissected)
Infrapyloric a. (ligated)
Fig. 4.19 The infrapyloric artery usually originates within the vicinity of the root of the right gastroepiploic artery, as mentioned in Chap. 3 on distal gastrectomy, but it may also diverge from the gastroduodenal artery (a and b). When metastasis to the No. 6 lymph nodes is sus-
pected, the infrapyloric artery should be ligated and divided at its root without hesitation. After ligation and division of the branches of the infrapyloric vessels along the duodenal wall, the “inferior mesoduodenum” is resected together with the No. 6 lymph nodes
108 |
4 Total Gastrectomy |
|
|
a
Ant. gastric br. of vagus n.
b Proper hepatic a. |
Post. gastric br. of vagus n. Ant. gastric br. of vagus n. |
Lesser omentum |
|
B |
Es |
|
|
|
PV |
Foramen of Winslow |
Omental bursa |
Ao
IVC
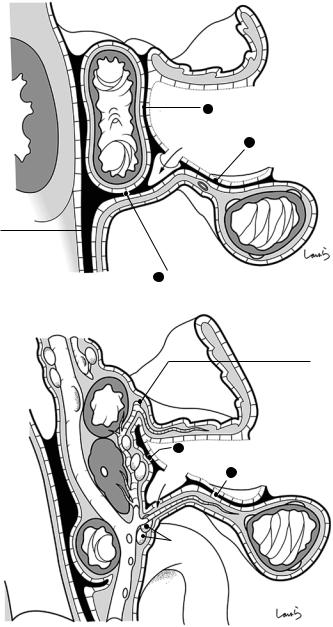
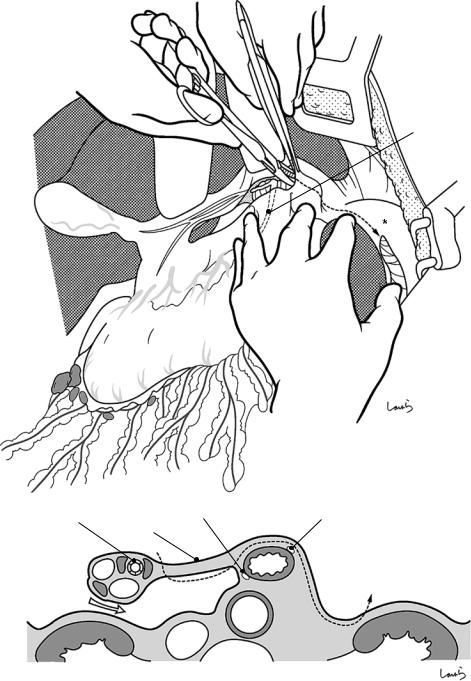
Fig. 4.20 We now move on to dissection of the suprapyloric area. A small incision is made at the right upper corner of the lesser omentum. A dissection clamp is inserted through the incision to guide electrocautery dissection of the lesser omentum along its attachment to the lateral segment of the liver. When the esophagus is reached, the dissection is continued across the front of the esophagus until it connects with the retroperitoneal incision line (asterisk in
a) along the lower border of the spleen. Beyond the esophagus, the dissection is advanced in an almost vertical direction. Two membranes are dissected before the esophagus is reached, and only one membrane is dissected after that (b). In front of the esophagus, the dissection line crosses slightly beneath the diaphragm-serosa transition. The first assistant pushes the spleen (and the bowel if protruded) caudally with the left hand to secure the operative field
4 Total Gastrectomy |
109 |
|
|
a |
R gastric a. & v. |
1st. branch of supraduodenal a. & v.
Divided peritoneum of hepatoduodenal lig.
b
Caudate lobe
Lesser omentum (divided)
3
12a |
5 |
3 |
Supraduodenal a. & v.
Fig. 4.21 Pulling the pyloric portion of the stomach caudally, the surgeon slides the left index finger under the lesser omentum to stretch the mesenteric triangle—the two sides of which are formed by the right gastric vessels and the first branch of the superior duodenal vessels—and makes an opening on it with electrocautery (a). Starting
from the opening, the peritoneum on the anterior surface of the hepatoduodenal ligament is incised while curving to the right until connecting with the lesser omentum incision from the previous step. The superior duodenal vessels crossing the incision line are ligated and divided along the duodenal wall (b)
110 |
4 Total Gastrectomy |
|
|
a
No.12 LN
R gastric a. & v.
b
Supraduodenal a. & v.
No.12p LN
L limbus of hepatoduodenal lig.
Common hepatic a.
Lesser omentum (divided)
R gastric v.
|
|
|
|
|
R gastric a. |
|
|
|
5 |
5 |
|
|
|
|
|
|
Omental bursa |
7 |
||
|
|
|
|
|||
|
|
|
|
|
||
|
|
|
|
|
|
|
|
|
|
|
|
|
|
12 |
12 |
|
|
|
|
9 |
B |
|
|
|
8a |
|
|
|
|
|
|
|
||
PV
Fig. 4.22 Now the pyloric portion of the stomach is pulled down along with the lesser omentum. By the earlier step described in Fig. 4.10, the incision along the right border of the omental bursa has already reached the upper border of the pancreas. The incision is now resumed along the left border of the hepatoduodenal ligament until it reaches the foramen of Winslow (a). More precisely, the incision line ascends between the No. 12a (group 2) and
No. 12p (group 3) lymph nodes. This determines the range of dissection of the hepatoduodenal ligament. White arrow (b) indicates the peritoneum on the anterior surface of the hepatoduodenal ligament incised in the procedure shown in Fig. 4.21, black arrow indicates the upper limit of the right border of the omental bursa incised in the present procedure, and dotted line connecting the two arrows indicates the range of dissection of the No. 12a lymph nodes
4 Total Gastrectomy |
111 |
|
|
a
12a
Gastroduodenal a.
b
12a |
|
|
|
|
5 |
5 |
|
12a |
|
7 |
|
|
|
|
|
Omental bursa |
9 |
|
B |
|
|
||
8a |
||||
|
||||
|
PV |
|||
|
IVC |
|||
Fig. 4.23 The No. 5 and No. 12a lymph nodes are dissected by removing the peritoneum together with the nodes within the dissection range (a). All lymph nodes on
both sides of the proper hepatic artery must be removed, as shown in the cross section (b)
112 |
4 Total Gastrectomy |
|
|
a
R gastric a. & v.
R gastric v.
b
R gastric a.
Proper hepatic a.
Omental bursa
Fig. 4.24 Once the root of the right gastric vessels has been exposed, they are ligated and divided en bloc (a). In the corresponding step in distal gastrectomy (Fig. 3.30), the vessels
are still connected to the peritoneum posteriorly, whereas in the present procedure, the peritoneum has already been dissected (Fig. 4.22) and only the vessels remain as shown in (b)
4 Total Gastrectomy |
113 |
|
|
No.12a LN
No.5 LN
No.3 LN
R gastric a. & v.
No.6 LN
R gastroepiploic a. (ligated)
R gastroepiploic v. (ligated)
R gastroepiploic a. (root)
Infrapyloric a. (root)
R gastroepiploic v. (root)
Fig. 4.25 A linear stapler is used close to the pyloric ring on its anal side to transect the duodenum. The staple line is invaginated by applying interrupted seromuscular 3-0 Vicryl sutures
114 |
4 Total Gastrectomy |
|
|
Lesser omentum
a
Esophagus
L gastric v.
8a
b |
|
Post. layer of lesser omentum |
|
Post. wall of omental bursa |
|
|
|
|
|
B |
Es |
|
|
|
|
PV |
|
|
|
AO |
|
IVC |
|
Fig. 4.26 Before dissecting the lymph nodes along the upper border of the pancreas, the Octopus retractor must be repositioned deeper to retract the caudate lobe of the liver and spread wide the posterior wall of the omental bursa. First, the range of dissection of the retroperitoneum is determined, as done in distal gastrectomy (Chap. 3), and its upper margin is incised (a). The retroperitoneum of
the posterior wall of the omental bursa turns over at the right border of the esophagus and continues as the posterior leaf of the lesser omentum, which was dissected in an earlier step. Therefore, by extending the upper limit incision of the retroperitoneum to the area in which it turns over, we can dissect the peritoneum of the right border of the esophagus continuously (b)
4 Total Gastrectomy |
115 |
|
|
Post. trunk of vagus n.
Divided peritoneum of |
|
post. wall of omental bursa |
3 |
1
7
9 11P
8a
Gastropancreatic lig.
L gastric v.
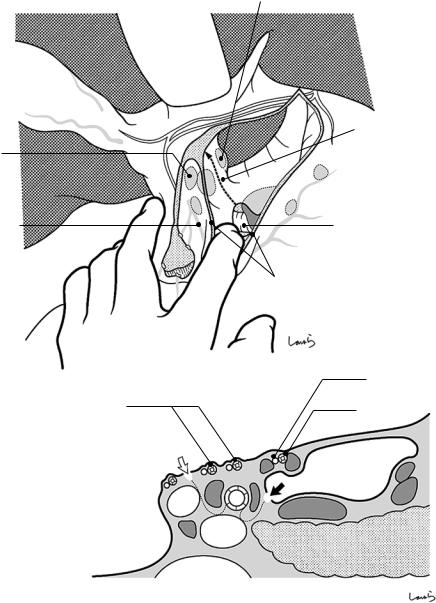
Fig. 4.27 The lower limit incision of the retroperitoneum proceeds along the upper border of the pancreas until the tail of the pancreas is reached. The first or second assistant firmly pulls the pancreas caudally to apply tension to the
retroperitoneum. If the left gastric vein (coronary vein) is identified at this point as it crosses the front of the common hepatic artery or splenic artery, it should be ligated and divided
116 |
4 Total Gastrectomy |
|
|
a
b
Common hepatic a.
L gastric v.
Lesser omentum
a
Omental |
burs |
|
8a
PHA
B
PV
Post. gastric a.
Adipose tissue including No.11d LNs
L gastric a. wrapped in nerve bundle
7
9
Fig. 4.28 Proceeding toward the root of the left gastric artery, the No. 8a lymph nodes along the common hepatic artery are dissected. The same procedure should be followed as described for distal gastrectomy (Fig. 3.39). The nerve bundle surrounding the artery may be preserved for prophylactic lymphadenectomy. But when lymph node
metastasis is suspected, the nerve bundle should be removed and therefore dissection should be carried out in a slightly deeper layer. The left gastric vein is ligated and divided as soon as it is identified during dissection (a). Cross section of the dissection procedure (b)
4 Total Gastrectomy |
117 |
|
|
L gastric v. (ligated)
Root of
L gastric a.
L gastric v. (root)
8a |
|
|
No.9 |
No.11p |
Adipose tissue |
|
|
|
7 |
|
including No.11d |
|
|
LNs |
7
Splenic a.
Celiac plexus
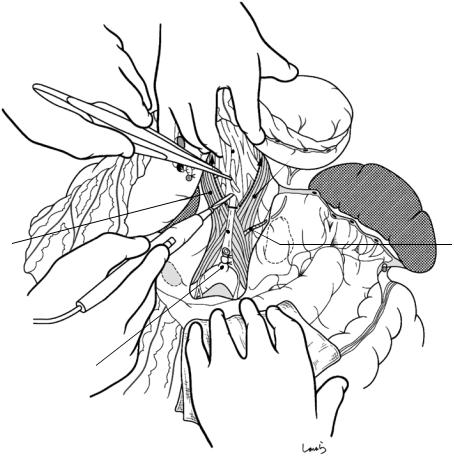
Fig. 4.29 The No. 9 and No. 11p lymph nodes are dissected by proceeding with peri-arterial dissection extending from the celiac artery to the splenic artery. The dissection continues to the vicinity of the origin of the posterior gastric artery. Between the common hepatic artery and the splenic artery is a band-like nerve bundle connecting the celiac plexus and the superior mesenteric
plexus. When metastasis to the No. 9 lymph nodes is suspected, the layer in which the arterial wall is exposed should be dissected with electrocautery and resected along with the nerve bundle. It should be noted that the root of the splenic artery may be excessively twisted to the right, to such an extent that it can be mistaken for an enlarged lymph node

118 |
4 Total Gastrectomy |
|
|
a |
L gastric a. (ligated) |
|
8a |
|
|
7 |
|
7 |
9 11p |
Post. gastric a. |
|
|
(ligated) |
Post. gastric a. (root)
Celiac br. of vagus n.
L gastric a. (root)
R crus of diaphragm
b |
LGA |
Post. gastric a.
CHA
Caudal panc. a.
Dorsal panc. a. |
Great panc. a. |
Fig. 4.30 After arising from the celiac trunk, the splenic artery travels curving slightly to the right until it reaches the upper border of the pancreas, from where it undulates twice while maintaining almost the same thickness before entering the splenic hilum (b). It usually gives off the dorsal pancreatic artery before reaching the upper border of the pancreas, the posterior gastric artery from the first peak, and the great and caudal pancreatic arteries from the last two troughs, although variations are common and
some branches may even be absent. For the final step in No. 9 lymphadenectomy, the root of the posterior gastric artery is exposed, ligated, and divided, and then ligation and division of the left gastric vessels follows. Also, the loose connective tissue inside the gastropancreatic fold is dissected toward the cardia of the stomach at the layer where the diaphragmatic crura are exposed (a). In parallel, the left leaf of the gastropancreatic fold (small arrow in Fig. 4.31a) is also incised
4 Total Gastrectomy |
119 |
|
|
Post. trunk of vagus n. (divided)
Fig. 4.31 The Octopus retractor, which has been applied deeply to retract the caudate lobe, is repositioned close to the esophageal hiatus to push away the lateral segment of the liver that is overlying this area. With the surgeon’s left index finger placed behind the abdominal esophagus and
Ant. trunk of vagus n.
L inf. phrenic a.
the cardiac part being pulled caudally, the esophageal wall is trimmed. After identifying the boundary with the esophageal muscle layer, the vagus nerve and other cord- like structures are separated with right angle forceps and divided with electrocautery
120 |
4 Total Gastrectomy |
|
|
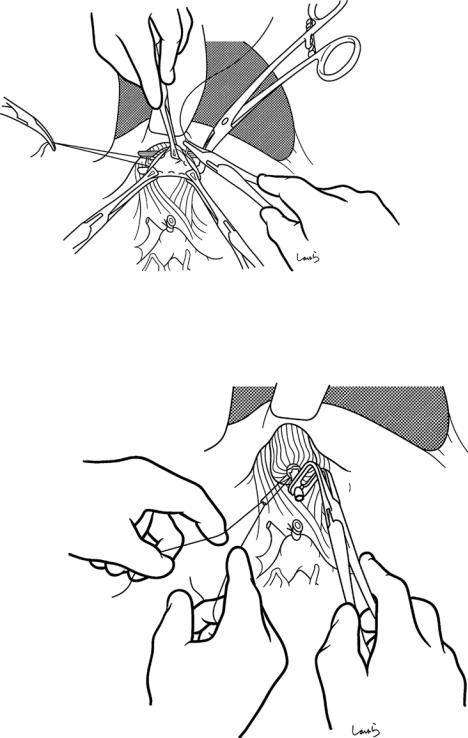
Fig. 4.32 The surgeon’s left index finger is flexed like a hook and placed under the esophagogastric junction to stretch the abdominal esophagus. Starting from the dissection edge of the peritoneum on the diaphragmatic side, the thin membrane surrounding the esophagus is divided with slightly opened Cooper scissors. A surprisingly long
“neck” can be obtained this way. Although this is a safe procedure, inadvertently damaging the muscular layer necessitates an otherwise unnecessary advancement of the dissection orally and provides only a limited margin for anastomosis, so this should be done to a moderate extent only
4 Total Gastrectomy |
121 |
|
|
Drawstring purse clamp
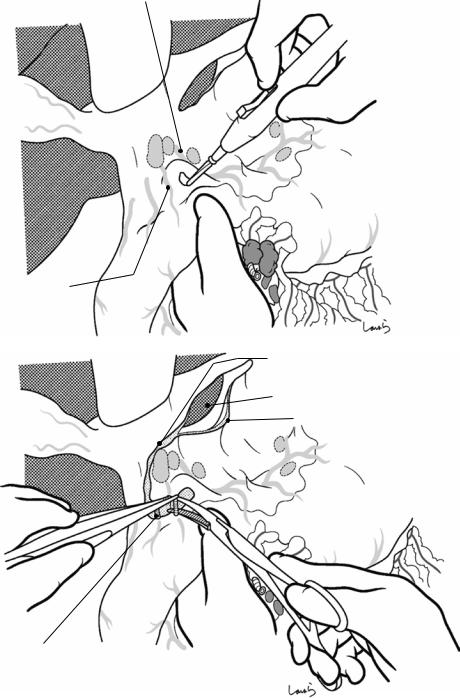
Fig. 4.33 A purse-string instrument is applied and a 2-0 nylon suture with straight needles at both ends is passed
122 |
4 Total Gastrectomy |
|
|
Stump clamp
Esophageal
clamp
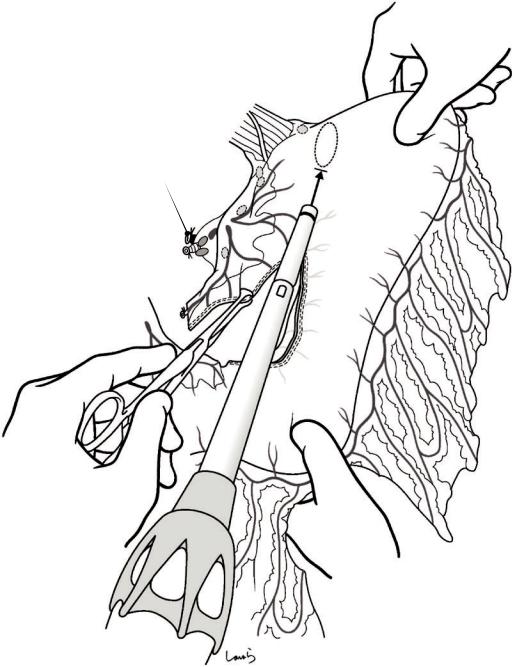
Fig. 4.34 After placing an esophageal clamp 2–3 cm orally from the purse-string instrument and a stump clamp on the anal side of the instrument while pulling the stomach caudally, the esophagus is transected with Cooper scissors along the instrument. If the transection line is too
close to the instrument, the esophageal stump will fall into the instrument immediately after transection. An appropriate margin is one that is almost equal in width to that of the blade of the Cooper scissors. The specimen is now ready to be excised unless the spleen is also to be removed
4 Total Gastrectomy |
123 |
|
|
Fig. 4.35 The purse-string instrument is removed and the esophageal stump, including the mucosal and muscular layers, is grasped with three pairs of intestinal grasping forceps. The second assistant should be ready with a suction tube in case of gastric juice leakage after the instru-
Fig. 4.36 With two pairs of intestinal grasping forceps held by the first assistant and one held by the surgeon, the esophageal opening is expanded to form a triangle into which the anvil of a 25-mm circular stapler is inserted. When the purse-string suture is tied, the first assistant should hold the anvil shaft with right angle forceps to prevent the purse portion from sliding upward
ment is opened. If a purse-string suture is placed on the esophageal mucosa on the other side, that part should be cut as small as possible and removed. An additional three or four interrupted sutures are placed slightly to the outer side of the existing suture for reinforcement
124 |
|
|
4 Total Gastrectomy |
|
|
|
|
|
|
Post. gastric a. (root) |
|
|
|
Adipose tissue |
|
|
|
including No.11d |
Omental bursa |
|
|
LNs |
Peritoneum |
Esophagus |
|
L adrenal gland |
|
|
|
L gastric a. (root)  Splenic a.
Pancreas |
tail |
|
Stomach |
wall) |
|
|
(posterior |
|
Post. gastric a. (ligated)
Esophagus stump
L gastric a. & v. (ligated)
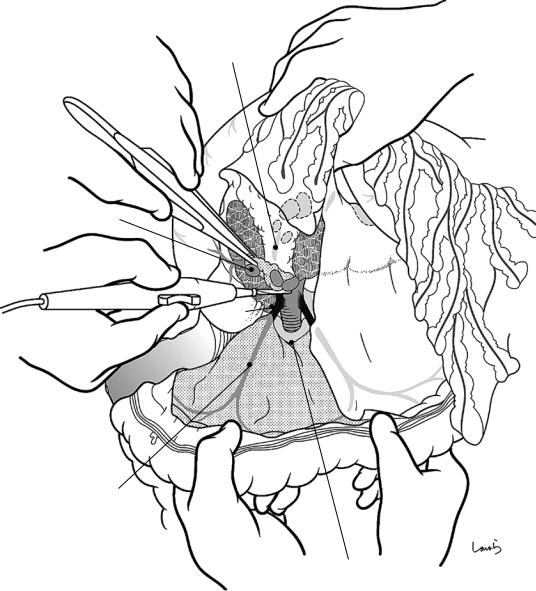
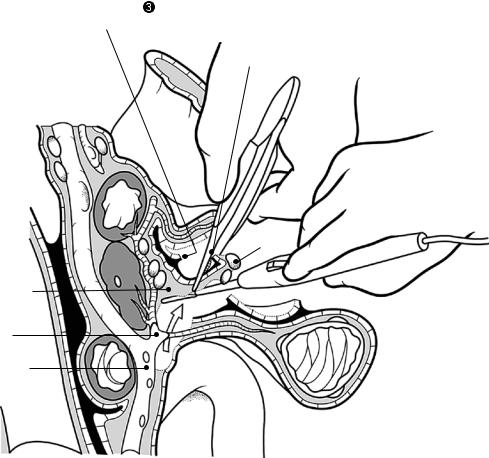
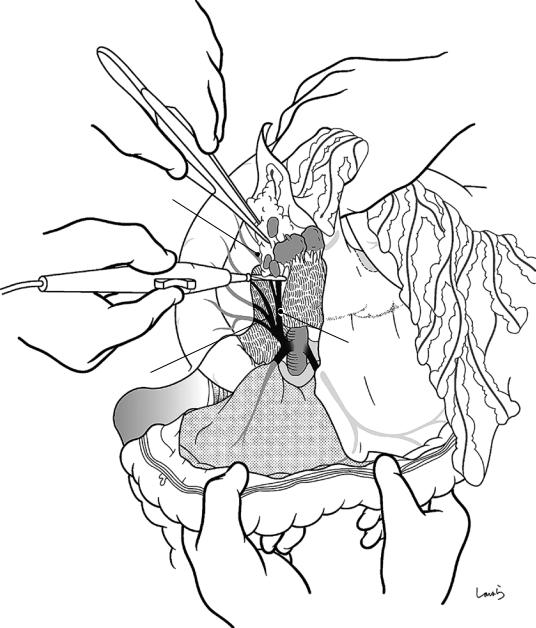
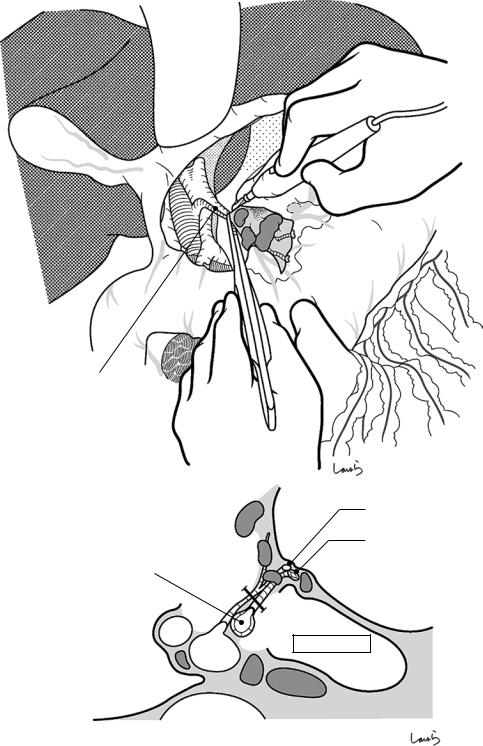
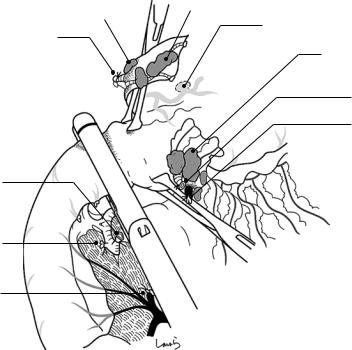
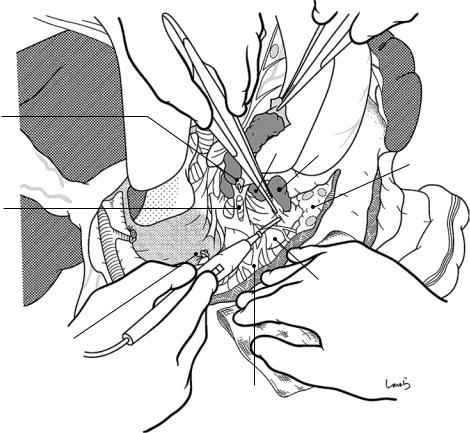
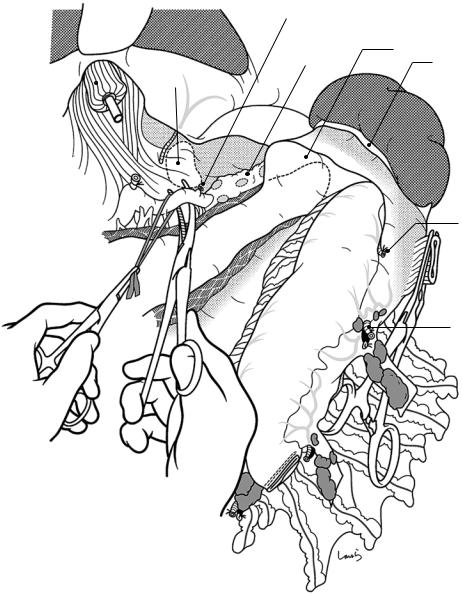
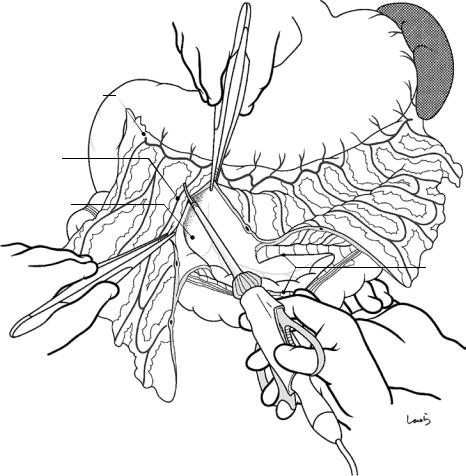
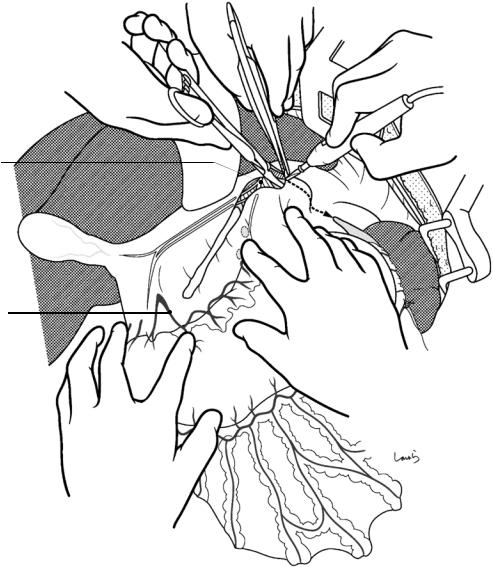
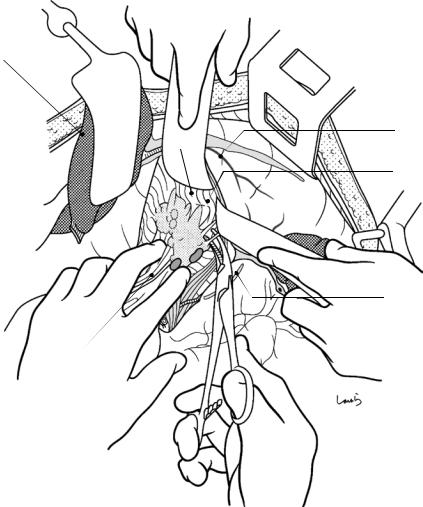
Fig. 4.37 We now move on to dissection of the No. 11 lymph nodes. After transection of the esophagus, the specimen (stomach and spleen) is barely connected to the pancreatic tail by the splenic vessels, and therefore, it can be turned over and drawn out of the wound, as shown. The
splenic artery is ligated and divided proximal to the stump of the root of the posterior gastric artery. The suture thread on the resection side is kept long enough so that it can later be pulled and grasped with mosquito forceps
4 Total Gastrectomy |
125 |
|
|
Adipose tissue including No.11d
Splenic a. LNs
Great panc. a.
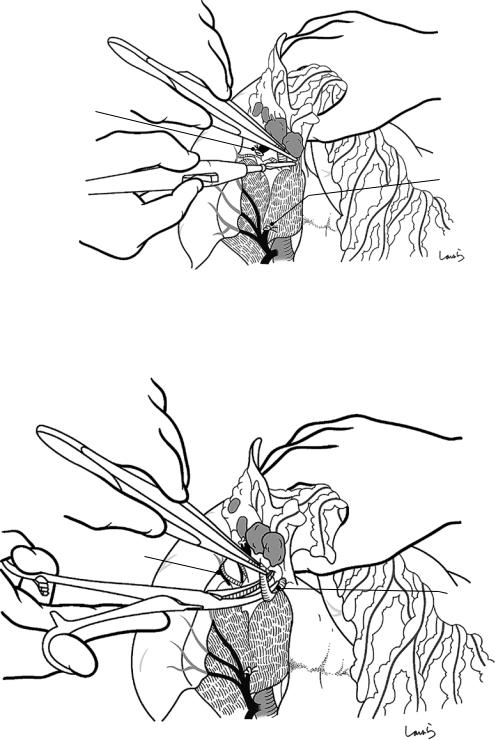
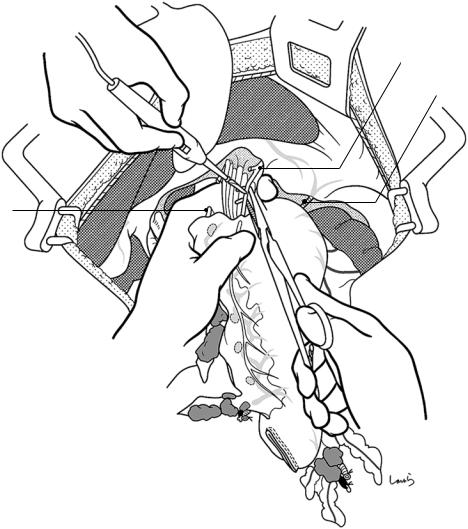
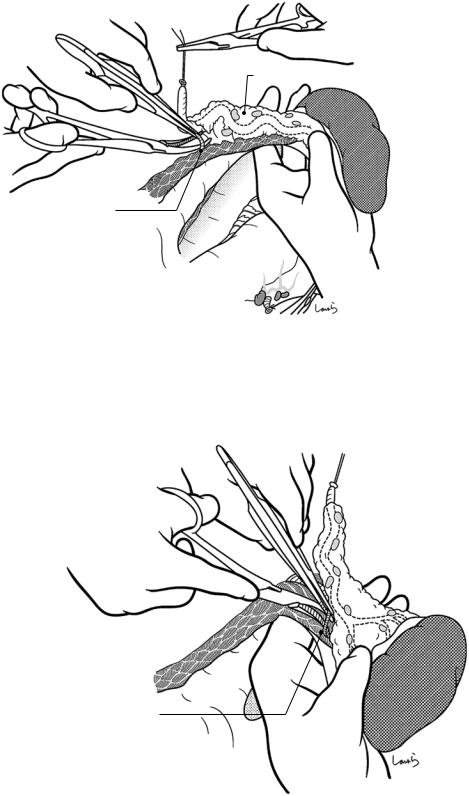
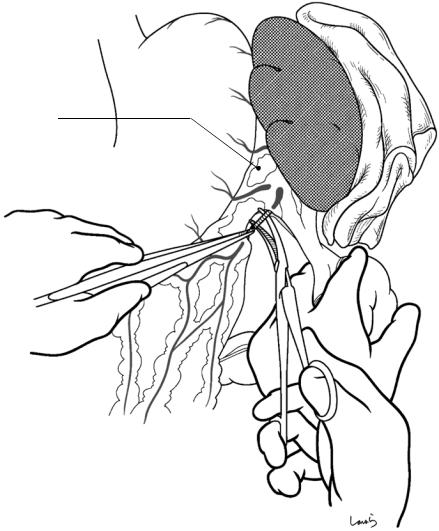
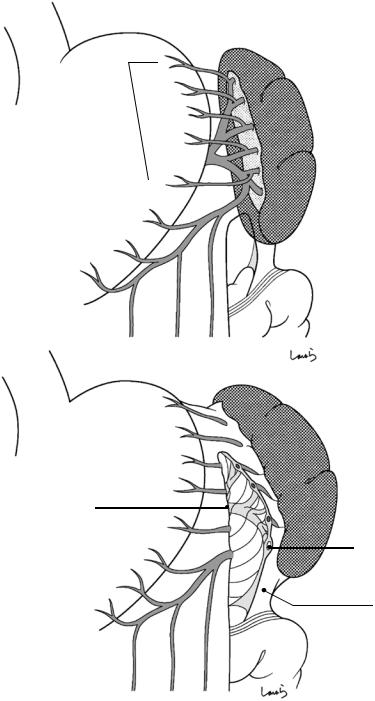
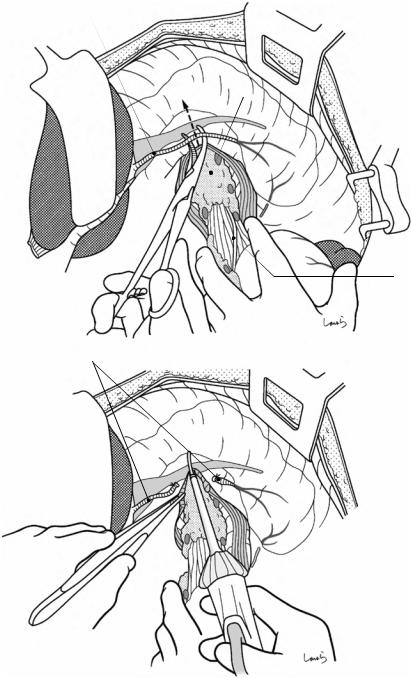
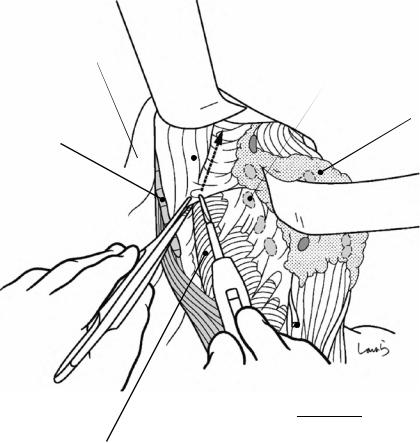
Fig. 4.38 The first assistant holds the spleen and pancreas and twists them so that the upper border of the pancreas can be seen from the front. The surgeon dissects the No. 11 lymph nodes by removing the fatty connective tissue attached to the splenic artery, with the lymph nodes included, as cleanly as possible. A pair of thin-tipped forceps, such as Kelly pediatric forceps, is inserted between
Fig. 4.39 The fatty connective tissue becomes wider as it approaches the splenic hilum, extending from the anterior surface of the pancreatic tail toward its lower border. If the caudal pancreatic artery is encountered on the way, it should be ligated and divided. Among the branches of the splenic artery leading to the pancreas, these are the two major vessels we need to ligate. If other small venous branches are
identified, we should
also ligate and divide Caudal panc. a. them, even though this is
a somewhat troublesome procedure
the pancreas and fat tissue to isolate a dissection layer, and the layer is dissected with electrocautery. If the splenic artery was divided proximal to the posterior gastric artery, the dorsal pancreatic artery is likely to be preserved. In this case, the first vessel encountered in this dissection procedure is the great pancreatic artery, which should be ligated and divided as soon as it is identified

126 |
4 Total Gastrectomy |
|
|
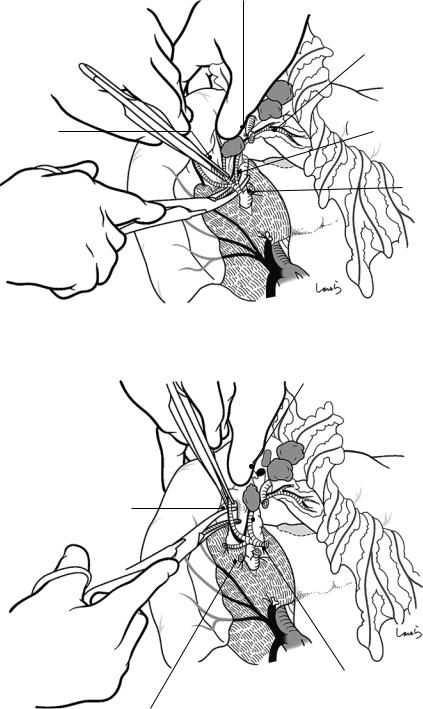
Splenic v.
Splenic a.
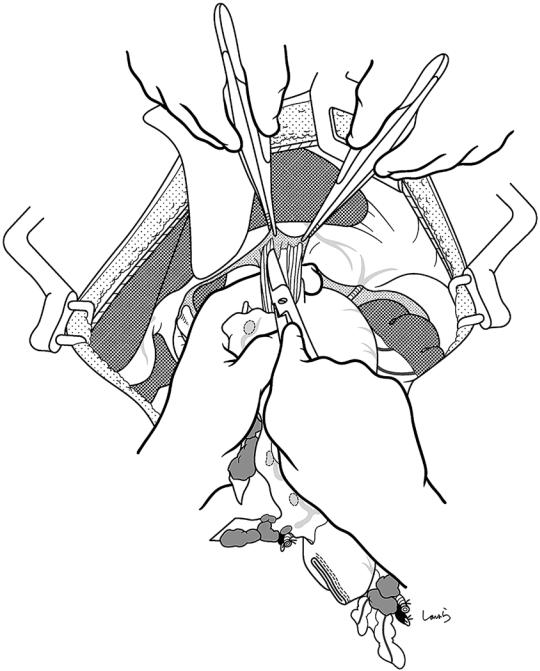
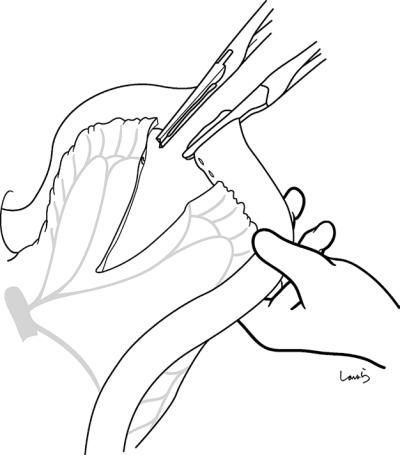
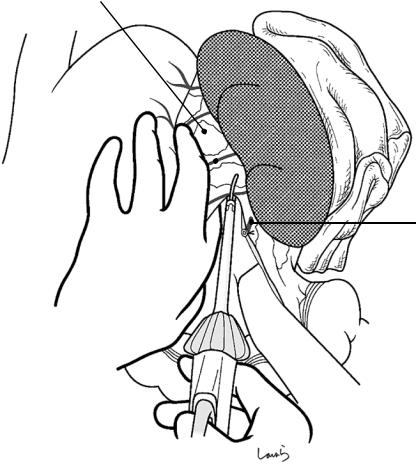
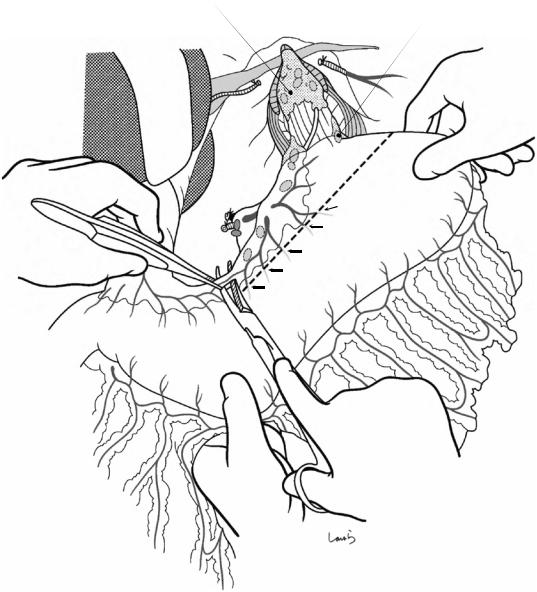
Fig. 4.40 Finally, the splenic vein is ligated and divided close to the pancreatic tail and the specimen is excised. The splenic vein should be preserved as long as possible to prevent congestion of the pancreas
4 Total Gastrectomy |
127 |
|
|
Stump clamp
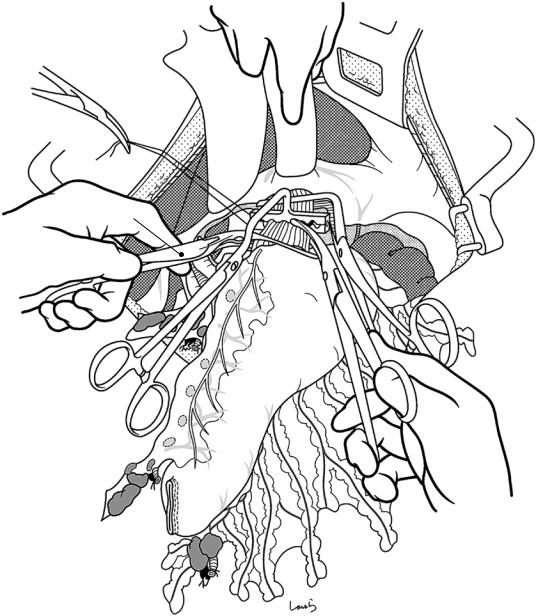
Fig. 4.41 For Roux-en-Y reconstruction, the transection line is determined approximately 20 cm distal to the ligament of Treitz, which is far enough away from the root of the mesojejunum (so that the jejunum can be lifted as high as possible) and where the space between blood vessels is as wide as possible. After a single pair of the marginal artery and vein is ligated and divided and the mesojeju-
num is incised, the straight arteries and veins within the range 1 cm proximal and 4 cm distal to the planned transection line are ligated and divided. An intestinal clamp and a stump clamp are placed on the proximal and distal sides of the planned transection line, respectively, and the intestine is transected along the intestinal clamp
128 |
|
4 Total Gastrectomy |
|
|
|
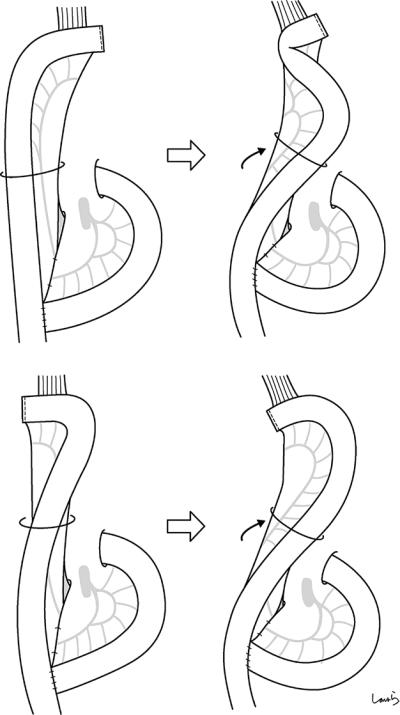
Fig. 4.42 An opening is |
a |
b |
made on the transverse |
|
|
mesocolon to the left of |
|
|
the middle colic vessels |
|
|
and the jejunum is lifted |
|
|
via the retrocolic route. |
|
|
If the spleen is |
|
|
preserved, it is advisable |
|
|
to have the blind end of |
|
|
the jejunum facing to the |
|
|
left to avoid torsion of |
|
|
the mesentery (a). If the |
|
|
spleen has been |
|
|
removed, the left colic |
|
|
flexure may be drawn |
|
|
into the large space |
|
|
formed under the left |
|
|
diaphragm, causing |
|
|
torsion of the Roux-limb |
|
|
and its bending at the |
|
|
anastomosis (b), and |
|
|
therefore, the blind |
|
|
jejunal end should be |
|
|
made facing to the right |
|
|
to prevent this torsion (c |
|
|
and d) |
|
|
|
c |
d |
4 Total Gastrectomy |
129 |
|
|
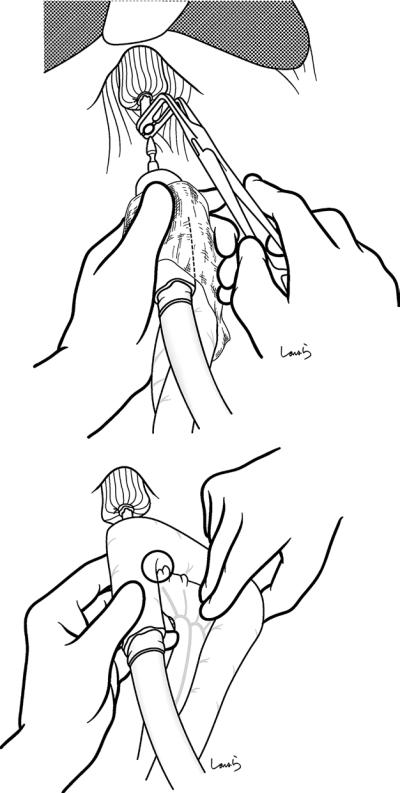
Fig. 4.43 The clamp on |
a |
the Roux-limb stump is |
|
removed and the stump |
|
is fully dilated using an |
|
anastomosing intestinal |
|
clamp. The body of the |
|
circular stapler is |
|
carefully inserted into |
|
the stump to avoid |
|
tearing the intestinal |
|
wall and is then |
|
advanced 5–6 cm. With |
|
the intestine grasped by |
|
hand and using gauze to |
|
prevent slippage, the |
|
center rod is pulled out |
|
on the antimesenteric |
|
side, moved toward the |
|
esophageal stump, and |
|
then inserted firmly into |
|
the anvil shaft (a). The |
|
stapler is tightened while |
|
confirming that there is |
|
no intestinal torsion or |
|
inclusion of other tissue. |
|
Before tightening the |
|
stapler completely, the |
|
mesentery is expanded |
|
once to make sure that |
|
the intestinal wall on the |
|
medial side (circled area |
|
in b) is not compressed. |
|
Note that excessively |
|
pulling the jejunum |
|
while tightening the |
b |
stapler will result in a |
|
narrow anastomosis. |
|
After firing, the body of |
|
the stapler is pulled out |
|
gently so as not to apply |
|
tension to the |
|
anastomosis |
|

130
Fig. 4.44 The stump is trimmed down with a linear stapler approximately 3 cm from the anastomosis, sparing one or two straight vessels. After completion of the anastomosis, a nasogastric tube is inserted up to about 15 cm distal from the anastomosis. This tube should be removed the following morning
Fig. 4.45 An anastomosing intestinal clamp is applied to the proximal jejunum and the Y-limb is end-to-side anastomosed with the jejunum 40–50 cm distal from the esophagojejunostomy site. Repair of the mesojejunum and fixation between the transverse mesocolon and the Roux-limb should also be performed
4 Total Gastrectomy
4 Total Gastrectomy |
131 |
|
|
Fig. 4.46 After washing the abdominal cavity, an 8-mm duple drain is inserted into the subphrenic space via the left abdominal wall and a second such drain is inserted
into the foramen of Winslow via the right abdominal wall. The operation is completed by closing the abdominal wall, suturing in three layers
Ivor Lewis Esophagectomy: |
5 |
A Curative Operation |
for Esophageal Cancer
Abstract |
|
|
5.1\ Part I: Abdominal |
|
|
|
|
This chapter describes Ivor Lewis esophagec- |
Manipulation |
||
tomy for treatment of middle to lower esophageal cancer. The operation consists of two parts: abdominal manipulation is carried out first to construct the gastric conduit; then after thoracotomy, esophagectomy is followed by esophagogastrostomy. Standard operation time is 5 h.
Keywords
Ivor Lewis esophagectomy · Esophageal cancer · Gastric conduit · Thoracotomy Abdominal manipulation
Fig. 5.1 The patient is placed in the supine position and the operative procedure starts with abdominal dissection and gastric conduit construction. The surgeon stands on the right side of the patient and makes an upper abdominal midline incision extending from the xiphoid process to the umbilicus. The peritoneum is incised to the left of the round ligament of the liver to open the abdomen. A wound retractor is then placed and exploration of abdominal organs commences. A rib retractor is placed on the left side and the liver is retracted cranially with an Octopus retractor to secure visualization of the operative field
© Springer Nature Singapore Pte Ltd. 2020 |
133 |
H. Shinohara, Illustrated Abdominal Surgery, https://doi.org/10.1007/978-981-15-1796-9_5 |
|
134 |
5 Ivor Lewis Esophagectomy: A Curative Operation for Esophageal Cancer |
|
|
Interrupted gastric arcade
Attachment to transverse colon Greater omentum
Arcade of epiploic a.
Greater omentum
to be added to gastric conduit
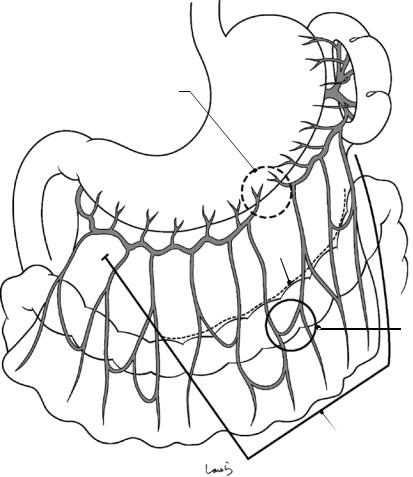
Fig. 5.2 The greater curvature of the stomach is examined to determine the presence or absence of the gastric arcade, which is formed by anastomoses between the left and right gastroepiploic arteries and veins. As shown,
when a clear arcade cannot be identified (about 10% of all cases), we need to use the gastroepiploic arcade (circled) and prepare a gastric conduit attached by a larger amount of greater omentum
5.1 Part I: Abdominal Manipulation |
135 |
|
|
Root of R gastroepiploic a. & v.
Epiploic a. & v.
R border of omental bursa
Greater omentum (divided)
Ultrasonically activated device
Fig. 5.3 After the omental bursa is entered from the midpoint of the greater curvature of the stomach, the omental dissection proceeds toward the infrapyloric area. The gastroepiploic arteries and veins must be ligated or coagulated with an ultrasonically activated device (USAD) before crossing these vessels. The omental dissection is then advanced across the right border of the omental bursa, at which point the peritoneum is penetrated, up to
the vicinity of the root of the right gastroepiploic artery and vein. The right gastroepiploic vessels are the lifelines for the gastric conduit. To avoid damaging these vessels from excessive tension during the subsequent lifting procedure, the omental dissection must be stopped far enough away from the vessels to preserve the supporting perivascular tissue
136 |
5 Ivor Lewis Esophagectomy: A Curative Operation for Esophageal Cancer |
|
|
Gastrosplenic lig.
L gastroepiploic a. & v.
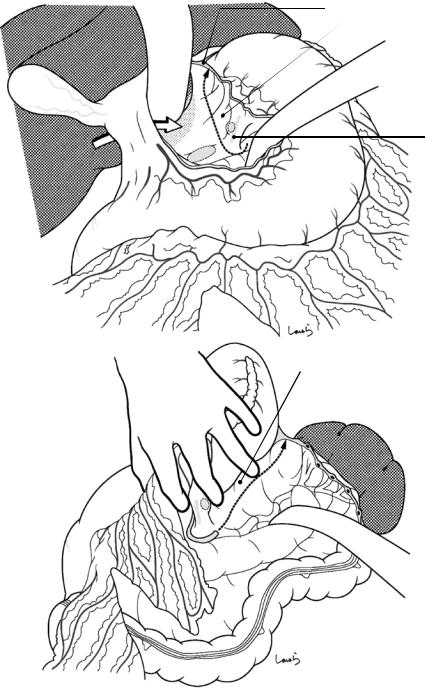
Fig. 5.4 The operative field is then shifted to the left and the omental dissection is continued, but this time toward the left colic flexure. When the dissection has approached the splenocolic ligament, a surgical laparotomy sponge is placed behind the spleen to bring the gastrosplenic ligament to a shallower level. The omental dissection is con-
Surgical laparotomy sponge
 Splenocolic lig.
L colic flexure
tinued toward the lower pole of the spleen until the left gastroepiploic artery and vein are encountered. These vessels are then ligated and divided. In overweight patients, there is particularly thickened fatty connective tissue in this area
5.1 Part I: Abdominal Manipulation |
137 |
|
|
a
Short gastric
L gastroepiploic a. 
Gastric wall
Epiploic a.
b
Gastrosplenic lig. (divided)
L border of omental bursa 
L gastroepiploic a. (root)
Splenocolic lig.
Fig. 5.5 The course of the short gastric arteries is highly variable in relation to the branching pattern of the splenic artery at the hilum of the spleen. The splenic artery usually divides into the superior and inferior branches at a distance slightly away from the hilum, and each of the branches then gives off several further branches to the spleen. In the most common type, the lowermost branch
gives off the left gastroepiploic artery, while the other upper branches give rise to short gastric arteries (a). We should keep this basic pattern in mind when carrying out the subsequent procedure. There are usually about five short gastric arteries. After dividing the gastrosplenic ligament, the left border of the omental bursa is exposed (b)
138 |
5 Ivor Lewis Esophagectomy: A Curative Operation for Esophageal Cancer |
|
|
Gastrosplenic lig.
Short gastric a.
L gastroepiploic a. (root)
Fig. 5.6 With the gastrosplenic ligament held between the left index and middle fingers and stretched, the short gastric arteries are ligated or coagulated with the USAD and dissected on the spleen side. Considering vasculariza-
tion of the gastric conduit, it would be safer to preserve as much fatty connective tissue on the greater curvature as possible, although dissecting the tissue too close to the spleen carries the risk of injuring the spleen

5.1 Part I: Abdominal Manipulation |
139 |
|
|
Gastrosplenic lig.
L border of omental bursa
L gastroepiploic a.
s Pancrea
Fig. 5.7 After approximately the lower two-thirds of the short gastric arteries have been dissected, the surgical laparotomy sponge placed behind the spleen is removed. This causes the spleen to sink and the remaining upper one-third of the gastrosplenic ligament is stretched by the weight of the spleen, making it easier to dissect the remaining one or two short gastric arteries. We must take
care here because the gastrosplenic ligament gets narrower as it approaches the upper pole of the spleen, with the short gastric arteries also getting shorter and thinner. After dissecting the uppermost short gastric artery, the dissection continues along the fundus of the stomach while cutting the retroperitoneum, up to the vicinity of the left border of the abdominal esophagus
140 |
5 Ivor Lewis Esophagectomy: A Curative Operation for Esophageal Cancer |
|
|
Ant. vagal trunk
*
Lesser omentum
L gastric a. & v.
Fig. 5.8 We then move on to the lesser curvature side. The stomach is pulled caudally to stretch the lesser omentum and identify the right gastric artery and vein, which are to be preserved. Starting far enough away from the root of these vessels, the lesser omentum is divided toward the right border of the abdominal esophagus using electro-
cautery. When the esophagus is reached, the dissection is continued across the peritoneum in front of the esophagus but quite close to the diaphragm until it connects with the retroperitoneal incision line (asterisk) extending from the fundus of the stomach
5.1 Part I: Abdominal Manipulation |
141 |
|
|
a
Incision in lesser omentum
R layer of gastropancreatic lig.
L gastric v.
L layer gastropancreaticlig
b
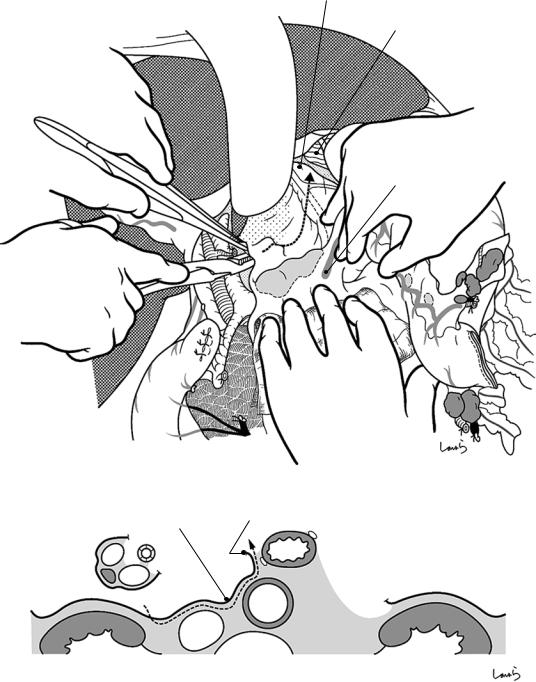
Fig. 5.9 The Octopus retractor is then repositioned deeper to retract the caudate lobe of the liver and spread wide the posterior wall of the omental bursa. With the stomach being pulled to the left to spread the gastropancreatic fold, a V-shape retroperitoneal incision is made, the apex of which is the left gastric artery/vein. The right part of the V-shape incision is advanced superiorly above
the crus of the diaphragm that forms the right margin of the aortic hiatus until it connects with the lesser omental incision (a), while the left part the incision is advanced toward the upper end of the gastrosplenic ligament or the left upper corner of the omental bursa. When the posterior gastric artery is encountered, it should be ligated and divided (b)
142 |
5 Ivor Lewis Esophagectomy: A Curative Operation for Esophageal Cancer |
|
|
L gastric v. (cut)
Post. gastric a.
L gastric v. (root)
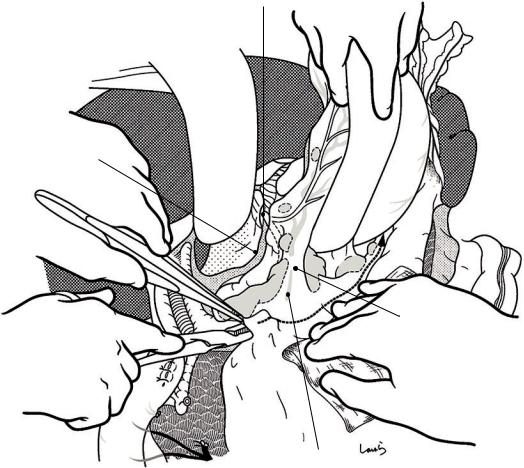
Fig. 5.10 The fatty connective tissue surrounding the left gastric artery and vein containing the No. 7 lymph nodes is dissected toward the root of the vessels using electrocautery. The shield formed by nerves extending from the celiac plexus and surrounding the left gastric artery should
be scooped with dissection forceps and dissected with electrocautery. The exposed roots of the left gastric vessels are ligated and divided. The artery should be double-ligated
5.1 Part I: Abdominal Manipulation |
143 |
|
|
Loose connective tissue in gastropancreatic lig.
L crus of diaphragm
L gastric a. (cut) 
L inf.
R crus of phrenic a. diaphragm
Celiac br. of vagus n.
L gastric a. (root)
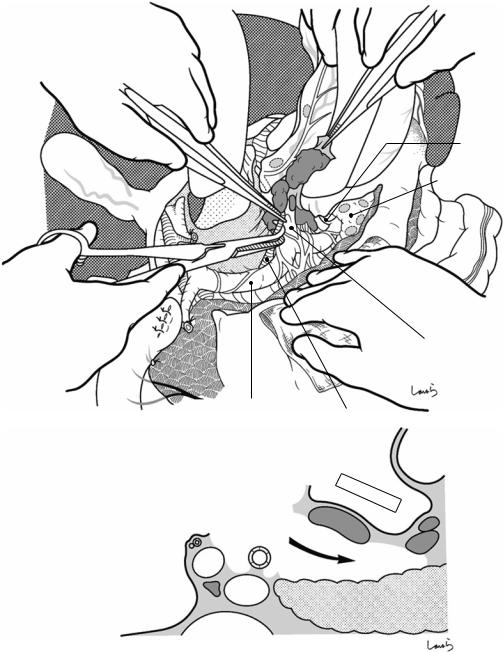
Fig. 5.11 The loose connective tissue intervening between the anterior aspect of the crus of diaphragm and the cardiac portion of the stomach is dissected toward the esophageal hiatus. This loose connective tissue corresponds to the “content” of the gastropancreatic fold and appears like a space covered by a spider web (and also resembles the “retrorectal space”). We should not hesitate when dissecting this tissue; do not be too careful in known avascular areas like this if you do not want to be underestimated! In front of the crus of the diaphragm is the
abdominal branch of the vagus nerve coursing longitudinally toward the celiac plexus. This nerve can be dissected at an appropriate point because it cannot be preserved anyway; the main vagal trunk will be dissected later during thoracic manipulation
As the connective tissue containing the No. 1 and 2 lymph nodes is shaved off with electrocautery to expose the muscle fibers of the bilateral crura of the diaphragm, the contour of the esophageal hiatus emerges gradually, appearing like the collar of a kimono
144 |
5 Ivor Lewis Esophagectomy: A Curative Operation for Esophageal Cancer |
|
|
a |
No.110 LN |
|
|
No.111 LN |
|
R crus
ICB  *
*
Sup. phrenicoesophageal  membrane
Int. phrenicoesophageal membrane
b
Esophageal muscular layer
Adventitia Pleura
 Diaphragm
 Peritoneum
 L crus
Stomach muscle layer
Pericardium
R parietal pleura
Azygos vein
Descending thoracic aorta
Thoracic duct

5.1 Part I: Abdominal Manipulation |
145 |
|
|
|
|
|
|
|
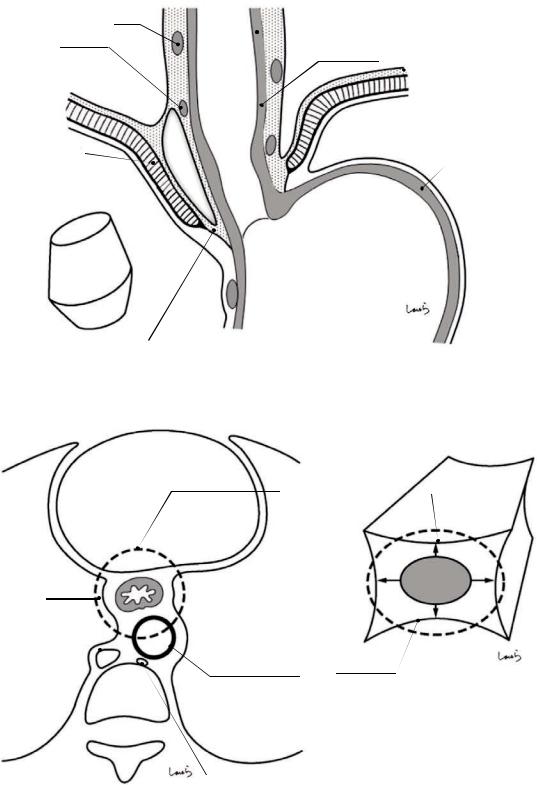
Fig. 5.12 Dissection of the inferior mediastinum from the esophageal hiatus (described in Figs. 5.12–5.16): For thoracic manipulation via a thoracotomy through the fourth intercostal space, which is the recommended approach to superior mediastinal dissection, it is reasonable to complete as much inferior mediastinal dissection as possible from the abdominal side. But first let us review the anatomy of the esophageal hiatus, the entrance to the inferior mediastinum. The diaphragmatic muscular bundle forming the esophageal hiatus consists of the right and left crura, which do not directly attach to the esophageal wall and anchor the esophagogastric junction via the fascia. This fascia serves as a suspension that allows for flexible movement of this area and is referred to as the phrenicoesophageal membrane
The phrenicoesophageal fascia is a thin membrane attached to the muscle layer of the stomach, and it is often ruptured inadvertently during manipulation around the hiatus. In the right side of the esophagogastric junction, do not be concerned about finding a space after cutting the thin membrane—you did not penetrate the thorax. This space is the infracardiac bursa (ICB) [11]. The ICB is a closed space formed by separation from the cranial part of the omental bursa in the embryo and is located on the right alongside the esophagus and on the cranial side of the diaphragmatic crus (asterisk in (a))
The basic structure of the inferior mediastinum can be considered a rectangular column surrounded by the pericardium on the upper side, the descending thoracic aorta on the lower side, and the parietal pleura on the right and left sides, through which the esophagus passes (b)
146 |
5 Ivor Lewis Esophagectomy: A Curative Operation for Esophageal Cancer |
|
|
Folded lateral segment of liver
L int. phrenic v.
Pericardium
L parietal pleura
No.110 LN 
No.111 LN 
L inf. phrenic a.
Esophagus
Fig. 5.13 When the lateral segment of the liver covers a substantial part of the esophageal hiatus and interferes with the view of the operative field, we can dissect the left triangular ligament and the coronary ligament up to the vicinity of the left hepatic vein and reposition the Octopus retractor to retract the lateral segment while folding it, and then proceed with dissection
The first assistant inserts an abdominal spatula through the esophageal hiatus to push the pericardium so that the heart can be slightly lifted upward. Another abdominal spatula is used to pull the hiatus to the left so as to widen
the inferior mediastinum. Using the left hand, the surgeon pulls the esophagus toward the abdominal cavity, scooping the connective tissue between the pericardium and the left parietal pleura with dissection forceps and dividing it with electrocautery while keeping the fatty connective tissue containing the No. 110 and 111 lymph nodes attached to the esophagus. As the dissection advances deeper, the spatula is inserted deeper so that the procedure can be performed under direct view. Note that particularly careful manipulation is needed when detaching the left wall to avoid penetrating the left pleura
5.1 Part I: Abdominal Manipulation |
147 |
|
|
|
|
a |
L inf. phrenic v. |
|
Fatty tissue containing No.110 LN
Ant. vagal trunk
b |
L inf. phrenic v. (divided) |
 L inf. phrenic a.
Fig. 5.14 After the dissection has proceeded to a certain extent, the diaphragm is incised ventrally from the esophageal hiatus. First, the left inferior phrenic vein, which runs across the upper margin of the hiatus and drains into the left hepatic vein, is scooped with a clamp, ligated, and divided (a). If bleeding occurs from the diaphragmatic muscular bundles, the USAD or the ligation/division procedure should be used because it is often difficult to achieve hemostasis with electrocautery (b). A roughly
four-finger-width opening will allow for smooth lifting of the gastric conduit attached to the greater omentum. The wider this opening of the esophageal hiatus is, the deeper we can advance the inferior mediastinal dissection. Although the dissection can go up to the bifurcation of the trachea, it is not necessary because we can adequately dissect the No. 107 lymph nodes in this area in the subsequent thoracotomy procedures
148 |
5 Ivor Lewis Esophagectomy: A Curative Operation for Esophageal Cancer |
|
|
R parietal pleura
Diaphragmatic muscle bundle (cut edge)
Descending thoracic aorta
Fig. 5.15 The esophagus is then retracted to the left using an abdominal spatula and the connective tissue between the esophagus and the right parietal pleura is dis-
No.112-ao LN
Fatty tissue containing
No.110 LN
 Esophagus
 L vagus n. (ant. trunk)
R vagus n. (post. trunk)
sected with electrocautery. Do not be concerned about damaging this pleura because the membrane will be incised later during the right thoracotomy procedures

5.1 Part I: Abdominal Manipulation |
149 |
|
|
No.110 LN
Proper esophageal a.
R parietal pleura 
 No.112-ao LN
 L vagus n.
No.111 LN
Thoracic duct
Descending thoracic aorta
Fig. 5.16 The esophagus is then retracted ventrally with the spatula, and the connective tissue between the esophagus and the descending thoracic aorta is dissected while keeping the fatty connective tissue containing the No. 112-ao thoracic para-aortic lymph nodes attached to the esophagus. Being mindful of the possible presence of the
proper esophageal artery, advance the dissection using the USAD while exposing the anterior aspect of the aorta. Do not worry about damaging the thoracic duct because it runs behind the aorta in this area. Completing this procedure marks the end of inferior mediastinal dissection
150 |
5 Ivor Lewis Esophagectomy: A Curative Operation for Esophageal Cancer |
|
|
Fatty tissue containing
No.110 LN
No.111 LN
Br. of R gastric a. entering stomach wall
Fig. 5.17 Construction of the gastric conduit: The arcade is ligated and divided ensuring that at least three to four branches of the right gastric artery entering the stomach wall remain intact. With the lesser curvature side of the stomach fully stretched, a linear stapler is applied along
the transection line extending from the point of arcade dissection and passing through the points at which the branches of the left gastric artery enter the stomach wall (arrows)
5.1 Part I: Abdominal Manipulation |
151 |
|
|
L gastric a. & v. (cut)
Fig. 5.18 The stomach is transected while securing a sufficient margin for inserting a circular stapler (dotted ellipsis). Additional interrupted seromuscular 3-0 Vicryl sutures are applied to invaginate the staple line
152 |
5 Ivor Lewis Esophagectomy: A Curative Operation for Esophageal Cancer |
|
|
Duple drain
Fig. 5.19 After washing the abdominal cavity, an 8-mm duple drain is inserted from the left abdominal wall and placed in the subphrenic space. This drain is mainly intended for removal of the pleural wash fluid draining into the abdominal cavity and is to be removed the follow-
ing day. After the gastric conduit and greater omentum are positioned properly without any torsion, the abdominal wall is closed by suturing in three layers to complete the abdominal part of the operation