

Distal Gastrectomy |
3 |
|
Abstract
In this chapter, we work through the procedure for distal gastrectomy with D1+ lymphadenectomy [5] in a step-by-step manner, with written explanations accompanied by clear, simple illustrations. We also look at two reconstruction techniques, the Roux-en-Y technique involving instrumental anastomosis and the classic Billroth-I technique involving manual suturing. Standard operation time is 2 h 30 min.
Keywords
Distal gastrectomy · D1+ lymphadenectomy · Billroth-I reconstruction · Roux-en-Y reconstruction
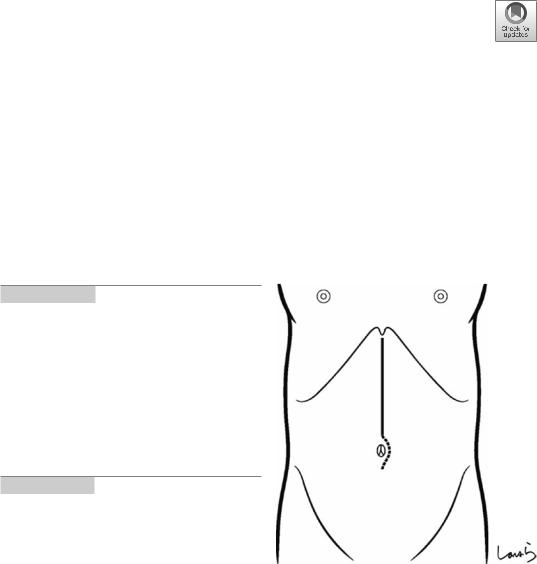
Fig. 3.1 Step 1. The operating surgeon stands on the right side of the patient and makes an upper abdominal midline incision extending from the xiphoid process to the umbilicus. The incision may be extended up to the side of the umbilicus depending on the distance between the xiphoid process and the umbilicus. If necessary, the incision is extended toward the left side of the umbilicus. The peritoneum is incised to the left of the round ligament of the liver to open the abdomen
© Springer Nature Singapore Pte Ltd. 2020 |
33 |
H. Shinohara, Illustrated Abdominal Surgery, https://doi.org/10.1007/978-981-15-1796-9_3 |
|
34 |
3 Distal Gastrectomy |
|
|
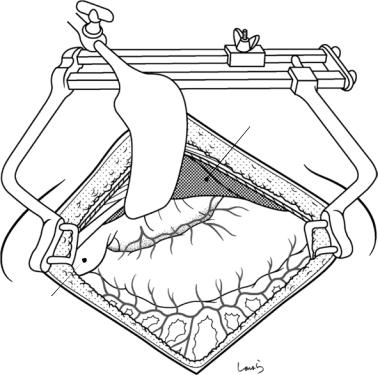
Fig. 3.2 Step 2. After placing a wound retractor, the abdominal cavity is explored including the liver, the pouch of Douglas, and other structures. The lateral segment of the liver is retracted cranially using an Octopus retractor
Gallbladder
Lateral segment
3 Distal Gastrectomy |
35 |
|
|
Stomach
Omental
bursa
Greater omentum
Transverse colon
Teniae coli
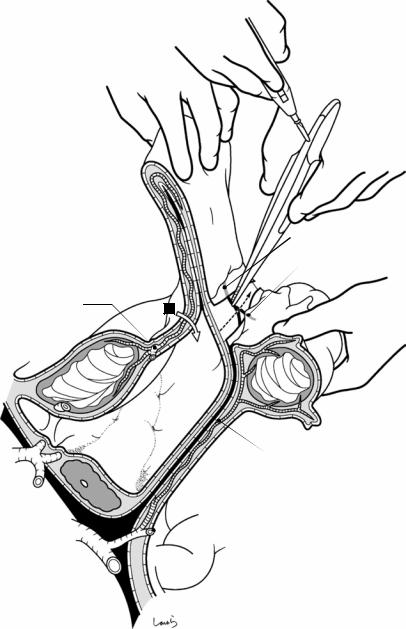
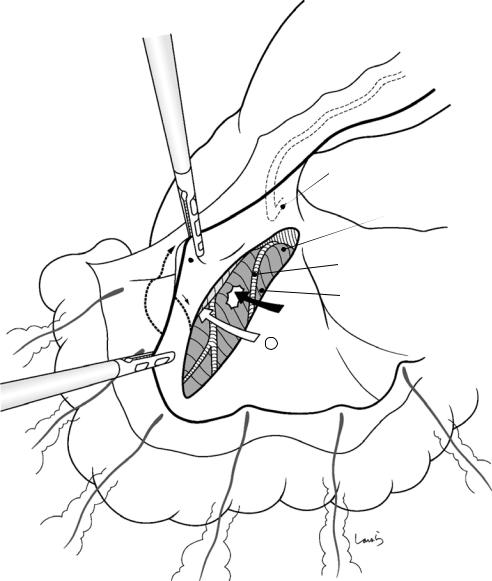
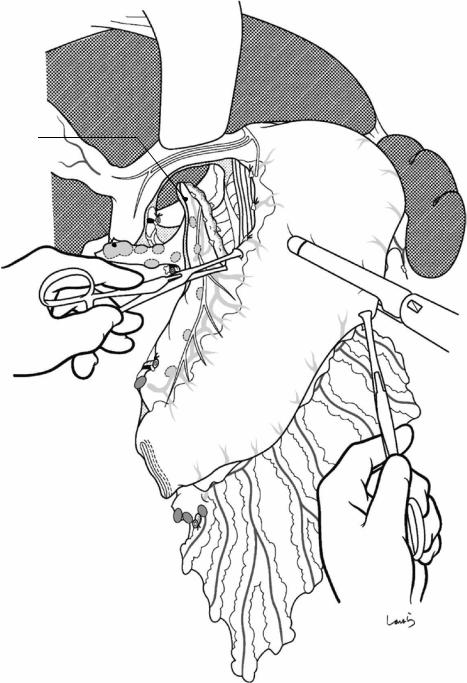
Fig. 3.3 Opening the omental bursa: Using electrocautery, the attachment of the greater omentum to the transverse colon is incised around the midpoint of the greater curvature of the stomach. The attachment line appears to consist of a single membrane, but actually two layers of
peritoneum have to be penetrated before gaining access to the omental bursa (see Fig. 3.4). In patients with a narrow bursa, it might be difficult to gain access unless the procedure is started more laterally from the left side
36 |
3 Distal Gastrectomy |
|
|
“Folded double-layered structure” formed  by fusion of two inner peritonea in contact
|
|
B |
* |
|
A |
||||
|
|
|||
|
|
|
Stomach
Omental
bursa
Transverse colon
L gastric a. 
Celiac axis |
Pancreas |
|
Dorsal mesogastrium fused with left transverse mesocolon
Common hepatic a.
Ligament of Treitz
Sup. mesenteric a.
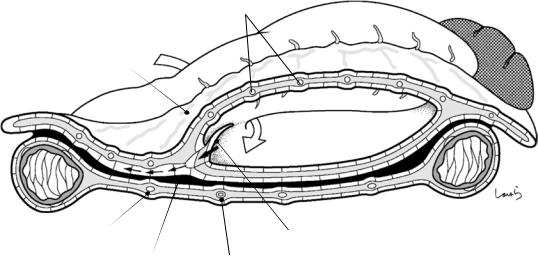
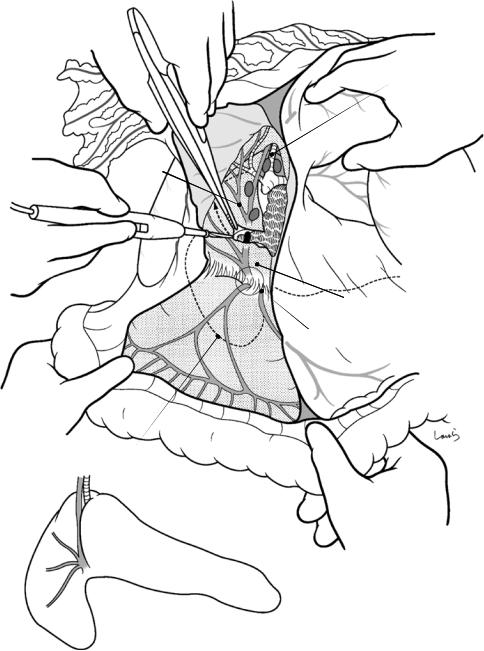
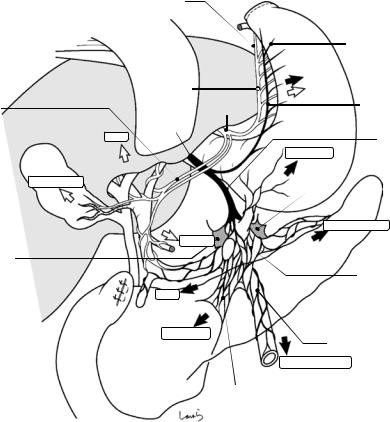
Fig. 3.4 What is the origin of this “double peritoneum”? The omental bursa is a bulge of the dorsal mesogastrium that has a “bag-like” shape, with its bottom surface collided and fused with the left transverse mesocolon and the remaining free portion, which has a “folded double-lay- ered structure” formed by fusion of two inner peritonea in contact, hanging down like an apron. So, to gain access to the omental bursa, we have to incise either between the stomach and the folded double-layered structure (A in the figure) or between the folded double-layered structure and the margin of its attachment to the transverse colon (omental tenia) (B in the figure). The latter is more suitable because the layer is thinner and less densely vascularized.
Thus, the “double peritoneum” originates from two peritonea surrounding two sides of the mesogastrium, which is essentially the mesentery of the stomach. These peritonea should not be transected both at once. The superficial layer should be incised first, close to the omental tenia, with a gentle, sliding motion of electrocautery. The incision line should be about 1 cm away from the omental tenia—spe- cifically, right above the border with the serosa of the colon (asterisk in the figure), which corresponds to Monk’s white line in the ascending and descending colon. Care must be taken during this procedure to avoid injury to some of the straight arteries entering the colon, which is pulled up, because they may form a loop under the serosa
3 Distal Gastrectomy |
37 |
|
|
Blood vessels entering omentum from greater curvature (Epiploic a.)
R gastroepiploic a. |
A |
|
Larger blood vessels in intermediate layer
Communicating branch to colon vessels
Blood vessels entering colon from mesocolon
Mid. colic a.
Fig. 3.5 With appropriate tension applied to the dissection line, the serosa of the colon will fall off together with the blood vessels entering the colon and forming a loop. Also, the tip of the electrocautery may be used as a spatula to push the blood vessels toward the colon. The dissection can usually be completed with just the electrocautery because the blood vessels entering the colon from the mesocolon and the vessels entering the greater omentum from the greater curvature are in separate layers, and the blood vessels contained in the intermediate layer of the greater omentum have already narrowed in this area. However, when there are larger blood vessels present in the intermediate layer or any communicating branches to
the colon vessels are encountered, they should be picked up with forceps and cauterized immediately. So, by extending the incision through the deep peritoneal layer as well as through the intermediate fat tissue, we can gain access to the omental bursa. The incision is then continued toward the left colic flexure
To open the omental bursa while preserving the greater omentum, it is advisable to enter between the stomach and the folded double-layered structure instead (white arrow). However, care should be taken to keep a distance of 3–4 cm from the arterial arcade to ensure removal of the No. 4 lymph nodes. Also, a number of omental arteries and veins crossing over the dissection line should be ligated while proceeding
38 |
3 Distal Gastrectomy |
|
|
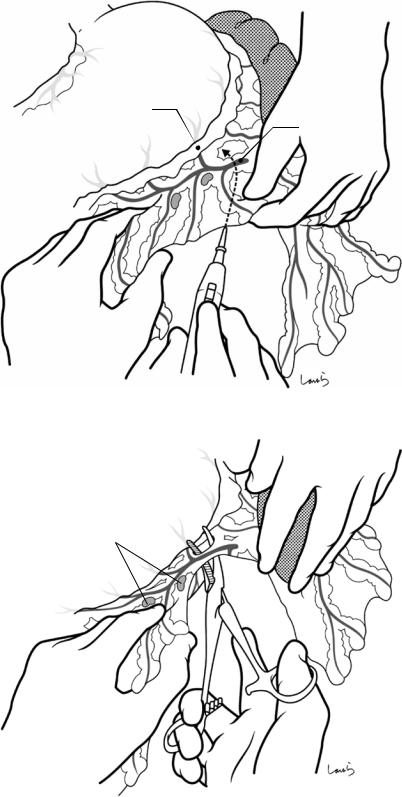
Fig. 3.6 After identifying the lower pole of the spleen, the greater omentum is divided toward the arteriovenous anastomosis of the left and right gastroepiploic arteries and veins (gastric arcade). With the greater omentum well stretched out, the omental dissection is continued by dissecting an avascular area with electrocautery while ligating and dividing larger vessels (omental arteries and veins)
Fig. 3.7 The left gastroepiploic artery and vein are ligated and divided. It is not necessary to identify these vessels up to their root in surgery because the lymph nodes around the root of the left gastroepiploic artery are classified as No. 10 station (see Fig. 3.10)
1st gastric branch
No.4sb LNs
Epiploic a. & v.
3 Distal Gastrectomy |
39 |
|
|
Short gastric a.
No.4sb LNs
L gastroepiploic a. (ligated)
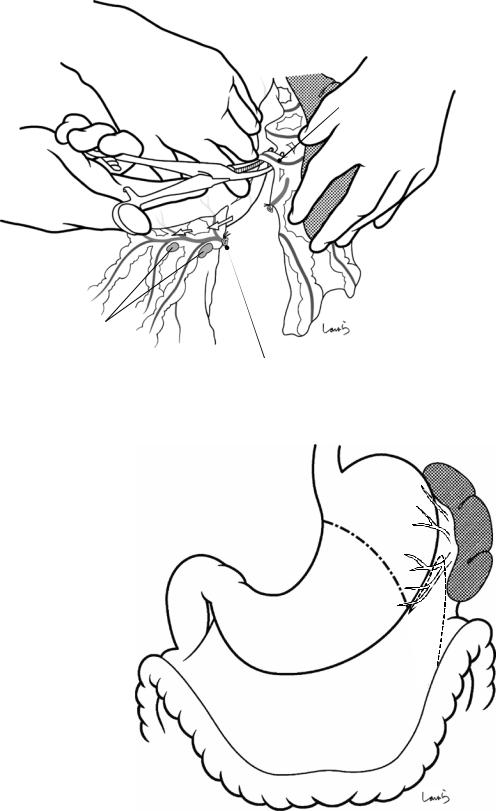
Fig. 3.8 Several branches of the left gastroepiploic artery are dissected along the gastric wall, returning to the planned transection line of the stomach. When the stom-
ach needs to be divided at a higher level, one or two short gastric arteries should be ligated and divided
Fig. 3.9 A schematic diagram is shown in the left omental dissection, as described in Figs. 3.6, 3.7, and 3.8. After completing the omental dissection on the greater curvature side, the transverse colon is placed back in the abdominal cavity
Tr ansection
line
40 |
3 Distal Gastrectomy |
|
|
R gastroepiploic a. |
4d |
|
L gastroepiploic a. (root)
4sb
10
Stomach posterior wall
L gastric a.
Caudate lobe
Pancreas
Splenic a.
Transverse |
|
|
mesocolon |
colon |
|
Transverse |
||
|
Incision line of greater omentum
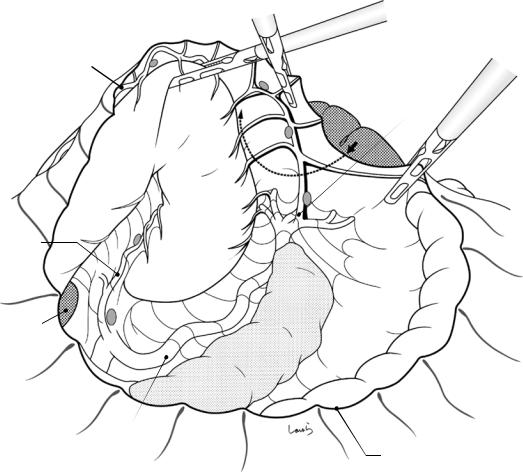
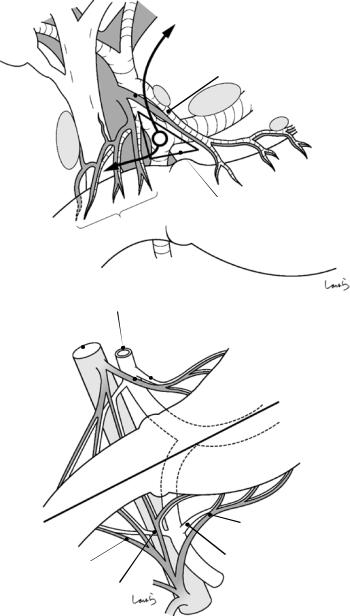
Fig. 3.10 When the greater omentum is to be preserved during laparoscopic surgery, to gain access to the omental bursa, the omental incision should be kept at a distance of several centimeters from the right gastroepiploic artery arcade. Unlike in open surgery, we can take advantage of viewing the operative field from the inside so as to deploy the stomach and the transverse mesocolon in a V shape,
which provides a clear view of the left edge (left border) of the bursa and the splenic hilum. Usually, the splenic artery separates into several branches beyond the pancreatic tail, and the left gastroepiploic artery arises from the lowest branch of the splenic artery, so an omental incision can be made along the route shown for removal of the No. 4sb lymph nodes
3 Distal Gastrectomy |
41 |
|
|
Peritoneum of anterior surface of pancreas
Right border of omental bursa
Fig. 3.11 The omental dissection proceeds by advancing from the midpoint toward the right until identifying the right border of the omental bursa, which corresponds to the folding line at which the anterior layer of the right transverse mesocolon is folded back and continues as the greater omentum. This is incised using Metzenbaum scis-
sors or electrocautery. This border line roughly follows the course of the middle colic artery. The dissection continues upward in that direction, incising the peritoneum that covers the anterior surface of the pancreas until reaching its upper border
42 |
3 Distal Gastrectomy |
|
|
Epiploic a. & v.
R gastroepiploic v.
Omental bursa
Accessory right colic. v. |
|
Fusion fascia formed by fusion |
Mid. colic v. |
of greater omentum and |
|
transverse mesocolon |
|
Incision in right border of omental bursa shown in Fig. 11
Fig. 3.12 Here we see the procedure shown in Fig. 3.11 illustrated in the cross section including the omental bursa. The white arrow indicates how to access the bursa from the foramen of Winslow. There is no omental bursa over the right transverse mesocolon; instead, the mesocolon is covered by and fused with the greater omentum that extends to the right. The omentum includes the right gastroepiploic vein, the transverse mesocolon includes the right accessory colic vein, and both veins merge to form
the gastrocolic trunk of Henle that drains into the superior mesenteric vein (SMV). From now, the procedure for detaching the greater omentum from the right transverse mesocolon starts for removal of the No. 6 subpyloric lymph nodes located along the right gastroepiploic vein. In this step, the correct plane of dissection (black arrow) is the layer just above the fusion fascia that is formed by fusion of the greater omentum and the transverse mesocolon (above is the omentum side)
3 Distal Gastrectomy |
43 |
|
|
R gastroepiploic v.
Gastroduodenal a.
Incision in right border of omental bursa
R colic flexure
Mid. colic a. & v.
Vasa recta
Fig. 3.13 Heading from the right border of the omental bursa toward the right colic flexure, the edge of the omental attachment onto the transverse colon is divided using electrocautery. In this step, the second assistant pulls the transverse colon caudally with both hands, while the first assistant pulls the omentum cranially, applying moderate tension to the incision line. When incising only the superficial peritoneal layer with electrocautery, loose cotton-
like connective tissue emerges in the layer underneath, and the cut end of the peritoneum slides over it and shifts to the omentum side. In the same way as in the dissection of the left omentum, the border of the serosa of the colon is identified and the incision is placed right above it. Loop-shaped blood vessels that are occasionally encountered should be spared and returned to the colon side
44 |
|
3 Distal Gastrectomy |
|
|
|
|
Proper hepatic a. |
|
|
Portal v. |
No.12 LN |
|
|
|
Hepatoduodenal |
|
No.8 LN |
|
|
|
lig. |
|
|
Foramen of Winslow |
|
Greater omentum |
|
Duodenal bulb |
|
Confluence of splenic v. |
|
SMV |
|
No.6 LN |
|
R gastroepiploic v. |
|
|
Gastrocolic trunk of Henle 
 No.14v
Horizontal part of duodenum 
IVC |
Accessory right colic v. |
Entry of J1v
Excised omentum
Fusion fascia
* |
Preserved omentum |
|
Access route when preserving omentum
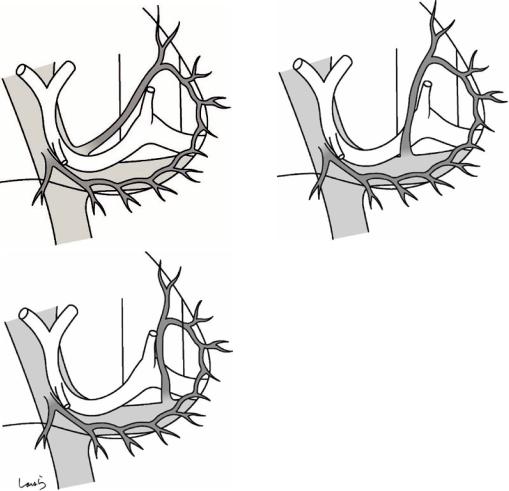
Fig. 3.14 Here we see the plane of dissection shown in step 13 of Fig. 3.13 illustrated in the sagittal cross section, with the greater omentum already detached from the transverse mesocolon. The right gastroepiploic vein from the greater omentum and the right accessory colic vein derived from the transverse mesocolon merge into the gastrocolic trunk of Henle that drains into the SMV. As shown in Fig. 3.14a, after dividing the attachment of the
greater omentum to the transverse colon, the layer above the fusion fascia (asterisk) is entered from below to detach the omentum from the fusion fascia
When the greater omentum is to be preserved, the right border of the omental bursa is incised, and from there, the layer indicated by an asterisk in Fig. 3.14a is entered from the left side to transect the greater omentum, followed by detachment of the omentum from the fusion fascia (Fig. 3.14b)
3 Distal Gastrectomy |
45 |
|
|
Incision line of omentum
Posterior wall of antrum
Gastroduodenal a.
Mid. colic a. & v.
Incision line of omentum
Accessory right colic v.
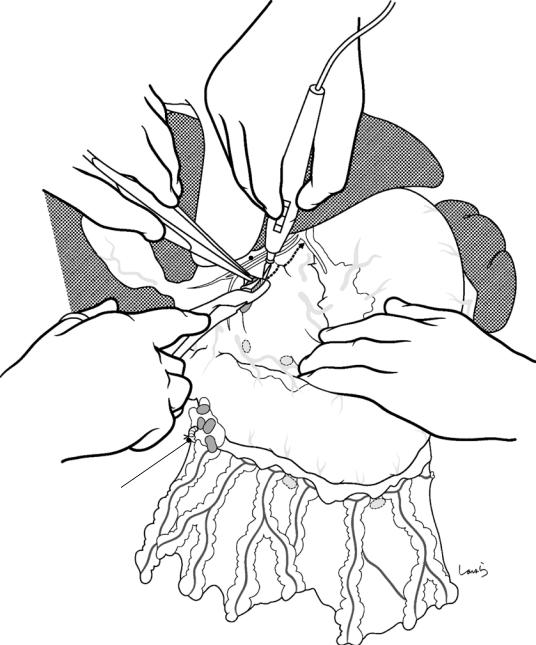
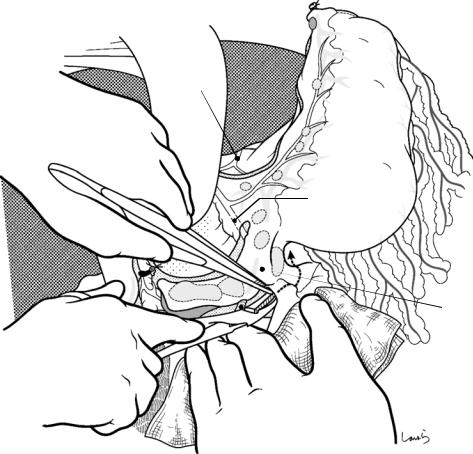
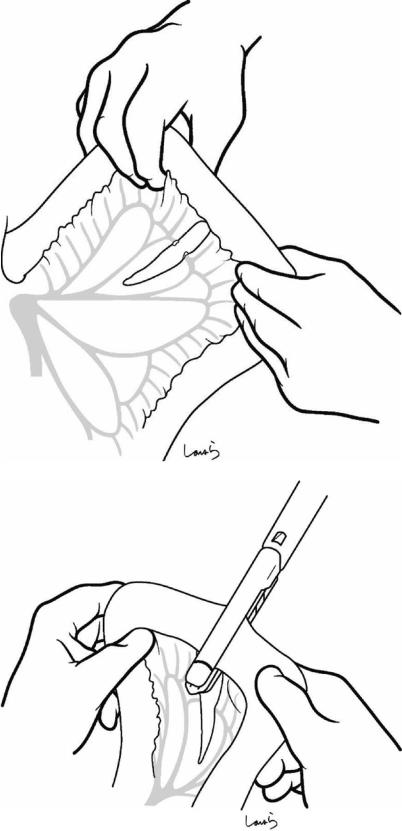
Fig. 3.15 To detach the greater omentum from the transverse mesocolon, the two assistants have to apply appropriate countertraction to the dissection line by grasping at three points, two on the transverse colon and one on the omentum (arrows). The surgeon grasps the edge of the incised peritoneum with forceps and peels off the mesocolon as if opening a sealed envelope. The white cotton-like
tissue between the two layers is retracted (as if it were melted) with just light contact with the electrocautery. The layer above the fusion fascia can be entered naturally with a driving force of around 70% traction and 30% electrocautery. The positioning of the countertraction shifts as the dissection progresses, aiming for the gastrocolic trunk of Henle
46 |
3 Distal Gastrectomy |
|
|
Excised greater omentum
Incision line of right omentum 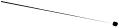
Preserved greater omentum
border Right bursa of
R gastroepiploic a.
Gastroduodenal a.
Top of posterior layer of transverse mesocolon
Mid. colic a. & v.
Posterior layer of right transverse
mesocolon
X
Incision line of omentum
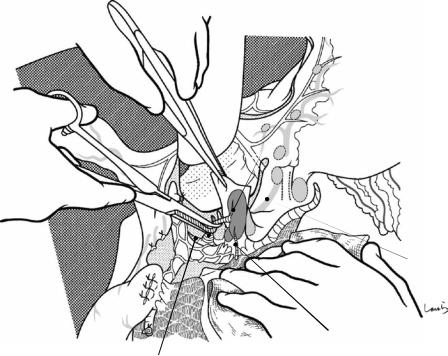
Fig. 3.16 Although countertraction is of paramount importance, it is difficult to achieve adequate traction of the transverse colon in laparoscopic surgery. Detachment of the greater omentum is shown after incising the right border of the omental bursa. Ordinarily, the base of the transverse mesocolon is located at a surprisingly high level, around the middle of the pancreatic head (see also Figs. 3.14 and 3.18), so care must be taken to determine
the correct dissection plane of the greater omentum (white arrow), keeping in mind that the posterior leaf of the transverse mesocolon underneath the fusion fascia, which must be preserved, is also lifted more than assumed. Also, care must be taken to avoid easy perforation of the posterior leaf because it is much thinner than the greater omen- tum—we must advance carefully as indicated by the black arrow
3 Distal Gastrectomy |
47 |
|
|
R gastroepiploic v.
ASPDV
Right border of omentum
 Mid. colic a. & v.
Accessory right colic v.
Right lateral mesocolon (layer of fusion fascia)
Fig. 3.17 After completing the desired fan-shaped dissection, which is required to reach the gastrocolic trunk of Henle, the right border of the greater omentum is incised toward the front of the pancreas. On the detached surface of the transverse mesocolon, the accessory right colic vein
can be seen through the fusion fascia. The right gastroepiploic vein and the anterior superior pancreaticoduodenal vein (ASPDV) can also be seen in the fat tissue over the surface of the pancreas
48 |
3 Distal Gastrectomy |
|
|
Supply area of infrapyloric a. & v.
*
CA
Infrapyloric a.
SPA
CHA
GDA
RGEA
Infrapyloric v.
RGEV
Direct branches from pancreatic parenchyma
ASPDV
Henle
ARCV
Attachment of transverse mesocolon
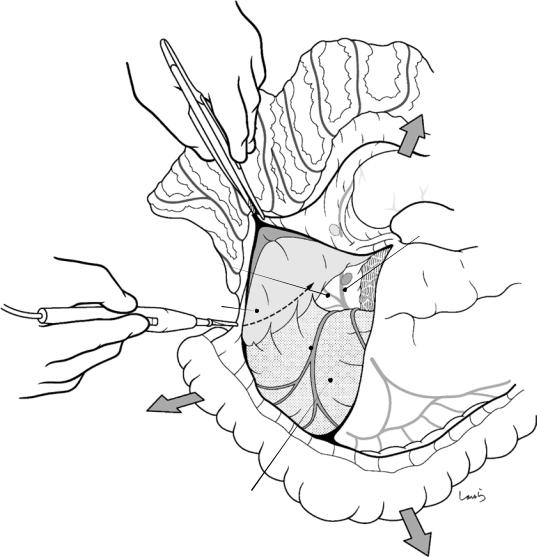
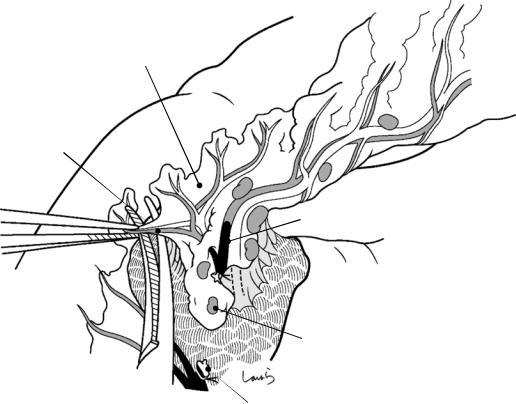
Fig. 3.18 Vascular anatomy of the infrapyloric area [6] Arterial system: The gastroduodenal artery (GDA) appears on the front of the pancreas after passing between the duodenal bulb and the upper edge of the pancreatic head, and after giving the right gastroepiploic artery (RGEA), it becomes the anterior superior pancreaticoduodenal artery (ASPDA) and dives in the pancreatic parenchyma. This makes it seem like the right gastroepiploic artery arises directly from the pancreatic surface. The infrapyloric artery originates near the root of the ASPDA and branches in a form that resembles an antler, supplying a wide area from the duodenal bulb to the pylorus (shaded area). Because of this, the first gastric branch of the right
gastroepiploic artery enters the stomach quite far from the pyloric ring. The infrapyloric artery may also diverge from the gastroduodenal artery
Venous system: As the right gastroepiploic vein (RGEV) descends over the anterior surface of the pancreas, it receives the confluence of the infrapyloric vein and the anterior superior pancreaticoduodenal vein (ASPDV). However, there are usually two or three anterior superior pancreaticoduodenal veins, and the infrapyloric vein can be regarded as the uppermost branch. The infrapyloric vein merges with the accessory right colic vein (ARCV) to form the gastrocolic trunk of Henle that drains into the SMV
3 Distal Gastrectomy |
49 |
|
|
R gastroepiploic a.
Infrapyloric v.
 R gastroepiploic v.
ASPDV
Fusion fascia
Location of Henle
Contour of pancreas
R gastroepiploic a. & v.
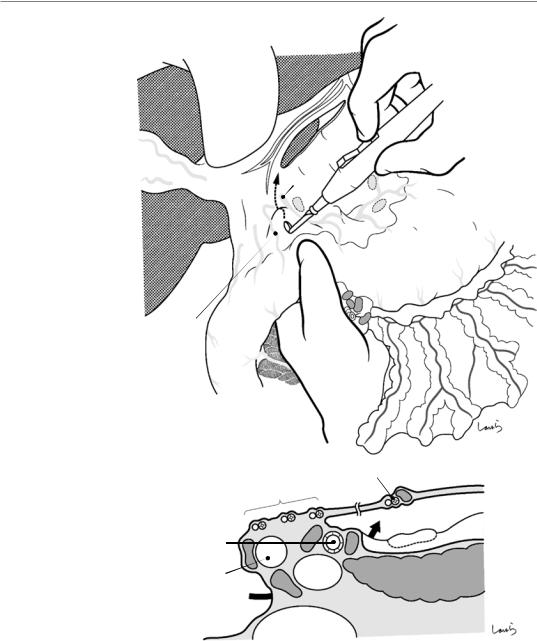
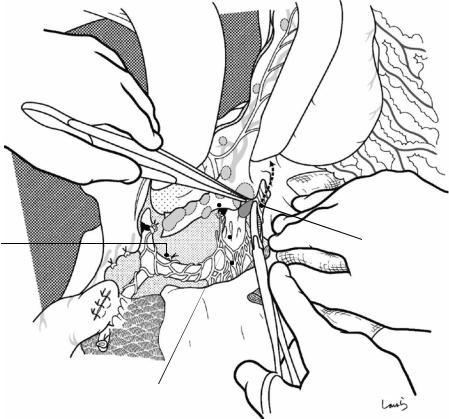
Fig. 3.19 Dissection of the No. 6 lymph nodes [7]: As shown in Fig. 3.14a, the No. 6 lymph nodes are in the fat layer underneath the fusion fascia formed by fusion of the peritoneum over the omentum and of the anterior surface of the pancreas, and this fat layer is essentially the mesentery containing the No. 6 nodes that drain the stomach. Before starting the dissection, the fusion fascia is incised at the lower limit of the No. 6 nodes, that is, at the level of the convergence of the ASPDV, and an incision is made into the fat tissue. This exposes the right gastroepiploic vein, which has been seen transparently. Then, by activating the electrocautery or using it as a spatula, the fat tissue around the
right gastroepiploic vein that contains the lymph nodes is peeled off the surface of the pancreatic parenchyma. Attention should be paid not to damage any thin venous branches draining directly from the pancreatic parenchyma into the left wall of the vein. It should be kept in mind that with the elevation of the pylorus, the head of the pancreas is lifted by the gastroepiploic artery and vein and the parenchyma is raised in a convex shape (Fig. 3.19b) [8]. Because the right gastroepiploic vein can easily be torn after removing the surrounding fat tissue, the second assistant holds the transverse colon while adjusting the traction force so as to apply appropriate tension to the operative field
50 |
3 Distal Gastrectomy |
|
|
Fusion fascia between omentum and pancreas
R gastroepiploic v. |
|
Anterior fascia of pancreas |
|
|
|
||
Infrapyloric v. |
6 |
6 |
|
6 |
6 |
||
|
Incised fusion fascia
ASPDV 
No.14v
Fusion fascia between omentum and transverse mesocolon
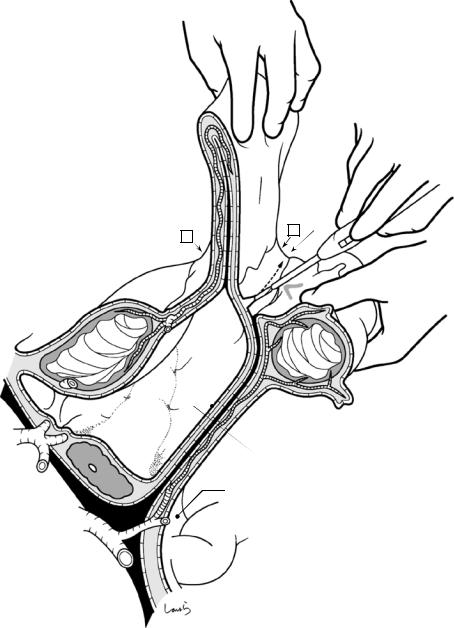
Fig. 3.20 The dissection of the infrapyloric area is illustrated in the sagittal cross section. To dissect the mesentery containing the No. 6 lymph nodes, it is necessary to transit to another layer, one level deeper than the layer entered, to detach the greater omentum. More specifically, the greater omentum and the transverse mesocolon are detached from the pancreas to broadly expose the fusion fascia on the anterior surface of the pancreas. As shown in Fig. 3.14, there is a gap formed by failed fusion of fascias at the base of the transverse mesocolon. This gap should be entered in order to proceed with the dissection adequately up to the vicinity of the convergence of the ASPDV (so that the mesocolon can be peeled downward)
Because in many cases the right gastroepiploic vein can be seen through the fusion fascia at this point, the approximate course of the vein should be determined.
Then, a transverse incision is made on the fusion fascia with activated electrocautery. Once the fusion fascia is penetrated, the fat tissue rupturing the subperitoneal fascia (prepancreatic fascia) is exposed. After incising this fascia, a vertical incision is made into the fat tissue until the anterior surface of the pancreas is reached and the right gastroepiploic vein is exposed. At this point, the incision is redirected horizontally to detach the fat tissue from the pancreatic parenchyma along with the lymph nodes included. In practice, especially during laparotomy, these fascial incisions are performed almost unconsciously without problem. If you carefully examine the fat tissue on the anterior surface of the pancreas before dissecting it, you can see that its surface is covered by a slightly shiny connective tissue. This is the prepancreatic fascia
3 Distal Gastrectomy |
51 |
|
|
Excised fusion fascia
Infrapyloric v.
1st branch of ASPDV 
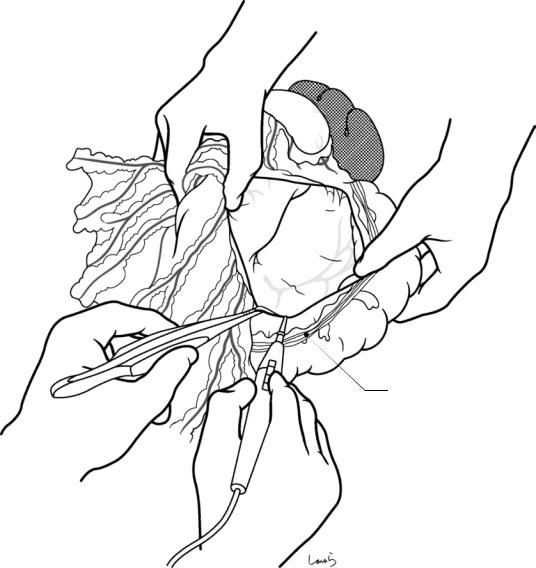
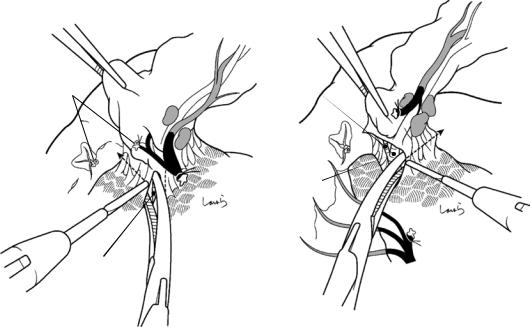
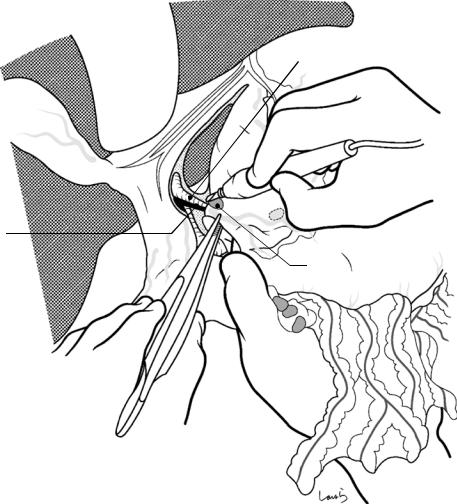
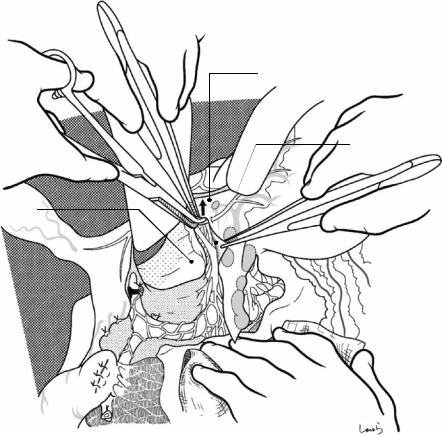
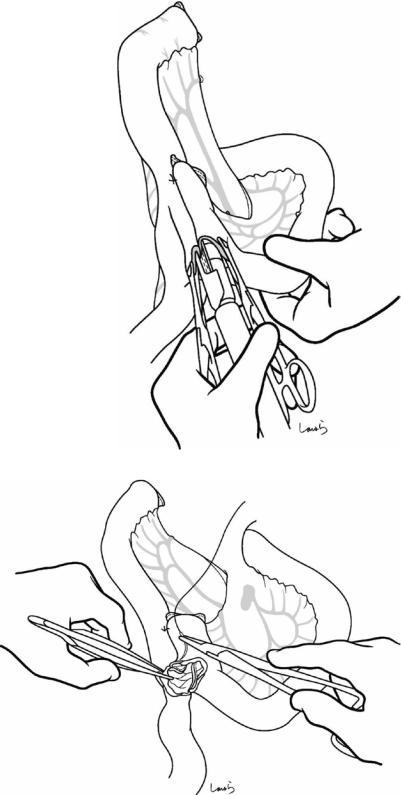
Fig. 3.21 The right gastroepiploic vein is isolated with right angle dissection forceps, ligated with 3-0 Vicryl, and divided. The forceps are passed at the level between the infrapyloric vein and the first branch of the ASPDV; however, they can be passed above the root of the infrapyloric vein if deemed easier. As mentioned earlier, the infrapyloric vein is the last branch of the ASPDV and there is no reason for concern when dividing it at its confluence. Priority should be given to safe handling of the right gastroepiploic vein. Even though the front of the vein is
 Direct branch from pancreatic parenchyma
clearly exposed, bleeding may occur when passing through the forceps. If bleeding occurs, then there has been injury either to the infrapyloric vein as it enters the posterior aspect of the gastroepiploic vein or to a direct branch from the pancreatic parenchyma. Also, in patients whose right gastroepiploic vein runs in a groove formed by protrusion of the parenchyma of the anterior surface of the pancreas, we should not try to thrust the forceps because the tip may penetrate the parenchyma
52 |
3 Distal Gastrectomy |
|
|
Distal branch of infrapyloric a. & v.
Infrapyloric mesentery
4d
4d
6
6 |
R gastroepiploic v. (cut) |
6
6
 R gastroepiploic a. (root)
6
Dissected No.6 LN
R gastroepiploic v. (root)
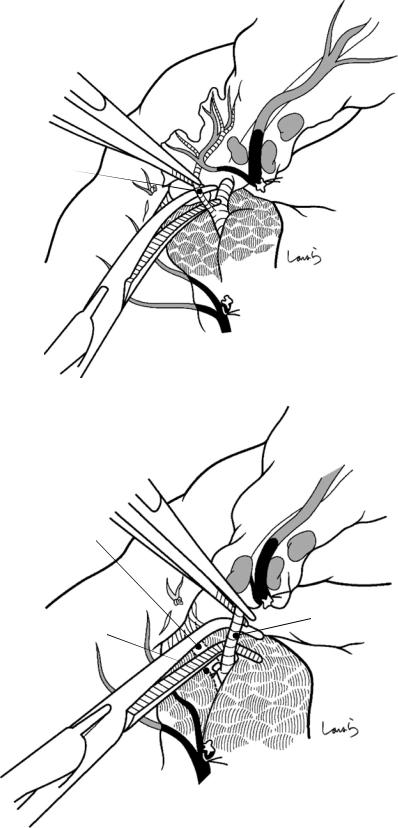
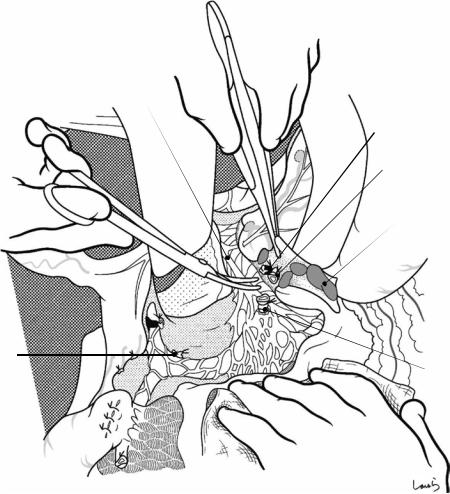
Fig. 3.22 The course of the infrapyloric artery should be confirmed before heading to the root of the right gastroepiploic artery. As described in Fig. 3.18, the infrapyloric artery and vein branch resemble an antler and have a mesentery connected to the bulbous part of the duodenum, although narrow (for descriptive convenience, the “superior and inferior duodenal mesentery”). Lymph nodes are rarely seen in this mesentery, and in the event that they are, they are not classified as No. 6, so there is no need for
dissection. As such, this mesentery should be preserved in pylorus-preserving gastrectomy, but in usual distal gastrectomy, regardless of whether the Roux-en-Y or the Billroth-I reconstruction technique is used, it is better to resect the mesentery along the duodenal wall because it is necessary with either technique to “lengthen the neck” of the duodenal bulb. First, the most distal branch is ligated and cut near the wall to release the edge of the mesentery
3 Distal Gastrectomy |
53 |
|
|
Distal branch of |
Infrapyloric a. |
|
infrapyloric a. (ligated) |
||
|
R gastroepiploic a.
R gastroepiploic a.
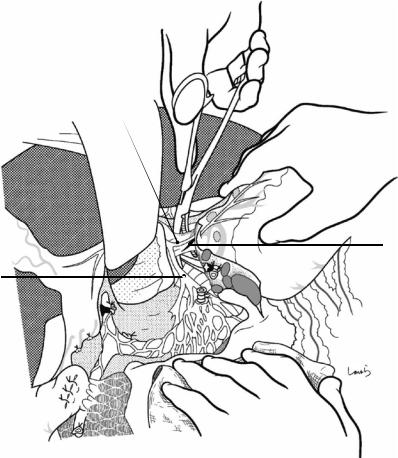
Fig. 3.23 When lifting the pylorus, a V-shaped connective tissue (containing nerve fibers) with the right gastroepiploic artery located at the apex is seen. Forceps are inserted from the apex under the connective tissue. After the right and left sides of the triangle are dissected with electrocautery, the root of the right gastroepiploic artery emerges behind. Upon dissection of the left side, care must be taken to accurately determine the margin of the suspended pancreatic parenchyma because it might be
ascending more than expected. If the pancreatic parenchyma is mistaken for fat and is accidentally transected, a distinct type of bleeding occurs. It is better to switch to suture hemostasis because electrocoagulation only makes the wound deeper. Inadvertently damaging the pancreas at this point would cause postoperative pancreatic leakage. The surgeon and first assistant should always proceed while confirming “This is fat, this is pancreas!”
54 |
3 Distal Gastrectomy |
|
|
Fig. 3.24 When the tension caused by the connective tissue is released, the right gastroepiploic artery is stretched and the infrapyloric artery branching the root of the gastroepiploic artery can be confirmed [9]. This artery is then isolated with dissection forceps, ligated with 3-0 Vicryl, and divided
Fig. 3.25 The right gastroepiploic artery is divided at its root after double ligation with 3-0 Vicryl. The gastroduodenal artery becomes the anterior superior pancreaticoduodenal artery after branching off the right gastroepiploic artery and immediately dives into the pancreatic parenchyma. Lifting the pyloric area shows the branching of the right gastroepiploic artery clearly, and it looks as if the artery is sticking out of the pancreatic parenchyma
Infrapyloric a.
Gastroduodenal a.
R gastroepiploic a.
Infrapyloric a. (root)
3 Distal Gastrectomy |
55 |
|
|
Fig. 3.26 When looking at the deployed mesentery after dissecting the root of the right gastroepiploic artery, the two arterial stumps appear aligned. To lengthen the neck of the duodenal bulb, the remaining branches of the infrapyloric artery and vein are ligated and divided one at a time along the duodenal wall and beyond the pyloric ring. In this way, the lymph nodes along the infrapyloric artery are dissected [10]
Infrapyloric a. & v.
Infrapyloric a. (ligated) 
R gastroepiploic a. (ligated)
R gastroepiploic a. (root)
56 |
3 Distal Gastrectomy |
|
|
a
R gastric v.
R gastric a.
5
8a
3
12b
|
|
|
. |
|
|
v |
|
|
& |
|
|
. |
|
|
|
a |
|
|
|
Supraduodenal |
|
|
|
Triangular avascular membrane
Proper hepatic a.
b
Portal v.
R gastric v.
R gastric a.
Supraduodenal a.
Axis of symmetry
Supraduodenal v.
|
R gastroepiploic v. |
Infrapyloric v. |
R gastroepiploic a. |
|
|
Infrapyloric a. |
Ant. sup. pancreaticoduodenal a. |
|
|
|
Sup. mesenteric v. |
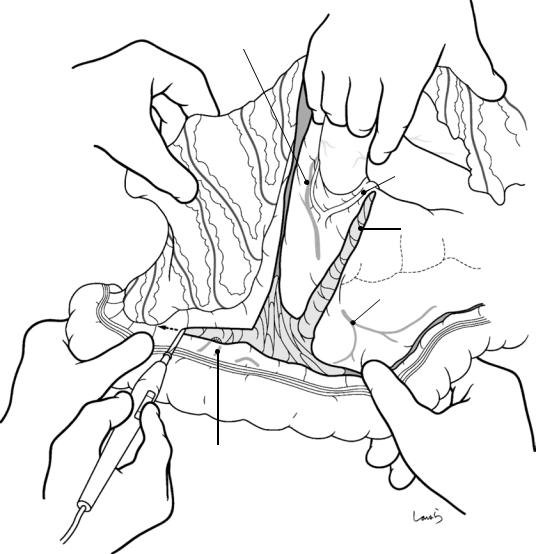
Fig. 3.27 Dissection of the suprapyloric area: The vessels that play a leading role in this area are the right gastric artery and vein, but it is especially interesting to note the course of the supraduodenal arteries and veins, which play a supporting role. There are three to four supraduodenal veins that gradually anastomose to adjacent branches on their left and often finally merge with the right gastric vein that drains into the portal vein. However, because the anastomotic area is located slightly deeper than the surface of the hepatoduodenal ligament and is difficult to see, these branches seem to suddenly disappear. The supraduodenal arteries arise from the proper hepatic artery separated from the right gastric artery, and they
accompany the venous branches to the duodenum. The branches of the supraduodenal arteries and veins resemble the infrapyloric arteries and veins upside down, which is easier to understand if we consider that these vessels have a symmetrical positional relationship to each other with the duodenum being the axis of symmetry (lower panel of Fig. 3.27b)
Because the right gastric vessels head toward the oral side of the pyloric ring and the first supraduodenal vessels head toward its anal side, a triangular avascular mesentery is formed where two vessels form the two sides of the triangle. It is advisable to use this as a landmark when starting dissection of the suprapyloric area (see Fig. 3.29)
3 Distal Gastrectomy |
57 |
|
|
Hepatic branch of vagal n.
Lesser omentum
R gastroepiploic a. (ligated)
Greater omentum
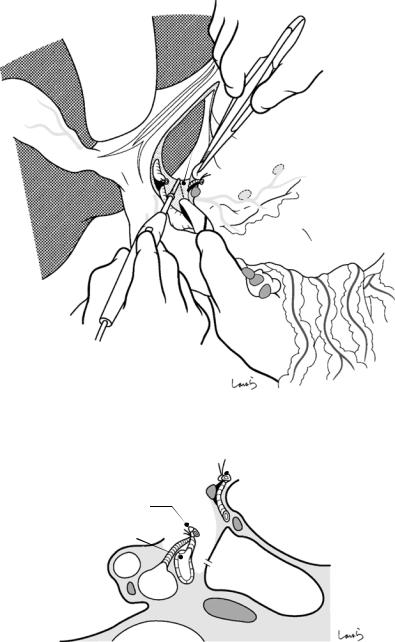
Fig. 3.28 An Octopus retractor is placed on the underside of the liver to retract its lateral segment cranially so as to secure an adequate view of the operative field in the lesser curvature of the stomach. A small incision is made in the lesser omentum caudal to the hepatic branch of the vagus nerve to be preserved. This actually means cutting two sheets of peritoneum, similar to the dissection of the greater omentum. Starting from this opening, the lesser omentum is incised along its attachment to the lateral seg-
ment of the liver toward the cardia region. It is advisable for an assistant to cut with electrocautery while guiding with dissection forceps from the other side of the membrane. The surgeon should be aware that an accessory left hepatic artery may be encountered midway, originating from the left gastric artery (the lesser omentum is also the mesentery of the liver, so it is natural for it to include arteries)
58
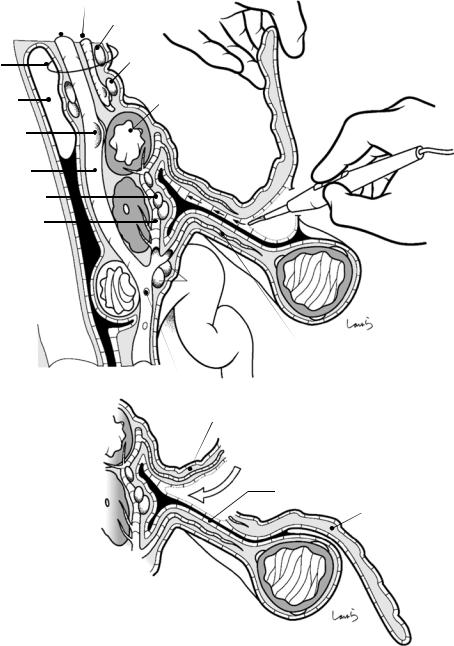
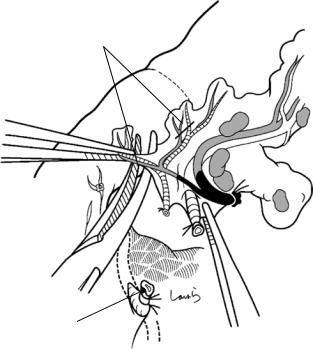
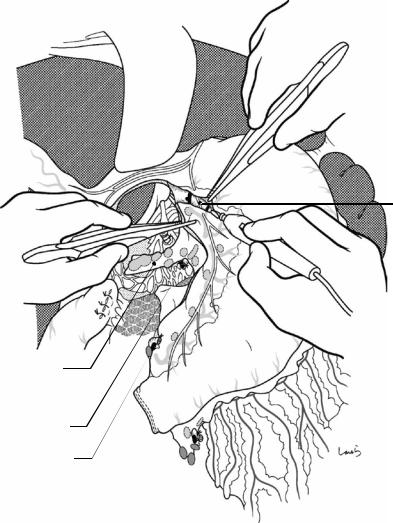
Fig. 3.29 When pulling the pylorus caudally, several supraduodenal arteries and veins can be identified, extending from the hepatoduodenal ligament to the upper margin of the duodenum. As shown in the cross-sectional view in Fig. 3.29b, the lesser omentum originates from the front, not from the left margin of the hepatoduodenal ligament. So, when sliding the left index finger from the back of the pylorus, it appears in the front of the hepatic artery (the space indicated by asterisk in Fig. 3.29b), and the triangular mesentery bordered by the right gastric vessels and the first supraduodenal vessels can be stretched from underneath. An opening is made with the electrocautery on the mesentery, and from here, only the peritoneum on the anterior surface of the hepatoduodenal ligament is incised, following the route that goes around the root of the right gastric artery, as indicated by the arrow in Fig. 3.29a
3 Distal Gastrectomy
R gastric a.
5
1st branch of supraduodenal a. & v.
|
a. & |
v. |
|
|
|
Supraduodenal |
|
|
Proper hepatic a. |
|
|
B |
|
|
Common bile duct |
PV |
|
Foramen of Winslow |
|
|
R gastric a. & v.
Omental bursa
*
8a
Pancreas
IVC
3 Distal Gastrectomy |
59 |
|
|
R gastric a.
Proper hepatic a.
R gastric v.
No.5 LN
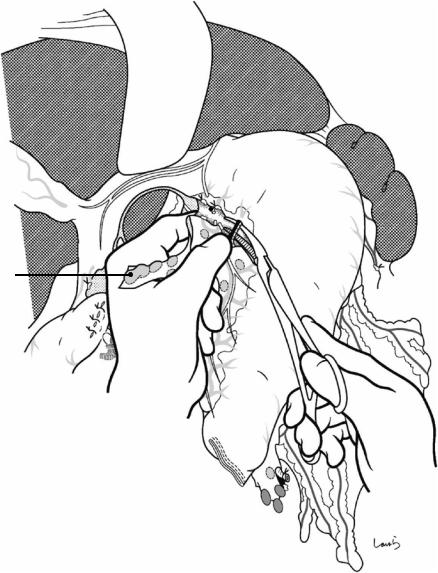
Fig. 3.30 Dissection of the No. 5 lymph nodes: The first assistant pulls the pylorus downward and to the left to cause the pedicle of the right gastric vessels to be stretched. Using electrocautery, the surgeon scrapes the fat tissue including the No. 5 lymph nodes along the blood vessels down toward the omentum side. The vessels usually run parallel—the artery on the cranial side and the
vein on the caudal side—and the root of the vein is located between the proper hepatic artery and the common bile duct. To avoid confusing the right gastric artery with the hepatic artery, the continuity from the common hepatic artery to the proper hepatic artery should be confirmed before dividing the right gastric artery
60 |
3 Distal Gastrectomy |
|
|
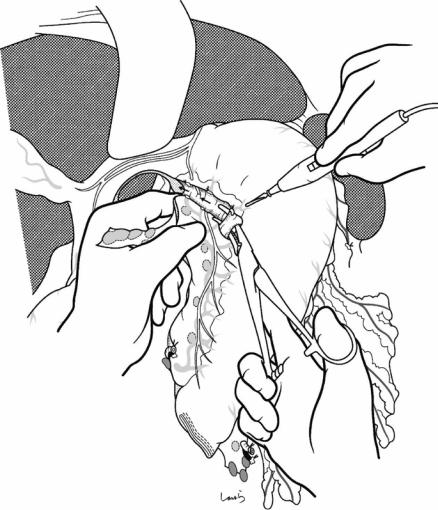
Fig. 3.31 The right gastric artery and vein are ligated together at the root and divided. Although the No. 5 lymph nodes were dissected, actually the peritoneum on the back of the vessels remains intact. This is the peritoneum made of the posterior wall of the omental bursa that is folded back at the left margin of the hepatoduodenal ligament and continues as the posterior layer of the lesser omentum (lower panel of
Fig. 3.31b), located near the foramen of Winslow at the right border of the omental bursa. By dividing it, the lesser omentum is finally separated from the hepatoduodenal ligament, and a leaf-shaped peritoneal defect occurs to the left of the hepatoduodenal ligament after No. 5 lymph node dissection
R gastric a. & v. (root)
Proper hepatic a.
B
PV
IVC
Peritoneum remaining after division of rt. gastric a. & v.
No.5 LN3
Stomach
6 6
6
R gastric a. & v. (ligated)
5
Omental bursa
8a
3 Distal Gastrectomy |
61 |
|
|
|
|
|
3 |
|
|
|
Peritoneal defect caused by No.5 |
|
|
|
LN dissection |
|
|
|
3 |
Supraduodenal a. & v. |
5 |
3 |
R gastric a. & v. (ligated) |
|
|||
|
|
No.8a LN
Common hepatic a.
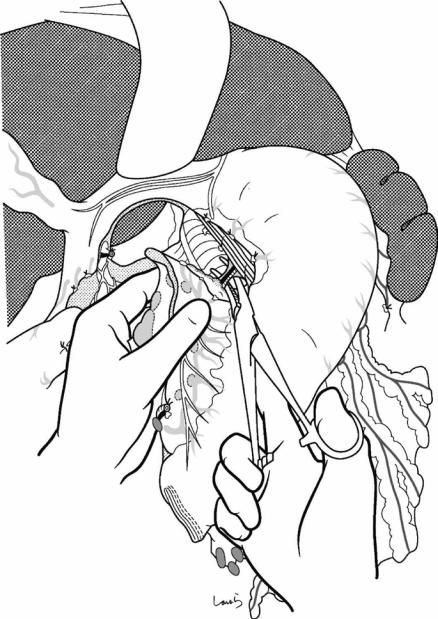
Fig. 3.32 To ensure an adequate margin for transection of the duodenum, one or two supraduodenal arteries and veins are ligated and divided along the wall
62 |
3 Distal Gastrectomy |
|
|
R gastric v.
Pyloric ring
Supraduodenal a. & v.
Direct branches to duodenal bulb 
Gastroduodenal a. 
R gastroepiploic a. (root)
R gastric a.
Proper hepatic a.
8a
Common hepatic a.
Fig. 3.33 In laparoscopic surgery, as the scope is advanced to the back of the omental bursa with the stomach lifted up ventrally, the blood vessels running above
the pylorus are well visualized from the inside. From this angle, the right gastric artery runs on the right and the vein runs the left, side by side
3 Distal Gastrectomy |
63 |
|
|
R gastric a. (ligated)
R gastroepiploic a. (ligated)
R gastroepiploic a. (root)
Infrapyloric a. (root)
R gastroepiploic v. (root)
Fig. 3.34 To transect the duodenum, a linear stapler is used close to the pyloric ring on its anal side. Because fatal complications can occur if there is closure insuffi-
ciency here, the staple line is reinforced and invaginated by interrupted seromuscular 3-0 Vicryl sutures. The separated stomach is then lifted and flipped to the left
64 |
3 Distal Gastrectomy |
|
|
5
|
|
Vagus n. |
|
|
(anterior trunk) |
Caudate lobe |
|
3 |
|
|
|
|
|
3 |
|
1 |
|
|
|
Vagus n. |
|
7 |
(posterior trunk) |
|
|
|
|
7 |
|
|
|
9 |
R gastric a. |
8a |
|
(ligated) |
|
L gastric v.
Supraduodenal a. & v.
R gastroepiploic a. (root)
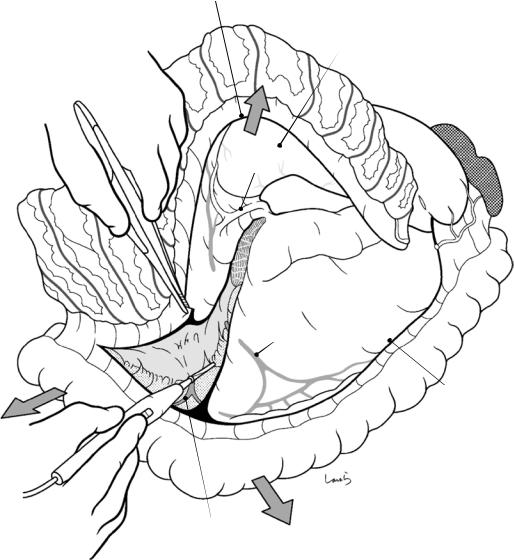
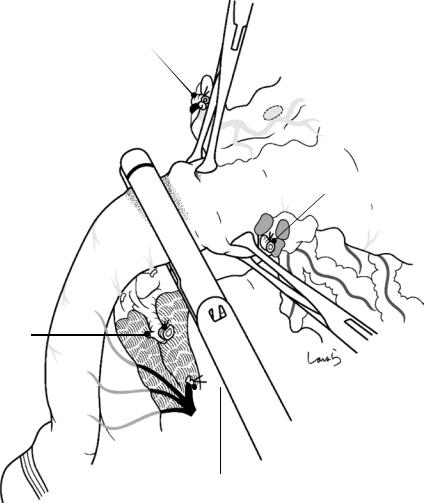
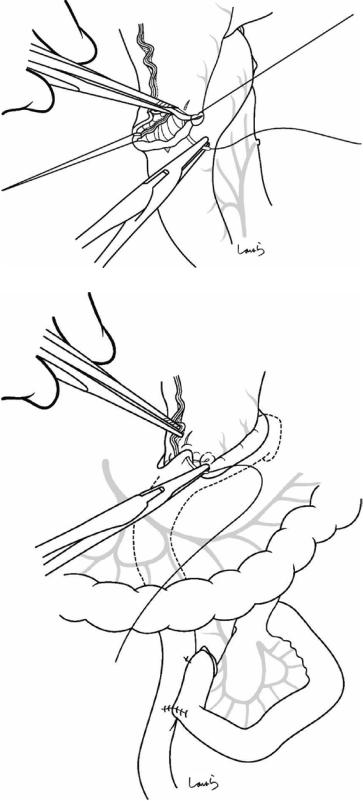
Fig. 3.35 Dissection of the suprapancreatic lymph nodes: These lymph nodes are dissected by peeling off the peritoneum of the posterior wall of the omental bursa from the hepatoduodenal ligament toward the root of the left gastric artery, along with the lymph nodes attached to it. Prior to the dissection, the Octopus retractor has to be repositioned deeper to retract the caudate lobe of the liver and spread the posterior wall of the omental bursa wide. First, the area of dissection of the retroperitoneum is determined and its upper and lower limits are incised. The retroperitoneum is then detached with forceps and cut
with electrocautery. As shown, the upper limit incision proceeds from the vicinity of the right gastric artery stump toward the root of the left gastric artery, parallel to the upper margin of the pancreas. In the first half of the dissection, the membrane is thin and travels deep, hidden behind the bulge of the common hepatic artery (the common hepatic artery fold), making it difficult to pass through the forceps and advance. In contrast, the second half of the membrane is thickened with fat tissue, which may cause some hesitation in cutting, but it is safe to say that beyond this point there is no danger
3 Distal Gastrectomy |
|
|
65 |
|
|
|
|
|
Anterior nerve of Latarjet |
|
|
|
|
|
Posterior nerve of Latarjet |
|
Anterior |
|
|
|
gastric |
|
|
Hepatic branch |
branch |
Anterior trunk |
Posterior gastric branch |
Posterior |
|
|
|
|
|
|
Liver |
Trunk |
|
Celiac branch |
||
|
||
|
Stomach |
|
Gallbladder |
L celiac ganglion |
|
|
||
|
Pancreatic tail |
|
|
Pylorus |
|
R celiac ganglion |
|
|
|
Celiac plexus |
|
|
Liver |
|
|
Pancreas |
|
|
Superior mesenteric plexus |
|
|
Intestinal tract |
|
|
Pancreatic head plexus part 1 |
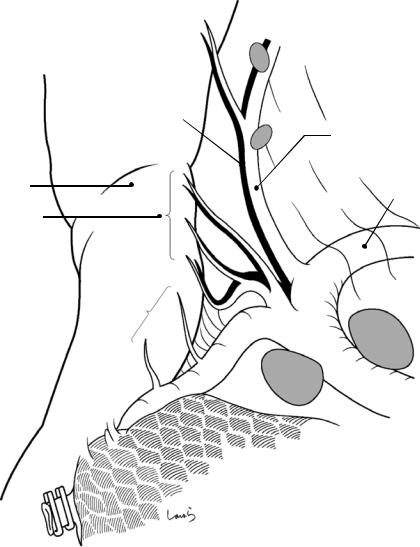
Fig. 3.36 Anatomy of the vagus nerve: Because of the rotation of the stomach, the left and right vagus nerves, which are parasympathetic nerves, become the anterior and posterior vagal trunks, respectively, at the level of the esophageal hiatus. The anterior vagal trunk branches to the hepatic branch and the anterior gastric branch (white line and white arrows), which descends along the anterior wall of the lesser curvature while branching off anterior corporeal branches to form the anterior pyloric branch (anterior nerve of Latarjet). On the other hand, the hepatic branch travels transversely to the right, as two to three white cords are located close to the liver attachment of the lesser omentum (a white thickened part called the tense part of the lesser omentum), before dividing into the ascending and descending branches along the proper hepatic artery. A part of the ascending branch reaches the gallbladder along the cystic artery. A part of the descending branch becomes a pyloric branch distributed to the stomach along the right gastric artery; the remainder merges with the branches of the posterior vagal trunk that have run along the common hepatic artery
The posterior vagal trunk (black line and black arrows) divides into the celiac branch and the posterior gastric branch at the level of the cardia, and the posterior gastric branch becomes the pyloric branch (posterior nerve of
Latarjet) after giving a number of posterior corporeal branches. The celiac branch descends inside the gastropancreatic fold along the anterior aspect of the aorta and enters the celiac ganglia after dividing into left and right at the origin of the left gastric artery. The splanchnic nerve (a sympathetic nerve) that comes through the diaphragm joins the same ganglia. Nerve fibers (sympathetic + parasympathetic) emerging from the celiac ganglion, after forming the celiac plexus, are distributed along the left gastric artery, common hepatic artery, splenic artery, and superior mesenteric artery toward the stomach, liver, pancreatic tail and spleen, and intestinal tract, respectively. Also, some of the fibers stretch in the lower right direction to form a beltshaped nerve bundle and then enter the uncinate process of the pancreas (pancreatic head plexus part 1)
Given the above, it is clear that the hepatic and celiac branches are the most important branches of the vagus nerve to be preserved in pylorus-preserving gastrectomy, and it is particularly essential to ensure that dissection of the celiac branch does not interfere with the merging of the parasympathetic nerve fibers into the celiac plexus. There are, however, variations in the course of the celiac branch, and the celiac branch needs to be sacrificed if it descends in close contact with the stomach wall and enters the celiac ganglion accompanying the left gastric artery
66 |
3 Distal Gastrectomy |
|
|
Anterior gastric branch
 Posterior
gastric branch
Celiac branch
7
7
9
8a
Gastropancreatic lig.
L gastric v.
Fig. 3.37 The lower limit of the dissection of the posterior wall of the omental bursa corresponds to the upper margin of the pancreas, going slightly upward on the gastropancreatic fold. Care should be taken to separate and lift only the thin peritoneum before dissecting; otherwise, there may be injury to the left gastric vein (coronary vein).
Because this vein can be seen through the gastropancreatic fold when it is spread out, it is advisable to confirm its approximate course in advance. When the first or second assistant pulls the pancreas caudally, the retroperitoneum is stretched, which considerably improves the operative view
3 Distal Gastrectomy |
67 |
|
|
a |
b |
Draining near portal v.– splenic v. confluence
Crossing the anterior surface of common hepatic a. and draining into the splenic v.
c
Crossing the anterior surface of splenic a. and draining into splenic v.
Fig. 3.38 For the left gastric vein, one type travels to the right along the upper rear of the common hepatic artery and directly drains the portal vein or near the portal vein– splenic vein confluence (a) and another type descends straight down along the left gastric artery and, after crossing in front of the common hepatic artery, drains into the splenic vein (b). Sometimes, the vein crosses the anterior surface of the splenic artery and drains into the splenic vein (c). In the case of b or c, because the vein traverses the anterior surface of the common hepatic artery, its root can often be identified in advance. The vein should be
ligated and divided immediately when it is identified. In patients with a lot of visceral fat, it is difficult to identify the left gastric vein and it may be inadvertently cut without being noticed, causing bleeding. In contrast, in type b cases where the vein can be divided early, extreme caution is not needed for No. 8a lymph node dissection. However, when the left gastric vein cannot be identified in the front of the common hepatic artery, this is type a and the No. 8a lymph nodes need to be carefully dissected while keeping in mind the presence of the accompanying left gastric vein
68 |
3 Distal Gastrectomy |
|
|
Small branches entering lt. gastric v. from LN
 L gastric a. (root)
Peripheral lt. gastric v. (visible through peritoneum)
|
|
Small vessel between LN |
|
|
Root of lt. gastric v. |
and pancreatic |
|
Portal v. |
parenchyma (*) |
||
|
Fig. 3.39 Proceeding toward the gastropancreatic fold, the No. 8a lymph nodes along the common hepatic artery are dissected. Instead of holding the lymph nodes themselves, it is better to grip the edge of the detached retroperitoneum with forceps and detach the fat tissue including the lymph nodes from the artery. It is safe to insert dissection forceps between the fat tissue and the arterial wall to isolate a dissection layer and dissect it with electrocautery. The dissection advances on the surface of the artery, while maintaining the superficial dissection layer that covers a meshy nerve bundle surrounding the artery. There is a small blood vessel communicating between the No. 8a
lymph nodes and the pancreatic parenchyma (asterisk in Fig. 3.39). This vessel should be ligated or cauterized because it can be a source of bleeding that is difficult to stop when overlooked. If the stump of this blood vessel gets retracted into the pancreatic parenchyma and it becomes difficult to achieve hemostasis, Z sutures with 3-0 Vicryl are applied to stop the bleeding. When the left gastric vein is identified on the way, it is advisable to ligate and divide it early. When passing forceps, care should be taken not to injure small branches entering the left gastric vein from the lymph nodes
3 Distal Gastrectomy |
69 |
|
|
L gastric v. |
Retractor |
|
|
(ligated) |
|
|
1 |
|
7 |
|
9 |
|
8a |
L gastric v. (root)
L gastric a. wrapped |
|
in nerve bundle |
Celiac plexus |
|
Loose connective tissue in gastropancreatic lig.
Fig. 3.40 Dissection of the left leaf of the gastropancreatic fold: The second assistant stands to the right of the first assistant (on the side closer to the patient’s head) and retracts the fundus of the stomach cranioventrally with an intestinal retractor. The tip of the retractor is advanced deep enough to reach the upper left corner of the omental bursa and, along with the Octopus retractor, secures the operative field by firmly pressing the gastropancreatic fold from both sides. The first assistant pulls the pancreatic tail caudally, which allows for wide expansion of the left edge of the gastropancreatic fold. (I love exposing the operative field in this area; the gastropancreatic fold, stretched up from the posterior wall of the omental bursa and straightened, is so beautiful!) There are no large vessels here, except for the posterior gastric artery that
emerges from the splenic artery. When the peritoneal incision is extended from the upper edge of the pancreas along the rising edge of the gastropancreatic fold, the loose connective tissue inside is stretched into a thin membrane. When inserting forceps here, it is possible to advance about 3 cm without any resistance. Then, by gently opening the forceps and dissecting the connective tissue with electrocautery, the No. 9 lymph nodes are dissected while still attached to the stomach. The gastropancreatic fold has a cross section of an inverse isosceles triangle with the left gastric artery at its apex; its interior consists of a space covered by a spider web resembling the “retrorectal space,” which I like to call the “retrogastric space”
70 |
3 Distal Gastrectomy |
|
|
Posterior wall of omental bursa
Celiac branch of  vagal n.
Fig. 3.41 Dissection of the right leaf of the gastropancreatic fold: The retroperitoneum of the posterior wall of the omental bursa turns over and continues as the right leaf of the gastropancreatic fold covering the right diaphragmatic crus, and transitions to the posterior leaf of the previously divided lesser omentum. So, by extending the upper limit incision of the retroperitoneum and dissecting the right leaf of the gastropancreatic fold obliquely, the peritoneum of the posterior wall of the lesser curvature in the upper body of the stomach is dissected continuously. Then, the
Posterior layer of lesser omentum
R leaf of gastropancreatic lig.
loose connective tissue inside the gastropancreatic fold is separated with dissection forceps and dissected using electrocautery. This tissue may contain several nerve fibers distributed from the celiac branch to the stomach. If we consider the celiac branch to correspond to the hypogastric nerve, the structure around here is also very similar to that of the retrorectal space. With this, only the left gastric artery wrapped in the armor of the nerve bundle remains
3 Distal Gastrectomy |
71 |
|
|
R layer of gastropanc. lig. (cut)
L gastric v. (ligated)
 L gastric a.
Celiac plexus
Fig. 3.42 The cord-like tissue that encloses the left gastric artery is spread out and a longitudinal tear is made on it using right angle forceps. From here, by scooping off the nerve bundle several times, it can be separated from the arterial wall and divided with electrocautery. The
nerve fibers are solid and sometimes thick enough to be confused with the left gastric artery. If you are confident enough not to hesitate in cutting them with electrocautery, then you are no longer a beginner in stomach surgery
72 |
3 Distal Gastrectomy |
|
|
Celiac branch of vagus
L gastric v. (ligated)
L gastric a. (ligated)
Suprapancreatic LNs dissected en bloc
L gastric v. |
|
(root) |
L gastric a. (root) |
|
Fig. 3.43 The left gastric artery is ligated and divided at its root. The aggregated No. 7, 8a, and 9 lymph nodes stay attached to the root of the left gastric artery and vein like a flap
3 Distal Gastrectomy |
73 |
|
|
Posterior gastric branch of vagus
|
Posterior gastric br. |
|
|
of lt. gastric a. |
|
Celiac branch |
(terminal ascending |
|
br.) |
||
|
Fig. 3.44 The celiac branch of the vagus nerve descending inside the fold is identified and preserved. The posterior gastric branch is divided after coming off at the level of the cardia
74 |
3 Distal Gastrectomy |
|
|
Anterior gastric br. of lt. gastric a. (terminal ascending br.)
1
8a 7
Suprapancreatic LNs
dissected en bloc
L gastric a. & v. (ligated)
R gastric a. & v. (ligated)
R gastroepiploic a. & v. (ligated)
Fig. 3.45 Dissection of the lesser curvature in the upper body of the stomach so-called three-layer dissection: The stomach is placed back to its original position and the Octopus retractor is repositioned close to the esophageal hiatus. The first assistant pulls the stomach caudally to stretch the lesser curvature in the upper body of the stom-
Anterior gastric branch of vagus
3
3
ach. The surgeon runs the electrocautery along the border between the omental fat tissue and the anterior wall of the stomach superficially, incising only the peritoneum of the anterior layer along the planned dissection line. On the way, the anterior gastric branch, which comes off the anterior vagal trunk in front of the cardia, is also divided
3 Distal Gastrectomy |
75 |
|
|
Anterior gastric branch of vagus
|
|
1 |
Suprapancreatic LNs |
8a |
3 |
|
||
|
|
|
dissected en bloc |
|
3 |
Fig. 3.46 The branches of the ascending limb of the left gastric artery entering the anterior wall of the stomach, which cross over the peritoneal incision line, are then ligated and divided along with the accompanying anterior
gastric branches of the vagus nerve. Several branches are divided while ascending from the level of the planned dissection line toward the cardia
76 |
3 Distal Gastrectomy |
|
|
1
8a
3
3
Fig. 3.47 The intermediate fat layer of the lesser omentum (“flesh”) is scooped with dissection forceps and divided with electrocautery. It is easier to identify the border when holding the fat tissue in the gastric attachment of
the lesser omentum between the left thumb and index and middle fingers while applying force in the direction to peel it off the stomach wall
3 Distal Gastrectomy |
77 |
|
|
1
8a
Fig. 3.48 The branches of the left gastric artery entering the posterior wall of the stomach, along with the accompanying branches of the vagus nerves, are ligated together and divided. These vessels are distributed over a shorter
distance compared with the anterior side, and there are also a smaller number of vessels to be dissected. In addition, the peritoneum has already been incised as the right leaf of the gastropancreatic fold
78 |
3 Distal Gastrectomy |
|
|
Omental adipose tissue |
|
|
containing No.1 LNs |
|
|
Suprapancreatic LNs |
|
1 |
dissected en bloc |
|
|
8a |
|
1 |
|
9 |
7 |
|
|
Fig. 3.49 The stomach is transected with a linear stapler and the specimen is removed. On the lesser curvature side of the resected specimen, the fat tissue of the lesser omen-
tum containing the No. 1 lymph nodes and the flap of the retroperitoneum with the No. 7, 8a, and 9 lymph nodes are attached together in a V shape
3 Distal Gastrectomy |
79 |
|
|
Fig. 3.50 Roux-en-Y reconstruction (see Fig. 3.50 through Fig. 3.57): With an imaginary dissection line drawn on the jejunum at approximately 20 cm
caudal from the ligament of Treitz, the mesentery is incised after the marginal artery and vein are ligated at a single point and divided. When performing Roux-en-Y reconstruction after distal gastrectomy, the jejunal limb does not need to be pulled up as much and the incision of the mesentery can be minimized
Fig. 3.51 The jejunum is transected with a linear stapler
80 |
3 Distal Gastrectomy |
|
|
Fig. 3.52 Approximately 30 cm of the Roux-limb is measured and a side-to-side anastomosis with the Y limb is performed using a linear stapler. The length of the anastomosis is 40 mm
Supporting suture 
Fig. 3.53 The opening for stapler insertion is closed with a single- layer, running 4-0 PDS suture. An opening is made on the transverse mesocolon to the left of the middle colic artery and vein, and the jejunum is pulled up via the retrocolic route
3 Distal Gastrectomy |
81 |
|
|
Fig. 3.54 The greater curvature corner of the gastric remnant stump is removed with electrocautery to make a small opening. A linear stapler is inserted to make a gastrojejunal side-to-side anastomosis (isoperistaltic, length of anastomosis 60 mm). It is easier first to insert the cartridge arm in the mobile jejunum and then to insert the anvil arm into the stomach
82 |
3 Distal Gastrectomy |
|
|
Fig. 3.55 The opening for stapler insertion is closed with a single- layer, running 4-0 PDS suture
Fig. 3.56 The anastomosis is pulled down below the transverse mesocolon, and the gastric remnant is anchored to the mesocolon with three interrupted 3-0 Vicryl sutures
3 Distal Gastrectomy |
83 |
|
|
Fig. 3.57 After washing the abdominal cavity, an 8-mm duple drain is inserted into the foramen of Winslow from the right side of the abdomen. The operation is completed by closing the abdominal wall, suturing in three layers
84 |
3 Distal Gastrectomy |
|
|
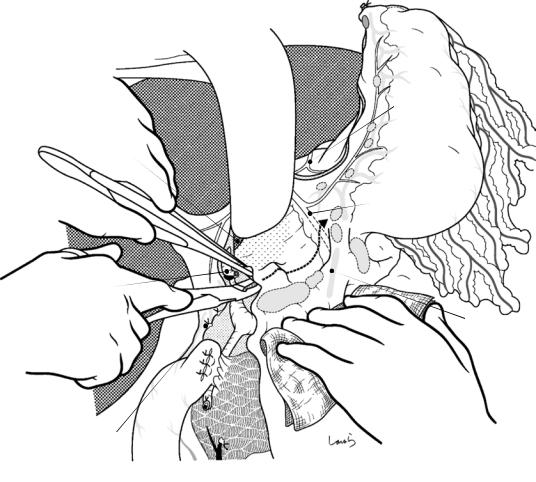
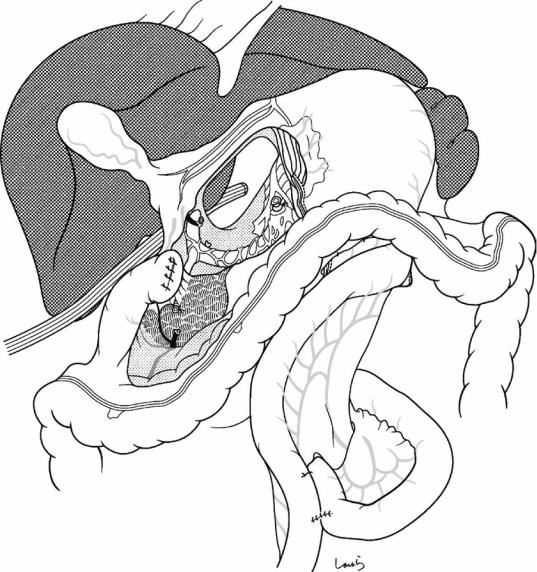
Fig. 3.58 Billroth-I reconstruction (Fig. 3.58 through Fig. 3.67): After completing the procedure as illustrated in Fig. 3.32, a sump clamp is placed on the immediate anal side of the pyloric ring and an intestinal clamp is placed on the duodenal transection line while ensuring an adequate margin for the transection. The duodenum is transected 1–2 mm orally from the clamp with a pointed blade (transecting too close to the clamp may dislodge it and result in deviation of the duodenum). The mucosal surface of the stump is wiped off and cleaned with gauze
Stump clamp
Intestinal clamp

3 Distal Gastrectomy |
85 |
|
|
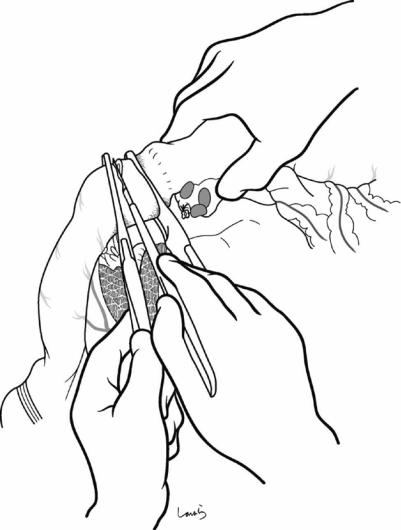
Gastric clamp
Stump clamp
Fig. 3.59 After dividing the stomach with a linear stapler, a stump clamp is applied, taking into consideration the diameter of the duodenum and (1) applying the clamp at an acute angle to the stomach stump and (2) ensuring
that the tip of the clamp is not beyond the edge of the stump. Then, the gastric clamp is also applied, the part of the stomach stump that protrudes from the stump clamp is transected, and the stump clamp is removed
86
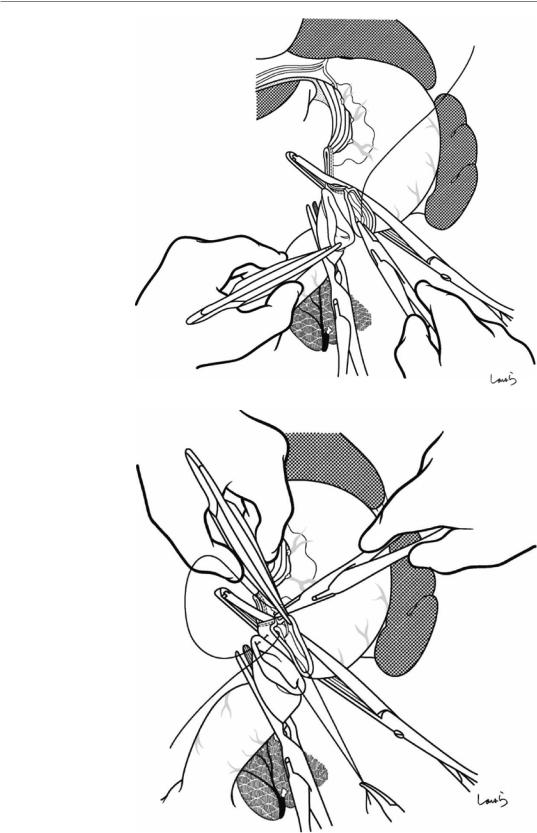
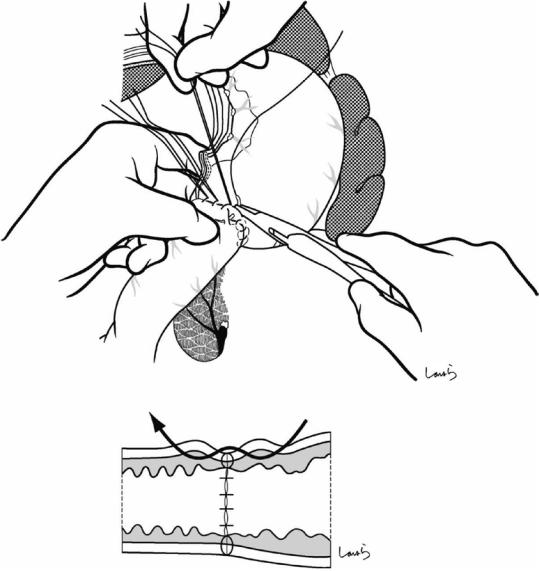
Fig. 3.60 Gastroduodenal anastomosis: An intestinal clamp for anastomosis is applied to the duodenal stump and the clamp is removed. The second assistant supports the stomach clamp and the intestinal clamp, and anastomosis is started. First, a full-layer 4-0 PDS suture is passed on the greater curvature corner in the sequence of inside → out →outside →in and is grasped with mosquito forceps without ligating
Fig. 3.61 In the lesser curvature corner, a 4-0 PDS mattress suture is applied around the staple line in the sequence inside of the posterior wall → out → outside → in → inside of the anterior wall → out → outside → in and is then ligated. One of the threads is grasped with mosquito forceps
3 Distal Gastrectomy
3 Distal Gastrectomy |
87 |
|
|
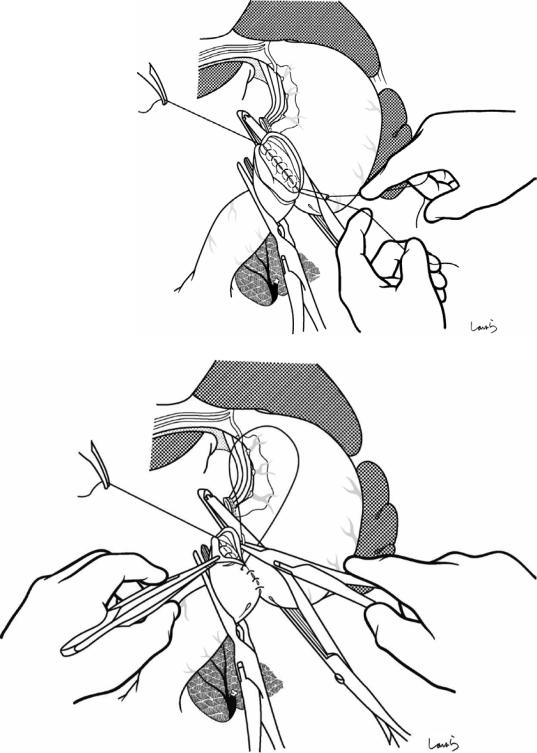
Fig. 3.62 An Albert suture is applied to the posterior wall. The surgeon and the first assistant hold the serosa of the stomach and duodenum, ensuring that all layers are passed. After completing the suture along the full length of the posterior wall, the thread on the lesser curvature side is ligated first, and then one of the threads on the contralateral side and the Albert suture are ligated, while the other thread is cut
Fig. 3.63 The Albert suture is then continued on the anterior wall with the same thread. The last few stitches should be placed after removing the intestinal and gastric clamps. After suturing the full length, the thread is ligated
with the thread end that was held with mosquito forceps at the beginning, thus completing the circumferential full- thickness suture
88 |
3 Distal Gastrectomy |
|
|
Fig. 3.64 Additional interrupted seromuscular 3-0 Vicryl sutures are applied, starting from the upper edge of the anterior wall. The correct technique is to suture the stom-
ach side and the duodenum side one after another as if drawing a “W” with the tip of the needle. (It is important to do this rhythmically!)

3 Distal Gastrectomy |
89 |
|
|
Fig. 3.65 The suture can be continued to a considerable portion of the posterior wall by rotating the anastomosis site. When you feel you cannot go any further, grasp the
Fig. 3.66 Then, the anastomosis is rotated in the reverse direction and lifted with the turned thread, while seromuscular sutures are applied to the remaining part of the posterior wall. The corner of the anastomosis adjacent to the staple line is most reliably secured with a 3-point triangular suture
last thread with Kocher forceps to pass it behind the anastomosis and cut the rest of the threads
90
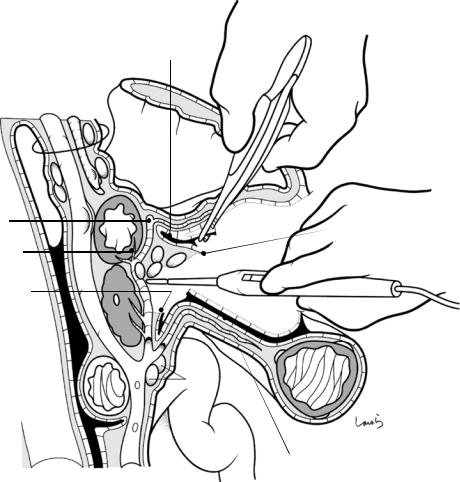
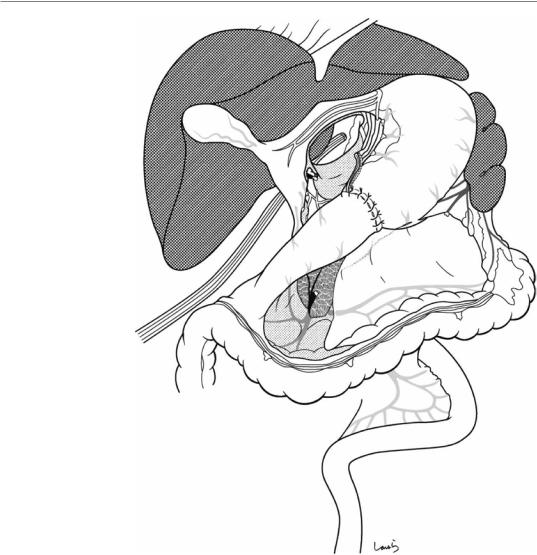
Fig. 3.67 If the anastomotic site seems to be under tension, additional duodenal mobilization should be performed (Kocher maneuver). Following mobilization, the hepatic portal vasculature deviates considerably toward the midline, as shown. After washing the abdominal cavity, an 8-mm duple drain is inserted into the foramen of Winslow from the right side of the abdomen. The operation is completed by closing the abdominal wall, suturing in three layers
3 Distal Gastrectomy