


1.9 Expansion of the Greater Omentum |
15 |
|
|
over up to three-quarters of its circumference as a result of fusion, as well as its collision with the retroperitoneum. It should be noted that the gap between the retroperitoneum and the mesostenium (asterisk in Fig. 1.12b) will also disappear in time and become the root of mesostenium (see Fig. 1.16).
1.8\ Collision oftheAscending and Descending Colons
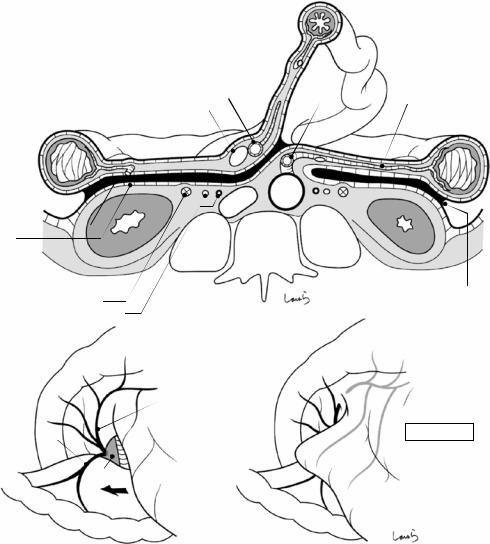
Subsequently, the ascending and descending colons are attracted to and collide with the abdominal wall, causing fusion between the visceral peritoneum over the mesocolon and the retroperitoneum and subsequent fixation of the colon (Fig. 1.13). The fused peritoneum is also referred to as the fusion fascia of Toldt, as in the case of the pancreatic tail. After collision, the mesentery will remain adherent to the retroperitoneum, although their boundary (Monk’s white line) can be clearly seen due to the slightly different nature of the two peritoneal membranes. As was the case with the preceding collision events, the layer structure of the intermediate fat layer containing blood vessels and lymphoid tissue and the overlaying subperitoneal fascia remains unchanged.
Figure 1.14a shows a computed tomography cross section of the ascending and descending colons at the middle part and around the root of the IMA. When mobilizing the colon, the layer below the fusion fascia of Toldt should be dissected up to the base of the mesentery to ensure that the intermediate layer containing lymph nodes is on the resection side. However, we can still dissect the layer above the fusion fascia of Toldt as long as we do not penetrate the fascia up to the intermediate layer, which is even safer in terms of avoiding damage to the ureter. It should also be remembered that the medial approach, where vascular root ligation is performed first, facilitates dissection below the fusion fascia of Toldt, whereas the lateral approach, where mobilization from Monk’s white line is performed first, facilitates dissection above the fusion fascia of Toldt.
Further details will be given in Chap. 6 on right hemicolectomy.
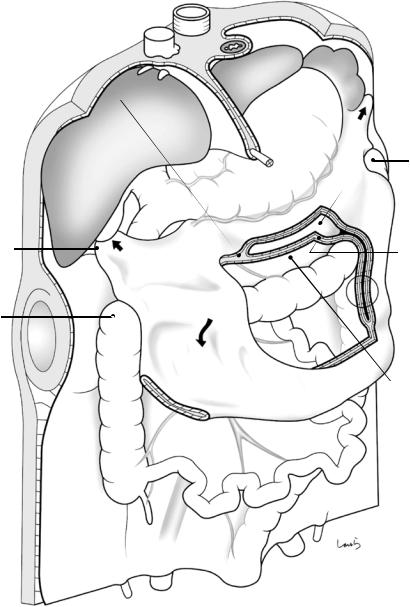
Now the anatomy of the stomach and surrounding structures is almost completed, except for the growth of the greater omentum. Let’s go back to Fig. 1.13. First, the dorsal mesogastrium extends downward past the transverse colon while maintaining its sac-like structure (which is cut off in the figure for better view of the cross section). The dorsal mesogastrium also extends to the right and left (arrows in Fig. 1.13), although these parts have no sac-like structure but instead a single-layered structure where only the superficial layer (consisting of, from top to bottom, the peritoneum, subperitoneal fascia, fat, subperitoneal fascia, and peritoneum) is extended. These extended parts of the dorsal mesogastrium is referred to as the greater omentum, which hangs down in the abdominal cavity while widely covering the small intestine. Figure 1.14b illustrates how the greater omentum extends to the right.
1.9\ Expansion oftheGreater Omentum
After expanding downward while maintaining its sac-like structure, the omental bursa begins to take on a folded double-layered structure formed by fusion of the internal peritoneal membranes. Therefore, this part of the greater omentum (circled in Fig. 1.15) has a layer structure consisting of, from top to bottom, the peritoneum, subperitoneal fascia, fat, subperitoneal fascia, fusion fascia, subperitoneal fascia, fat, subperitoneal fascia, and peritoneum.
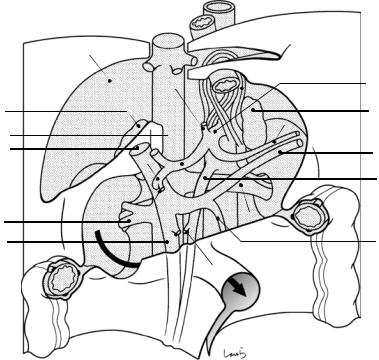
The part of the greater omentum extending to the right expands over the right transverse mesocolon past the right colic flexure up to the diaphragm, where it stops expanding. The part of the greater omentum that came into contact with the diaphragm becomes the right phrenicocolic ligament, which pulls up the right colic flexure. As the omental bursa extends, the apposed peritoneal membranes are fused with each other, as always. An exception is that three peritoneal membranes fail to merge where they meet (asterisk in

16 |
1 Anatomy of the Stomach and Surrounding Structures, Part I: For Those Who Seek Theoretical Basis… |
|
|
RGA
SPDA
 RGEA RGEV
MCV
ARCV
A
SM
Dorsal mesogastrium
 Omental
bursa
Post. layer of transverse mesocolon
Fig. 1.13 Extension of the dorsal mesogastrium to form the omental bursa, and collision of the ascending and descending colons
1.9 Expansion of the Greater Omentum |
17 |
|
|
a
Monk’s white  line
line
Toldt fusion fascia
Gerota’s fascia
Zuckerkandl‘s  fascia Ureter
Gonadal a. & v.
b
Infrapyloric v.
ASPDV
ARCV
SMV
Jejunum
SMA |
IMA |
SMV |
L colic a. |
IVC Ao
Monk’s white line
RGEV
Omental bursa
Greater |
omentum |
|
Fig. 1.14 Computed tomography cross section of the ascending and descending colons at the middle part (a), and schematic diagram of the extending greater omentum (b)
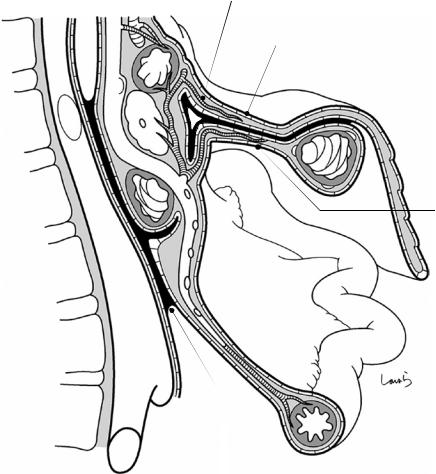
Fig. 1.16), forming a gap containing loose connective tissue. The right invasion of the greater omentum results in loss of the peritoneum covering the anterior aspect of the pancreatic head, making the whole pancreas a retroperitoneal organ. Thereafter, the greater omentum over the right transverse mesocolon will be recognized as
the anterior layer of the mesentery (as the dorsal mesogastrium is in contact with the left transverse mesocolon), while the “former” transverse mesocolon becomes the posterior layer. Thus, the “new” right transverse mesocolon has exactly the same layer structure as that of the left counterpart, consisting of, from top to bottom, the peri-
18 |
1 Anatomy of the Stomach and Surrounding Structures, Part I: For Those Who Seek Theoretical Basis… |
|
|
Ant. layer of L
transverse  L phrenicocolic lig. mesocolon
 Splenocolic lig.
|
L colic flexure |
|
|
Omental bursa |
|
R phrenicocolic |
Ant. layer of L |
|
transverse |
||
lig. |
||
mesocolon |
||
|
||
R colic flexure |
|
Greater omentum
Post. layer of transverse mesocolon
Fig. 1.15 Fully developed abdomen after extension of the greater omentum
toneum, subperitoneal fascia, fat, subperitoneal fascia, fusion fascia, subperitoneal fascia, fat, subperitoneal fascia, and peritoneum (italics indicate the omentum-derived anterior layer). This is
well illustrated in the cross section of Fig. 3.12. When looking at the entire transverse colon, the area ratio of the right to left mesocolon is 1:3 to 1:4, with the right border of the omental bursa, or
1.9 Expansion of the Greater Omentum |
19 |
|
|
|
Greater omentum covering anterior aspect of the pancreatic head |
PV |
Ant. layer of R transverse mesocolon |
|
*
SM |
V |
|
C IV
Post. layer of transverse mesocolon
Greater omentum
Root of mesentery of small intestine
Fig. 1.16 Sagittal cross section showing the greater omentum extending over the right transverse mesocolon and pancreas
the boundary between both mesocolons, coursing almost along the middle colic artery/vein. Compared with the sagittal cross section in Sect. 1.6, we see that the part of the greater omentum extending to the right is now part of the “new” transverse mesocolon. We can also see that the mesostenium near the center of torsion has fused with the retroperitoneum anterior to the inferior vena cava to form the root of the mesostenium.
The part of the greater omentum extending to the left continues to extend from the lower pole of the spleen toward the left colic flexure and again reaches the diaphragm, where it stops extending. The part of this greater omentum that came into contact with the diaphragm becomes the splenocolic ligament and the left phrenicocolic ligament, which pull up the left colic flexure.
Anatomy of the Stomach |
2 |
and Surrounding Structures, Part |
II: For Those Who Value Practical
Knowledge
Abstract
Precise understanding of clinical anatomy comes from precise understanding of embryology. Senior colleagues who make such statements probably have never opened embryology textbooks such as Moore’s “The Developing Human: Clinically Oriented Embryology” or Langman’s “Medical Embryology” but are very good surgeons. A knowledge of embryology is indeed needed, and in this chapter we not only consider embryology but also focus on a slightly different approach to gaining practical knowledge to inform our surgeries. The master carpenter, when building a palace, requires an accurate drawing. But creating a plastic model—a precise miniature of this pal- ace—requires only standard preshaped parts straight out of the box; parts just need to be assembled sequentially from top to bottom, which can be done by anyone with glue. In sur-
gery, if we have a basic understanding of the complex three-dimensional structure of the stomach and surrounding structures (adnexa)— akin to knowing the standard parts needed to assemble a model—we can omit certain theoretically important steps or include them later when needed. In this chapter, we explore the anatomy of the stomach and adnexa, where individual parts are assembled sequentially from deep to superficial. We emphasize only structures that are recognizable as membranes in practice, omitting those strictly defined embryologically such as the retropancreatic fascia and the fusion fascia in the retrocolic spaces. This chapter therefore suits to those who want to learn practical aspects of surgery.
Keywords
Stomach · Mesentery · Fascia · Clinical anatomy · Embryology
© Springer Nature Singapore Pte Ltd. 2020 |
21 |
H. Shinohara, Illustrated Abdominal Surgery, https://doi.org/10.1007/978-981-15-1796-9_2 |
|
22 |
2 Anatomy of the Stomach and Surrounding Structures, Part II: For Those Who Value Practical Knowledge |
||
|
|
|
|
|
|
Abdominal aorta |
|
|
|
Esophagus |
|
|
|
Inf. vena cava |
|
|
Diaphragm |
|
|
|
(bare area) |
Crus of diaphragm |
|
|
|
||
|
L gastric a. |
Celiac a. |
|
|
|
||
|
R adrenal gland |
L adrenal gland |
|
Common hepatic a. |
Splenic a. |
||
|
|||
|
Portal v. |
Splenic v. |
|
Gastroduodenal a. |
|||
|
|||
|
|
Sup. |
|
|
|
mesenteric a. |
|
R gastroepiploic a. |
L renal v. |
||
|
R renal v. |
||
|
|
||
Sup. mesenteric v. |
Inf. mesenteric v. |
||
|
|
Mid. colic a. |
|
Mid. colic v.
Fig. 2.1 Here we see the deepest layer of the abdomen. The shaded area represents the part that has not yet been covered by peritoneum. Blood vessels, the kidney, and the ascending and descending colon are already in place. The underside of the diaphragm that is attached to the bare area
of the liver has no peritoneum, so the muscle fibers are exposed. The left and right crura of the diaphragm surrounding the esophageal hiatus cross and attach to the lumbar spine to form the aortic hiatus. The arrow indicates the route along which the duodenum passes in the next step
2 Anatomy of the Stomach and Surrounding Structures, Part II: For Those Who Value Practical Knowledge 23
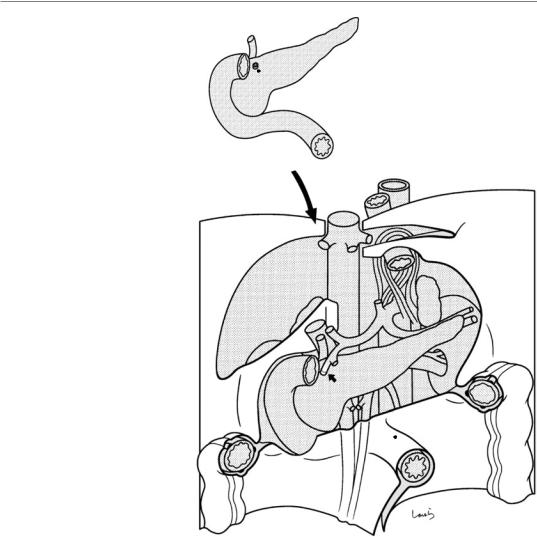
Fig. 2.2 We can now |
Bile duct |
assemble the pancreas, |
|
intrapancreatic bile duct, |
|
and duodenum. The |
|
horizontal and the lower |
|
parts of the duodenum, |
|
indicated by the arrow in |
|
Fig. 2.1, pass underneath |
|
the superior mesenteric |
|
artery and vein and enter |
|
the abdominal cavity |
|
through the ligament of |
|
Treitz. The superior |
|
pancreaticoduodenal |
|
artery (formerly the |
|
gastroduodenal artery |
|
after branching off from |
|
the right gastroepiploic |
|
artery) is attached to the |
|
portion indicated by the |
|
small arrow. The inferior |
|
pancreaticoduodenal |
|
artery is omitted here |
|
Sup. pancreaticoduodenal a.
Lig . of Treitz

24 2 Anatomy of the Stomach and Surrounding Structures, Part II: For Those Who Value Practical Knowledge
|
3 |
|
2 |
Post. layer of |
|
transverse mesocolon |
1 |
|
Mid. colic a. & v.
Post. wall of omental bursa
Omental tenia
L gastric a. |
|
|
|
|
|
|
|
c |
L border of |
|
|
b |
omental bursa |
|
Foramen of Winslow |
|
3 |
|
|
|
|
|
||
|
|
|
2 |
Gastropancreatic lig. |
|
a |
|
|
|
|
|
|
|
|
|
|
|
1 |
|
R border of omental bursa
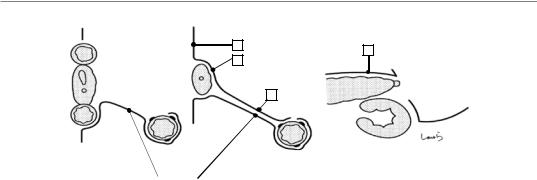
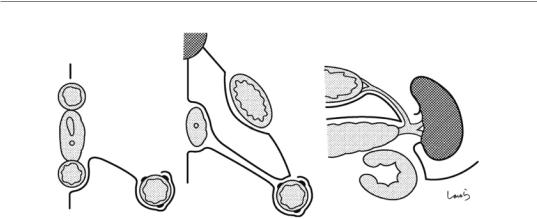
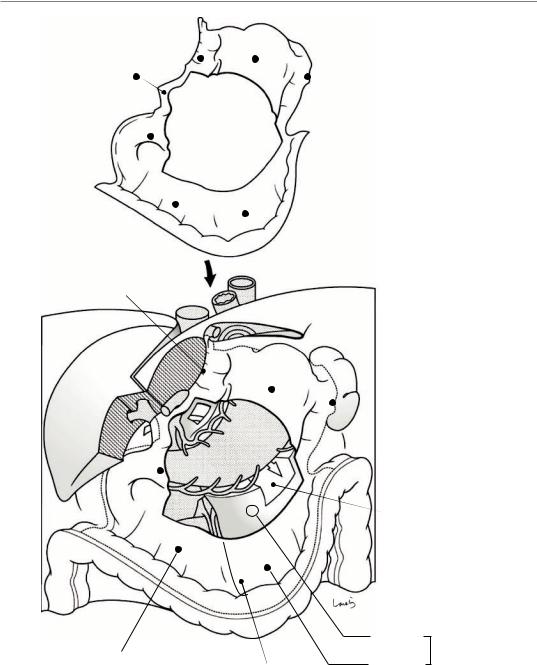
Fig. 2.3 The next two parts for assembly are the posterior layer of the transverse mesocolon (plus the transverse colon), shown in the top left, and the posterior wall of the omental bursa, shown in the top right. The posterior wall of the omental bursa is a single peritoneal membrane consisting of the anterior layer of the left transverse mesocolon ( 1 ), the capsule of the anterior aspect of the pancreatic body and tail ( 2 ), and the retroperitoneum located cranially ( 3 ). The border of the omental bursa is folded back to clearly visualize the sac-like structure of the omental bursa. The right folding line (right border) of the omental bursa runs almost along the middle colic artery and vein, and its
Ant. layer of L transverse mesocolon
left border is at the splenic hilum. The membrane indicated by 3 continues as the retroperitoneum at the right margin of the inferior vena cava to form the posterior wall of the foramen of Winslow (white arrow indicates the route of entry into the omental bursa through this foramen). There is a notch-shaped defect in the retroperitoneum in the area from the abdominal esophagus to the root of the left gastric artery and vein, and this exposes the crus of the diaphragm in front of the aorta. The muscular layer of the stomach directly attaches to this area via loose connective tissue, forming what is called the gastropancreatic fold. The left gastric artery arises from the apex of the notch
2 Anatomy of the Stomach and Surrounding Structures, Part II: For Those Who Value Practical Knowledge 25
a |
b |
c |
|
3 |
2 |
|
2 |
|
|
|
|
|
1 |
Pancreas |
|
|
|
|
|
Kidney |
Post. layer of transverse mesocolon |
|
|
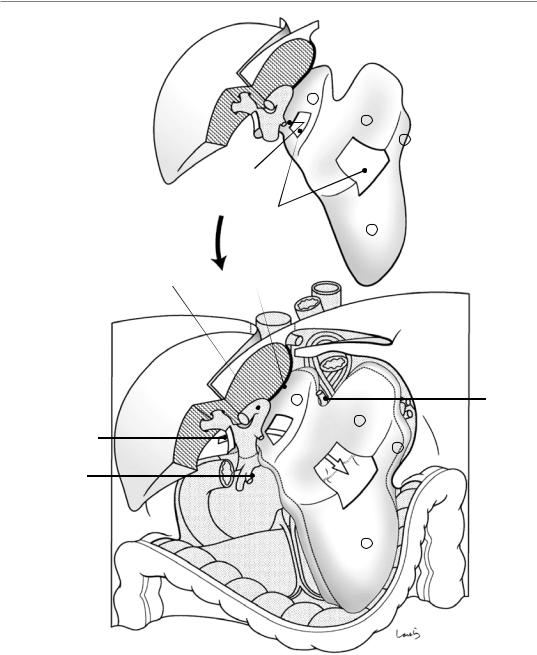
Fig. 2.3 (continued) The transverse colon is covered by peritoneum, as an extension from the posterior leaf of the mesocolon, along two-thirds of the circumference (between the mesocolic tenia and the omental tenia) on the right side of the right border of the omental bursa; on the left side where the omental bursa is present, it is almost circumferentially covered by the posterior leaf as well as the anterior leaf of the mesocolon (the posterior layer of the omental bursa), which
has been folded back. The bulbous and descending parts of the duodenum and the anterior aspect of the pancreatic head are not yet covered by peritoneum. Here, the three vessels constituting the hepatoduodenal ligament are depicted as a single vessel for convenience. The bottom panels a, b, and c are cross sections along the lines a, b, and c, respectively, shown in the middle panel
26 2 Anatomy of the Stomach and Surrounding Structures, Part II: For Those Who Value Practical Knowledge
Liver
4
3
2
R gastric a.
Ant. lid of omental bursa
Windows
1
Umbilical portion of portal v. Duct of Arantius
4 |
L gastric a. |
3
Foramen of Winslow
2
R gastriepipioic a. |
Omental |
|
|
|
bursa |
|
1 |
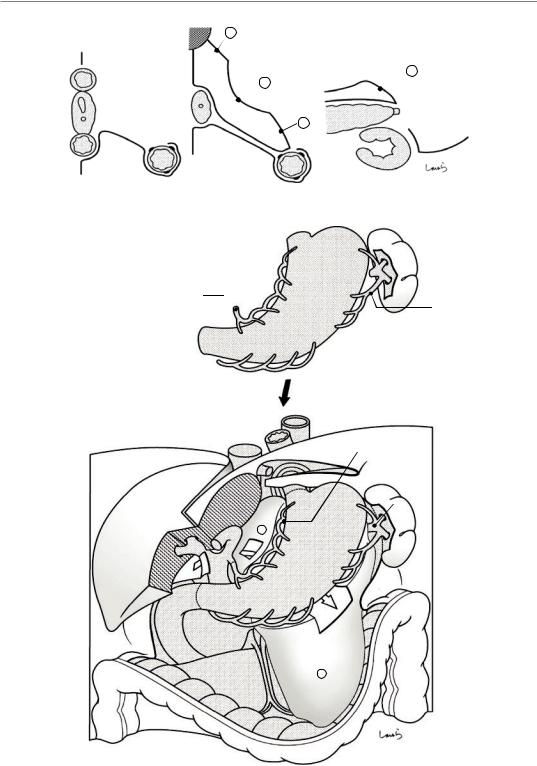
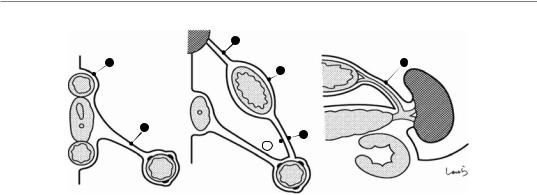
Fig. 2.4 Now we can assemble the liver (excluding the lateral segment) and the anterior lid of the omental bursa. The anterior lid of the omental bursa is a single peritoneal membrane consisting of the posterior layer of the gastrocolic ligament, the posterior layer of the gastrosplenic ligament, the serosa of the posterior gastric wall, and the posterior layer of the lesser omentum. When we apply an adhesive to the folded area of the posterior wall of the omental bursa, which was assembled in the previous step, and we fit this part inside, we get a sac-like omental bursa. The posterior layer of the lesser omentum ( ) attaches to the duct of Arantius, which courses along the boundary
between the medial segment of the liver and Spiegel’s part of the caudate lobe. The right border of the posterior layer continues as the peritoneum behind the hepatoduodenal ligament and serves as the anterior wall of the foramen of Winslow. The top panel of Fig. 2.4 shows two windows that are cut out to visualize the route of entry into the omental bursa from the foramen of Winslow (shown by the white arrow in the lower panel). Here, a part of the S4 segment of the liver is also omitted to provide a clear view of the hepatic portal region. The caudate lobe and gallbladder are omitted. The lower panels (a, b, and c) show cross sections
2 Anatomy of the Stomach and Surrounding Structures, Part II: For Those Who Value Practical Knowledge 27
a |
4 |
b |
c |
|
|
|
2
3
|
Omental bursa |
|
Omental |
1 |
|
bursa |
||
|
Fig. 2.4 (continued)
LGA
 SPA
SPA
RGA
LGEA
RGEA
LGA
SPA
4
 LGEA
LGEA
RGA
RGEA 
1
Fig. 2.5 We can then assemble the stomach and spleen, and the roots of the left gastric artery (LGA), right gastric artery (RGA), right gastroepiploic artery (RGEA), and splenic artery (SPA) are adherent. The left gastroepiploic
artery (LGEA) branches from the splenic artery. The spleen is already covered by the serosa, except for the hilum, and is placed in the pocket lateral to the left kidney. The lower panels (a, b, and c) show cross sections
28 2 Anatomy of the Stomach and Surrounding Structures, Part II: For Those Who Value Practical Knowledge
a b c
STM
STM
Omental bursa
Omental
bursa
Fig. 2.5 (continued)
2 Anatomy of the Stomach and Surrounding Structures, Part II: For Those Who Value Practical Knowledge 29
5 4
6 |
3 |
4 Window
1
2
Duct of Arantius
4
3
4
1
1
2
Ant. layer of R transverse mesocolon
R border of omental bursa
Omental bursal
Post. layer
Gastrocolic lig.
Ant. layer
Fig. 2.6 Here the parts of the outermost layer are attached. These parts constitute a single peritoneal membrane that comprises the anterior leaf of the right transverse mesocolon, the anterior layer of the gastrocolic ligament, the anterior layer of the gastrosplenic ligament, the serosa of the anterior wall of the stomach and duodenum, the anterior leaf of the lesser omentum, and
the peritoneum on the anterior aspect of the hepatoduodenal ligament. A large window is cut out at the center of the membrane. The lower panels (a, b, and c) show cross sections. Attaching these parts to the omental tenia gives us circumferential coverage of the transverse colon with peritoneum
30 2 Anatomy of the Stomach and Surrounding Structures, Part II: For Those Who Value Practical Knowledge
a |
|
b |
|
c |
|
|
5 |
|
|
4 |
|
|
4 |
3 |
|
|
|
|
|
|
|
|
|
Omental bursa |
|
1 |
Omental |
|
2 |
|
bursa |
|
||
|
|
|
||
|
|
1 |
|
|
Fig. 2.6 (continued)
2 Anatomy of the Stomach and Surrounding Structures, Part II: For Those Who Value Practical Knowledge 31
2 |
1 |
Greater omentum |
Omental bursa |
|
1
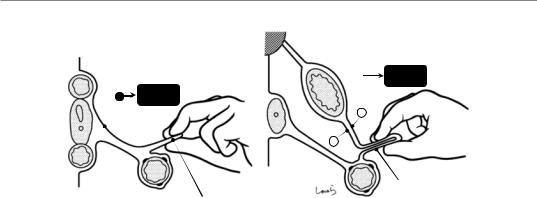
Fig. 2.7 By pinching the anterior leaf of the right transverse mesocolon ( ) and the anterior and posterior layers of the gastrocolic ligament ( + ) around their attachment to the transverse colon and then lifting them up to stretch them, we create the greater omentum. The right and left halves of the stretched part have a layered structure composed of two and four layers of peritoneum, respectively. In the right transverse mesocolon, where there is no omental bursa, the greater omentum also ends
up serving as the anterior leaf of the transverse mesocolon. The lower panels (a and b) show cross sections
As the final step in building our plastic model of the upper abdomen, we attach the lateral segment of the liver (a part of S3 is omitted)
Although what we have covered here may not be truly academic because it doesn’t take into account the developmental process, it does offer beginners in stomach surgery a basic but important understanding of the anatomy
32 2 Anatomy of the Stomach and Surrounding Structures, Part II: For Those Who Value Practical Knowledge |
|
a |
b |
|
|
Greater |
|
Greater |
omentum |
1 |
|
|
omentum |
|
|
|
|
|
|
|
2 |
|
|
Omental |
|
|
bursa 1 |
|
|
Stretched part |
|
|
Stretched part |
Fig. 2.7 (continued) |
|
|