

- •Foreword
- •Preface
- •Contents
- •1.1 Introduction
- •1.2 Prologue
- •1.9 Expansion of the Greater Omentum
- •3: Distal Gastrectomy
- •4: Total Gastrectomy
- •5.2 Part II: Thoracic Manipulation
- •6: Right Hemicolectomy
- •7: Appendectomy
- •8.6 Internal Pudendal Artery and Its Branches
- •8.13 Lateral Ligament
- •8.16 Fascia Propria of the Rectum: Part II
- •9: Sigmoidectomy
- •13: Hemorrhoidectomy
- •14: Right Hemihepatectomy
- •15: Left Lateral Sectionectomy
- •16: Laparoscopic Cholecystectomy
- •17: Open Cholecystectomy
- •Bibliography
Sigmoidectomy |
9 |
|
Abstract
The sigmoidectomy procedure described in this chapter is an introductory procedure of colectomy. Compared with other parts of the large intestine, the sigmoid colon is anatomically simpler because it has an unfused mesentery. Although sigmoidectomy is now rarely performed via open surgery, its significance remains the same even when performed laparoscopically. The standard operation time is 2 h.
Keywords
Sigmoidectomy · Colectomy · Sigmoid colon
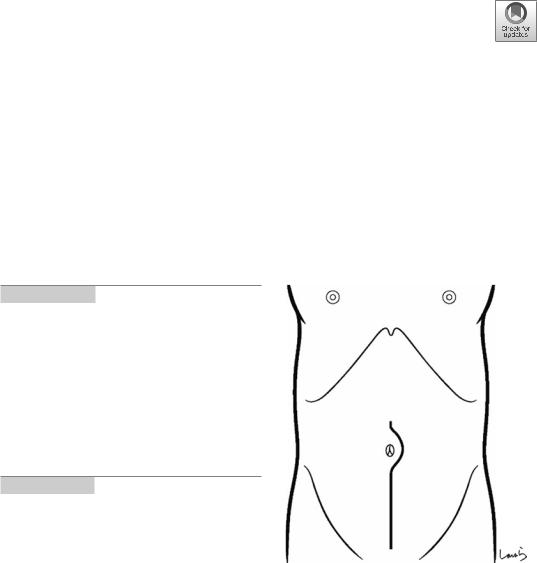
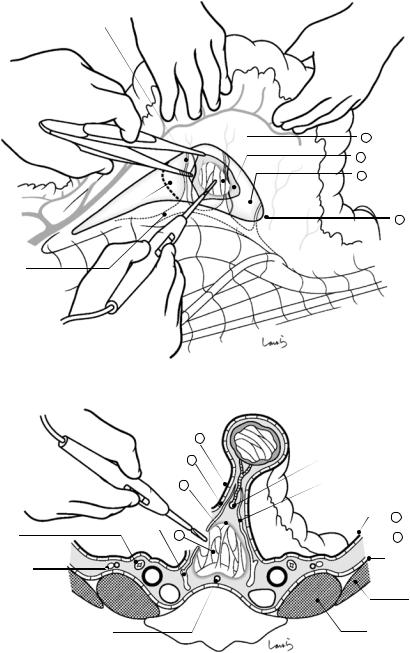
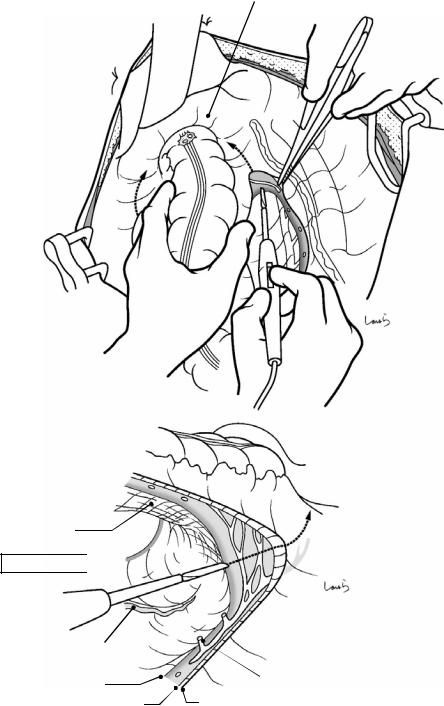
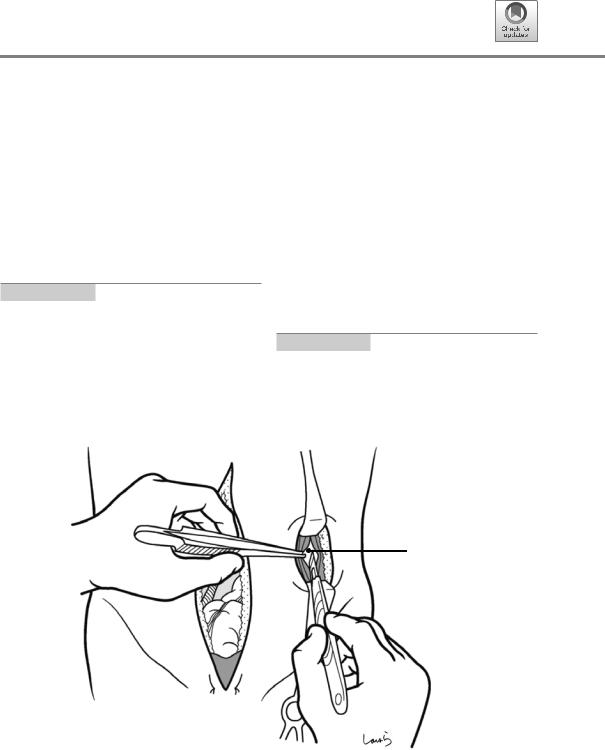
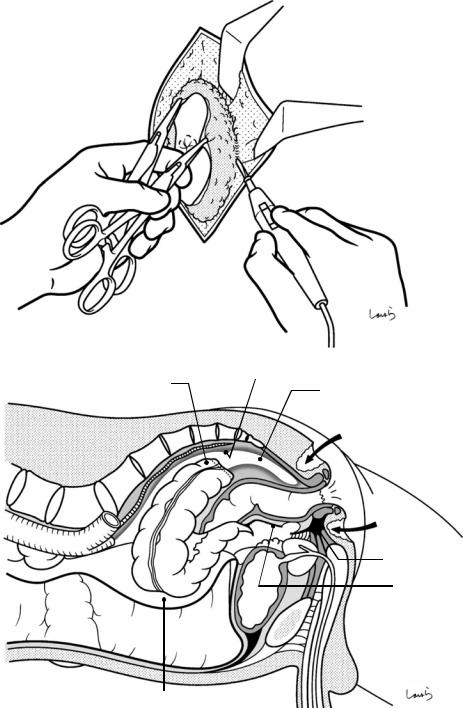
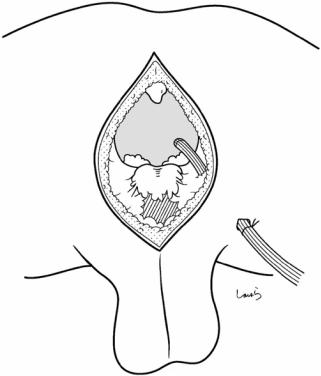
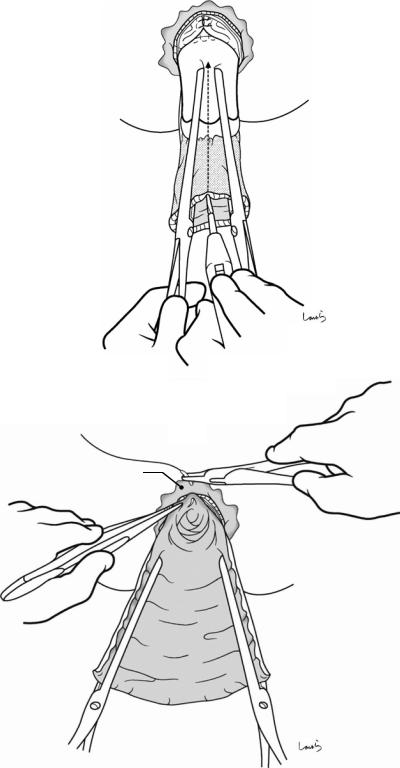
Fig. 9.1 The surgeon stands on the right side of the patient and makes a lower abdominal midline incision extending from 3 cm above the umbilicus to the upper border of the pubis. Limiting the incision to the level of the umbilicus makes it difficult to access the root of the interior mesenteric artery (IMA); incising excessively upward may result in intestinal prolapse, interfering with the procedure. We should be careful not to cut the urinary bladder when incising the lower part of the abdomen. The incision may be shorter depending on the site of the lesion and the extent of lymph node dissection needed
© Springer Nature Singapore Pte Ltd. 2020 |
247 |
H. Shinohara, Illustrated Abdominal Surgery, https://doi.org/10.1007/978-981-15-1796-9_9 |
|

248 |
9 Sigmoidectomy |
|
|
Fig. 9.2 After the abdominal cavity is explored, a wound retractor is placed. If the incision has been extended to the upper border of the pubis, the peritoneum should be fixed
to the skin using two sutures placed at the lower end of the wound and as close as possible to the midline for reliable fixation
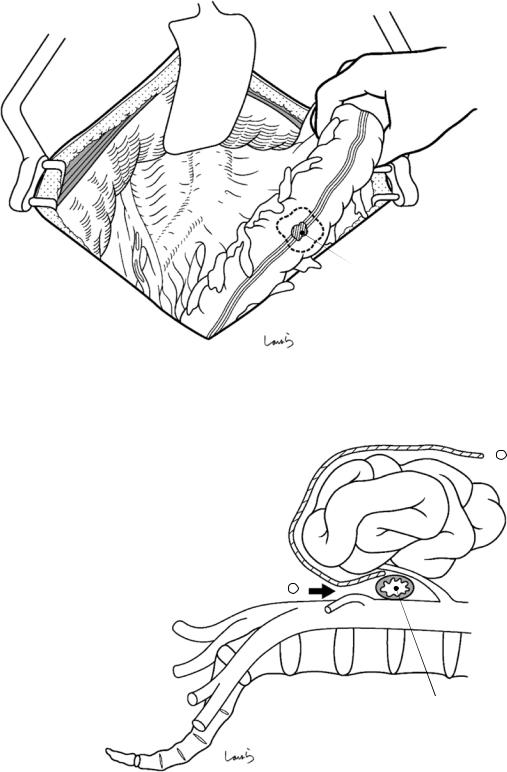
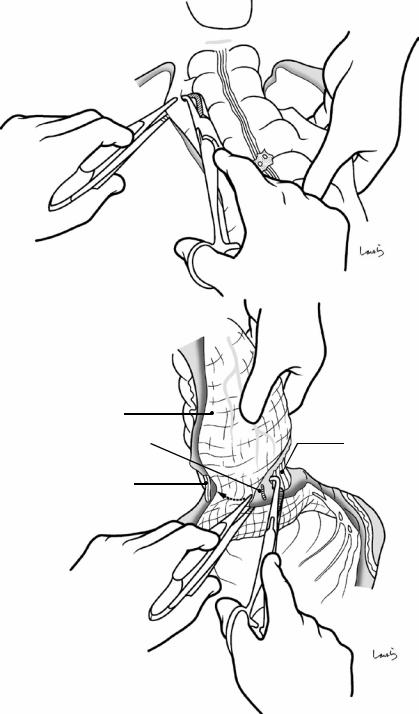
Fig. 9.4 The smoothness of the subsequent procedures is substantially influenced by how the surgical laparotomy sponge is placed over the intestine. The sponge should be spread and placed so that it can wrap around the entire small intestine, rather than rolling it into a ball and squeezing it under the intestine. It is advisable to insert the sponge firmly between the small intestine and the retroperitoneum. With the left palm formed into a cup, the surgeon ade-
quately retracts the small intestine cranially, holds it for a while to confirm that the intestine does not protrude, and receives the sponge spread out. After the left palm is lifted from the retroperitoneum and the sponge is placed between the intestine and the retroperitoneum ( ), the left hand is carefully removed and the sponge is inverted in such a way that it wraps around the small intestine and is spread out between the abdominal wall and the intestine ( )
9 Sigmoidectomy |
249 |
|
|
Cancerous lesion
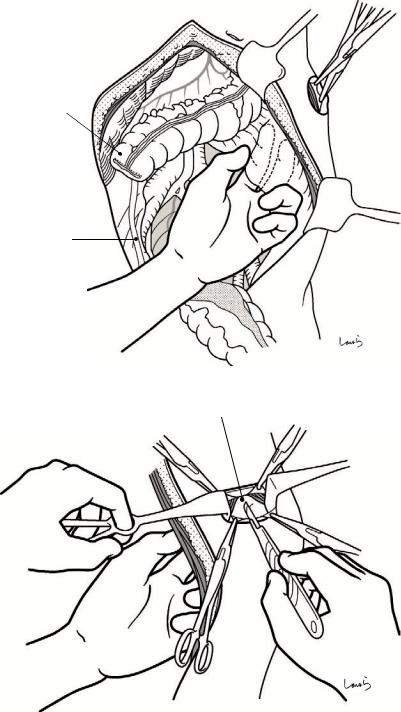
Fig. 9.3 With the sigmoid colon lifted up, the small intestine is covered with a surgical laparotomy sponge and retracted cranially with an Octopus retractor. This can be
done more easily by the first assistant standing on the left side of the patient
Surgical laparotomy sponge |
2 |
|
Small intestine
|
1 |
SMA |
|
|
IMA |
5 |
4 |
L3 |
|
|
Horizontal part of duodernum
250 |
|
|
|
|
9 Sigmoidectomy |
|
|
|
|
|
|
|
|
|
IMA |
|
|
|
|
|
|
D3 |
D |
|
|
|
|
||
|
Main LNs |
|
|
|
|
|
|
|
|
|
|
|
|
|
|
|
LCA |
|
|
|
|
|
D2 |
|
|
|
|
|
|
|
|
|
|
|
|
|
|
|
|
S1 |
|
|
Intermediate LNs |
|
|
|
|
|
|
|
SRA |
S2 |
D1 |
|
|
|
|
||
|
|
|
|
|
|
|
Paracolic LNs |
|
|
St |
|
|
|
|
|
||
|
|
|
|
||
|
|
|
|
|
|
|
|
|
|
|
S |
|
|
|
|
|
|
|
Sudeck point |
|
|
|
|
|
|
|
RS |
|
|
|
|
|
Ra |
|
|
|
|
|
Rb |
|
|
|
|
|
P |
|
|
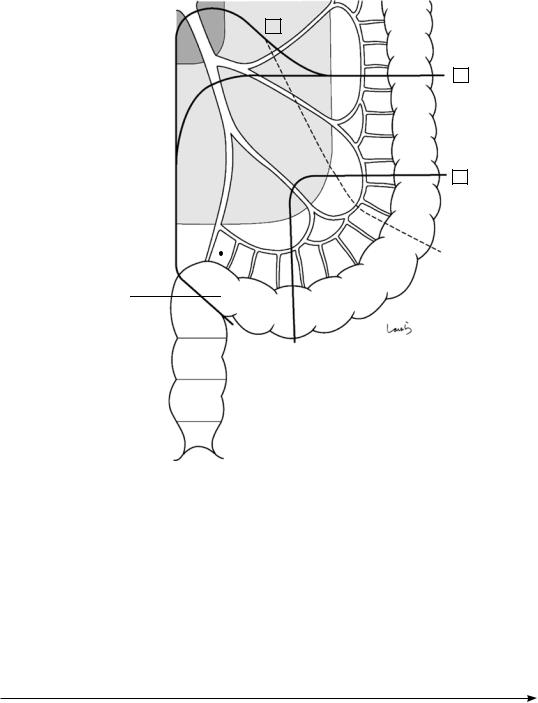
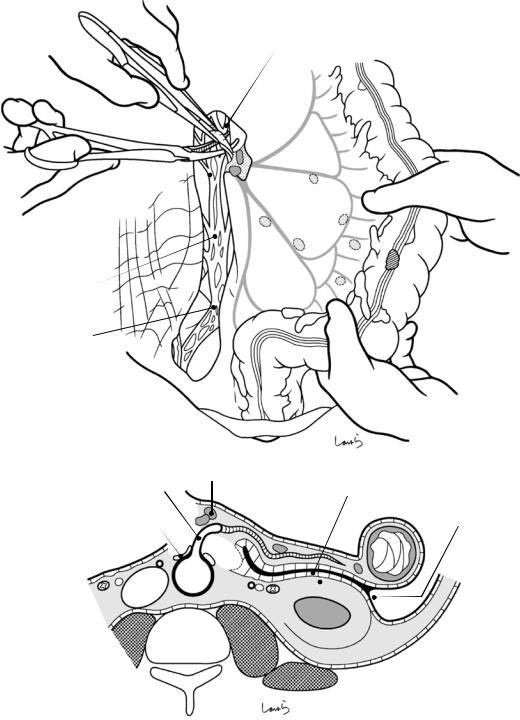
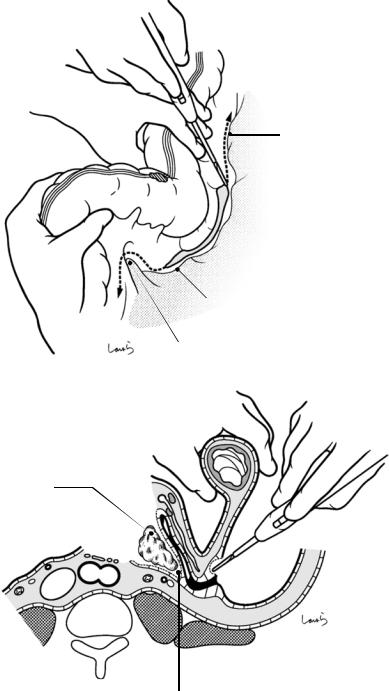
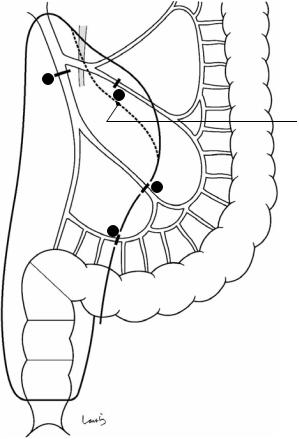
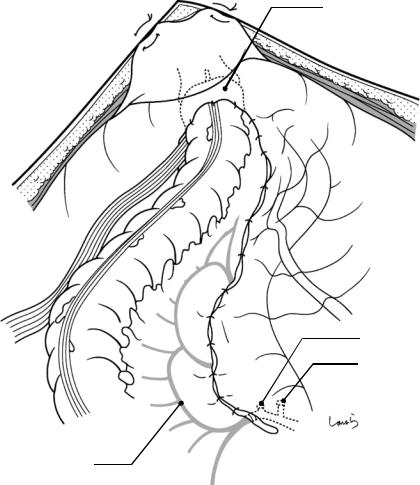
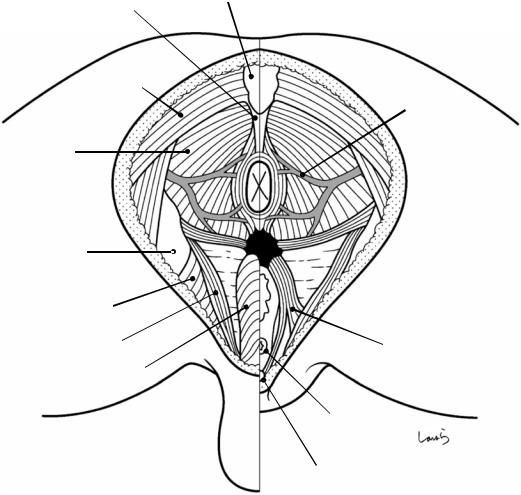
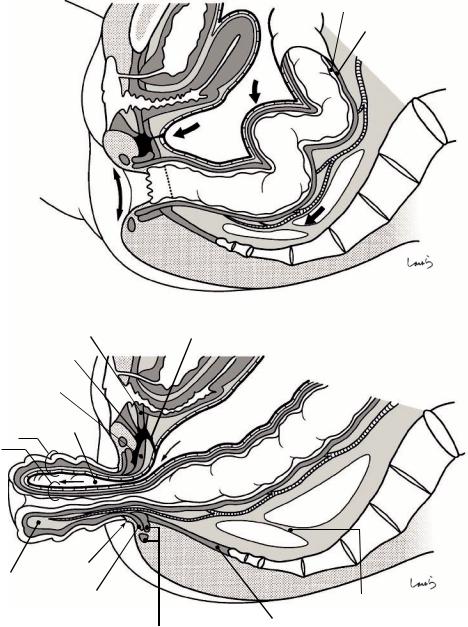
Fig. 9.5 The supplying arteries and draining lymph nodes of the sigmoid colon are usually categorized into three sigmoid arteries. The first sigmoid artery (S1) most commonly branches off from the IMA as a common trunk with the left colic artery (LCA). The terminal sigmoid colon artery (St) branches off from the superior rectal artery (SRA). Because there often is no marginal artery between the St and SRA (the Sudeck point), we may recognize the St as a marginal artery between the second sigmoid colon artery (S2) and the SRA. The distance between the root of the IMA and the origin of the LCA is 3–10 cm, which may be longer than expected
Lymph nodes are divided into the paracolic, intermediate (light-shaded area), and main (dark-shaded area)
lymph nodes. D0-D1 dissection is sufficient in cases of mucosal cancer. For submucosal cancer, which has been associated with a 10% prevalence of lymph node metastasis including intermediate nodes, D2 dissection should be performed. In that case, the LCA can be preserved. Cases of advanced cancer require D3 dissection, so the IMA should be ligated and divided at its root. The LCA will then be divided, typically followed by ligation of the marginal arteries between the LCA and S1. If the sigmoid colon is shorter and the cancerous lesion is located closer to the rectum, S1 can also be divided and crossed at the midpoint to preserve marginal arteries in a wider range (route indicated by the dotted line)
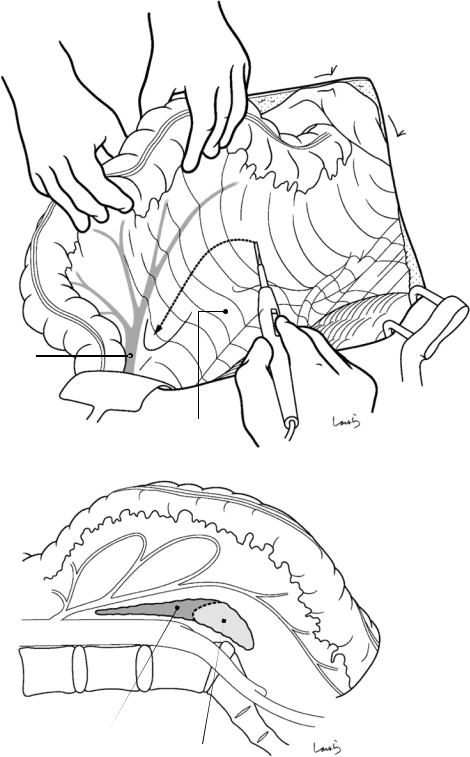
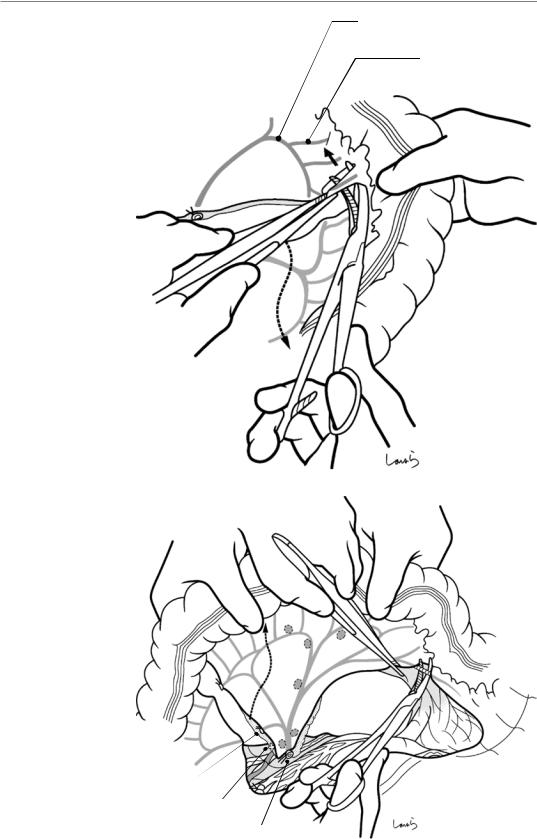
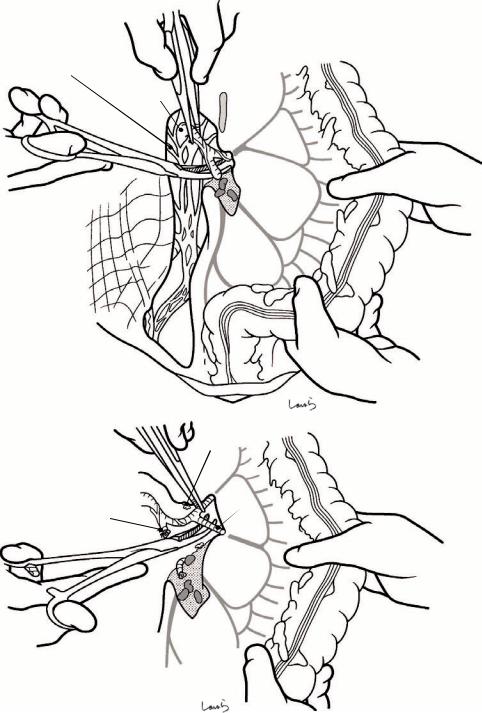
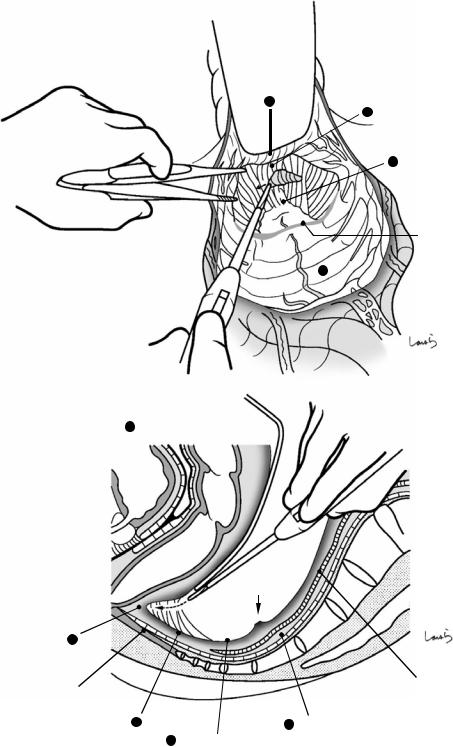
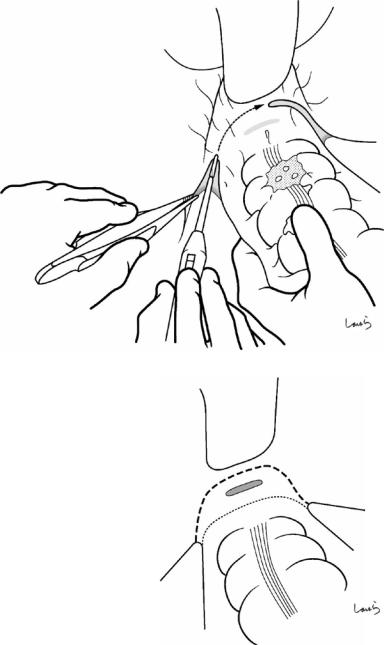
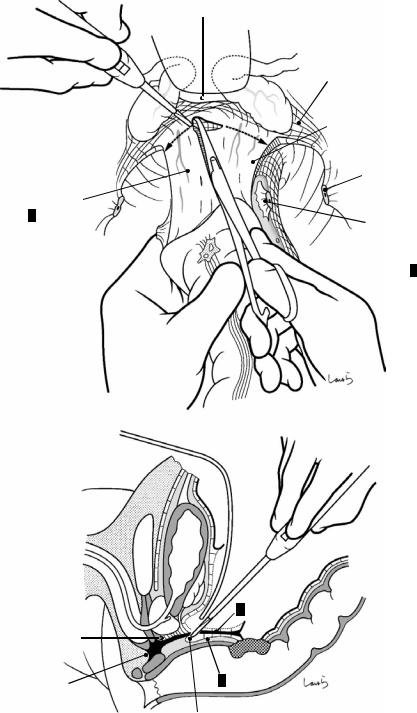
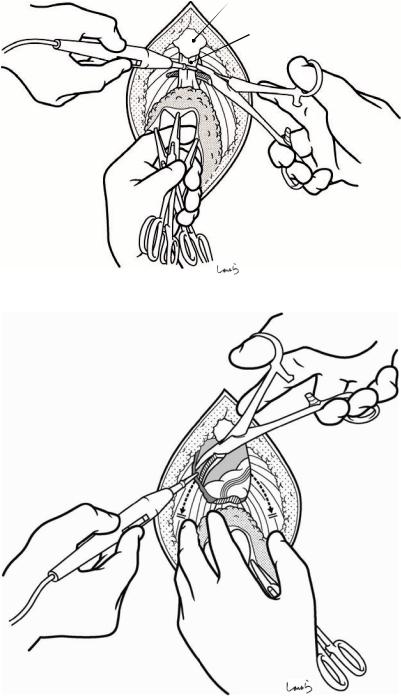
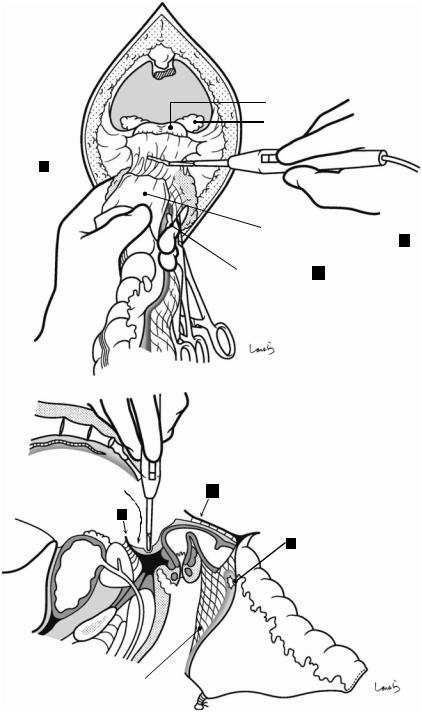
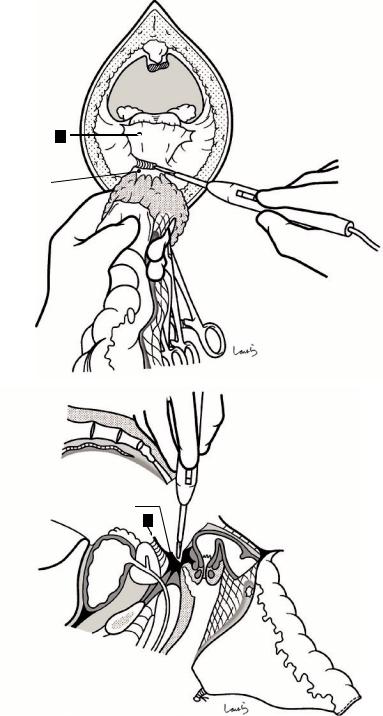
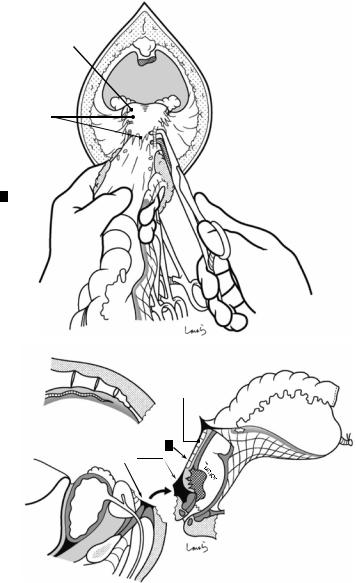
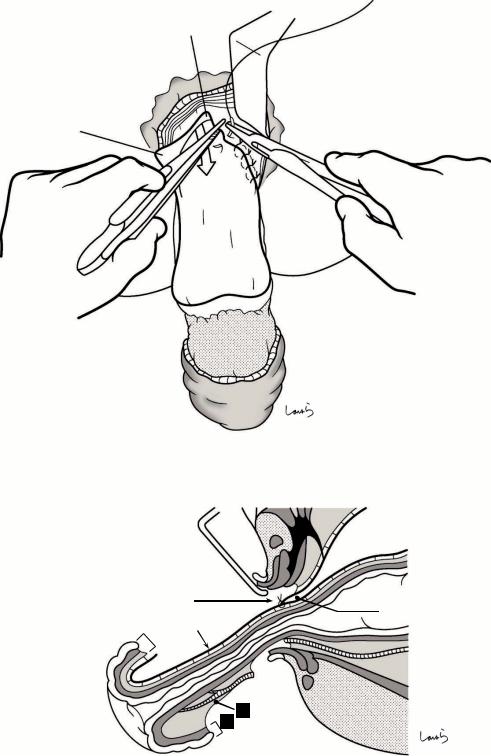
Fig. 9.6 The procedure to mobilize the sigmoid colon from the inner side should be started by entering the retrorectal space. The first assistant pulls the rectosigmoid (RS) laterally to the left to tautly stretch the right leaf of the mesorectum. The surgeon then makes a superficial incision on just the peritoneum with electrocautery at
2–3 cm below the cord-like structure containing the superior rectal artery (SRA) (a). The upper border of the retrorectal space (asterisk in b) is located around the iliac triangle, and the connective tissue contained in the mesorectal base is slightly dense on the proximal and loose on the distal side of this area
9 Sigmoidectomy |
251 |
|
|
a
SRA
S1
IMA
Promontory
b
St
S1 S2
LCA
*
SRA
Slightly dense
connective tissue Loose connective tissue
252 |
9 Sigmoidectomy |
|
|
a
Rectal branch
4 Retrorectal space
3 Pre-hypogastric n. fascia
2 Subperitoneal fascia
Upper border of |
|
|
retrorectal space |
1 |
Peritoneum |
|
R hypogastric n.
b
R |
|
L |
|
|
|
|
|
1 |
|
2 |
SRA |
|
|
|
3 |
|
Rectal branch |
|
|
1
R hypogastric n.
Ureter 4  2
2
Fascia transversalis
Gonadal a. & v.
|
A |
|
A |
|
V |
V |
Iliacus m. |
|
|
||
Mid. sacral a. |
|
S1 |
Psoas m. |
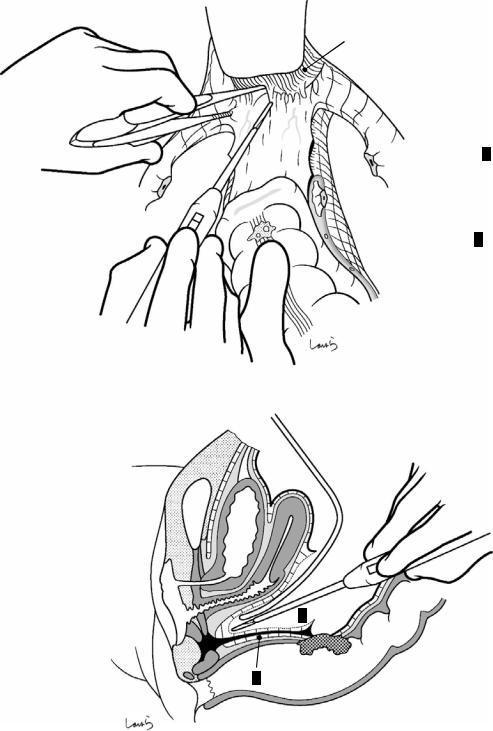
Fig. 9.7 Once the peritoneum ( ) is incised, a thin fascia appears right beneath it (a). This is the subperitoneal fascia ( ). Through the fascia, several small nerves (rectal branches of the hypogastric nerve) and blood vessels can be seen coursing toward the intestine. By making the incision shallower than before on the fascia with electrocautery while grasping these nerves and vessels with forceps and cauterizing them, white cotton-like loose connective
tissue is exposed ( ). The right hypogastric nerve should be immediately identified and caused to fall under the dissection layer. With the dissection proceeding deeper through the loose connective tissue, a space covered by spider’s web-like connective tissue ( ) is entered (b). This is the retrorectal space. The tissue dissected last ( ) is the thickened loose connective tissue lining the retrorectal space, that is, the prehypogastric nerve fascia
9 Sigmoidectomy |
253 |
|
|
a
2 Subperitoneal fascia
4 Retrorectal space
242
252
253
IMA
Retrorectal space (space continues up to the
vicinity of the root of IMA)
b
L
|
SRA |
|
2 |
Aortic plexus |
S2 |
|
|
|
Ao |
|
IVC |
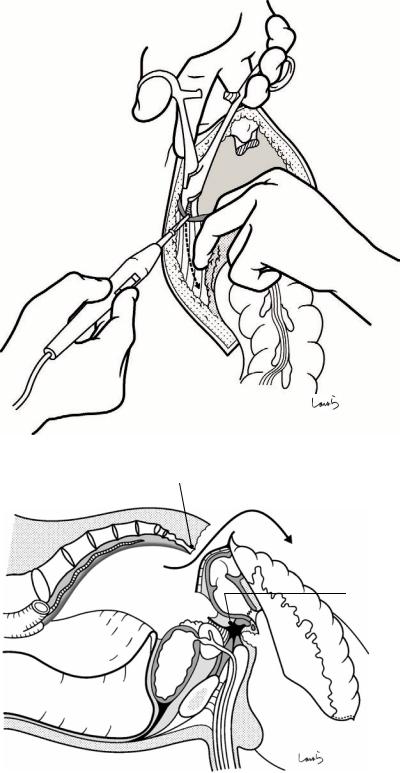
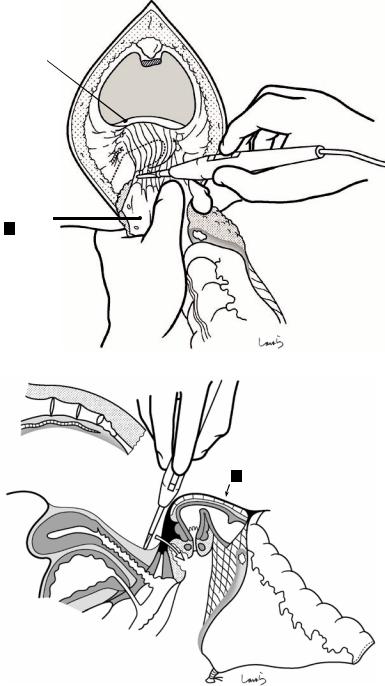
Fig. 9.8 Once the retrorectal space is entered at the level of the Rs, the operation moves on to the procedure for transecting the sigmoid mesocolon at its base. After incising just the subperitoneal fascia with electrocautery (a), the mesenteric fat tissue is dissected anterior to the aortic plexus (b). Although not as loose as the retrorectal space, the presence of a distinct space in this area also helps with layer separation. The dissec-
tion proceeds to the vicinity of the root of the IMA [arrow in (a)]. The upper border of the retrorectal space, which is essentially loose connective tissue, is not clearly defined (as described in Sect. 8.9), and the space in the mesorectal base continues beyond the iliac triangle up to the vicinity of the root of the IMA, as shown in Fig. 9.6b. This is why layer separation is easy to do at the base of the sigmoid mesocolon
254 |
9 Sigmoidectomy |
|
|
a
L lumbar splanchnic n.
LCA
S1
S2
Inf. mesenteric plexus
SRA
Aortic plexus
Sup. hypogastric plexus
b
Root of IMA |
253 |
Fusion fascia ofToldt |
|
Inf. mesenteric plexus |
Monk’s white line |
|
Ao
IVC
Subperitoneal fascia (fascia of Gerota)
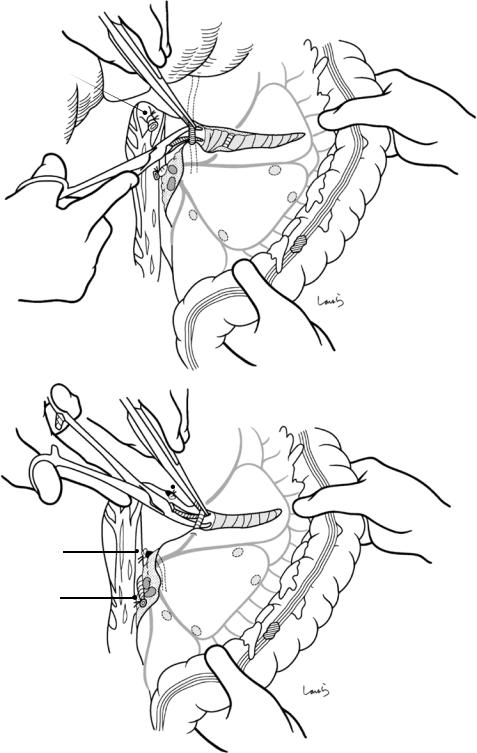
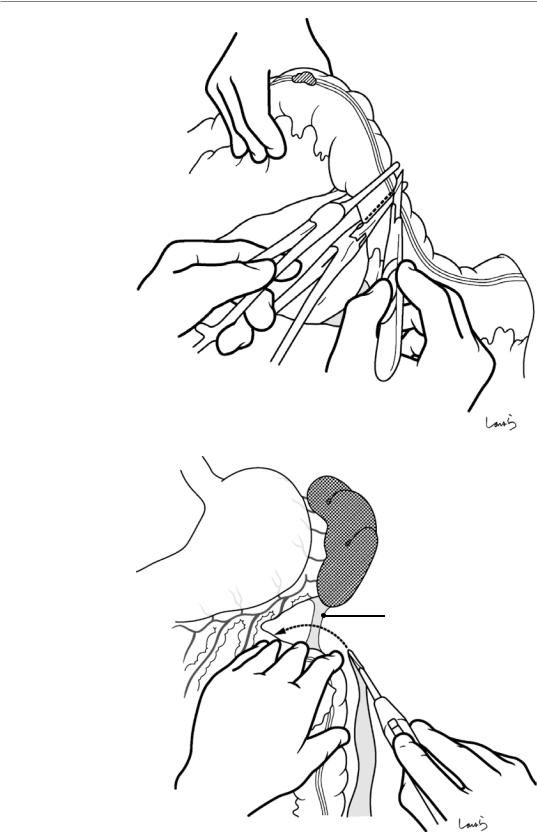
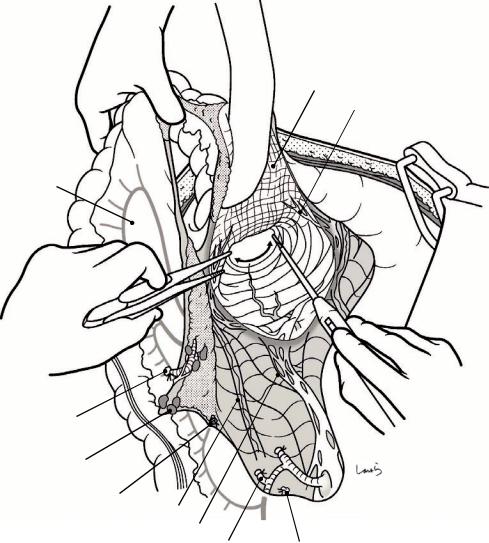
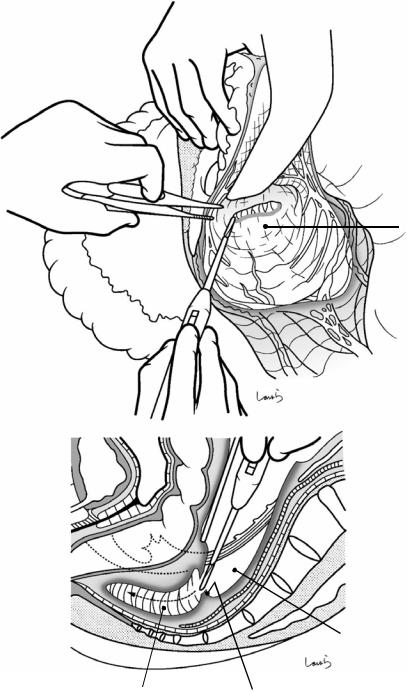
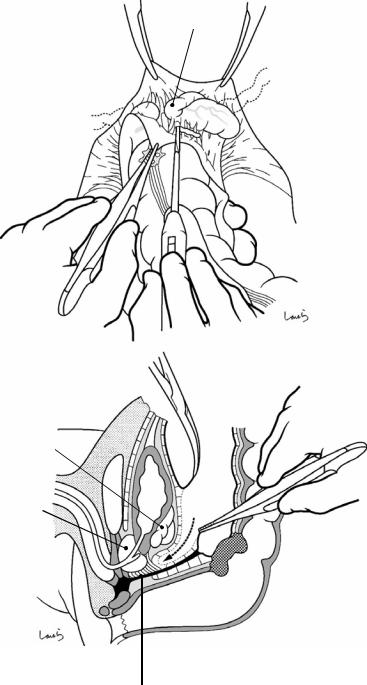
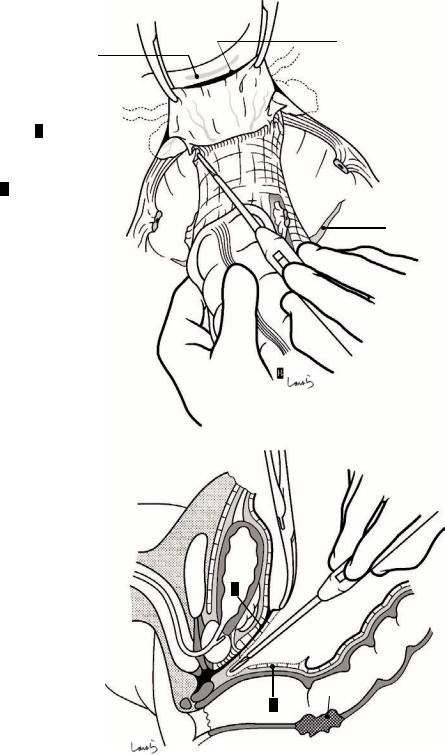
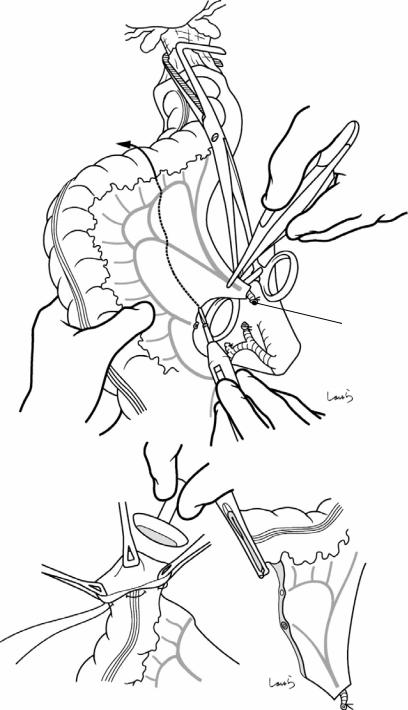
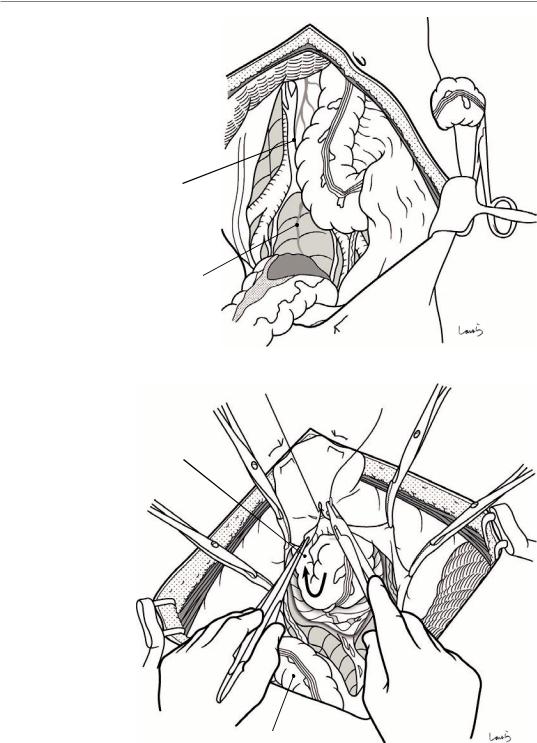
Fig. 9.9 The root of the IMA should then be accessed. The right and left lumbar splanchnic nerves merge to form the inferior mesenteric plexus around the root of the IMA. The dissection proceeds while dissecting the nerve bundle extending from the inferior mesenteric plexus along the IMA into the mesocolon with electrocautery,
and the fat tissue including the lymph nodes around the root of the IMA (No. 253) is divided as the nodes lie on the resection side to expose the arterial wall (a). The artery is then ligated and divided. We must be careful not to cut the inferior mesenteric plexus (b)
9 Sigmoidectomy |
255 |
|
|
a
IMA (root)
IMV
LCA
S1
S2
b
IMV (root)
LCA
IMV (ligated)
IMA (ligated)
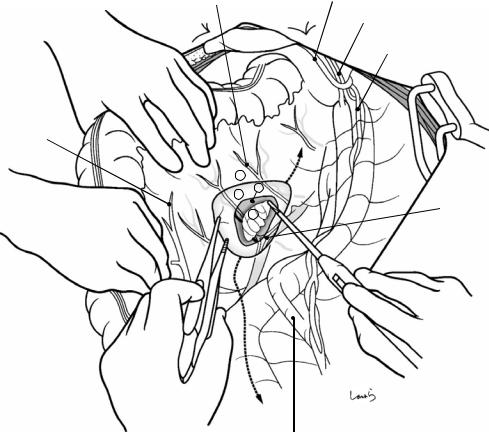
Fig. 9.10 With the sigmoid mesocolon stretched, a superficial incision is made on the peritoneum (right leaf) toward the planned intestinal transection line. Then, the fat tissue of the mesentery is dissected up to the vicinity of
the marginal arteries (a). En route, the inferior mesenteric vein (IMV) and the LCA are ligated and divided in the order they are encountered (b). The IMV usually courses 1–2 cm to the left of the IMA
256 9 Sigmoidectomy
a |
L gonadal a. & v. |
|
Retrorectal space
LCA (ligated)
L ureter
IMA (ligated) Crossing point of vessels and ureter
b
Folding back
Partial physiological adhesion of sigmoid mesocolon and retroperitoneum
L gonadal a. & v.
L ureter
Fig. 9.11 After completing vascular dissection, we move on to mesenteric dissection (a). Although the left leaf of the sigmoid mesocolon has no peritoneal fusion like the fusion fascia of Toldt, in most cases it is folded back at its base and is partially attached to the retroperitoneum as a result of physiological adhesion occurring after birth. So, the mesenteric dissection started from inside usually enters the layer under the folded peritoneum (b). The same logic applies to the fact that in right hemicolectomy, the dissection via the medial approach enters the layer below the fusion fascia of Toldt. The mesentery is dissected toward the lateral side while staying in that layer. As the dissection advances while viewing the dissection
plane in front, we encounter the left ureter suspended from the thin subperitoneal fascia continued from the fascia of Gerota. This should be detached from the membrane with care. Around the intersigmoid recess, the ureter approaches the mesocolon at its closest point and is difficult to detach. Beyond this area, the gonadal vessels are exposed. These vessels are located more closely toward the posterior aspect of the mesocolon than the ureter, so they should be detached with greater care (b). In cases of cancer invasion, combined resection of the gonadal vessels is far more likely to be needed than that of the ureter. Once the dissection advances beyond the gonadal vessels, a sheet of stretched gauze is placed in situ
9 Sigmoidectomy |
257 |
|
|
a
Monk’s white line
Boundary between retroperitoneum and left leaf of sigmoid mesocolon
Intersigmoid recess
b
Gauze
Dissection advances beyond the gonadal vessels via the medial approach
Fig. 9.12 At this point, the mesenteric dissection is stopped halfway and started over from the lateral side. When the sigmoid colon is lifted toward the surgeon, the physiologically adherent retroperitoneum is also lifted up (a). The boundary between the retroperitoneum and the left leaf of the sigmoid mesocolon is identified, and then a
peritoneal incision is made along the boundary slightly close to the intestine to gain access to enter the layer above the adhered peritoneum (b). The peritoneal incision is advanced proximally along Monk’s white line up to the midpoint of the descending colon and distally up to the Rs

258 |
9 Sigmoidectomy |
|
|
a
Gauze
(visible through retroperitoneum)
Ureter
 Intersigmoid recess
b
Retroperitoneum 
Fig. 9.13 The physiological adhesion between the left leaf of the sigmoid mesocolon and the retroperitoneum often remains incomplete in the middle portion. This incomplete adhesion may result in a pocket forming, which may be entered during the dissection procedure. This pocket, whose apex is the intersigmoid recess, can be a landmark for iden-
tifying the ureter when accessed via the lateral approach (a). Once the dissection has reached this point, the preplaced gauze can be seen through the retroperitoneum. The retroperitoneum is incised and penetrated with electrocautery to remove the gauze (b). This procedure is similar to that of right hemicolectomy (explained in Fig. 6.13)
9 Sigmoidectomy
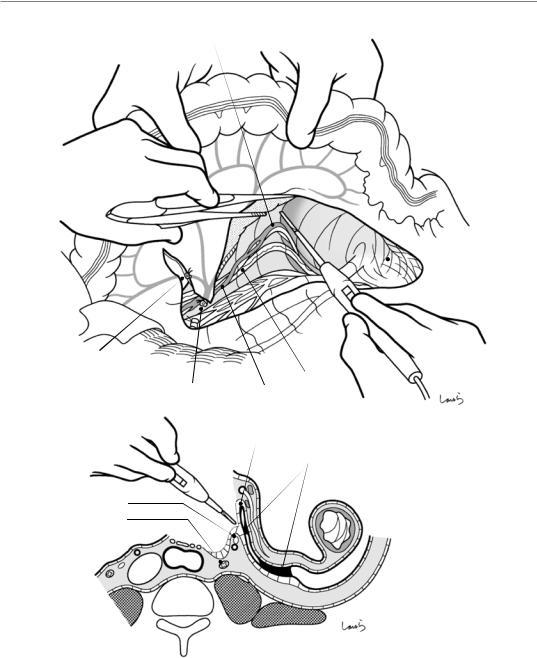
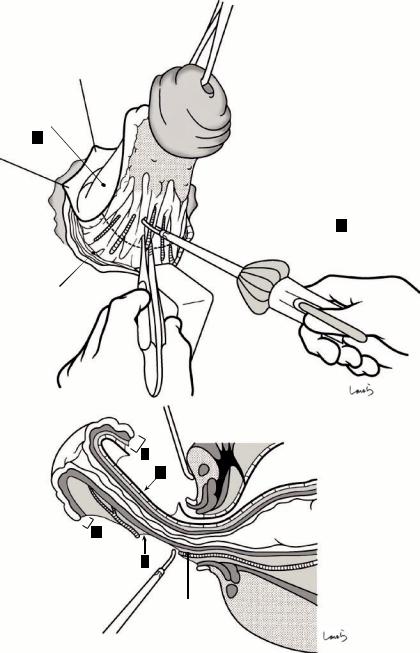
Fig. 9.14 After ligating and dividing the marginal vessels near the planned proximal transection line of the colon, the colonic wall is trimmed by dissecting several vessels of the vasa recta (solid arrow). Here we see dissection of the marginal arteries between the LCA and S1. If we want to preserve a longer section of proximal colon, the dissection should proceed across the S1 toward the marginal arteries between the S1 and S2, as also shown in Fig. 9.5 (route indicated by the dotted line)
259
Marginal a. (LCA - S1)
Vasa recta
LCA
S1
Fig. 9.15 The vessels |
|
|
near the distal |
|
|
transection line should |
|
|
be trimmed in the same |
|
|
way. Usually, the |
|
|
proximal rectum is also |
|
|
supplied by the internal |
|
|
iliac artery. The |
|
|
rectosigmoid (RS) can |
|
|
therefore be preserved |
|
|
even after the IMA has |
|
|
been divided at its root. |
|
|
The SRA may have been |
S2 |
|
split into two arteries |
||
|
||
around this area. The |
|
|
dotted line shows the |
|
|
route of dissection |
S1 |
|
advanced across the S1 |
|
|
toward the marginal |
|
|
arteries between the S1 |
|
|
and S2 |
|
|
|
LCA (ligated) |
|
|
IMV (ligated) |
|
|
IMA (ligated) |
A SR
260
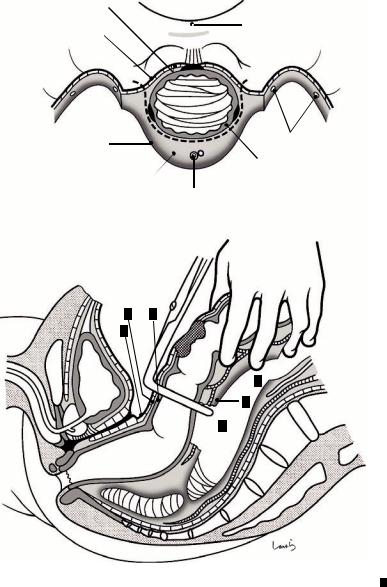
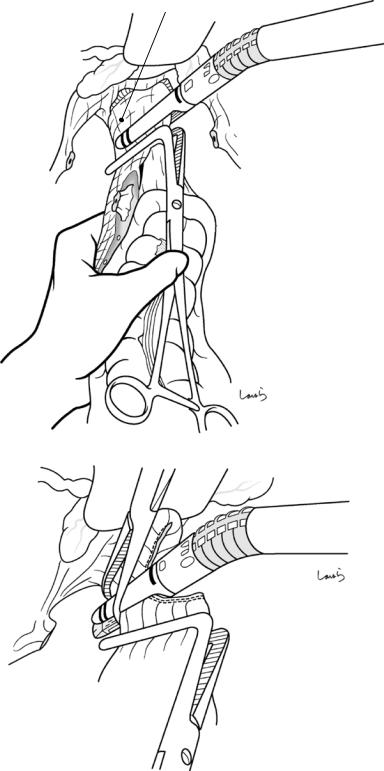
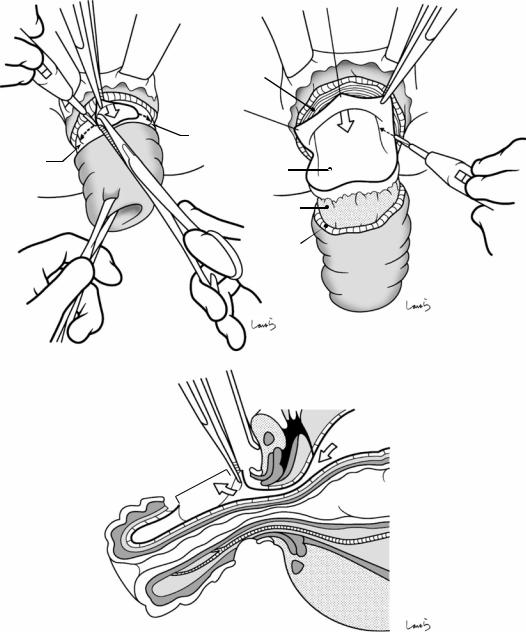
Fig. 9.16 An intestinal clamp and a stump clamp are then placed slightly apart from each other, and the intestine is transected along the intestinal clamp with a scalpel (dotted line)
Fig. 9.17 If we think excessive tension will need to be applied to the anastomosis, the dissection should proceed along Monk’s white line up to the left colic flexure to divide the splenocolic ligament (arrow). This mobilizes the descending colon to the extent that it comes down
9 Sigmoidectomy
Stump clamp
Intestinal clamp
Splenocolic lig.

9 Sigmoidectomy |
261 |
|
|
L-shaped intestinal clamp
IMA (root)
Fig. 9.18 Intestinal anastomosis is performed using an Albert-Lembert suture. If we want to perform anastomosis at a lower level, it is advisable to use an L-shaped intestinal clamp

262 |
9 Sigmoidectomy |
|
|
Peritoneal defect sutured closed
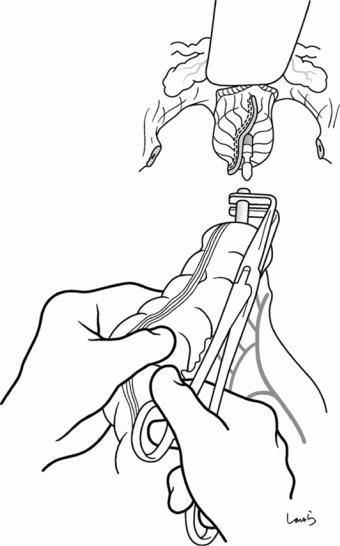
Fig. 9.19 After suturing the mesenteric defect closed, the abdominal cavity is washed and an 8-mm duple drain is inserted from the left abdominal wall into the pouch of
Douglas. The operation is completed by closing the abdominal wall and suturing in three layers
Low Anterior Resection |
10 |
of the Rectum |
Abstract
This chapter describes a rectal cancer resection procedure based on the concept of total mesorectal excision proposed by Professor RJ Heald [13]. This procedure aims at resecting the rectum and the mesorectum en bloc without damaging the fascia propria of the
rectum, based on the understanding of the continuity of the fascia. The standard operation time is 3 h.
Keywords
Total mesorectal excision · Fascia propria of the rectum · Mesorectum
© Springer Nature Singapore Pte Ltd. 2020 |
263 |
H. Shinohara, Illustrated Abdominal Surgery, https://doi.org/10.1007/978-981-15-1796-9_10 |
|
264 |
10 Low Anterior Resection of the Rectum |
|
|
Rectal branch
SRA
1
2 3
4
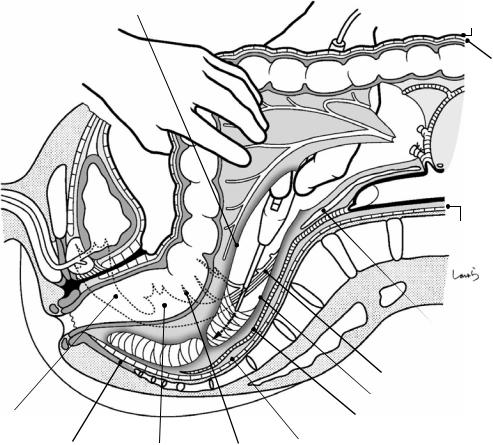
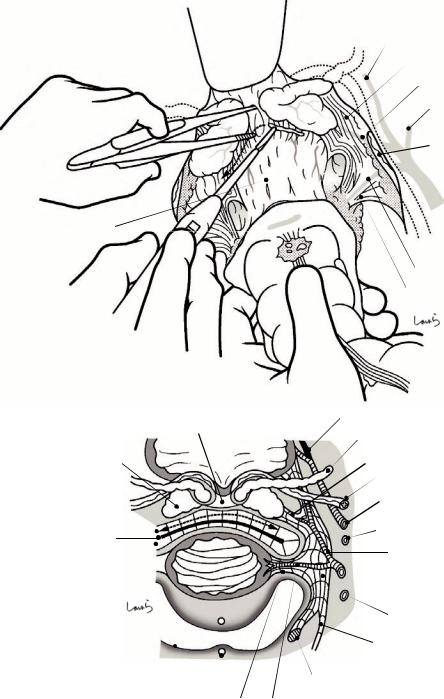
Fig. 10.1 The patient lies in the lithotomy position with the legs supported using levitator stirrups. The surgeon stands on the right side of the patient and makes an abdominal midline incision extending from 3 cm above the umbilicus to the upper border of the pubis. Once the abdomen is opened, the retrorectal space is entered following the same procedures described in Figs. 9.6 and 9.7 on sigmoidectomy. The first assistant pulls the rectosigmoid (RS) laterally to the left to apply tension to the right leaf of the mesorectum. The surgeon then makes a superficial incision just on the peritoneum ( ) with electrocautery 2–3 cm below the cord-like structure containing the superior rectal artery (SRA). A thin fascia (subperitoneal
Vas deferens
Inf. epigastric a. & v.
Testicular a. & v.
 R ext. iliac a. & v.
R hypogastric n.
Ureter
fascia ) immediately appears under the peritoneum, and through this fascia, several small nerves (rectal branches of the hypogastric nerve) and blood vessels can be seen coursing toward the intestine. Making an incision shallower than before on the fascia with electrocautery while grasping these nerves and vessels with forceps and cauterizing them exposes white cotton-like loose connective tissue, the prehypogastric nerve fascia ( ). When advancing the dissection through the fascia while detaching the suspended right hypogastric nerve from the dissection layer, a space covered by spider’s web-like connective tissue, the retrorectal space ( ), is entered

10 Low Anterior Resection of the Rectum |
265 |
|||
|
|
|
|
|
|
|
|
|
|
|
L |
|
R |
|
|
|
|
|
|
Rectal branch
|
|
1 |
L hypogastric n. |
SRA |
2 |
|
|
3 |
|
|
R hypogastric n. |
|
4 |
|
Gonadal a. & v. |
|
Subperitoneal fascia |
Ureter |
|
Fascia transversalis |
|
|
Pre-sacral fascia |
|
Med. sacral a. |
Iliacus m. |
R common iliac a. |
|
R common iliac v. |
|
Fig. 10.2 Route for entry into the retrorectal space. By advancing the incision in the order of the peritoneum, subperitoneal fascia, and prehypogastric nerve fascia, the retrorectal space ( ) is entered. Attempting to enter the retrorectal space without the first assistant applying sufficient traction to the rectum may result in iatrogenic transection of the hypogastric nerve
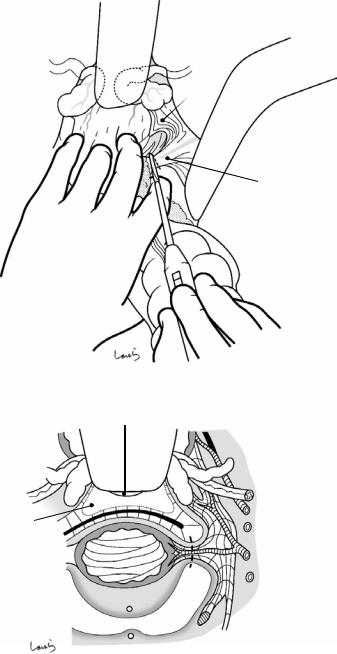
Next, as done in sigmoidectomy, the incisional line on the right leaf of the mesorectum is extended proximally for detachment of the sigmoid mesocolon. While confirming that the superior hypogastric plexus, which is upstream of the hypogastric nerve, and the aortic plexus remain intact under the dissection layer, the incision is advanced to the vicinity of the root of the inferior mesenteric artery (IMA)
266 |
10 Low Anterior Resection of the Rectum |
|
|
IMA |
|
IMV |
D |
LCA |
1
2
S1
Dissection range when S1 is preserved
|
S2 |
SRA |
3 |
St
4
S
RS
Ra
Rb
P
Fig. 10.3 Range of dissection and where to divide the arteries. In low anterior resection, the left colic artery (LCA) should be preserved whenever possible to maintain blood flow to the proximal intestine, except in cases of positive No. 252 lymph nodes. So, the IMA should be divided beyond the bifurcation of the LCA ( ) after dissecting the No. 253 lymph nodes around the root of the IMA. The first sigmoid colon artery (S1) often shares a common trunk with the LCA. In this case, S1 can also be preserved to limit the dissection range as indicated by the
dotted line. However, when creating an anastomosis at a low level, because excessive tension is more likely to be generated by a stretched mesentery than by the proximal intestine, dissection is performed in most cases within the range indicated by the solid line, followed by division of S1 at position . Then, the second sigmoid colon artery (S2) and the terminal sigmoid colon artery (St) are divided at positions and , respectively, to preserve as many marginal arteries as possible
10 Low Anterior Resection of the Rectum |
267 |
|
|
a
Lumbar splanchnic n.
Root of IMA |
IMV |
|
LCA
S1
No.253 LN
b |
IMV (ligated) |
S1
IMA (ligated)
Fig. 10.4 Actual operative situation. When the peritoneal incision on the right leaf of the sigmoid mesocolon approaches the horizontal part of the duodenum, the incisional line is curved along an arc to turn around the root of the IMA. The fat tissue containing the No. 253 lymph nodes is scraped off with electrocautery to expose the IMA surrounded by nerve bundles. We need to be careful to avoid cutting the inferior mesenteric plexus and to preserve the lumbar
splanchnic nerves. The IMA is ligated and divided beyond the bifurcation of the LCA (a), and the IMV is also ligated and divided at the same level. At this point, the course of the S1 is determined, and if it is like that shown in (b), S1 is ligated and divided at an adequate distance from the bifurcation. Vascular dissection of the mesentery is discontinued at this point; the marginal arteries and intestinal transection will be dissected immediately before anastomosis (see Fig. 10.23)
268 |
10 Low Anterior Resection of the Rectum |
|
|
Fascia propria of rectum
Rectal br.
Sigmoid mesocolon
Cut edge of  prehypogastric n.
fascia
 R ureter
 Cut edge of peritoneum
IMA (ligated)
No.253 LN
S1 (ligated)
L ureter
Sup. hypogastric plexus |
LCA |
S1 (ligated)
IMV (ligated)
Fig. 10.5 Following division of the vasculature, the sigmoid mesocolon is dissected as described in Figs. 9.11– 9.13. The dissection starts from the inner side and advances until the left ureter and the left gonadal vessels are passed. Then, the left leaf of the sigmoid mesocolon is incised along Monk’s white line and penetrated while releasing physiological adhesions
The surgeon then moves to the left side of the patient and starts retrorectal dissection. The second assistant stands between the patient’s legs, pulls up the rectum, and retracts it caudally with a long flat rectal retractor. The
retrorectal space is entered through its opening and the dissection proceeds as if breaking a spider’s web. By slightly activating the electrocautery, the spider web threads are diffused circumferentially as if being melted and the site is increasingly cleared. Dissection continues by drawing an arc with the tip of the electrocautery, keeping in mind the concave anterior surface of the sacrum. As the dissection proceeds deeper, the second assistant repositions the rectal retractor deeper so that the rectum can be accurately retracted with the tip of the retractor
10 Low Anterior Resection of the Rectum |
269 |
|
|
Fascia propria of rectum
3
4
5
NVB
Anococcygeal body Pelvic plexus |
Rectal br. |
Peritoneum
Subperitoneal fascia
LCA
S1
SRA
IMA
Ao
Fascia transversalis
4
5
1
2
Sup. hypogastric plexus
Hypogastric n.
Prehypogastric n. fascia
Mid. sacral a.
Presacral fascia
Fig. 10.6 In this sagittal cross section, the dense connective tissue lining the rectal side of the retrorectal space represents “the fascia propria of the rectum.” However, if we define the fascia encompassing the entire rectum as the fascia propria of the rectum, this membrane is the posterior layer (see Sect. 8.15 on the anatomy of the rectum and surrounding structures). On the sacral side of the retrorectal space, the middle sacral artery can be seen through the
“prehypogastric nerve fascia.” The accompanying middle sacral vein and the sacral venous plexus are also in the same layer. Underneath this layer lie the presacral fascia, fascia transversalis, and sacrum. As mentioned in Sect. 8.9, the presacral fascia is a part of the broad fascia surrounding the subperitoneal fat tissue from the lateral side. If the presacral fascia is exposed, then the retrorectal dissection has gone too deep
270 |
10 Low Anterior Resection of the Rectum |
|
|
a |
Peritoneal inversion |
|
Tumor 
 Rectal br.
 R ureter
 R hypogastric n.
 Dissected rectal br.
b
Fascia propria of rectum
Retrorectal space 
 R hypogastric n.
Mid. sacral a. |
|
Prehypogastric n. fascia |
Dissected rectal br. |
|
|
Subperitoneal fascia |
Peritoneum |
Fig. 10.7 After the posterior dissection has reached a certain point, the dissection also needs to proceed laterally. On both sides of the rectum, the peritoneal incision is extended up to the point of peritoneal inversion (arrows in a). The fat tissue of the mesentery is then incised with electrocautery. This fat tissue is not thick at all but is
crossed by small nerve fibers extending from the hypogastric nerve to the rectum (rectal branches). We should be careful not to cut these nerves because pulling the rectum has also caused the hypogastric nerve to come closer to the rectum (arrow in b). The ureter also approaches the rectum in this area, so it should be identified beforehand
10 Low Anterior Resection of the Rectum |
271 |
|
|
a
Rectosacral fascia
b
|
|
1 |
|
|
|
2 |
|
|
|
3 |
|
|
|
|
|
5 |
4 |
|
Retrorectal space |
|
|
|
|
|
|
|
|
Supralevator space |
|
Rectosacral fascia |
|
|
|
|
|
Fig. 10.8 We return now to dissection of the retrorectal space. As the dissection further advances caudally, dense connective tissue of a distinct nature is reached. This is the rectosacral fascia and is the furthest limit of the retrorectal space, located at the level of the fourth sacral vertebra. In this area, where the rectum most closely approaches the sacrum, the connective tissues lining the rectal and sacral sides of the retrorectal space are fused, forming this mem-
branous fascia. This fascia is carefully incised and penetrated using activated electrocautery (a). Once the rectosacral fascia is passed, the resistance is again diminished and another space covered by a spider’s web, the supralevator space, is entered (b). This time, the dissection proceeds deeper while viewing the coccyx and the levator ani muscle through the dorsal fascia
272 |
10 Low Anterior Resection of the Rectum |
|
|
a
4
5
3
Transection line of rectosacral fascia
1
b
4 Fascia propria of rectum
|
Transection line of |
|
rectosacral fascia |
5 |
|
Anococcygeal body |
Med. sacral a. |
|
|
3 |
2 Presacral fascia |
1 |
Prehypogastricn. fascia |
Fig. 10.9 The prehypogastric nerve fascia ( ) forming the posterior wall of the retrorectal space fuses with the presacral fascia ( ), which has descended along the sacrum, beyond the rectosacral fascia after reaching the coccyx, forming a single layer ( ). This fascia expands while cover-
ing the levator ani muscle and its tendon of insertion at the anococcygeal body, and finally merges ( ) with the fascia propria of the rectum ( ), which has descended on the rectal side of the space (a). Incising between these fascias with electrocautery is the final step in retrorectal dissection (b)
10 Low Anterior Resection of the Rectum |
273 |
|
|
|
Lateral lig. |
||
|
Rectal br. |
||
|
Pelvic plexus |
||
|
S4 |
|
|
|
|
Pelvic splanchnic ns. |
|
Incision point where presacral |
S3 |
|
|
S2 |
|||
|
|||
fascia merges with fascia propria |
|
||
|
|
||
of rectum ( 5 in Fig. 10.9) |
|
|
|
Transection line of rectosacral fascia
Fig. 10.10 The lateral dissection advances deeper on both sides of the rectum. On the lateral wall of the retrorectal space, the S2–S4 pelvic splanchnic nerves entering the pelvic plexus can be seen through the prehypogastric nerve fascia and have a snowboard half-pipe-like appearance. As the rectum is lifted and pulled up, the pelvic
splanchnic nerves are also lifted toward the intestine and their several rectal branches are stretched so tight that they prevent the expansion of the retrorectal space. Dissecting these branches one by one with electrocautery causes the pelvic plexus to fall toward the pelvic wall and the rectum to be lifted further
274 |
10 Low Anterior Resection of the Rectum |
|
|
a
Bladder
 Recess
 Tumor
Tumor
b
A
B
Fig. 10.11 The peritoneum on the anterior surface of the rectum is incised. While the second assistant applies a rectal retractor to the pouch of Douglas and applies force to the tip, the first assistant pulls the rectum cranially to remove slack at the site of peritoneal inversion. Still, a slight recess remains at the midpoint, which is the origin of the fascia of Denonvilliers formed by fusion of the inverted peritoneum (a). If we consider the fascia of Denonvilliers as the rectal version of the fusion fascia of Toldt, then this recess corresponds to Monk’s white line. The standard pre-
rectal dissection procedure involves entering the layer above the fascia of Denonvilliers. So, the route for the peritoneal incision in the pouch of Douglas should pass outside the recess following the larger dotted line (A in b). However, if the tumor is localized in the posterior wall, the layer below Denonvilliers’ fascia may be entered by following the smaller dotted line (B in b) (see Fig. 10.19). The layers above and below the fascia of Denonvilliers are officially referred to as the “retroprostate space” and “preprostate space,” respectively
10 Low Anterior Resection of the Rectum |
275 |
|
|
Fig. 10.12 While the first assistant pulls the rectum cranially, the surgeon grasps and everts the edge of the incised peritoneum of the pouch of Douglas with forceps to expose the seminal vesicle (covered by the subperitoneal fascia) located anterolateral to the rectum. While applying appropriate tension to the loose connective tissue between the seminal vesicle and posterior aspect of the peritoneum, the tissue is incised and dissected with electrocautery (a). The dissection is now connected to the dissection layer from the lateral side (Fig. 10.10). The sagittal cross section in (b) shows the dissection route continuing to enter the layer above the fascia of Denonvilliers [16]
a
b
Seminal vesicle
Prostate
Ampulla of vas deferens
 Seminal vesicle
 Pouch of Douglas
Fascia of Denonvilliers
276 |
10 Low Anterior Resection of the Rectum |
|
|
a
Fascia of Denonvilliers
b |
Prostate |
|
Bladder
Sup vesical a.
NVB
Inf. vesical a.
Obturator a.
Ureter
Mid. rectal a.
Lateral lig
Lat. umbilical lig.
Vas deferens
Seminal vesicle
Retroprostate space
Fascia of Denonvilliers
Prerectal space 
Fascia propria of rectum 
SRA
Prehypogastric n. fascia 
Mid. sacral a. 
Lateral lig.
NVB
Ureter
Sup vesical a.
Obturator a.
Inf. vesical a.
 Pelvic plexus
Int. pudendal a.
Pelvic splanchnic n.
Hypogastric n.
Mid. rectal a.
Fig. 10.13 The seminal vesicle is detached from the fascia of Denonvilliers with electrocautery. This fascia is a robust membranous connective tissue with pasteboard-like appearance, through which small blood vessels contained in it can be seen. Here again, the first assistant should pull
the rectum cranially with enough force to facilitate layer separation (a). Although it is preferable to adequately extend the dissection bilaterally (dotted line in b), we should advance the dissection carefully to avoid damaging the neurovascular bundles (NVB) located on both sides
10 Low Anterior Resection of the Rectum |
277 |
|
|
Fig. 10.14 The next step is to divide the lateral ligament. The second assistant applies two rectal retractors on both sides of the lateral ligament to retract the seminal vesicle and the lateral pelvic wall outward. With the index and middle fingers placed on both sides of the lateral ligament, the surgeon pulls the rectum craniomedially to apply appropriate tension to the ligament. This makes the lateral ligament look like a wedge driven from the pelvic plexus into the lateral wall of the rectum. The narrowed portion near the tip of the wedge is divided with electrocautery (a). The middle rectal artery contained in the lateral ligament (b) does not need to be ligated as long as it is cut slowly with electrocautery
a
NVB
Lateral lig.
b |
Inf. aspect of prostate gland |
Dissected layer above fascia of Denonvilliers (retroprostate space)

278 |
10 Low Anterior Resection of the Rectum |
|
|
Fig. 10.15 Once the lateral ligament is penetrated, the
dissection advances to in front of the fascia of Denonvilliers and
connects to the dissection layer (Fig. 10.13). When passing through this area, we must avoid cutting the NVB. Keep in mind that as the rectum is pulled, the NVB is also pulled toward the rectum and forms a tent-like shape. The dissection should then proceed while identifying the boundary between the nerve fibers and the connective tissue to be dissected (arrow in a). The tension applied to the NVB is greatest around the edge of the fascia of Denonvilliers. Dissecting this area results in exposure of the lateral border of
the fascia (asterisk in a and b)
a
NVB
Lateral lig. (cut)
*
b
*
Mid. rectal a.
Lateral border of fascia of Denonvilliers |
Lateral lig. (cut) |
10 Low Anterior Resection of the Rectum |
279 |
|
|
Nerve fibers between prostate and fascia of Denonvilliers
a
NVB
R margin of fascia of
Denonvilliers
Lateral lig. (cut)
Fascia of Denonvilliers
A
Lateral lig. (cut)
 Fascia propria of the rectum B
b
A
Nerve fibers from NVB
B
Perineal body
Layer below fascia
Fig. 10.16 Division of the fascia of Denonvilliers: The fascia of Denonvilliers (A) is attached to the perineal body. In men, the presence of nerve fibers from the NVB between this fascia and the posterior surface of the prostate means that it is difficult to detach the fascia from the prostate from inside the abdominal cavity. We therefore need to divide the fascia of Denonvilliers at the level of the inferior aspect of
the prostate so that the dissection layer can be changed to the layer below the fascia (b). After a small incision is made at the midpoint of the fascia of Denonvilliers, right-angled dissecting forceps are slid under the fascia to dissect connective tissue and the fascia is divided with electrocautery. By extending this incision to the right and left, the fascia can then be divided [arrows in (a)]

280 |
10 Low Anterior Resection of the Rectum |
|
|
a
Inf. aspect of prostate gland
Cut edge of fascia of
Denonvilliers (remnant side) A
 Fascia propria of rectum B
 Cut edge of fascia of
Denonvilliers ' (resection side) A
 Lateral lig. (cut)
Rectal br. (cut)
b
A
|
|
|
' |
|
|
|
A |
||
B |
||||
|
’ |
|||
|
|
|||
Fig. 10.17 Once Denonvilliers’ fascia is divided, the rectum can now be pulled further upward (a). The dissection of the layer below Denonvilliers’ fascia is advanced one step deeper to complete the anterior dissection (b)
10 Low Anterior Resection of the Rectum |
281 |
|
|
a
Vagina
 Fascia of Denonvilliers
A
 Fascia propria of rectum
B
b
 A
A
B
Fig. 10.18 In women, a relatively loose adhesion between the posterior vaginal wall and the fascia of Denonvilliers allows the dissection to proceed to the vicinity of the perineal body with the fascia remaining
attached to the rectum (the layer above the fascia remains intact). Women also have a wider pelvic cavity, which, combined with the abovementioned features, provides good conditions for performing rectal cancer surgery
282 |
10 Low Anterior Resection of the Rectum |
|
|
a
Bladder
Recess
AFascia of  Denonvilliers
(reverse side)
B Fascia propria of rectum 
Cut edge of peritoneum of pouch of Douglas (remnant side)
Transection line of rectosacral fascia
b
A
Layer below fascia
Tumor
B
Fig. 10.19 If the tumor is localized to the posterior wall with limited depth of invasion, the layer below the fascia of Denonvilliers can be entered from ab initio as shown in (a). Although this might be a little difficult to enter, this
dissection route is safer because the connective tissue is detached and lifted along with the fascia of Denonvilliers, so the NVB is not encountered (b)
10 Low Anterior Resection of the Rectum |
283 |
|
|
a
Incision in fascia of Denonvilliers (remnant side) A
Fascia of Denonvilliers to be included in resected specimen
A '
b
 Fascia propria of rectum B
A A '
B
D
B C
Fig. 10.20 After applying an L-shaped intestinal (rectal) clamp to the rectum distal to the tumor, the lumen of the rectum is washed. Although the fascia of Denonvilliers A has been removed, the fascia propria of the rectum B still circumferentially surrounds the rectum (a). If the retrorectal dissection shown in Fig. 10.9 has been adequately advanced
distally, the fat C between the fascia propria of the rectum and the muscle layer of the rectum D should be thin enough not to interfere with anastomosis (b). If this fat layer remains thick, because it remains on the resection side and obscures the view, it should be removed so that the muscle layer near the planned intestinal transection line can be exposed
284 |
|
|
|
|
|
10 Low Anterior Resection of the Rectum |
|
|
|
||||
a |
Fascia of retroperitoneum |
|
||||
|
(broadly defined as fascia |
|
||||
|
propria of rectum) |
B |
' |
Bladder |
||
|
|
|
||||
|
Peritoneum |
|
|
|
|
Pouch of Douglas |
|
E |
|
|
|||
Fascia propria of rectum |
B |
|
|
|
|
Dissected br. of rectal n. |
||
Fat of mesorectum |
|
Rectal wall (mucosal + muscular layers) |
||||||
|
|
|
|
|||||
|
|
D |
|
|||||
|
|
|
C |
|
SRA |
|
|
|
|
|
|
|
|
|
|
||
b
B ' D
E
 C
C
B
 D
D
Fig. 10.21 If the tumor is located proximal to the site of peritoneal inversion (Ra, RS) (this figure and Fig. 10.22), we should perform tumor-specific mesorectal excision. To
do this, the fat of the mesorectrum C has to be peeled off around the planned intestinal transection line
10 Low Anterior Resection of the Rectum |
285 |
|
|
a
b
Fascia propria of rectum |
|
Br. of SRA |
Muscle layer of |
|
rectum |
Muscle layer of rectum |
|
Fig. 10.22 On both sides of the rectum, the mesorectum is divided with a clamp inserted along the lateral wall of the rectum (a). Once the muscle layer is exposed, the clamp is inserted into the fat tissue along the surface of the muscle layer. The fat tissue is then scooped transversely and cut with electrocautery. The fat tissue contains several
branches of the superior rectal artery (SRA) and vein, which should be ligated and divided once identified (arrow in b). This results in the posterior half of the circumference of the rectum not being covered by the fascia or serosa, and the muscle layer is exposed
286 |
10 Low Anterior Resection of the Rectum |
|
|
a
St
S2
S1
IMA (ligated)
b
Stump clamp
Fig. 10.23 Dissection of the sigmoid mesocolon. Typically, S2 is ligated and divided, followed by ligation and division of the marginal arteries between S2 and St (dotted arrow in a) (see also Fig. 10.3). After trimming around the intestinal transection line, a purse-string suture clamp is applied and a 2-0 nylon suture with straight needles at both ends is passed. Slightly away from the clamp, a stump clamp is applied on the resection side of the rec-
tum and the rectum is transected with a pointed blade. After expanding the sigmoid colon stump to form a triangle using three pairs of intestinal grasping forceps and inserting the anvil of a circular stapler into the opening, the colon is suture-fixed to the anvil shaft with the preplaced nylon suture (b). A 33-mm circular stapler is commonly used in low anterior resection
10 Low Anterior Resection of the Rectum |
287 |
|
|
Fig. 10.24 Transection of the rectum: With the rectum pulled cranially with enough force, a linear stapler is applied along the distal side of the rectal clamp to transect the rectum. Because the rectum is transected at the ampulla in low anterior resection, when we think that we cannot achieve transection with one firing, we can do a planned two-fraction transection instead. More specifically, the first firing of the linear stapler is done so that the seam of the staple line is around the midpoint of the planned anastomosis made by a circular stapler. If we are too conservative in the first firing, this might leave a long distance to be cut by the second firing. So, we should do the first firing intending to cut about 60–70% of the width of the intestine (a). For complete transection, we should do the second firing with the rectum scooped and pulled with a strong curved clamp (b). In either case, we should try to make the staple line as short as possible and as perpendicular as possible to the short axis of the rectum
a
b
Rectal ampulla
288 |
10 Low Anterior Resection of the Rectum |
|
|
Fig. 10.25 A circular stapler is inserted through the anus and the center rod is pulled slowly out of the rectal wall. Before the rod penetrates the intestinal wall, the advance of the rod is stopped and fine adjusted so that its tip comes out just beside the seam of the staple line. After connecting the center rod to the anvil and confirming that there is no torsion of the colon or inclusion of other tissues in the anastomosis, the circular staple is fired
10 Low Anterior Resection of the Rectum |
289 |
|
|
Drain placed in front of sacrum
Preserved marginal a.
Reconstructed pouch of Douglas
|
S2 |
|
S1 (root) |
S1 |
SRA (root) |
|
LCA
Fig. 10.26 After washing the pelvic cavity and confirming hemostasis, the cut edge of the retroperitoneum on the right and the cut edge of the sigmoid mesocolon are sutured to reconstruct the retroperitoneum. The anastomosis is concealed under the retroperitoneum, which helps reduce tension to the anastomosis and, in
case of anastomotic leak, limit abscess formation within the pelvic cavity
After inserting a drain via the left abdominal wall and placing it near the anastomosis in front of the sacrum, the operation is completed by closing the abdominal wall, suturing in three layers
Abdominoperineal Resection |
11 |
of the Rectum |
Abstract
Although advances in lower level anastomosing techniques have substantially reduced the use of the Miles’ operation for rectal cancer, this surgical procedure is still a good option for advanced rectal cancer when there is a limited distance between the tumor and the distal intestinal transection line. The standard opera-
tion time is 4 h, including the time needed to change the patient’s body position.
Keywords
Lower-level anastomosing techniques · Distal intestinal transection line · Advanced rectal cancer
Ant. wall of rectus sheath
Fig. 11.1 After completing the intraabdominal procedure to detach the rectum from the surrounding structures, the blood vessels of the sigmoid mesocolon are ligated and divided and the intestine is transected using a linear stapler. While the preoperatively marked planned colostomy site on the skin is grasped and lifted with a Kocher clamp, a 2–3-cm round skin
incision is made with a scalpel, with care taken not to make the incision too large. The subcutaneous tissue is divided with a flat retractor to expose the anterior rectus sheath. A cruciate incision is made with a scalpel, and a Kocher clamp is applied to the edge of the incision (which is helpful for later fixing the stoma to the anterior rectus sheath)
© Springer Nature Singapore Pte Ltd. 2020 |
291 |
H. Shinohara, Illustrated Abdominal Surgery, https://doi.org/10.1007/978-981-15-1796-9_11 |
|
292 |
11 Abdominoperineal Resection of the Rectum |
|
|
Fig. 11.2 To secure a path for the stoma, the left index and middle fingers are inserted from the dissected margin of the left leaf of the sigmoid mesocolon into the retroperitoneal space. The fingers are advanced toward the anterior abdominal wall until reaching directly under the planned colostomy site, where the round skin incision had already been made
Fig. 11.3 The rectus abdominis muscle bundle is opened vertically with a retractor and the posterior sheath is incised. The opening should be large enough to allow for passage of the index and middle fingers. To avoid cutting through the peritoneum, both fingers are placed beneath the muscle to guide in cutting the posterior sheath only
Sigmoid colon (Cut edge)
R ureter
Rectum
Post. wall of rectus sheath
11 Abdominoperineal Resection of the Rectum
Fig. 11.4 Dissection forceps are inserted through the opening into the abdominal cavity to grasp the stump of the sigmoid colon and withdraw it while ensuring there is no torsion. The withdrawn portion of the colon should be long enough to prevent later retraction of the stoma. The anterior rectus sheath and the seromuscular layer of the sigmoid colon are fixed by several interrupted 3-0 Vicryl sutures. In addition, a Kocher clamp is applied to the intestinal stump as a “weight”
Fig. 11.5 After washing the pelvic cavity and confirming hemostasis, the rectum is repositioned as shown (arrow) so that it can be easily withdrawn later during perineal manipulation. The retroperitoneum is repaired with a running 3-0 Vicryl suture. In women, it is advisable to have the uterus retroflexed and sutured bilaterally to the retroperitoneum before repairing the retroperitoneum
Cut edge  of retroperitoneum
Mid. sacral a.
Rectum
293
Cut edge of sigmoid colon
Sigmoid colon
294 |
11 Abdominoperineal Resection of the Rectum |
|
|
Fig. 11.6 The abdominal wall is then closed by suturing in three layers. A protection film is applied to the wound and then the stoma is fixed to the skin. The intestine is transected along the staple line, and the resulting opening is fixed to the skin with about 12 interrupted 3-0 Vicryl sutures. A protruding stoma can then be created by applying one suture to a part of the intestinal wall while fixed to the skin
Fig. 11.7 The patient is repositioned in the jack-knife position. The anus is closed with a purse-string suture. In women, the vagina should be washed thoroughly. A spindle-shaped skin incision is made between the lower border of the coccyx superiorly and the perineal body (asterisk) inferiorly
11 Abdominoperineal Resection of the Rectum |
295 |
|
|
a
b |
|
Incised rectosacral fascia |
|
Cut edge of resected specimen |
Supralevator space |
|
|
Perineal body
Dissected fascia of
Denonvilliers
Stoma
Repaired retroperitoneum (reverse side)
Fig. 11.8 The fat tissue surrounding the external anal sphincter is dissected with electrocautery (a). This fat tissue contains branches of the inferior rectal artery but can usually be ignored. The dissection should proceed with some force until reaching the layer through which the anococcygeal ligament and the levator ani muscle can be
seen. Arrows in the sagittal cross section (b) show the dissection route. The resected specimen is placed as shown in (b) and the peritoneum is suture-repaired. The fascia of Denonvilliers has been partially detached, remaining attached to the rectum until halfway, and it is dissected at the level of the inferior aspect of the prostate
296 |
|
11 Abdominoperineal Resection of the Rectum |
||
|
|
|
|
|
|
|
|
|
|
|
Male |
|
Female |
|
|
|
|
|
|
Anococcygeal body |
Coccyx |
|
Gluteus maximus m.
Levator ani m.
Obturator internus m. 
Ischial tuberosity
gracilis m.
Ischiocavernosus m.
Bulbospongiosus m.
Inf. rectal a.
 Ext. anal sphincter
 Sup. transverse perineal m.
 Perineal body
 Urogenital diaphragm
Bulbospongiosus m.
Urethral orifice
Clitoris
Fig. 11.9 Surgeon’s view of the perineal anatomy. Left: male. Right: female
11 Abdominoperineal Resection of the Rectum |
297 |
|
|
Fig. 11.10 Curved dissection forceps are inserted from the right lateral side of the anococcygeal body into the abdominal cavity. A relatively thick and dense ligament is then scooped with the forceps and divided with electrocautery
Fig. 11.11 The levator ani muscles bilaterally are dissected up to the 3 and 9 o’clock positions, respectively (arrows). After inserting the index finger into the abdominal cavity to assess the thickness of the levator ani muscle, curved dissection
forceps are inserted into
the abdominal cavity to Levator ani m.  guide dissection with
electrocautery. Note that inadequate intraabdominal dissection complicates this procedure, so it is advisable to perform the intraabdominal dissection procedure adequately, rather than postponing it, thinking that it can be done from the bottom later
Coccyx
Anococcygeal body
 Pelvic cavity
298 |
11 Abdominoperineal Resection of the Rectum |
|
|
Fig. 11.12 The rectum is withdrawn out of the wound, following which the dissection of the bilateral levator ani muscles is advanced downward (arrow)
 Anococcygeal
body (divided)
Fig. 11.13 This sagittal cross section of the surgical area shows the rectum withdrawn. The rectum comes out while turning around the perineal body (arrow), like performing a giant swing on a horizontal bar. Note that the rectum is now upside down
Anococcygeal body (divided)
Pelvic cavity
Perineal body
Abdominal cavity
Withdrawn rectum
11 Abdominoperineal Resection of the Rectum |
299 |
|
|
a
 Anococcygeal body (divided)
Prostate
Seminal vesicle
Distal part of fascia of Denonvilliers
(remnant side) A
Fascia of Denonvilliers to be included in resected specimen B
Lateral lig. (cut) C
b
Layer below fascia |
B |
|
A
C
Fascia propria of rectum
Fig. 11.14 If the fascia of Denonvilliers has been dissected intraabdominally, the end portion of the remaining fascia covers the prostate gland as shown in (a). With tension applied by pulling the rectum with the left hand, the connective tissue attached to the fascia propria of the rec-
tum (corresponding to the layer below the fascia of Denonvilliers) is dissected with electrocautery (b). This dissection layer can be seen just anteriorly in the jackknife position, providing a much better operative view than from the abdominal cavity
300 |
11 Abdominoperineal Resection of the Rectum |
|
|
Fig. 11.15 Finally, the perineal body is dissected with electrocautery so that the specimen can be excised. For localized cancer of the posterior wall, it is safer to leave the end portion of the fascia of Denonvilliers on the prostate side as shown in (a). A sagittal cross section is shown in (b). We can also enter the layer below the fascia of Denonvilliers ab initio (as described in Fig. 10.19 on low anterior resection) and leave the entire fascia behind
a
Distal part of fascia of Denonvilliers (remnant side) A
Perineal body
b
Perineal body
A
11 Abdominoperineal Resection of the Rectum |
301 |
|
|
Fig. 11.16 However, when the rectal cancer is located so close to the anus, it is generally advisable to dissect the entire length of the fascia of Denonvilliers remain-
ing attached to the rectum. In such cases, we need to advance the dissection to the perineal body while staying in the layer above the fascia of Denonvilliers, and this inevitably requires detachment between the posterior surface of the prostate and the fascia of Denonvilliers. So, intraabdominal anterior dissection should be discontinued at the inferior aspect of the prostate and the latter half of the dissection should
be performed in the jack-knife position, which provides a better operative view. On both sides of the prostate gland, nerve fibers from the neurovascular bundle; NVB, along with small blood vessels, enter between the prostatic capsule and the fascia of Denonvilliers as shown in (a). These nerve fibers and vessels should be carefully ligated and divided as the dissection proceeds. Although the area to be dissected is limited, note that any careless dissection in this area might cause massive bleeding. Once the perineal body is reached, it is dissected with electrocautery and the specimen is excised (b). Compared with Fig. 11.15, this figure shows that the completely dissected fascia of Denonvilliers fully covers the anterior surface of the rectum and is excised without damaging the layer below the fascia
a
Prostate
Nerve fibers and vessels from NVB
Dissected fascia of Denonvilliers
D
b
Layer below fascia
D
Perineal body
302 |
11 Abdominoperineal Resection of the Rectum |
|
|
Fig. 11.17 In women, a relatively loose adhesion between the posterior vaginal wall and the fascia of Denonvilliers allows the intraabdominal anterior dissection to advance to the very vicinity of the perineal body with the fascia remaining attached to the rectum (the layer above the fascia remains intact) (see Fig. 10.18 on low anterior resection). After the patient has been repositioned in the jack-knife position, the dissection proceeds with electrocautery guided by the left index finger inserted into the vagina, while identifying the boundary between the posterior vaginal wall and the fascia of Denonvilliers (a), until finally the perineal body is dissected (arrow in b). This way, the specimen can be excised without cutting the layer below the fascia of Denonvilliers. Nerves and vessels on both sides of the vagina should also be ligated and divided, although this does not require the same level of extreme care that is needed for dissection around the prostate gland
a
Uterus
Vagina 
Fascia of
Denonvilliers
D
b
D
11 Abdominoperineal Resection of the Rectum |
303 |
|
|
Fig. 11.18 After washing the pelvic cavity thoroughly with an enema tube and confirming hemostasis, an 8-mm duple drain tube is inserted from the right side of the wound up to the anterior surface of the sacrum and fixed. The wound is closed by suturing in two layers using interrupted 3-0 Vicryl sutures, sequentially from the deeper skin layer to minimize dead space, followed by a 3-0 nylon skin suture to complete the operation
Perineal body 
Surgical Repair of Rectal Prolapse: |
12 |
The Altemeier Procedure |
Abstract
You may wonder why a minor operation like rectal prolapse repair is included in this book on major gastrointestinal operations. We include it because it provides a good opportunity to understand the rectal anatomy by viewing it from a different angle. This chapter describes an established rectosigmoidectomy
procedure via the perineal approach, commonly known as the Altemeier procedure. The operation time is 1 h.
Keywords
Rectal prolapse repair · Perineal rectosigmoidectomy · Altemeier procedure
© Springer Nature Singapore Pte Ltd. 2020 |
305 |
H. Shinohara, Illustrated Abdominal Surgery, https://doi.org/10.1007/978-981-15-1796-9_12 |
|
306 |
12 Surgical Repair of Rectal Prolapse: The Altemeier Procedure |
|
|
a |
Mucosal layer |
|
Muscular layer |
|
|
b
Urogenital diaphragm |
Fascia of Denonvilliers |
Perineal body |
|
Levator ani m. |
|
Abdominal cavity
Outer tube
Inner tube
|
Retrorectal |
space |
|
|
|
||
Supralevator |
spac |
e |
|
|
|
|
|
Dentate line |
|
|
|
Mesorectum |
|
|
|
Int. anal sphincter |
|
|
Rectosacral fascia |
Anococcygeal body
Ext. anal sphincter
Fig. 12.1 Various complex factors are thought to cause rectal prolapse, including an excessively long sigmoid colon, a deep and wide pouch of Douglas, thinning of the rectosacral fascia, which supports the posterior wall of the rectum, and a relaxed and widened external anal sphincter. The sagittal cross section (a) illustrates these abnormalities in a way that figures in previous chapters did not: it distinguishes between the mucosal and muscular layers of the rectal wall (white and shaded layers, respectively). When the rectum is prolapsed, the rectal wall becomes dual structured, consisting of the outer and inner
tubes (b). The upper half of the space between the outer and inner tubes is a sac-like “abdominal cavity” formed by the descent of the pouch of Douglas along the route indicated by the arrows. The lower half of the space consists of the “mesorectum,” which is the fat tissue on the posterior side of the rectum, and loose connective tissue contained in the retrorectal space and supralevator space. The pelvic floor muscles and the fascia of Denonvilliers are pulled by the prolapsed rectum and deformed. The following figures show the step-by-step repair procedure toward achieving the goal shown in Fig. 12.12

12 Surgical Repair of Rectal Prolapse: The Altemeier Procedure |
307 |
|
|
Fig. 12.2 The tip of the prolapsed rectum is grasped and pulled with intestinal grasping forceps. In cases of mild prolapse, it is advisable to ask the patient to bear down on the rectum so that it can be grasped before anesthesia takes effect. An incision is made with electrocautery on the outer tube about 1 cm away from the dentate line parallel to the short axis of the rectum (a). Both the mucosal and muscular layers of the outer tube are incised (arrow in b). It may be difficult to penetrate the muscular layer due to marked thickening of the rectal wall resulting from repeated prolapse and reduction. Also, hemostasis must be confirmed while proceeding with the incision of the well-vascularized tissue
a
1 cm
b |
Dentate line |
|
Mucosal layer |
||
|
||
Muscular layer |
|
|
Subperitoneal |
|
|
tissues |
|
Dentate line
Dentate line

308 |
12 Surgical Repair of Rectal Prolapse: The Altemeier Procedure |
|
|
Fig. 12.3 The |
a |
peritoneum is reached |
|
by dissecting to a depth |
|
of about 5 mm (a). It is |
|
grasped and lifted with |
|
forceps and incised with |
|
electrocautery to enter |
|
the extended “abdominal |
|
cavity” (arrow in b) |
|
b
Incised peritoneum
Peritoneum

12 Surgical Repair of Rectal Prolapse: The Altemeier Procedure |
309 |
|
|
Fig. 12.4 After confirming the thickness
of the outer tube, the a “mucosal plus muscular
layer” is incised circumferentially at a constant distance (1 cm) from the dentate line (a and sagittal cross section in b). An ultrasonically activated scalpel may be used to advance the procedure with reduced bleeding (a)
b
Mucosal and muscular layers of outer tube
Abdominal cavity
Peritoneum
310 |
12 Surgical Repair of Rectal Prolapse: The Altemeier Procedure |
|
|
a
R border of peritoneal sac
b
Ext. anal sphincter |
|
L border of |
* |
peritoneal sac |
|
Serosa of |
|
inner tube |
|
Subperitoneal tissue
Mucosal and muscular layers
c
Widely opened peritoneal sac
Fig. 12.5 Grasping the cut edge of the peritoneum with forceps, the incision is extended to the right and left guided by right-angled forceps placed under the peritoneum (a). On reaching the border of the peritoneal sac, the
incision is turned around and advanced up to the transition to the serosa of the inner tube (asterisk in b). White arrows in (b) and (c) indicate communication with the abdominal cavity
12 Surgical Repair of Rectal Prolapse: The Altemeier Procedure |
311 |
|
|
a
Serosa of inner tube
B
 Mucosal and muscular layers of outer
tube |
|
|
|
A |
|
 Loose connective tissue inside mesorectum
C
Br. of superior rectal a. 
Ext. anal sphincter
b
A
B
A
C
Br. of superior rectal a.
Fig. 12.6 The lower half of the circumference of the inner tube is inside the mesorectum and has no communication with the abdominal cavity. There are many small vessels branching from the superior rectal artery in this area. Loose connective tissue is dissected sequentially from the superficial layer while carefully sealing these vessels with an ultrasonically activated scalpel until the muscular layer is reached. In this step, dissecting at a constant distance of about 1 cm from the external anal sphincter while applying appropriate tension to the mesorectum by pulling the inner tube (a) will help to adequately with-
draw the excess intestine and naturally reduce slack of the intestine inside the body. In short, the mesorectum is dissected obliquely and proximally toward the intestinal wall. Because the dissected vessels are immediately drawn back deep into the connective tissue due to the tension applied, note that inadequate sealing of the vessels may result in difficult-to-control bleeding
At this point, the upper half of the circumference of the inner tube is covered by the serosa, while the muscular layer is exposed in the lower half (b)
312 |
12 Surgical Repair of Rectal Prolapse: The Altemeier Procedure |
|
|
a
30 Vicryl detach
b
Sutured |
|
Newly created pouch |
|
|
|
|
of Douglas |
|
|
B |
|
|
|
|
|
A |
|
|
|
|
|
|
|
|
|
|
|
C
A
Fig. 12.7 After the rectum is pulled out to the final position, the cut edge of the peritoneum is sutured to the serosa of the upper-half surface of the inner tube, forming an arch (a). This way a new pouch of Douglas is created, as shown in (b)

12 Surgical Repair of Rectal Prolapse: The Altemeier Procedure |
313 |
|
|
a
Puborectalis m.
b
Sutured puborectalis m.
B
A
C
A
Fig. 12.8 The next step is to plicate the levator ani muscle. With the right and left puborectalis muscles withdrawn with Pean forceps (a), 1-0 Vicryl plication sutures
are applied between the muscles sequentially from the perineal body side. This ensures that the anus can be tightened at a deeper level as shown in (b)
314 |
12 Surgical Repair of Rectal Prolapse: The Altemeier Procedure |
|
|
Fig. 12.9 We move |
a |
now to resection of the |
|
excess intestine. After |
|
the outer tube is everted |
|
into a single tube, |
|
intestinal forceps are |
|
applied to the 11:05 |
|
position and the intestine |
|
is divided between the |
|
forceps at the 12:00 |
|
position with |
|
electrocautery (arrow in |
|
a). If the excess intestine |
|
is much longer than the |
|
intestinal forceps, it can |
|
be tentatively cut to an |
|
appropriate length |
|
before actual incision. |
|
The incision is stopped |
|
1–2 cm before reaching |
|
the peritoneal suture |
|
line, and this part of the |
|
intestine is fixed to the |
|
12:00 position of the |
|
stump of the outer |
|
tube with a 3-0 Vicryl |
|
suture (b) |
|
b 3-0 Vicryl detach
Outer tube stump
Dentate line
 Sutured puborectalis m.
  Peritoneal suture line
12 Surgical Repair of Rectal Prolapse: The Altemeier Procedure |
315 |
|
|
|
|
Fig. 12.10 The |
a |
|
intestinal forceps are |
|
|
repositioned to the 7:25 position and the intestine is divided between the forceps at the 6:00 position with electrocautery (arrow in a). The intestine is then fixed in the 6:00 position of the outer tube stump with a 3-0 Vicryl suture in the similar manner. The excess intestine opened bilaterally like strips is then transected along the anal verge with electrocautery (arrows in b)
b
316 |
12 Surgical Repair of Rectal Prolapse: The Altemeier Procedure |
|
|
a
b
Dissected edge of inner tube
Outer tube stump
Fig. 12.11 The dissected edge of the intestine (inner tube) is fixed to the outer tube stump with 16–20 sutures (a) and sagittal cross section in (b). Because the anasto-
mosis is not subject to excessive tension and is well vascularized, anastomotic leak is very unlikely to occur after this operation
12 Surgical Repair of Rectal Prolapse: The Altemeier Procedure |
317 |
|
|
a
b
Sutured peritoneum (new pouch of
 Douglas)
New anus tightened by plicated puborectalis m.
Fig. 12.12 After completing circumferential suturing, the anastomosis is introverted to reduce the prolapse. The index finger is inserted to assess for tension (a). Compared with Fig. 12.1b showing a prolapsed rectum, (b) here
shows a shortened intestine with a “new” anus tightened by the plicated puborectalis muscle behind the relaxed external anal sphincter