

- •About
- •Chapter 1: Getting started with C# Language
- •Section 1.1: Creating a new console application (Visual Studio)
- •Section 1.2: Creating a new project in Visual Studio (console application) and Running it in Debug mode
- •Section 1.3: Creating a new program using .NET Core
- •Section 1.4: Creating a new program using Mono
- •Section 1.5: Creating a new query using LinqPad
- •Section 1.6: Creating a new project using Xamarin Studio
- •Chapter 2: Literals
- •Section 2.1: uint literals
- •Section 2.2: int literals
- •Section 2.3: sbyte literals
- •Section 2.4: decimal literals
- •Section 2.5: double literals
- •Section 2.6: float literals
- •Section 2.7: long literals
- •Section 2.8: ulong literal
- •Section 2.9: string literals
- •Section 2.10: char literals
- •Section 2.11: byte literals
- •Section 2.12: short literal
- •Section 2.13: ushort literal
- •Section 2.14: bool literals
- •Chapter 3: Operators
- •Section 3.1: Overloadable Operators
- •Section 3.2: Overloading equality operators
- •Section 3.3: Relational Operators
- •Section 3.4: Implicit Cast and Explicit Cast Operators
- •Section 3.5: Short-circuiting Operators
- •Section 3.6: ? : Ternary Operator
- •Section 3.7: ?. (Null Conditional Operator)
- •Section 3.8: "Exclusive or" Operator
- •Section 3.9: default Operator
- •Section 3.10: Assignment operator '='
- •Section 3.11: sizeof
- •Section 3.12: ?? Null-Coalescing Operator
- •Section 3.13: Bit-Shifting Operators
- •Section 3.14: => Lambda operator
- •Section 3.17: Postfix and Prefix increment and decrement
- •Section 3.18: typeof
- •Section 3.19: Binary operators with assignment
- •Section 3.20: nameof Operator
- •Section 3.21: Class Member Operators: Member Access
- •Section 3.22: Class Member Operators: Function Invocation
- •Chapter 4: Conditional Statements
- •Section 4.1: If-Else Statement
- •Section 4.2: If statement conditions are standard boolean expressions and values
- •Section 4.3: If-Else If-Else Statement
- •Chapter 5: Equality Operator
- •Section 5.1: Equality kinds in c# and equality operator
- •Chapter 6: Equals and GetHashCode
- •Section 6.1: Writing a good GetHashCode override
- •Section 6.2: Default Equals behavior
- •Section 6.3: Override Equals and GetHashCode on custom types
- •Section 6.4: Equals and GetHashCode in IEqualityComparator
- •Chapter 7: Null-Coalescing Operator
- •Section 7.1: Basic usage
- •Section 7.2: Null fall-through and chaining
- •Section 7.3: Null coalescing operator with method calls
- •Section 7.4: Use existing or create new
- •Section 7.5: Lazy properties initialization with null coalescing operator
- •Chapter 8: Null-conditional Operators
- •Section 8.1: Null-Conditional Operator
- •Section 8.2: The Null-Conditional Index
- •Section 8.3: Avoiding NullReferenceExceptions
- •Section 8.4: Null-conditional Operator can be used with Extension Method
- •Chapter 9: nameof Operator
- •Section 9.1: Basic usage: Printing a variable name
- •Section 9.2: Raising PropertyChanged event
- •Section 9.3: Argument Checking and Guard Clauses
- •Section 9.4: Strongly typed MVC action links
- •Section 9.5: Handling PropertyChanged events
- •Section 9.6: Applied to a generic type parameter
- •Section 9.7: Printing a parameter name
- •Section 9.8: Applied to qualified identifiers
- •Chapter 10: Verbatim Strings
- •Section 10.1: Interpolated Verbatim Strings
- •Section 10.2: Escaping Double Quotes
- •Section 10.3: Verbatim strings instruct the compiler to not use character escapes
- •Section 10.4: Multiline Strings
- •Chapter 11: Common String Operations
- •Section 11.1: Formatting a string
- •Section 11.2: Correctly reversing a string
- •Section 11.3: Padding a string to a fixed length
- •Section 11.4: Getting x characters from the right side of a string
- •Section 11.5: Checking for empty String using String.IsNullOrEmpty() and String.IsNullOrWhiteSpace()
- •Section 11.7: Convert Decimal Number to Binary,Octal and Hexadecimal Format
- •Section 11.8: Construct a string from Array
- •Section 11.9: Formatting using ToString
- •Section 11.10: Splitting a String by another string
- •Section 11.11: Splitting a String by specific character
- •Section 11.12: Getting Substrings of a given string
- •Section 11.13: Determine whether a string begins with a given sequence
- •Section 11.14: Getting a char at specific index and enumerating the string
- •Section 11.15: Joining an array of strings into a new one
- •Section 11.16: Replacing a string within a string
- •Section 11.17: Changing the case of characters within a String
- •Section 11.18: Concatenate an array of strings into a single string
- •Section 11.19: String Concatenation
- •Chapter 12: String.Format
- •Section 12.1: Since C# 6.0
- •Section 12.2: Places where String.Format is 'embedded' in the framework
- •Section 12.3: Create a custom format provider
- •Section 12.4: Date Formatting
- •Section 12.5: Currency Formatting
- •Section 12.6: Using custom number format
- •Section 12.7: Align left/ right, pad with spaces
- •Section 12.8: Numeric formats
- •Section 12.9: ToString()
- •Section 12.10: Escaping curly brackets inside a String.Format() expression
- •Section 12.11: Relationship with ToString()
- •Chapter 13: String Concatenate
- •Section 13.1: + Operator
- •Section 13.3: Concat string array elements using String.Join
- •Section 13.4: Concatenation of two strings using $
- •Chapter 14: String Manipulation
- •Section 14.1: Replacing a string within a string
- •Section 14.2: Finding a string within a string
- •Section 14.3: Removing (Trimming) white-space from a string
- •Section 14.4: Splitting a string using a delimiter
- •Section 14.5: Concatenate an array of strings into a single string
- •Section 14.6: String Concatenation
- •Section 14.7: Changing the case of characters within a String
- •Chapter 15: String Interpolation
- •Section 15.1: Format dates in strings
- •Section 15.2: Padding the output
- •Section 15.3: Expressions
- •Section 15.4: Formatting numbers in strings
- •Section 15.5: Simple Usage
- •Chapter 16: String Escape Sequences
- •Section 16.1: Escaping special symbols in string literals
- •Section 16.2: Unicode character escape sequences
- •Section 16.3: Escaping special symbols in character literals
- •Section 16.4: Using escape sequences in identifiers
- •Section 16.5: Unrecognized escape sequences produce compile-time errors
- •Chapter 17: StringBuilder
- •Section 17.1: What a StringBuilder is and when to use one
- •Section 17.2: Use StringBuilder to create string from a large number of records
- •Chapter 18: Regex Parsing
- •Section 18.1: Single match
- •Section 18.2: Multiple matches
- •Chapter 19: DateTime Methods
- •Section 19.1: DateTime Formatting
- •Section 19.2: DateTime.AddDays(Double)
- •Section 19.3: DateTime.AddHours(Double)
- •Section 19.4: DateTime.Parse(String)
- •Section 19.5: DateTime.TryParse(String, DateTime)
- •Section 19.6: DateTime.AddMilliseconds(Double)
- •Section 19.7: DateTime.Compare(DateTime t1, DateTime t2 )
- •Section 19.8: DateTime.DaysInMonth(Int32, Int32)
- •Section 19.9: DateTime.AddYears(Int32)
- •Section 19.10: Pure functions warning when dealing with DateTime
- •Section 19.12: DateTime.Add(TimeSpan)
- •Section 19.13: Parse and TryParse with culture info
- •Section 19.14: DateTime as initializer in for-loop
- •Section 19.16: DateTime ToString, ToShortDateString, ToLongDateString and ToString formatted
- •Section 19.17: Current Date
- •Chapter 20: Arrays
- •Section 20.1: Declaring an array
- •Section 20.3: Copying arrays
- •Section 20.4: Comparing arrays for equality
- •Section 20.5: Multi-dimensional arrays
- •Section 20.6: Getting and setting array values
- •Section 20.7: Iterate over an array
- •Section 20.8: Creating an array of sequential numbers
- •Section 20.9: Jagged arrays
- •Section 20.10: Array covariance
- •Section 20.11: Arrays as IEnumerable<> instances
- •Section 20.12: Checking if one array contains another array
- •Chapter 21: O(n) Algorithm for circular rotation of an array
- •Section 21.1: Example of a generic method that rotates an array by a given shift
- •Chapter 22: Enum
- •Section 22.1: Enum basics
- •Section 22.2: Enum as flags
- •Section 22.3: Using << notation for flags
- •Section 22.4: Test flags-style enum values with bitwise logic
- •Section 22.5: Add and remove values from flagged enum
- •Section 22.6: Enum to string and back
- •Section 22.7: Enums can have unexpected values
- •Section 22.8: Default value for enum == ZERO
- •Section 22.9: Adding additional description information to an enum value
- •Section 22.10: Get all the members values of an enum
- •Section 22.11: Bitwise Manipulation using enums
- •Chapter 23: Tuples
- •Section 23.1: Accessing tuple elements
- •Section 23.2: Creating tuples
- •Section 23.3: Comparing and sorting Tuples
- •Section 23.4: Return multiple values from a method
- •Chapter 24: Guid
- •Section 24.1: Getting the string representation of a Guid
- •Section 24.2: Creating a Guid
- •Section 24.3: Declaring a nullable GUID
- •Chapter 25: BigInteger
- •Section 25.1: Calculate the First 1,000-Digit Fibonacci Number
- •Chapter 26: Collection Initializers
- •Section 26.1: Collection initializers
- •Section 26.2: C# 6 Index Initializers
- •Section 26.3: Collection initializers in custom classes
- •Section 26.4: Using collection initializer inside object initializer
- •Section 26.5: Collection Initializers with Parameter Arrays
- •Chapter 27: An overview of C# collections
- •Section 27.1: HashSet<T>
- •Section 27.2: Dictionary<TKey, TValue>
- •Section 27.3: SortedSet<T>
- •Section 27.4: T[ ] (Array of T)
- •Section 27.5: List<T>
- •Section 27.6: Stack<T>
- •Section 27.7: LinkedList<T>
- •Section 27.8: Queue
- •Chapter 28: Looping
- •Section 28.1: For Loop
- •Section 28.2: Do - While Loop
- •Section 28.3: Foreach Loop
- •Section 28.4: Looping styles
- •Section 28.5: Nested loops
- •Section 28.6: continue
- •Section 28.7: While loop
- •Section 28.8: break
- •Chapter 29: Iterators
- •Section 29.1: Creating Iterators Using Yield
- •Section 29.2: Simple Numeric Iterator Example
- •Chapter 30: IEnumerable
- •Section 30.1: IEnumerable with custom Enumerator
- •Section 30.2: IEnumerable<int>
- •Chapter 31: Value type vs Reference type
- •Section 31.1: Passing by reference using ref keyword
- •Section 31.2: Changing values elsewhere
- •Section 31.3: ref vs out parameters
- •Section 31.4: Assignment
- •Section 31.6: Passing by reference
- •Chapter 32: Built-in Types
- •Section 32.1: Conversion of boxed value types
- •Section 32.2: Comparisons with boxed value types
- •Section 32.3: Immutable reference type - string
- •Section 32.4: Value type - char
- •Section 32.5: Value type - short, int, long (signed 16 bit, 32 bit, 64 bit integers)
- •Section 32.6: Value type - ushort, uint, ulong (unsigned 16 bit, 32 bit, 64 bit integers)
- •Section 32.7: Value type - bool
- •Chapter 33: Aliases of built-in types
- •Section 33.1: Built-In Types Table
- •Chapter 34: Anonymous types
- •Section 34.1: Anonymous vs dynamic
- •Section 34.2: Creating an anonymous type
- •Section 34.3: Anonymous type equality
- •Section 34.4: Generic methods with anonymous types
- •Section 34.5: Instantiating generic types with anonymous types
- •Section 34.6: Implicitly typed arrays
- •Chapter 35: Dynamic type
- •Section 35.1: Creating a dynamic object with properties
- •Section 35.2: Creating a dynamic variable
- •Section 35.3: Returning dynamic
- •Chapter 36: Type Conversion
- •Section 36.1: Explicit Type Conversion
- •Section 36.2: MSDN implicit operator example
- •Chapter 37: Casting
- •Section 37.1: Checking compatibility without casting
- •Section 37.2: Cast an object to a base type
- •Section 37.3: Conversion Operators
- •Section 37.4: LINQ Casting operations
- •Section 37.5: Explicit Casting
- •Section 37.6: Safe Explicit Casting (`as` operator)
- •Section 37.7: Implicit Casting
- •Section 37.8: Explicit Numeric Conversions
- •Chapter 38: Nullable types
- •Section 38.1: Initialising a nullable
- •Section 38.2: Check if a Nullable has a value
- •Section 38.3: Get the value of a nullable type
- •Section 38.4: Getting a default value from a nullable
- •Section 38.5: Default value of nullable types is null
- •Section 38.7: Check if a generic type parameter is a nullable type
- •Chapter 39: Constructors and Finalizers
- •Section 39.1: Static constructor
- •Section 39.2: Singleton constructor pattern
- •Section 39.3: Default Constructor
- •Section 39.4: Forcing a static constructor to be called
- •Section 39.5: Calling a constructor from another constructor
- •Section 39.6: Calling the base class constructor
- •Section 39.7: Finalizers on derived classes
- •Section 39.8: Exceptions in static constructors
- •Section 39.9: Constructor and Property Initialization
- •Section 39.10: Generic Static Constructors
- •Section 39.11: Calling virtual methods in constructor
- •Chapter 40: Access Modifiers
- •Section 40.1: Access Modifiers Diagrams
- •Section 40.2: public
- •Section 40.3: private
- •Section 40.4: protected internal
- •Section 40.5: internal
- •Section 40.6: protected
- •Chapter 41: Interfaces
- •Section 41.1: Implementing an interface
- •Section 41.2: Explicit interface implementation
- •Section 41.3: Interface Basics
- •Section 41.5: Implementing multiple interfaces
- •Section 41.6: Why we use interfaces
- •Section 41.7: "Hiding" members with Explicit Implementation
- •Chapter 42: Static Classes
- •Section 42.1: Static Classes
- •Section 42.2: Static class lifetime
- •Section 42.3: Static keyword
- •Chapter 43: Singleton Implementation
- •Section 43.1: Statically Initialized Singleton
- •Section 43.2: Lazy, thread-safe Singleton (using Lazy<T>)
- •Section 43.3: Lazy, thread-safe Singleton (using Double Checked Locking)
- •Section 43.4: Lazy, thread safe singleton (for .NET 3.5 or older, alternate implementation)
- •Chapter 44: Dependency Injection
- •Section 44.1: Dependency Injection C# and ASP.NET with Unity
- •Section 44.2: Dependency injection using MEF
- •Chapter 45: Partial class and methods
- •Section 45.1: Partial classes
- •Section 45.2: Partial classes inheriting from a base class
- •Section 45.3: Partial methods
- •Chapter 46: Object initializers
- •Section 46.1: Simple usage
- •Section 46.2: Usage with non-default constructors
- •Section 46.3: Usage with anonymous types
- •Chapter 47: Methods
- •Section 47.1: Calling a Method
- •Section 47.2: Anonymous method
- •Section 47.3: Declaring a Method
- •Section 47.4: Parameters and Arguments
- •Section 47.5: Return Types
- •Section 47.6: Default Parameters
- •Section 47.7: Method overloading
- •Section 47.8: Access rights
- •Chapter 48: Extension Methods
- •Section 48.1: Extension methods - overview
- •Section 48.2: Null checking
- •Section 48.3: Explicitly using an extension method
- •Section 48.4: Generic Extension Methods
- •Section 48.5: Extension methods can only see public (or internal) members of the extended class
- •Section 48.6: Extension methods for chaining
- •Section 48.7: Extension methods with Enumeration
- •Section 48.8: Extension methods dispatch based on static type
- •Section 48.9: Extension methods on Interfaces
- •Section 48.10: Extension methods in combination with interfaces
- •Section 48.11: Extension methods aren't supported by dynamic code
- •Section 48.12: Extensions and interfaces together enable DRY code and mixin-like functionality
- •Section 48.14: Extension methods as strongly typed wrappers
- •Section 48.15: Using Extension methods to create beautiful mapper classes
- •Section 48.16: Using Extension methods to build new collection types (e.g. DictList)
- •Section 48.17: Extension methods for handling special cases
- •Section 48.18: Using Extension methods with Static methods and Callbacks
- •Chapter 49: Named Arguments
- •Section 49.1: Argument order is not necessary
- •Section 49.2: Named arguments and optional parameters
- •Section 49.3: Named Arguments can make your code more clear
- •Section 50.1: Optional Arguments
- •Section 50.2: Named Arguments
- •Chapter 51: Data Annotation
- •Section 51.1: Data Annotation Basics
- •Section 51.2: Creating a custom validation attribute
- •Section 51.3: Manually Execute Validation Attributes
- •Section 51.4: Validation Attributes
- •Section 51.5: EditableAttribute (data modeling attribute)
- •Chapter 52: Keywords
- •Section 52.1: as
- •Section 52.2: goto
- •Section 52.3: volatile
- •Section 52.4: checked, unchecked
- •Section 52.5: virtual, override, new
- •Section 52.6: stackalloc
- •Section 52.7: break
- •Section 52.8: const
- •Section 52.9: async, await
- •Section 52.10: for
- •Section 52.11: abstract
- •Section 52.12: fixed
- •Section 52.13: default
- •Section 52.14: sealed
- •Section 52.15: is
- •Section 52.16: this
- •Section 52.17: readonly
- •Section 52.18: typeof
- •Section 52.19: foreach
- •Section 52.20: dynamic
- •Section 52.21: try, catch, finally, throw
- •Section 52.22: void
- •Section 52.23: namespace
- •Section 52.24: ref, out
- •Section 52.25: base
- •Section 52.26: float, double, decimal
- •Section 52.27: operator
- •Section 52.28: char
- •Section 52.29: params
- •Section 52.30: while
- •Section 52.31: null
- •Section 52.32: continue
- •Section 52.33: string
- •Section 52.34: return
- •Section 52.35: unsafe
- •Section 52.36: switch
- •Section 52.37: var
- •Section 52.38: when
- •Section 52.39: lock
- •Section 52.40: uint
- •Section 52.41: if, if...else, if... else if
- •Section 52.42: static
- •Section 52.43: internal
- •Section 52.44: using
- •Section 52.45: where
- •Section 52.46: int
- •Section 52.47: ulong
- •Section 52.48: true, false
- •Section 52.49: struct
- •Section 52.50: extern
- •Section 52.51: bool
- •Section 52.52: interface
- •Section 52.53: delegate
- •Section 52.54: unchecked
- •Section 52.55: ushort
- •Section 52.56: sizeof
- •Section 52.57: in
- •Section 52.58: implicit
- •Section 52.59: do
- •Section 52.60: long
- •Section 52.61: enum
- •Section 52.62: partial
- •Section 52.63: event
- •Section 52.64: sbyte
- •Section 53.1: Classes:
- •Chapter 54: Recursion
- •Section 54.1: Recursion in plain English
- •Section 54.2: Fibonacci Sequence
- •Section 54.3: PowerOf calculation
- •Section 54.4: Recursively describe an object structure
- •Section 54.5: Using Recursion to Get Directory Tree
- •Section 54.6: Factorial calculation
- •Chapter 55: Naming Conventions
- •Section 55.1: Capitalization conventions
- •Section 55.2: Enums
- •Section 55.3: Interfaces
- •Section 55.4: Exceptions
- •Section 55.5: Private fields
- •Section 55.6: Namespaces
- •Chapter 56: XML Documentation Comments
- •Section 56.1: Simple method annotation
- •Section 56.2: Generating XML from documentation comments
- •Section 56.3: Method documentation comment with param and returns elements
- •Section 56.4: Interface and class documentation comments
- •Section 56.5: Referencing another class in documentation
- •Chapter 57: Comments and regions
- •Section 57.1: Comments
- •Section 57.2: Regions
- •Section 57.3: Documentation comments
- •Chapter 58: Inheritance
- •Section 58.1: Inheritance. Constructors' calls sequence
- •Section 58.2: Inheriting from a base class
- •Section 58.3: Inheriting from a class and implementing an interface
- •Section 58.4: Inheriting from a class and implementing multiple interfaces
- •Section 58.5: Constructors In A Subclass
- •Section 58.6: Inheritance Anti-patterns
- •Section 58.7: Extending an abstract base class
- •Section 58.8: Testing and navigating inheritance
- •Section 58.9: Inheriting methods
- •Section 58.10: Base class with recursive type specification
- •Chapter 59: Generics
- •Section 59.1: Implicit type inference (methods)
- •Section 59.2: Type inference (classes)
- •Section 59.3: Using generic method with an interface as a constraint type
- •Section 59.4: Type constraints (new-keyword)
- •Section 59.5: Type constraints (classes and interfaces)
- •Section 59.6: Checking equality of generic values
- •Section 59.7: Reflecting on type parameters
- •Section 59.8: Covariance
- •Section 59.9: Contravariance
- •Section 59.10: Invariance
- •Section 59.11: Variant interfaces
- •Section 59.12: Variant delegates
- •Section 59.13: Variant types as parameters and return values
- •Section 59.14: Type Parameters (Interfaces)
- •Section 59.15: Type constraints (class and struct)
- •Section 59.16: Explicit type parameters
- •Section 59.17: Type Parameters (Classes)
- •Section 59.18: Type Parameters (Methods)
- •Section 59.19: Generic type casting
- •Section 59.20: Configuration reader with generic type casting
- •Chapter 60: Using Statement
- •Section 60.1: Using Statement Basics
- •Section 60.2: Gotcha: returning the resource which you are disposing
- •Section 60.3: Multiple using statements with one block
- •Section 60.4: Gotcha: Exception in Dispose method masking other errors in Using blocks
- •Section 60.5: Using statements are null-safe
- •Section 60.6: Using Dispose Syntax to define custom scope
- •Section 60.7: Using Statements and Database Connections
- •Section 60.8: Executing code in constraint context
- •Chapter 61: Using Directive
- •Section 61.1: Associate an Alias to Resolve Conflicts
- •Section 61.2: Using alias directives
- •Section 61.3: Access Static Members of a Class
- •Section 61.4: Basic Usage
- •Section 61.5: Reference a Namespace
- •Section 61.6: Associate an Alias with a Namespace
- •Chapter 62: IDisposable interface
- •Section 62.1: In a class that contains only managed resources
- •Section 62.2: In a class with managed and unmanaged resources
- •Section 62.3: IDisposable, Dispose
- •Section 62.4: using keyword
- •Section 62.5: In an inherited class with managed resources
- •Chapter 63: Reflection
- •Section 63.1: Get the members of a type
- •Section 63.2: Get a method and invoke it
- •Section 63.3: Creating an instance of a Type
- •Section 63.4: Get a Strongly-Typed Delegate to a Method or Property via Reflection
- •Section 63.5: Get a generic method and invoke it
- •Section 63.6: Get a System.Type
- •Section 63.7: Getting and setting properties
- •Section 63.8: Create an instance of a Generic Type and invoke it's method
- •Section 63.9: Custom Attributes
- •Section 63.10: Instantiating classes that implement an interface (e.g. plugin activation)
- •Section 63.11: Get a Type by name with namespace
- •Section 63.12: Determining generic arguments of instances of generic types
- •Section 63.13: Looping through all the properties of a class
- •Chapter 64: IQueryable interface
- •Section 64.1: Translating a LINQ query to a SQL query
- •Chapter 65: Linq to Objects
- •Section 65.1: Using LINQ to Objects in C#
- •Chapter 66: LINQ Queries
- •Section 66.1: Chaining methods
- •Section 66.3: Except
- •Section 66.4: SelectMany
- •Section 66.5: Any
- •Section 66.6: JOINS
- •Section 66.7: Skip and Take
- •Section 66.8: Defining a variable inside a Linq query (let keyword)
- •Section 66.9: Zip
- •Section 66.10: Range and Repeat
- •Section 66.11: Basics
- •Section 66.12: All
- •Section 66.13: Aggregate
- •Section 66.14: Distinct
- •Section 66.15: SelectMany: Flattening a sequence of sequences
- •Section 66.16: GroupBy
- •Section 66.17: Query collection by type / cast elements to type
- •Section 66.18: Enumerating the Enumerable
- •Section 66.19: Using Range with various Linq methods
- •Section 66.20: Where
- •Section 66.21: Using SelectMany instead of nested loops
- •Section 66.22: Contains
- •Section 66.23: Joining multiple sequences
- •Section 66.24: Joining on multiple keys
- •Section 66.25: ToLookup
- •Section 66.26: SkipWhile
- •Section 66.28: Sum
- •Section 66.29: GroupBy one or multiple fields
- •Section 66.30: OrderBy
- •Section 66.31: Any and First(OrDefault) - best practice
- •Section 66.32: GroupBy Sum and Count
- •Section 66.33: SequenceEqual
- •Section 66.34: ElementAt and ElementAtOrDefault
- •Section 66.35: DefaultIfEmpty
- •Section 66.36: ToDictionary
- •Section 66.37: Concat
- •Section 66.38: Build your own Linq operators for IEnumerable<T>
- •Section 66.39: Select - Transforming elements
- •Section 66.40: OrderByDescending
- •Section 66.41: Union
- •Section 66.42: GroupJoin with outer range variable
- •Section 66.43: Linq Quantifiers
- •Section 66.44: TakeWhile
- •Section 66.45: Reverse
- •Section 66.46: Count and LongCount
- •Section 66.47: Incrementally building a query
- •Section 66.48: Select with Func<TSource, int, TResult> selector - Use to get ranking of elements
- •Chapter 67: LINQ to XML
- •Section 67.1: Read XML using LINQ to XML
- •Chapter 68: Parallel LINQ (PLINQ)
- •Section 68.1: Simple example
- •Section 68.2: WithDegreeOfParallelism
- •Section 68.3: AsOrdered
- •Section 68.4: AsUnordered
- •Chapter 69: XmlDocument and the System.Xml namespace
- •Section 69.1: XmlDocument vs XDocument (Example and comparison)
- •Section 69.2: Reading from XML document
- •Section 69.3: Basic XML document interaction
- •Chapter 70: XDocument and the System.Xml.Linq namespace
- •Section 70.1: Generate an XML document
- •Section 70.2: Generate an XML document using fluent syntax
- •Section 70.3: Modify XML File
- •Chapter 71: C# 7.0 Features
- •Section 71.1: Language support for Tuples
- •Section 71.2: Local functions
- •Section 71.3: out var declaration
- •Section 71.4: Pattern Matching
- •Section 71.5: Digit separators
- •Section 71.6: Binary literals
- •Section 71.7: throw expressions
- •Section 71.8: Extended expression bodied members list
- •Section 71.9: ref return and ref local
- •Section 71.10: ValueTask<T>
- •Chapter 72: C# 6.0 Features
- •Section 72.1: Exception filters
- •Section 72.2: String interpolation
- •Section 72.3: Auto-property initializers
- •Section 72.4: Null propagation
- •Section 72.5: Expression-bodied function members
- •Section 72.6: Operator nameof
- •Section 72.7: Using static type
- •Section 72.8: Index initializers
- •Section 72.9: Improved overload resolution
- •Section 72.10: Await in catch and finally
- •Section 72.11: Minor changes and bugfixes
- •Section 72.12: Using an extension method for collection initialization
- •Section 72.13: Disable Warnings Enhancements
- •Chapter 73: C# 5.0 Features
- •Section 73.1: Async & Await
- •Section 73.2: Caller Information Attributes
- •Chapter 74: C# 4.0 Features
- •Section 74.1: Optional parameters and named arguments
- •Section 74.2: Variance
- •Section 74.3: Dynamic member lookup
- •Section 74.4: Optional ref keyword when using COM
- •Chapter 75: C# 3.0 Features
- •Section 75.1: Implicitly typed variables (var)
- •Section 75.2: Language Integrated Queries (LINQ)
- •Section 75.3: Lambda expresions
- •Section 75.4: Anonymous types
- •Chapter 76: Exception Handling
- •Section 76.1: Creating Custom Exceptions
- •Section 76.2: Finally block
- •Section 76.3: Best Practices
- •Section 76.4: Exception Anti-patterns
- •Section 76.5: Basic Exception Handling
- •Section 76.6: Handling specific exception types
- •Section 76.7: Aggregate exceptions / multiple exceptions from one method
- •Section 76.8: Throwing an exception
- •Section 76.9: Unhandled and Thread Exception
- •Section 76.10: Implementing IErrorHandler for WCF Services
- •Section 76.11: Using the exception object
- •Section 76.12: Nesting of Exceptions & try catch blocks
- •Chapter 77: NullReferenceException
- •Section 77.1: NullReferenceException explained
- •Chapter 78: Handling FormatException when converting string to other types
- •Section 78.1: Converting string to integer
- •Section 79.1: Stack trace for a simple NullReferenceException in Windows Forms
- •Chapter 80: Diagnostics
- •Section 80.1: Redirecting log output with TraceListeners
- •Section 80.2: Debug.WriteLine
- •Chapter 81: Overflow
- •Section 81.1: Integer overflow
- •Section 81.2: Overflow during operation
- •Section 81.3: Ordering matters
- •Chapter 82: Getting Started: Json with C#
- •Section 82.1: Simple Json Example
- •Section 82.2: First things First: Library to work with Json
- •Section 82.3: C# Implementation
- •Section 82.4: Serialization
- •Section 82.5: Deserialization
- •Section 82.6: Serialization & De-Serialization Common Utilities function
- •Chapter 83: Using json.net
- •Section 83.1: Using JsonConverter on simple values
- •Section 83.2: Collect all fields of JSON object
- •Chapter 84: Lambda expressions
- •Section 84.1: Lambda Expressions as Shorthand for Delegate Initialization
- •Section 84.2: Lambda Expression as an Event Handler
- •Section 84.3: Lambda Expressions with Multiple Parameters or No Parameters
- •Section 84.4: Lambdas can be emitted both as `Func` and `Expression`
- •Section 84.5: Put Multiple Statements in a Statement Lambda
- •Section 84.6: Lambdas for both `Func` and `Action`
- •Section 84.7: Using lambda syntax to create a closure
- •Section 84.8: Passing a Lambda Expression as a Parameter to a Method
- •Section 84.9: Basic lambda expressions
- •Section 84.10: Basic lambda expressions with LINQ
- •Section 84.11: Lambda syntax with statement block body
- •Chapter 85: Generic Lambda Query Builder
- •Section 85.1: QueryFilter class
- •Section 85.2: GetExpression Method
- •Section 85.3: GetExpression Private overload
- •Section 85.4: ConstantExpression Method
- •Section 85.5: Usage
- •Chapter 86: Properties
- •Section 86.1: Auto-implemented properties
- •Section 86.2: Default Values for Properties
- •Section 86.3: Public Get
- •Section 86.4: Public Set
- •Section 86.5: Accessing Properties
- •Section 86.6: Read-only properties
- •Section 86.7: Various Properties in Context
- •Chapter 87: Initializing Properties
- •Section 87.1: C# 6.0: Initialize an Auto-Implemented Property
- •Section 87.2: Initializing Property with a Backing Field
- •Section 87.3: Property Initialization during object instantiation
- •Section 87.4: Initializing Property in Constructor
- •Chapter 88: INotifyPropertyChanged interface
- •Section 88.1: Implementing INotifyPropertyChanged in C# 6
- •Chapter 89: Events
- •Section 89.1: Declaring and Raising Events
- •Section 89.2: Event Properties
- •Section 89.3: Creating cancelable event
- •Section 89.4: Standard Event Declaration
- •Section 89.5: Anonymous Event Handler Declaration
- •Section 89.6: Non-Standard Event Declaration
- •Section 89.7: Creating custom EventArgs containing additional data
- •Chapter 90: Expression Trees
- •Section 90.1: Create Expression Trees with a lambda expression
- •Section 90.2: Creating Expression Trees by Using the API
- •Section 90.3: Compiling Expression Trees
- •Section 90.4: Parsing Expression Trees
- •Section 90.5: Expression Tree Basic
- •Section 90.6: Examining the Structure of an Expression using Visitor
- •Section 90.7: Understanding the expressions API
- •Chapter 91: Overload Resolution
- •Section 91.1: Basic Overloading Example
- •Section 91.2: "params" is not expanded, unless necessary
- •Section 91.3: Passing null as one of the arguments
- •Chapter 92: BindingList<T>
- •Section 92.1: Add item to list
- •Section 92.2: Avoiding N*2 iteration
- •Chapter 93: Preprocessor directives
- •Section 93.1: Conditional Expressions
- •Section 93.2: Other Compiler Instructions
- •Section 93.3: Defining and Undefining Symbols
- •Section 93.4: Region Blocks
- •Section 93.5: Disabling and Restoring Compiler Warnings
- •Section 93.6: Generating Compiler Warnings and Errors
- •Section 93.7: Custom Preprocessors at project level
- •Section 93.8: Using the Conditional attribute
- •Chapter 94: Structs
- •Section 94.1: Declaring a struct
- •Section 94.2: Struct usage
- •Section 94.3: Structs are copied on assignment
- •Section 94.4: Struct implementing interface
- •Chapter 95: Attributes
- •Section 95.1: Creating a custom attribute
- •Section 95.2: Reading an attribute
- •Section 95.3: Using an attribute
- •Section 95.4: DebuggerDisplay Attribute
- •Section 95.5: Caller info attributes
- •Section 95.6: Obsolete Attribute
- •Section 95.7: Reading an attribute from interface
- •Chapter 96: Delegates
- •Section 96.1: Declaring a delegate type
- •Section 96.2: The Func<T, TResult>, Action<T> and Predicate<T> delegate types
- •Section 96.3: Combine Delegates (Multicast Delegates)
- •Section 96.4: Safe invoke multicast delegate
- •Section 96.5: Delegate Equality
- •Section 96.7: Assigning a named method to a delegate
- •Section 96.8: Assigning to a delegate by lambda
- •Section 96.9: Encapsulating transformations in funcs
- •Section 96.10: Passing delegates as parameters
- •Section 96.11: Closure inside a delegate
- •Chapter 97: File and Stream I/O
- •Section 97.1: Reading from a file using the System.IO.File class
- •Section 97.2: Lazily reading a file line-by-line via an IEnumerable
- •Section 97.3: Async write text to a file using StreamWriter
- •Section 97.4: Copy File
- •Section 97.6: Writing to a file using the System.IO.File class
- •Section 97.7: Create File
- •Section 97.8: Move File
- •Section 97.9: Delete File
- •Section 97.10: Files and Directories
- •Chapter 98: Networking
- •Section 98.1: Basic TCP Communication Client
- •Section 98.2: Download a file from a web server
- •Section 98.3: Async TCP Client
- •Section 98.4: Basic UDP Client
- •Chapter 99: Performing HTTP requests
- •Section 99.1: Creating and sending an HTTP POST request
- •Section 99.2: Creating and sending an HTTP GET request
- •Section 99.3: Error handling of specific HTTP response codes (such as 404 Not Found)
- •Section 99.4: Retrieve HTML for Web Page (Simple)
- •Section 99.5: Sending asynchronous HTTP POST request with JSON body
- •Chapter 100: Reading and writing .zip files
- •Section 100.1: Writing to a zip file
- •Section 100.2: Writing Zip Files in-memory
- •Section 100.3: Get files from a Zip file
- •Section 100.4: The following example shows how to open a zip archive and extract all .txt files to a folder
- •Chapter 101: FileSystemWatcher
- •Section 101.1: IsFileReady
- •Section 101.2: Basic FileWatcher
- •Chapter 102: Access network shared folder with username and password
- •Section 102.1: Code to access network shared file
- •Chapter 103: Asynchronous Socket
- •Section 103.1: Asynchronous Socket (Client / Server) example
- •Chapter 104: Action Filters
- •Section 104.1: Custom Action Filters
- •Chapter 105: Polymorphism
- •Section 105.1: Types of Polymorphism
- •Section 105.2: Another Polymorphism Example
- •Chapter 106: Immutability
- •Section 106.1: System.String class
- •Section 106.2: Strings and immutability
- •Chapter 107: Indexer
- •Section 107.1: A simple indexer
- •Section 107.2: Overloading the indexer to create a SparseArray
- •Section 107.3: Indexer with 2 arguments and interface
- •Chapter 108: Checked and Unchecked
- •Section 108.1: Checked and Unchecked
- •Section 108.2: Checked and Unchecked as a scope
- •Chapter 109: Stream
- •Section 109.1: Using Streams
- •Chapter 110: Timers
- •Section 110.1: Multithreaded Timers
- •Section 110.2: Creating an Instance of a Timer
- •Section 110.3: Assigning the "Tick" event handler to a Timer
- •Section 110.4: Example: Using a Timer to perform a simple countdown
- •Chapter 111: Stopwatches
- •Section 111.1: IsHighResolution
- •Section 111.2: Creating an Instance of a Stopwatch
- •Chapter 112: Threading
- •Section 112.2: Creating and Starting a Second Thread
- •Section 112.3: Parallel.ForEach Loop
- •Section 112.4: Deadlocks (hold resource and wait)
- •Section 112.5: Simple Complete Threading Demo
- •Section 112.6: Creating One Thread Per Processor
- •Section 112.7: Simple Complete Threading Demo using Tasks
- •Section 112.8: Deadlocks (two threads waiting on each other)
- •Section 112.9: Explicit Task Parallism
- •Section 112.10: Implicit Task Parallelism
- •Section 112.11: Starting a thread with parameters
- •Section 113.1: ASP.NET Configure Await
- •Section 113.2: Task "run and forget" extension
- •Section 113.3: Async/await
- •Section 113.4: BackgroundWorker
- •Section 113.5: Task
- •Section 113.6: Thread
- •Chapter 114: Async-Await
- •Section 114.1: Await operator and async keyword
- •Section 114.2: Concurrent calls
- •Section 114.3: Try/Catch/Finally
- •Section 114.4: Returning a Task without await
- •Section 114.5: Async/await will only improve performance if it allows the machine to do additional work
- •Section 114.6: Web.config setup to target 4.5 for correct async behaviour
- •Section 114.7: Simple consecutive calls
- •Section 114.8: Blocking on async code can cause deadlocks
- •Chapter 115: Synchronization Context in Async-Await
- •Section 115.1: Pseudocode for async/await keywords
- •Section 115.2: Disabling synchronization context
- •Section 115.3: Why SynchronizationContext is so important?
- •Chapter 116: BackgroundWorker
- •Section 116.1: Using a BackgroundWorker to complete a task
- •Section 116.3: Creating a new BackgroundWorker instance
- •Section 116.4: Assigning Properties to a BackgroundWorker
- •Chapter 117: Task Parallel Library
- •Section 117.1: Parallel.ForEach
- •Section 117.2: Parallel.For
- •Section 117.3: Parallel.Invoke
- •Chapter 118: Making a variable thread safe
- •Section 118.1: Controlling access to a variable in a Parallel.For loop
- •Chapter 119: Lock Statement
- •Section 119.1: Throwing exception in a lock statement
- •Section 119.2: Simple usage
- •Section 119.3: Return in a lock statement
- •Section 119.4: Anti-Patterns and gotchas
- •Section 119.5: Using instances of Object for lock
- •Chapter 120: Yield Keyword
- •Section 120.1: Simple Usage
- •Section 120.2: Correctly checking arguments
- •Section 120.3: Early Termination
- •Section 120.4: More Pertinent Usage
- •Section 120.5: Lazy Evaluation
- •Section 120.6: Try...finally
- •Section 120.7: Eager evaluation
- •Section 120.8: Using yield to create an IEnumerator<T> when implementing IEnumerable<T>
- •Section 120.9: Lazy Evaluation Example: Fibonacci Numbers
- •Section 120.11: Return another Enumerable within a method returning Enumerable
- •Section 121.1: ActionBlock<T>
- •Section 121.2: BroadcastBlock<T>
- •Section 121.4: JoinBlock<T1, T2,…>
- •Section 121.5: WriteOnceBlock<T>
- •Section 121.6: BatchedJoinBlock<T1, T2,…>
- •Section 121.7: TransformBlock<TInput, TOutput>
- •Section 121.8: TransformManyBlock<TInput, TOutput>
- •Section 121.9: BatchBlock<T>
- •Chapter 122: Functional Programming
- •Section 122.1: Func and Action
- •Section 122.2: Higher-Order Functions
- •Section 122.3: Avoid Null References
- •Section 122.4: Immutability
- •Section 122.5: Immutable collections
- •Chapter 123: Func delegates
- •Section 123.1: Without parameters
- •Section 123.2: With multiple variables
- •Section 123.3: Lambda & anonymous methods
- •Section 123.4: Covariant & Contravariant Type Parameters
- •Chapter 124: Function with multiple return values
- •Section 124.1: "anonymous object" + "dynamic keyword" solution
- •Section 124.2: Tuple solution
- •Section 124.3: Ref and Out Parameters
- •Chapter 125: Binary Serialization
- •Section 125.1: Controlling serialization behavior with attributes
- •Section 125.2: Serialization Binder
- •Section 125.3: Some gotchas in backward compatibility
- •Section 125.4: Making an object serializable
- •Section 125.5: Serialization surrogates (Implementing ISerializationSurrogate)
- •Section 125.6: Adding more control by implementing ISerializable
- •Chapter 126: ICloneable
- •Section 126.1: Implementing ICloneable in a class
- •Section 126.2: Implementing ICloneable in a struct
- •Chapter 127: IComparable
- •Section 127.1: Sort versions
- •Chapter 128: Accessing Databases
- •Section 128.1: Connection Strings
- •Section 128.2: Entity Framework Connections
- •Section 128.3: ADO.NET Connections
- •Chapter 129: Using SQLite in C#
- •Section 129.1: Creating simple CRUD using SQLite in C#
- •Section 129.2: Executing Query
- •Chapter 130: Caching
- •Section 130.1: MemoryCache
- •Chapter 131: Code Contracts
- •Section 131.1: Postconditions
- •Section 131.2: Invariants
- •Section 131.3: Defining Contracts on Interface
- •Section 131.4: Preconditions
- •Chapter 132: Code Contracts and Assertions
- •Section 132.1: Assertions to check logic should always be true
- •Chapter 133: Structural Design Patterns
- •Section 133.1: Adapter Design Pattern
- •Chapter 134: Creational Design Patterns
- •Section 134.1: Singleton Pattern
- •Section 134.2: Factory Method pattern
- •Section 134.3: Abstract Factory Pattern
- •Section 134.4: Builder Pattern
- •Section 134.5: Prototype Pattern
- •Chapter 135: Implementing Decorator Design Pattern
- •Section 135.1: Simulating cafeteria
- •Chapter 136: Implementing Flyweight Design Pattern
- •Section 136.1: Implementing map in RPG game
- •Chapter 137: System.Management.Automation
- •Section 137.1: Invoke simple synchronous pipeline
- •Section 138.1: Authenticated SSL LDAP connection, SSL cert does not match reverse DNS
- •Section 138.2: Super Simple anonymous LDAP
- •Chapter 139: C# Authentication handler
- •Section 139.1: Authentication handler
- •Chapter 140: Pointers
- •Section 140.1: Pointers for array access
- •Section 140.2: Pointer arithmetic
- •Section 140.3: The asterisk is part of the type
- •Section 140.4: void*
- •Section 140.5: Member access using ->
- •Section 140.6: Generic pointers
- •Chapter 141: Pointers & Unsafe Code
- •Section 141.1: Introduction to unsafe code
- •Section 141.2: Accessing Array Elements Using a Pointer
- •Section 141.3: Compiling Unsafe Code
- •Section 141.4: Retrieving the Data Value Using a Pointer
- •Section 141.5: Passing Pointers as Parameters to Methods
- •Chapter 142: How to use C# Structs to create a Union type (Similar to C Unions)
- •Section 142.1: C-Style Unions in C#
- •Section 142.2: Union Types in C# can also contain Struct fields
- •Chapter 143: Reactive Extensions (Rx)
- •Section 143.1: Observing TextChanged event on a TextBox
- •Section 143.2: Streaming Data from Database with Observable
- •Chapter 144: AssemblyInfo.cs Examples
- •Section 144.1: Global and local AssemblyInfo
- •Section 144.2: [AssemblyVersion]
- •Section 144.3: Automated versioning
- •Section 144.4: Common fields
- •Section 144.5: [AssemblyTitle]
- •Section 144.6: [AssemblyProduct]
- •Section 144.7: [InternalsVisibleTo]
- •Section 144.8: [AssemblyConfiguration]
- •Section 144.9: [AssemblyKeyFile]
- •Section 144.10: Reading Assembly Attributes
- •Chapter 145: Creating a Console Application using a Plain-Text Editor and the C# Compiler (csc.exe)
- •Chapter 146: CLSCompliantAttribute
- •Section 146.1: Access Modifier to which CLS rules apply
- •Section 146.2: Violation of CLS rule: Unsigned types / sbyte
- •Section 146.3: Violation of CLS rule: Same naming
- •Section 146.4: Violation of CLS rule: Identifier _
- •Section 146.5: Violation of CLS rule: Inherit from non CLSComplaint class
- •Chapter 147: ObservableCollection<T>
- •Section 147.1: Initialize ObservableCollection<T>
- •Chapter 148: Hash Functions
- •Section 148.1: PBKDF2 for Password Hashing
- •Section 148.2: Complete Password Hashing Solution using Pbkdf2
- •Section 148.3: MD5
- •Section 148.4: SHA1
- •Section 148.5: SHA256
- •Section 148.6: SHA384
- •Section 148.7: SHA512
- •Section 149.1: Generate a random int
- •Section 149.2: Generate a random int in a given range
- •Section 149.3: Generating the same sequence of random numbers over and over again
- •Section 149.5: Generate a Random double
- •Section 149.6: Generate a random character
- •Section 149.7: Generate a number that is a percentage of a max value
- •Chapter 150: Cryptography (System.Security.Cryptography)
- •Section 150.1: Modern Examples of Symmetric Authenticated Encryption of a string
- •Section 150.2: Introduction to Symmetric and Asymmetric Encryption
- •Section 150.3: Simple Symmetric File Encryption
- •Section 150.4: Cryptographically Secure Random Data
- •Section 150.5: Password Hashing
- •Section 150.6: Fast Asymmetric File Encryption
- •Chapter 151: ASP.NET Identity
- •Section 151.1: How to implement password reset token in asp.net identity using user manager
- •Chapter 152: Unsafe Code in .NET
- •Section 152.1: Using unsafe with arrays
- •Section 152.2: Using unsafe with strings
- •Section 152.3: Unsafe Array Index
- •Chapter 153: C# Script
- •Section 153.1: Simple code evaluation
- •Chapter 154: Runtime Compile
- •Section 154.1: RoslynScript
- •Section 154.2: CSharpCodeProvider
- •Chapter 155: Interoperability
- •Section 155.1: Import function from unmanaged C++ DLL
- •Section 155.2: Calling conventions
- •Section 155.3: C++ name mangling
- •Section 155.4: Dynamic loading and unloading of unmanaged DLLs
- •Section 155.5: Reading structures with Marshal
- •Section 155.6: Dealing with Win32 Errors
- •Section 155.7: Pinned Object
- •Section 155.8: Simple code to expose class for com
- •Chapter 156: .NET Compiler Platform (Roslyn)
- •Section 156.1: Semantic model
- •Section 156.2: Syntax tree
- •Section 156.3: Create workspace from MSBuild project
- •Chapter 157: ILGenerator
- •Section 157.1: Creates a DynamicAssembly that contains a UnixTimestamp helper method
- •Section 157.2: Create method override
- •Chapter 158: T4 Code Generation
- •Section 158.1: Runtime Code Generation
- •Section 159.1: How to use own created MessageBox control in another Windows Form application
- •Section 159.2: Creating Own MessageBox Control
- •Chapter 160: Including Font Resources
- •Section 160.1: Instantiate 'Fontfamily' from Resources
- •Section 160.2: Integration method
- •Section 160.3: Usage with a 'Button'
- •Chapter 161: Import Google Contacts
- •Section 161.1: Requirements
- •Section 161.2: Source code in the controller
- •Section 161.3: Source code in the view
- •Chapter 162: Garbage Collector in .Net
- •Section 162.1: Weak References
- •Section 162.2: Large Object Heap compaction
- •Section 164.1: Getting started sample
- •Credits
- •You may also like

Chapter 1: Getting started with C# Language
Version Release Date
1.0 2002-01-01
1.2 2003-04-01
2.0 2005-09-01
3.0 2007-08-01
4.0 2010-04-01
5.0 2013-06-01
6.0 2015-07-01
7.0 2017-03-07
Section 1.1: Creating a new console application (Visual Studio)
1.Open Visual Studio
2.In the toolbar, go to File → New Project
3.Select the Console Application project type
4.Open the file Program.cs in the Solution Explorer
5.Add the following code to Main():
public class Program
{
public static void Main()
{
// Prints a message to the console.
System.Console.WriteLine("Hello, World!");
/* Wait for the user to press a key. This is a common way to prevent the console window from terminating
and disappearing before the programmer can see the contents
of the window, when the application is run via Start from within VS. */
System.Console.ReadKey();
}
}
6.In the toolbar, click Debug -> Start Debugging or hit F5 or ctrl + F5 (running without debugger) to run the program.
Live Demo on ideone
Explanation
 class Program is a class declaration. The class Program contains the data and method definitions that your program uses. Classes generally contain multiple methods. Methods define the behavior of the class. However, the Program class has only one method: Main.
 static void Main() defines the Main method, which is the entry point for all C# programs. The Main method states what the class does when executed. Only one Main method is allowed per class.
 System.Console.WriteLine("Hello, world!"); method prints a given data (in this example, Hello, world!) as an output in the console window.
GoalKicker.com – C# Notes for Professionals |
2 |
 System.Console.ReadKey(), ensures that the program won't close immediately after displaying the message. It does this by waiting for the user to press a key on the keyboard. Any key press from the user will terminate the program. The program terminates when it has finished the last line of code in the main() method.
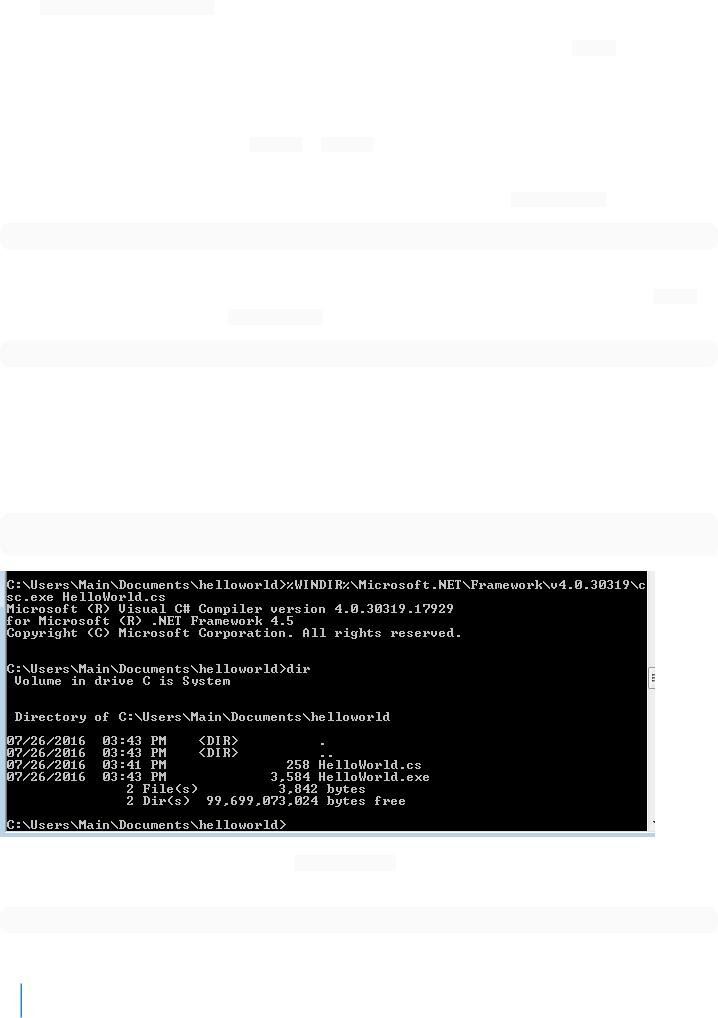
Using the command line
To compile via command line use either MSBuild or csc.exe (the C# compiler), both part of the Microsoft Build Tools package.
To compile this example, run the following command in the same directory where HelloWorld.cs is located:
%WINDIR%\\Microsoft.NET\\Framework64\\v4.0.30319\\csc.exe HelloWorld.cs
It can also be possible that you have two main methods inside one application. In this case, you have to tell the compiler which main method to execute by typing the following command in the console.(suppose Class ClassA also has a main method in the same HelloWorld.cs file in HelloWorld namespace)
%WINDIR%\\Microsoft.NET\\Framework64\\v4.0.30319\\csc.exe HelloWorld.cs /main:HelloWorld.ClassA
where HelloWorld is namespace
Note: This is the path where .NET framework v4.0 is located in general. Change the path according to your .NET version. In addition, the directory might be framework instead of framework64 if you're using the 32-bit .NET Framework. From the Windows Command Prompt, you can list all the csc.exe Framework paths by running the following commands (the first for 32-bit Frameworks):
dir %WINDIR%\\Microsoft.NET\\Framework\\csc.exe /s/b dir %WINDIR%\\Microsoft.NET\\Framework64\\csc.exe /s/b
There should now be an executable file named HelloWorld.exe in the same directory. To execute the program from the command prompt, simply type the executable's name and hit Enter as follows:
HelloWorld.exe
This will produce:
Hello, world!
GoalKicker.com – C# Notes for Professionals |
3 |
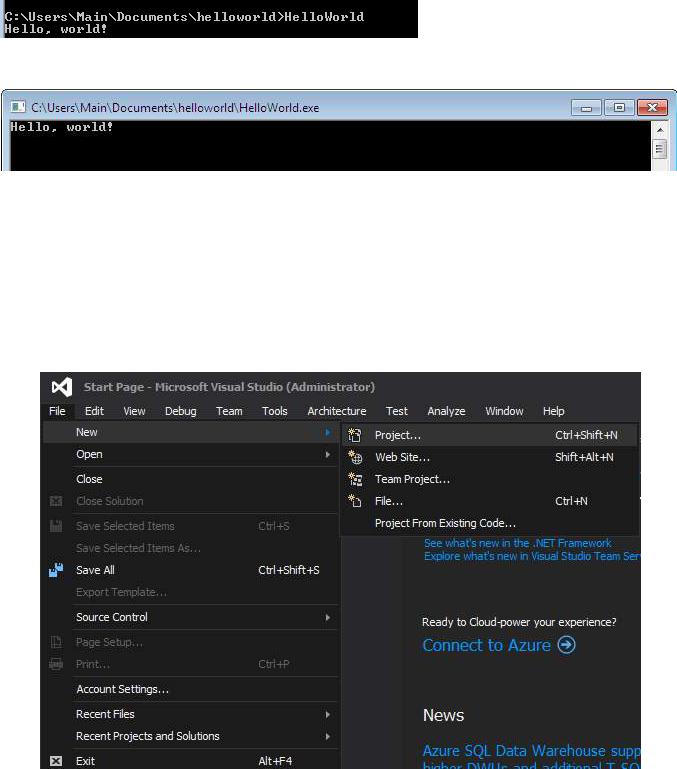
You may also double click the executable and launch a new console window with the message "Hello, world!"
Section 1.2: Creating a new project in Visual Studio (console application) and Running it in Debug mode
1.Download and install Visual Studio. Visual Studio can be downloaded from VisualStudio.com. The Community edition is suggested, first because it is free, and second because it involves all the general features and can be extended further.
2.Open Visual Studio.
3.Welcome. Go to File → New → Project.
4. Click Templates → Visual C# → Console Application
GoalKicker.com – C# Notes for Professionals |
4 |
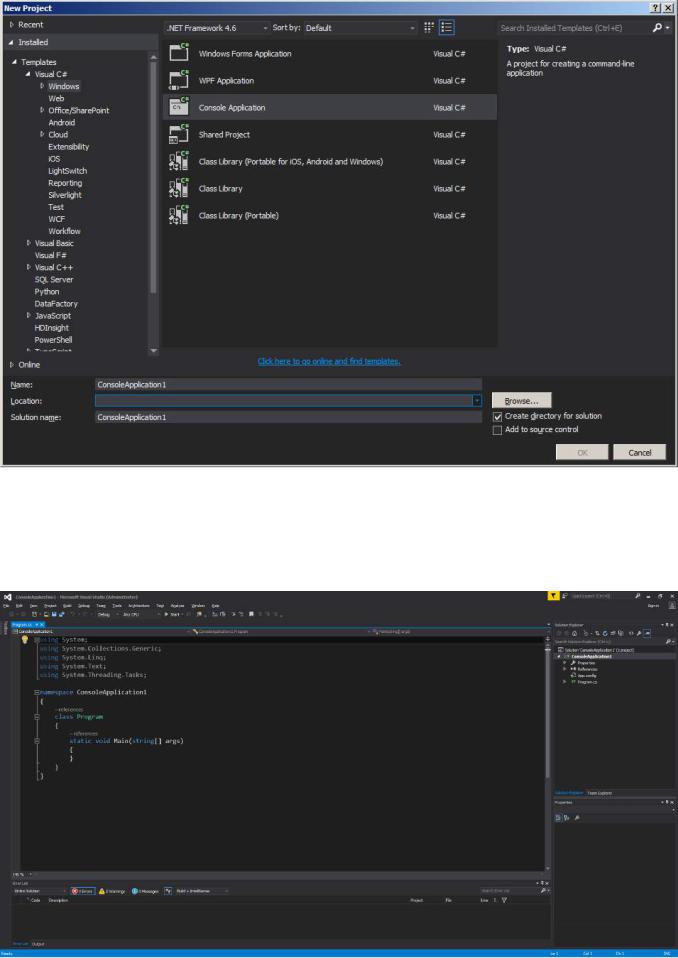
5. After selecting Console Application, Enter a name for your project, and a location to save and press OK . Don't worry about the Solution name.
6. Project created. The newly created project will look similar to:
(Always use descriptive names for projects so that they can easily be distinguished from other projects. It is recommended not to use spaces in project or class name.)
GoalKicker.com – C# Notes for Professionals |
5 |

7. Write code. You can now update your Program.cs to present "Hello world!" to the user.
using System;
namespace ConsoleApplication1
{
public class Program
{
public static void Main(string[] args)
{
}
}
}
Add the following two lines to the public static void Main(string[] args) object in Program.cs: (make sure it's inside the braces)
Console.WriteLine("Hello world!");
Console.Read();
Why Console.Read()? The first line prints out the text "Hello world!" to the console, and the second line waits for a single character to be entered; in e ect, this causes the program to pause execution so that you're able to see the output while debugging. Without Console.Read();, when you start debugging the application it will just print "Hello world!" to the console and then immediately close. Your code window should now look like the following:
using System;
namespace ConsoleApplication1
{
public class Program
{
public static void Main(string[] args)
{
Console.WriteLine("Hello world!"); Console.Read();
}
}
}
8. Debug your program. Press the Start Button on the toolbar near the top of the window  or press F5 on your keyboard to run your application. If the button is not present, you can run the program from the top menu: Debug → Start Debugging. The program will compile and then open a console window. It should look similar to the following screenshot:
GoalKicker.com – C# Notes for Professionals |
6 |