

inking like a pro
Many people break into the business by inking
other people's pencils, so it's important to at least acquaint yourself with the subject. But inking is an art in itself. Even the most dramatic comic book illustrations can achieve their full impact only when a talented inker adds his magic. The ink line has a crispness, boldness, and variety of thickness that a pencil line can't produce. As shown in the illustrations at right, there are three basic types of ink line. By varying its thickness, we get bolder or softer lines. Just using one thickness of line leaves a character looking lifeless.
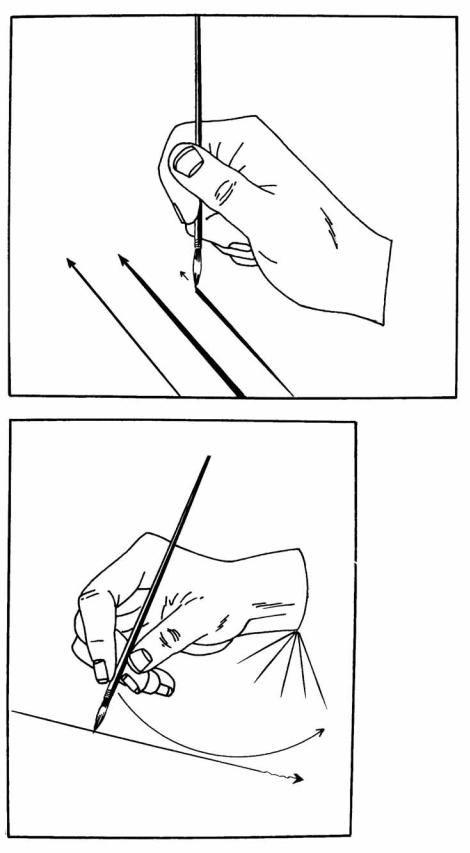
The magician's adage "It's all in the wrist" also applies to inking. The more you bend your wrist, the less control you'll have. Of course, the line will remain straight up to a point. But when you bend your wrist too much, the line becomes wobbly. The solution is to keep your wrist locked, your hand loose, and move your whole arm instead. With a little practice, it'll become second nature to you.
A few more points: Hold the pen or brush straight up and down. Feel free to move the page around, so that your
arm is always at a comfortable angle.
HOLD THE PEN OR
BRUSH PERPENDICULAR
TO THE PAPER
THICK TO THIN
EVEN
THIN TO THICK
DON'T BEND YOUR WRIST OR THE LINE WILL BECOME WOBBLY

stuff you need to know
TRIANGLE
T-SQUARE
Doesn't a T-square look serious? But hey, if comic book artists use one, how complicated
can it be? It's a great tool. You'll actually like it when you use it. Scary thought. All horizontal lines are drawn with a T-square; all vertical lines are drawn against a triangle. This eliminates the fuss of measuring.
Lucky you. Just when you were wondering when we were going to get back to this subject, here it is again: more gray tones! In black-and- white drawings, tones are created by adding shaded sheets that come in various percentages of gray. If you look closely at a newspaper image, you'll see that the shades are all made up of black dots called screens. The bigger and closer together the dots are, the darker the shade. After your drawing is finished, carefully cut a sheet of screen so that the piece fits precisely within the area to be shaded, then burnish it down.
COMIC BOOK
PAGE WITH
DRAWN PANELS
20% |
30% |
40% |
50% |
In addition to drawing your own patterns for shading, you can use screens.
art supplies shopping list
You don't have to commit this |
|
stuff to memory. Just bring this |
|
book into any art store and the |
|
salespeople will help you find the |
|
items you need. Before you purchase |
|
any art materials, check the labels to |
|
make sure they're nontoxic. You |
|
shouldn't buy or use anything that |
|
has a warning label on it. Use only |
|
nontoxic inks and materials with all |
|
the instruments listed in this chapter. |
|
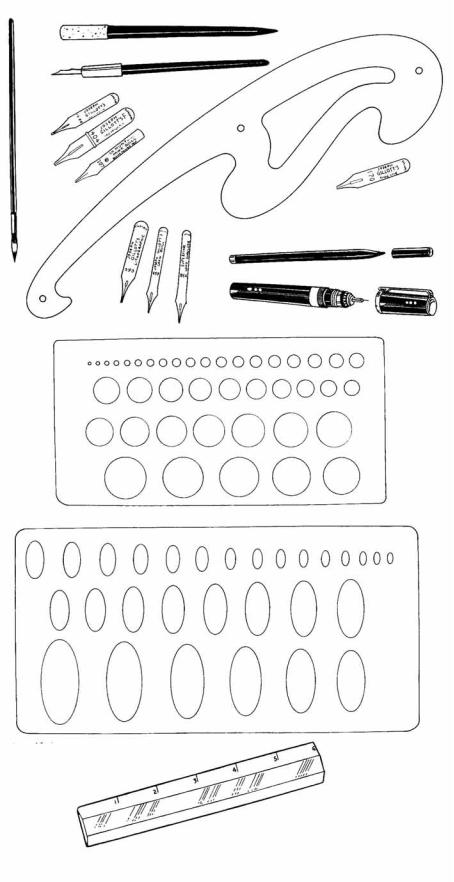
The brush preferred by many inkers is the |
BRUSH |
Winsor & Newton Series 7 watercolor |
|
brush. The best sizes are the No. 1 and |
|
the No. 2. Experiment to find the size |
|
that works for you. The advantage of a |
|
brush is that it gives you thin and thick lines |
|
without changing instruments. It gives your |
|
line a softer edge, and a brush line dries |
|
faster than a pen line. But the thing that |
|
the pros like about it is that it's fast. |
|
However, a brush takes time to master. Be |
|
sure to wash the ink out of your brush before it |
|
dries or it'll be ruined, and brushes are expensive. |
|
Just dab it in a jar of water immediately after |
|
using and dry it with a clean rag. |
|
Professional inkers also use pens, which are easier to use than brushes. Starting out you'll feel more confident using a flexible-point pen that has removable tips. There are many pen tips to
choose from. Try starting with Joseph Gillott Nos. 170, 290, and 404. If your local art supply store doesn't carry this brand, ask the manager to help you choose something comparable.
Use a technical pen with a nontoxic ink to give you an even-weight line. Its points are interchangeable and come in varying degrees of thickness. It has a rigid feel. You should also buy a few nontoxic fineline markers in different widths.
Use a nontoxic India ink for inking and Pro White for whiting out. If you use nonwaterproof ink, your drawing will smear if it gets wet after the ink has dried. Waterproof inks, on the other hand, are permanent.
French curves, available in many sizes and shapes, are used by pencilers and inkers for drawing smooth, curved lines.
Drawing circles and ellipses can take a long time if done freehand. So we cheat a little. We use circle and ellipse guides, which are plastic and translucent.
For inking straight lines, use a raised 6-inch plastic ruler. A T-square is too unwieldy to use for drawing short lines. Turn the ruler upside down and run your pen against the edge. If the pen weren't raised off the
paper surface, the ink would blot and you don't want that.
FRENCH CURVE
NIB HOLDERS
PEN NIBS
PEN NIB
FINE-LINE MARKER
PEN NIBS |
TECHNICAL PEN |
|
CIRCLE GUIDE
ELLIPSE GUIDE
RAISED PLASTIC RULER
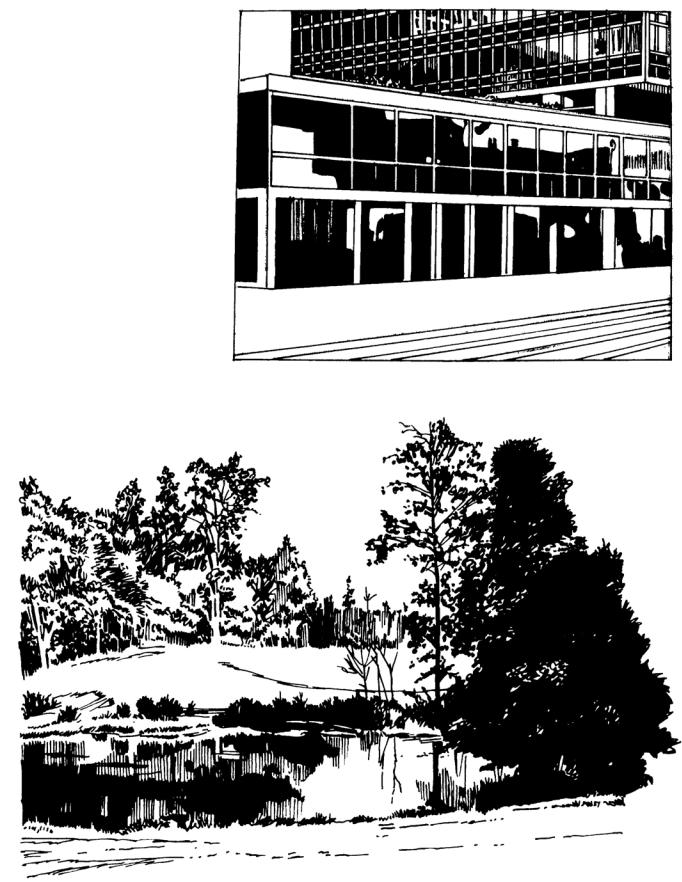
reflections
oth glass and water reflect Blight. A glass skyscraper should be drawn so that it either reflects what's across the street, or so you can see through it, but not a combination of the two. Think of windows as a big sheet of glass interrupted by little strips of nonreflective material. Don't shade each pane differently. Also, be sure to show a slight rippling effect, which helps it
to "read" as glass.
For the most part, water reflects the sky and surrounding foliage, depending, of course, on the character of its surface. If the water is smooth, it will reflect like a mirror. If it's rough or choppy, you'll get a broken reflection.