

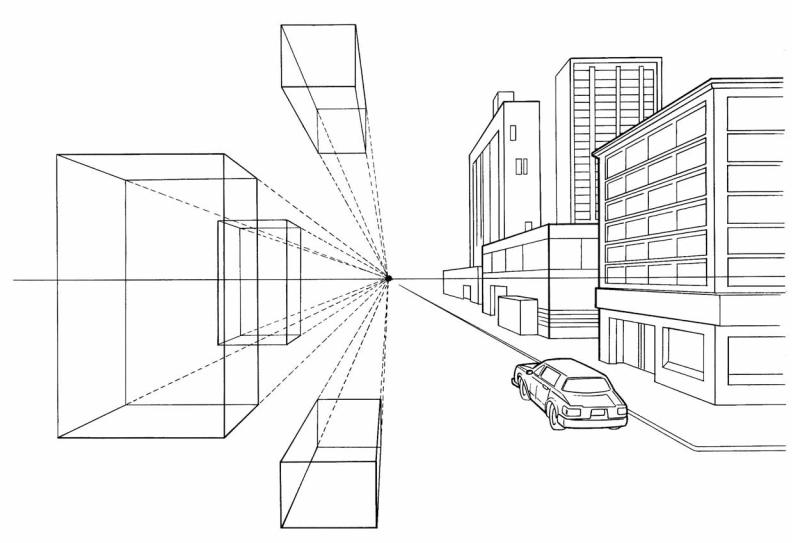
one-point perspective
T he terms horizon line and eye level are used to refer to the line of sight that's created from
your position in relation to the scene you're about to draw. A drawing uses a system of one-point perspective when all of the lines that recede toward the horizon line eventually converge at one point, which is called the vanishing point.
Note, however, that not every line converges. The vertical and horizontal lines remain parallel to the frame of the panel. These lines don't converge
because they're not traveling into the distance. They just go up and down, or from side to side. Once you draw a line that appears to travel from the background to the foreground, or from the foreground to the background, you need to use the principles of perspective.
Take a look at the boxes below. Notice how you can extend guidelines to the vanishing point to create the corners within a box, which you normally wouldn't see in a finished illustration.
HORIZON LINE
VANISHING
OR EYE LEVEL
POINT
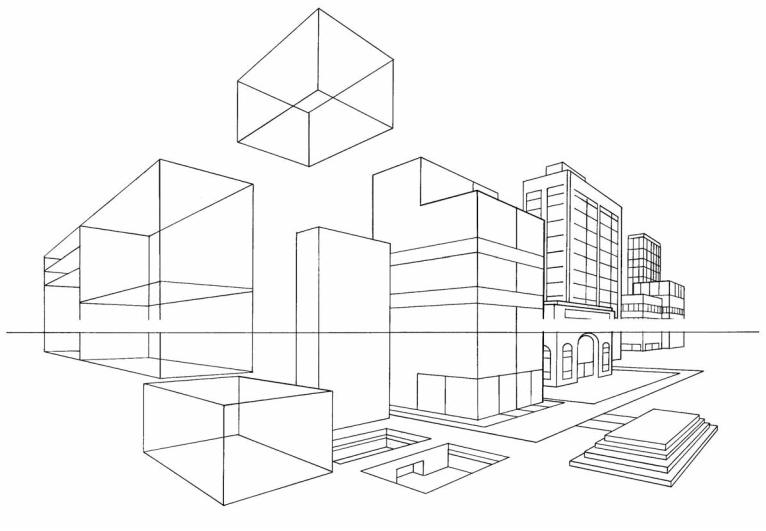
two-point perspective
Take this quiz: Two-point perspective means that the picture has:
(a)One vanishing point
(b)Two vanishing points.
If you picked "a," take a lap, give me ten push ups, and sharpen your pencil. If you picked "b," keep reading.
In two-point perspective, the objects in the picture are not facing forward, but are turned at an angle so that a corner is pointed at the viewer. Because of this, the horizontal lines no longer
vanish toward the center of the page as before, but toward opposite ends of the page, to two separate vanishing points. (These can't be seen here because they're too far off to place in the picture.) If you
were to extend every line in this picture (except for
the vertical ones) in the direction it's already heading, you'd see that they all converge at either the left or right vanishing point. In illustrations where you want the perspective to appear more gradual, you can place the vanishing points farther away from one another. The closer together the vanishing points are, the more severe the perspective will be.
You'll notice that the horizon line runs horizontally across the picture. It doesn't matter where you place the horizon line; that's just your own personal preference. But once you've
established the horizon line's position, the rest of the picture must conform to it. Everything below the horizon line vanishes up, while everything above it vanishes down-toward the left and
right vanishing points.
< TO VANISHING POINT LEFT |
HORIZON LINE |
TO VANISHING POINT RIGHT > |
finding the vanishing points
Pretty scary-looking, huh? These two scenes may intimidate the ordinary artist, but after reading
the preceding page, you can sense the logic behind each one.
The horizon lines are the horizontal ones running across each picture. All figures diminish or increase in size relative to their distance from the viewer. If you have more than one figure in a scene, you've got to draw the ones that are
supposed to be close bigger, and the farther ones
smaller. Don't give me that bit about how your characters are from another planet where the laws of perspective are different. Cute.
Notice how all of the figures fall within the parameters of the vanishing points. They have to. It's not a choice-it's a law. A physical law. If you break it, you get a metaphysical ticket.
Can you spot the three vanishing points in the illustration at the bottom of the page, and the four vanishing points in the one immediately below?
PERSPECTIVE LINES
HORIZON LINE
HORIZON LINE
PERSPECTIVE LINES
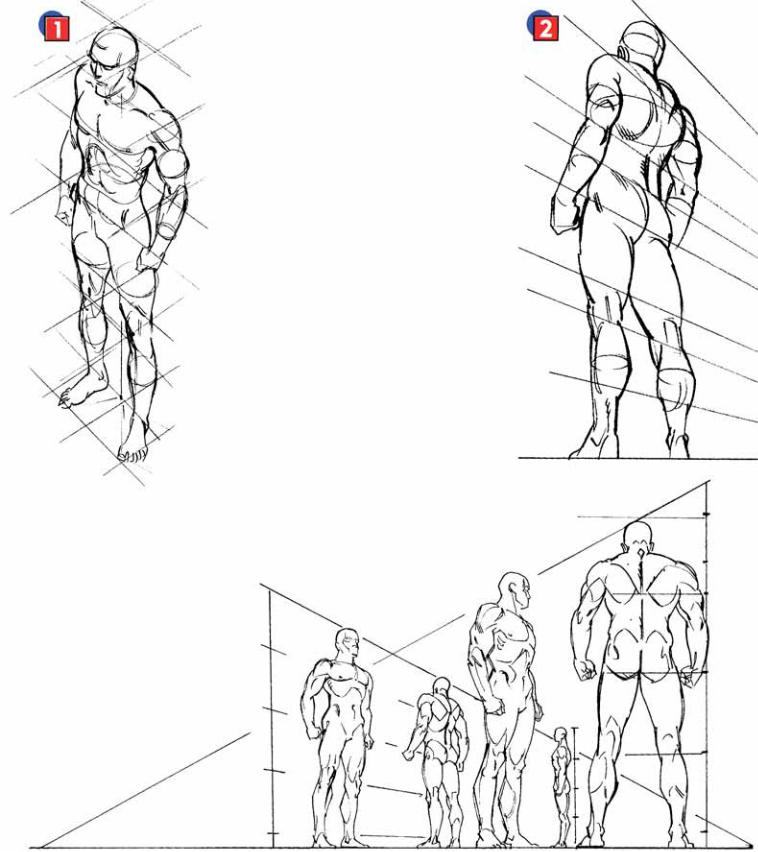
the horizon line and the figure
W here you place the horizon line in a drawing determines whether the viewer
looks up at the subject, down at the subject, or straight at it. In other words, the position of the horizon line determines the position of the viewer relative to the picture.
In drawing 1, the horizon line is at ground level, which means that the viewer is positioned above the figure, at a high eye level, which creates the illusion that the viewer is looking down at the figure. The ellipses that are used to indicate the figure's underlying form become wider the lower they are within the drawing. Therefore, the ellipse within each calf is rounder than the one within the chest. Because the vanishing points of the perspective lines would run off the page, a rough grid has been drawn over the figure.
In contrast, a low eye level places the viewer's eye below a figure, which creates the illusion that the viewer is looking up at the figure, as shown in drawing 2. In both examples, the angle of view distorts the figure slightly. In the example at right, the feet and legs appear larger than the head and chest because they are closer to us. In the other drawing, the effect is reversed, so that the head and chest seem larger, and the legs and feet appear smaller.
To determine the proportions of a figure regardless of the location of the horizon line or the
eye level, erect a vertical line from the horizon line anywhere along its length. To approximate the points for the top of the head and the crotch, divide the vertical in half. Divide each half in half once more to establish the chest at its broadest point and the position of the knees. A bit of room has been left below the bottom quarter for the feet, which makes the figure slightly taller than 8 heads high-great proportions
for a comic book hero.
PERSPECTIVE LINES
VANISHING POINT
HORIZON LINE