

Pro ASP.NET 2.0 In CSharp 2005 (2005) [eng]
.pdf258 C H A P T E R 7 ■ A D O. N E T F U N D A M E N TA L S
Isolation Levels
The isolation level determines how sensitive a transaction is to changes made by other in-progress transactions. For example, by default when two transactions are running independently of one another, records inserted by one transaction are not visible to the other transaction until the first transaction is committed.
The concept of isolation levels is closely related to the concept of locks, because by determining the isolation level for a given transaction you determine what types of locks are required. Shared locks are locks that are placed when a transaction wants to read data from the database. No other transactions can modify the data while shared locks exist on a table, row, or range. However, more than one user can use a shared lock to read the data simultaneously. Exclusive locks are the locks that prevent two or more transactions from modifying data simultaneously. An exclusive lock is issued when a transaction needs to update data and no other locks are already held. No other user can read or modify the data while an exclusive lock is in place.
■Note SQL Server actually has several types of locks that work together to help prevent deadlocks and other situations. To learn more, refer to the information about locking in the SQL Server Books Online help, which is installed with SQL Server.
In a SQL Server stored procedure, you can set the isolation level using the SET TRANSACTION ISOLATION LEVEL command. In ADO.NET, you can pass a value from the IsolationLevel enumeration to the Connection.BeginTransaction() method. Table 7-6 lists possible values.
Table 7-6. Values of the IsolationLevel Enumeration
Value |
Description |
ReadUncommitted |
No shared locks are placed, and no exclusive locks are honored. This type |
|
of isolation level is appropriate when you want to work with all the data |
|
matching certain conditions, irrespective of whether it’s committed. Dirty |
|
reads are possible, but performance is increased. |
ReadCommitted |
Shared locks are held while the data is being read by the transaction. |
|
This avoids dirty reads, but the data can be changed before a transaction |
|
completes. This may result in nonrepeatable reads or phantom rows. This |
|
is the default isolation level used by SQL Server. |
RepeatableRead |
In this case, shared locks are placed on all data that is used in a query. |
|
This prevents others from modifying the data, and it also prevents |
|
nonrepeatable reads. However, phantom rows are possible. |
Serializable |
A range lock is placed on the data you use, thereby preventing other |
|
users from updating or inserting rows that would fall in that range. This |
|
is the only isolation level that removes the possibility of phantom rows. |
|
However, it has an extremely negative effect on user concurrency and is |
|
rarely used in multiple user scenarios. |
Snapshot |
Stores a copy of the data your transaction accesses. As a result, the |
|
transaction won’t see the changes made by other transactions. This |
|
approach reduces blocking, because even if other transactions are |
|
holding locks on the data a transaction with snapshot isolation will be |
|
able to read a copy of the data. This option is supported only in SQL |
|
Server 2005 and needs to be enabled through a database-level option. |
|
|

C H A P T E R 7 ■ A D O. N E T F U N D A M E N TA L S |
259 |
The isolation levels in Table 7-6 are arranged from the least degree of locking to the highest degree of locking. The default, ReadCommitted, is a good compromise for most transactions. Table 7-7 summarizes the locking behavior for different isolation levels.
Table 7-7. Isolation Levels Compared
|
Dirty |
Nonrepeatable |
Phantom |
|
Isolation Level |
Read? |
Read? |
Data? |
Concurrency |
Read uncommitted |
Yes |
Yes |
Yes |
Best |
Read committed |
No |
Yes |
Yes |
Good |
Repeatable read |
No |
No |
Yes |
Poor |
Serializable |
No |
No |
No |
Very poor |
|
|
|
|
|
Savepoints
Whenever you roll back a transaction, it nullifies the effect of every command you’ve executed since you started the transaction. But what happens if you want to roll back only part of an ongoing transaction? SQL Server handles this with a feature called savepoints.
Savepoints are markers that act like bookmarks. You mark a certain point in the flow of transaction, and then you can roll back to that point. You set the savepoint using the Transaction.Save() method. Note that the Save() method is available only for the SqlTransaction class, because it’s not part of the standard IDbTransaction interface.
Here’s a conceptual look at how you use a savepoint:
// Start the transaction.
SqlTransaction tran = con.BeginTransaction();
//(Enlist and execute some commands inside the transaction.)
//Mark a savepoint.
tran.Save("CompletedInsert");
//(Enlist and execute some more commands inside the transaction.)
//If needed, roll back to the savepoint. tran.Rollback("CompletedInsert");
//Commit or roll back the transaction.
tran.Commit();
Note how the Rollback() method is used with the savepoint name as a parameter. If you want to roll back the whole transaction, simply omit this parameter.
■Note Once you roll back to a savepoint, all the savepoints defined after that save point are lost. You must set them again if they are needed.

260 C H A P T E R 7 ■ A D O. N E T F U N D A M E N TA L S
Nested Transactions
Savepoints allow a transaction to be arranged as a sequence of actions that can be rolled back individually. Nested transactions play essentially the same role as savepoints—they allow you to start smaller transactions inside a larger transaction that can be committed or rolled back individually. To initiate nested transactions, you must call the Begin() method of the Transaction object. This returns a new Transaction object, which you can use just like the original Transaction object.
The implementation of nested transactions is up to the data source. Some data sources, such as SQL Server, don’t properly support nested transactions. In SQL Server, rolling back a nested transaction actually rolls back the entire transaction. For that reason, the Begin() method isn’t provided for the SqlTransaction class. Instead, you can use savepoints for similar functionality.
Provider-Agnostic Code
For the most part, ADO.NET’s provider model is an ideal solution for dealing with different data sources. It allows each database vendor to develop a native, optimized solution while enforcing a high level of consistency so that skilled developers don’t need to relearn the basics.
However, the provider model isn’t perfect. Although you can use standard interfaces to interact with Command and Connection objects, when you instantiate a Command or Connection object, you need to know the provider-specific, strongly typed class you want to use (such as SqlConnection). This limitation makes it difficult to build other tools or add-ins that use ADO.NET. For example, in Chapter 9 you’ll consider the new ASP.NET data source controls, which allow you to create databound pages without writing a line of code. To provide this functionality, you need a way for the data control to create the ADO.NET objects that it needs behind the scenes. It wouldn’t be possible to implement this feature without dramatic restrictions in .NET 1.x.
.NET 2.0 solves this problem and adds improved support for writing provider-agnostic code (code that can work with any database). The secret is a new factory model.
■Note Provider-agnostic code is useful when building specialized components. It may also make sense if you anticipate the need to move to a different database in the future or if you aren’t sure what type of database you’ll use in the final version of an application. However, it also has drawbacks. Provider-agnostic code can’t take advantage of some provider-specific features (such as XML queries in SQL Server) and is more difficult to optimize. For those reasons, it’s uncommon in large-scale professional web applications.
Creating the Factory
The basic idea of the factory model is that you use a single factory object to create every other type of provider-specific object you need. You can then interact with these provider-specific objects in a completely generic way, through a set of common base classes.
The factory class is itself provider-specific—for example, the SQL Server provider includes a class named System.Data.SqlClient.SqlClientFactory. The Oracle provider uses System.Data.OracleClient.OracleClientFactory. At first glance, this might seem to stop you from writing provideragnostic code. However, it turns out that there’s a completely standardized class that’s designed to dynamically find and create the factory you need. This class is System.Data.Common.DbProviderFactories. It provides a static GetFactory() method that returns the factory you need based on the provider name.
For example, here’s the code that uses DbProviderFactories to get the SqlClientFactory:
string factory = "System.Data.SqlClient";
DbProviderFactory provider = DbProviderFactories.GetFactory(factory);

C H A P T E R 7 ■ A D O. N E T F U N D A M E N TA L S |
261 |
Even though the DbProviderFactories class returns a strongly typed SqlClientFactory object, you shouldn’t treat it as such. Instead, your code should access it as a DbProviderFactory instance. That’s because all factories inherit from DbProviderFactory. If you use only the DbProviderFactory members, you can write code that works with any factory.
The weak point in the code snippet shown previously is that you need to pass a string that identifies the provider to the DbProviderFactories.GetFactory() method. You would typically read this from an application setting in the web.config file. That way, you can write completely databaseagnostic code and switch your application over to another provider simply by modifying a single setting.
■Tip In practice, you’ll need to store several provider-specific details in a configuration file. Not only do you need to retrieve the provider name, but you’ll also need to get a connection string. You might also need to retrieve queries or stored procedure names if you want to avoid hard-coding them because they might change. It’s up to you to determine the ideal trade-off between development complexity and flexibility.
For the DbProviderFactories class to work, your provider needs a registered factory in the machine.config or web.config configuration file. The machine.config file registers the four providers that are included with the .NET Framework:
<configuration>
<system.data>
<DbProviderFactories>
<add name="Odbc Data Provider" invariant="System.Data.Odbc" type="System.Data.Odbc.OdbcFactory, ..." />
<add name="OleDb Data Provider" invariant="System.Data.OleDb" type="System.Data.OleDb.OleDbFactory, ..." />
<add name="OracleClient Data Provider" invariant="System.Data.OracleClient" type="System.Data.OracleClient.OracleClientFactory, ..." />
<add name="SqlClient Data Provider" invariant="System.Data.SqlClient" type="System.Data.SqlClient.SqlClientFactory, ..." />
</DbProviderFactories>
</system.data>
...
</configuration>
This registration step identifies the factory class and assigns a unique name for the provider (which, by convention, is the same as the namespace for that provider). If you have a third-party provider that you want to use, you need to register it in the <DbProviders> section of the machine.config file (to access it across a specific computer) or a web.config file (to access it
in a specific Web application). It’s likely that the person or company that developed the provider will include a setup program to automate this task or the explicit configuration syntax.
Create Objects with Factory
Once you have a factory, you can create other objects, such as Connection and Command instances, using the DbProviderFactory.CreateXxx() methods. For example, the CreateConnection() method returns the Connection object for your data provider. Once again, you must assume you don’t know what provider you’ll be using, so you can interact with the objects the factory creates only through a standard base class.
Table 7-8 gives a quick reference that shows what method you need in order to create each type of data access object and what base class you can use to manipulate it safely.

262 C H A P T E R 7 ■ A D O. N E T F U N D A M E N TA L S
Table 7-8. Interfaces for Standard ADO.NET Objects
Type of Object |
Base Class |
Example |
DbProviderFactory Method |
Connection |
DbConnection |
SqlConnection |
CreateConnection() |
Command |
DbCommand |
SqlCommand |
CreateCommand() |
Parameter |
DbDataParameter |
SqlParameter |
CreateParameter() |
DataReader |
DbDataReader |
SqlDataReader |
CreateDataReader() |
DataAdapter |
DbDataAdapter |
SqlDataAdapter |
CreateDataAdapter() |
|
|
|
|
■Note As explained earlier in this chapter, the provider-specific objects also implement certain interfaces (such as IDbConnection). However, because some objects use more than one ADO.NET interface (for example, a DataReader implements both IDataRecord and IDataReader), the base class model simplifies the model.
A Query with Provider-Agnostic Code
To get a better understanding of how all these pieces fit together, it helps to consider a simple example. In this section, you’ll see how to perform a query and display the results using provideragnostic code. In fact, this example is an exact rewrite of the page shown earlier in Figure 7-3. The only difference is that it’s no longer tightly bound to the SQL Server provider.
The first step is to set up the web.config file with the connection string, provider name, and query for this example:
<configuration xmlns="http://schemas.microsoft.com/.NetConfiguration/v2.0"> <connectionStrings>
<add name="Northwind" connectionString=
"Data Source=localhost;Initial Catalog=Northwind;Integrated Security=SSPI"/> </connectionStrings>
<appSettings>
<add key="factory" value="System.Data.SqlClient" />
<add key="employeeQuery" value="SELECT * FROM Employees" /> </appSettings>
...
</configuration>
Next, here’s the factory-based code:
// Get the factory.
string factory = WebConfigurationManager.AppSettings["factory"]; DbProviderFactory provider = DbProviderFactories.GetFactory(factory);
//Use this factory to create a connection. DbConnection con = provider.CreateConnection(); con.ConnectionString =
WebConfigurationManager.ConnectionStrings["Northwind"].ConnectionString;
//Create the command.
DbCommand cmd = provider.CreateCommand();
cmd.CommandText = WebConfigurationManager.AppSettings["employeeQuery"]; cmd.Connection = con;

C H A P T E R 7 ■ A D O. N E T F U N D A M E N TA L S |
263 |
//Open the Connection and get the DataReader. con.Open();
DbDataReader reader = cmd.ExecuteReader();
//The code for navigating through the reader and displaying the records
//is identical from this point on.
To give this example a real test, try modifying the web.config file to use a different provider. For example, you can access the same database through the OLE DB provider by making this change:
<configuration xmlns="http://schemas.microsoft.com/.NetConfiguration/v2.0"> <connectionStrings>
<add name="Northwind" connectionString="Provider=SQLOLEDB;Data Source= localhost;Initial Catalog=Northwind;Integrated Security=SSPI"/>
</connectionStrings>
...
</configuration>
Now when you run the page, you’ll see the same list of records. The difference is that the DbDataFactories class creates OLE DB objects to work with your code.
■Note The challenges of provider-agnostic aren’t completely solved yet. Even with the provider factories, you still face a few problems. For example, there’s no generic way to catch database exception objects (because different provider-specific exception objects don’t inherit from a common base class). Also, different providers may have slightly different conventions with parameter names and may support specialized features that aren’t available through the common base classes (in which case you need to write some thorny conditional logic).
Summary
In this chapter, you learned about the first level of database access with ADO.NET: connected access. In many cases, using simple commands and quick read-only cursors to retrieve results provides the easiest and most efficient way to write data access code for a web application. Along the way, you considered some advanced topics, including SQL injection attacks, transactions, and provider-agnostic code.
In the next chapter, you’ll learn how to use these techniques to build your own data access classes and how to use ADO.NET’s disconnected DataSet.


C H A P T E R 8
■ ■ ■
Data Components and the DataSet
In the previous chapter, you had your first look at ADO.NET, and you examined connection-based data access. Now, it’s time to bring your data access code into a well-designed application.
In a properly organized application, your data access code is never embedded directly in the code-behind for a page. Instead, it’s separated into a dedicated data component. In this chapter, you’ll see how to create a simple data access class of your own, adding a separate method for each data task you need to perform. Best of all, this data class isn’t limited to code-intensive scenarios. In the next chapter, you’ll see how to consume your class with ASP.NET’s new data binding infrastructure.
This chapter also tackles disconnected data—the ADO.NET features that revolve around the DataSet and allow you to interact with data long after you’ve closed the connection to the data source. The DataSet isn’t required in ASP.NET pages. However, it gives you more flexibility for navigating, filtering, and sorting your data—topics you’ll consider in this chapter.
■Tip The information you’ll see in this chapter hasn’t changed much from ASP.NET 1.x. You use the same techniques to build a good database component, and the DataSet works in the same way (along with a few refinements). For a more detailed look at ADO.NET and how you can use it with a variety of .NET application types, refer to Pro ADO.NET 2.0 (Apress, 2005).
Building a Data Access Component
In professional applications, database code is not embedded directly in the client but encapsulated in a dedicated class. To perform a database operation, the client creates an instance of this class and calls the appropriate method.
When creating a data class, you should follow the basic guidelines in this section. This will ensure that you create a well-encapsulated, optimized database component that can be executed in a separate process, if needed, and even used in a load-balancing configuration with multiple servers.
Open and close connections quickly: Open the database connection in every method call, and close it before the method ends. Connections should never be held open between client requests, and the client should have no control over how connections are acquired or when they are released. If the client does have this ability, it introduces the possibility that a connection might not be closed as quickly as possible or might be inadvertently left open, which hampers scalability.
Implement error handling: Use error handling to make sure the connection is closed even if |
|
the SQL command generates an exception. Remember, connections are a finite resource, and |
|
using them for even a few extra seconds can have a major overall effect on performance. |
265 |
266 C H A P T E R 8 ■ D ATA C O M P O N E N T S A N D T H E D ATA S E T
Follow stateless design practices: Accept all the information needed for a method in its parameters, and return all the retrieved data through the return value. If you create a class that maintains state, it cannot be easily implemented as a web service or used in a load-balancing scenario. Also, if the database component is hosted out of the process, each method call has a measurable overhead, and using multiple calls to set properties will take much longer than invoking a single method with all the information as parameters.
Don’t let the client specify connection string information: This poses security risks, raises the possibility that an out-of-date client will fail, and compromises the ability of connection pooling, which requires matching connection strings.
Don’t connect with the client’s user ID: Introducing any variability into the connection string will thwart connection pooling, as you learned in the previous chapter. Instead, rely on rolebased security or a ticket-based system whereby you authenticate users and prevent them from attempting to perform a restricted operation. This model is also faster than trying to perform a database query under an invalid security account and waiting for an error.
Don’t let the client use wide-open queries: Every query should judiciously select only the columns it needs. Also, you should restrict the results with a WHERE clause whenever possible. For example, when retrieving order records, you might impose a minimum date range (or an SQL clause such as TOP 1000). Without these safeguards, your application may work well at first but will slow down as the database grows and clients perform large queries, which can tax both the database and the network.
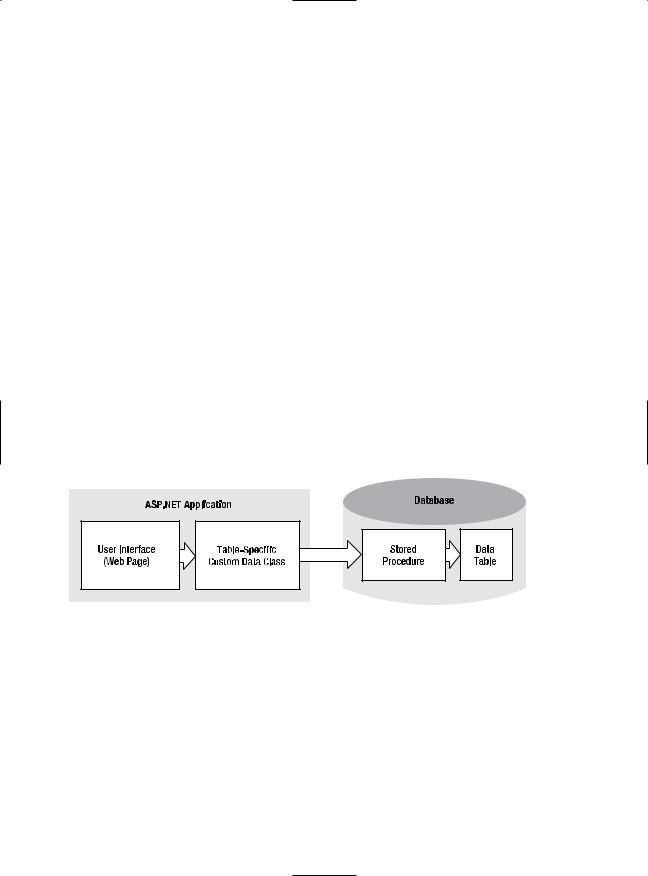
A good, straightforward design for a database component uses a separate class for every database table (or logically related group of tables). The common database access methods such as inserting, deleting, and modifying a record are all wrapped in separate stateless methods. Finally, every database call uses a dedicated stored procedure. Figure 8-1 shows this carefully layered design.
Figure 8-1. Layered design with a database class
The following example demonstrates a simple database component. Rather than placing the database code in the web page, it follows a much better design practice of separating the code into a distinct class that can be used in multiple pages. This class can then be compiled as part of a separate component if needed. Additionally, the connection string is retrieved from the <connectionStrings> section of the web.config file, rather than being hard-coded.
The data component actually consists of two classes—a data package class that wraps a single record of information and a database utility class that performs the actual database operations with ADO.NET code.

C H A P T E R 8 ■ D ATA C O M P O N E N T S A N D T H E D ATA S E T |
267 |
The Data Package
To make it easier to shuffle information to the Northwind database and back, it makes sense to create an EmployeeDetails class that provides all the fields as public properties. Here’s the full code for this class:
public class EmployeeDetails
{
private int employeeID; public int EmployeeID
{
get {return employeeID;} set {employeeID = value;}
}
private string firstName; public string FirstName
{
get {return firstName;} set {firstName = value;}
}
private string lastName; public string LastName
{
get {return lastName;} set {lastName = value;}
}
private string titleOfCourtesy; public string TitleOfCourtesy
{
get {return titleOfCourtesy;} set {titleOfCourtesy = value;}
}
public EmployeeDetails(int employeeID, string firstName, string lastName, string titleOfCourtesy)
{
this.employeeID = employeeID; this.firstName = firstName; this.lastName = lastName; this.titleOfCourtesy = titleOfCourtesy;
}
}
Note that this class doesn’t include all the information that’s in the Employees table in order to make the example more concise.
The Stored Procedures
Before you can start coding the data access logic, you need to make sure you have the set of stored procedures you need in order to retrieve, insert, and update information. The following code shows the five stored procedures that are needed: