

Pro ASP.NET 2.0 In CSharp 2005 (2005) [eng]
.pdf318 CHAPTER 9 ■ DATA BINDING
Handling Errors
When you deal with an outside resource such as a database, you need to protect your code with a basic amount of error-handling logic. Even if you’ve avoided every possible coding mistake, you still need to defend against factors outside your control—for example, if the database server isn’t running or the network connection is broken.
You can count on the SqlDataSource to properly release any resources (such as connections) if an error occurs. However, the underlying exception won’t be handled. Instead, it will bubble up
to the page and derail your processing. As with any other unhandled exception, the user will receive a cryptic error message or an error page. This design is unavoidable—if the SqlDataSource suppressed exceptions, it could hide potential problems and make debugging extremely difficult. However, it’s a good idea to handle the problem in your web page and show a more suitable error message.
To do this, you need to handle the data source event that occurs immediately after the error. If you’re performing a query, that’s the Selected event. If you’re performing an update, delete, or insert operation, you would handle the Updated, Deleted, or Inserted events instead. (If you don’t want to offer customized error messages, you could handle all these events with the same event handler.)
In the event handler, you can access the exception object through the SqlDataSourceStatusEventArgs.Exception property. If you want to prevent the error from spreading any further, simply set the SqlDataSourceStatusEventArgs.ExceptionHandled property to true. Then, make sure you show an appropriate error message on your web page to inform the user that the command was not completed.
Here’s an example:
protected void sourceEmployees_Selected(object sender, SqlDataSourceStatusEventArgs e)
{
if (e.Exception != null)
{
//Mask the error with a generic message (for security purposes.) lblError.Text = "An exception occurred performing the query.";
//Consider the error handled.
e.ExceptionHandled = true;
}
}
Updating Records
Selecting data is only half of the equation. The SqlDataSource can also apply changes. The only catch is that not all controls support updating. For example, the humble ListBox doesn’t provide any way for the user to edit values, delete existing items, or insert new ones. Fortunately, ASP.NET’s rich data controls—including the GridView, DetailsView, and FormView—all have editing features that you can switch on.
The first step is to define suitable commands for the operations you want to perform, such as inserting (InsertQuery), deleting (DeleteQuery), and updating (UpdateQuery). If you know that you will allow the user to perform only certain operations (such as updates) but not others (such as insertions and deletions), you can safely omit the commands you don’t need.
You define the InsertCommand, DeleteCommand, and UpdateCommand in the same way you define the command for the SelectCommand property—by using a parameterized query. For example, here’s a SqlDataSource that defines a basic update command that updates every field:
CHAPTER 9 ■ DATA BINDING |
319 |
<asp:SqlDataSource ID="sourceEmployees" runat="server" ProviderName="System.Data.SqlClient" ConnectionString="<%$ ConnectionStrings:Northwind %>"
SelectCommand="SELECT EmployeeID, FirstName, LastName, Title, City FROM Employees" UpdateCommand="UPDATE Employees SET FirstName=@FirstName, LastName=@LastName, Title=@Title, City=@City FROM Employees WHERE EmployeeID=@EmployeeID"> </asp:SqlDataSource>
In this example, the parameter names aren’t chosen arbitrarily. As long as you give each parameter the same name as the field it affects and preface it with the @ symbol (so FirstName because @FirstName), you don’t need to define the parameter. That’s because the ASP.NET data controls automatically submit a collection of parameters with the new values before triggering the update. Each parameter in the collection uses this naming convention.
To try this, create a page with the SqlDataSource shown previously and a linked GridView control. Now, take the following steps to enable editing:
1.Select the GridView. In the smart tag, choose the Add New Column link.
2.In the Choose a Field Type box, select CommandField. Then, select the Edit/Update check box and the Show Cancel Button check box. Make sure all other check boxes are unchecked.
3.Click OK to add the column with editing controls.
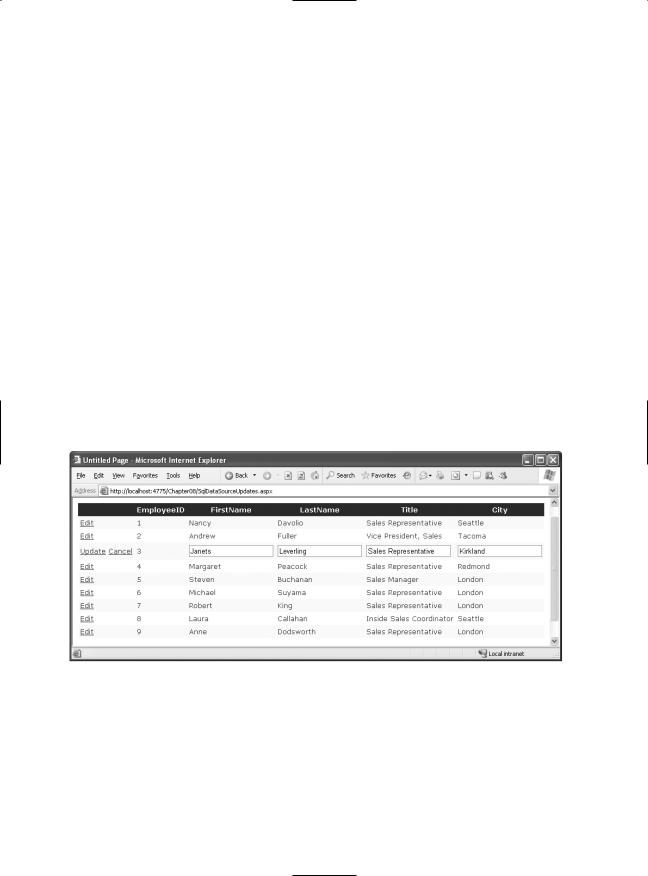
When you complete these steps, the GridView editing controls appear in an additional column. When you run the page and the GridView is bound and displayed, the edit column shows an Edit link next to every record. When clicked, this link switches the corresponding row into edit mode. All fields are changed to text boxes (with the exception of read-only fields), and the Edit link is replaced with an Update link and a Cancel link (see Figure 9-10).
Figure 9-10. Editing with the GridView
The Cancel link returns the row to its initial state. The Update link passes the values to the SqlDataSource.UpdateParameters collection (using the field names) and then triggers the SqlDataSource.Update() method to apply the change to the database. Once again, you don’t have to write any code.
You can create similar parameterized commands for the DeleteCommand and InsertCommand. To enable deleting and inserting, you need to add a column to the GridView that has the ShowInsertButton and ShowDeleteButton properties set to true.

320 CHAPTER 9 ■ DATA BINDING
■Note The GridView is an extremely flexible control. Templates, one of its many features, allow you to define the controls and markup used when editing a record. This is handy if you want to enable editing through drop-down lists, add validation controls, or just fine-tune the appearance of a row in edit mode. You’ll learn about templates in Chapter 10.
Updating and Key Fields
All the rich data controls include a DataKeyNames property. This property indicates which field (or fields) are considered primary keys.
To use this feature, you must set the DataKeyNames property with a comma-separated list of one or more key fields. Often, you’ll have only one key field, as shown here:
<asp:GridView ID="gridEmployees" runat="server" DataSourceID="sourceEmployees" DataKeyNames="EmployeeID" ... >
Key fields are given special treatment. For example, the GridView makes it possible to easily retrieve the key information for a given row. Additionally, when you commit an update to a row, the data control passes the original value of the key fields, as well as the changed value (unless it’s read-only). The original value is used in a WHERE clause to locate the row so you can perform the update. To avoid confusion, the parameter that contains the original value is automatically given the prefix original_. For example, the @EmployeeID parameter becomes @original_EmployeeID.
This difference can lead to a potential problem. You may begin using a parameter name such as @EmployeeID and then set the DataKeyName property to get access to another feature, such as selection. When you attempt to perform an update, you’ll receive an error indicating the parameter @EmployeeID can’t be found. What makes this problem even more confusing is that you can take certain actions in Visual Studio—such as refreshing the schema for your data control—that will automatically set the DataKeyName property without warning you.
Now that you understand the problem, the solution is quite simple. Most of the time you will use the DataKeyNames property, so you should modify your command to use the original value of any read-only primary keys. Here’s an example:
UpdateCommand="UPDATE Employees SET FirstName=@FirstName, LastName=@LastName, Title=@Title, City=@City FROM Employees WHERE EmployeeID=@original_EmployeeID">
This problem has another workaround. The @original_ naming convention is configurable. You can use a different prefix by changing the SqlDataSource.OldValuesParameterFormatString property. This property takes a string of the form @original_{0}, where {0} indicates the unadulterated name. If you are sure that your key values are read-only and won’t be modified in an update operation, you have no reason to use this convention, because there’s no difference between the original name and the current name. So, simply change the OldValuesParameterFormatString property to {0}, and your commands will continue to work with the unmodified field names.
Strict Concurrency Checking
The update command in the previous example matches the record based on its ID. The problem with this approach is that the update command updates every field indiscriminately—it has no way to distinguish between fields that are and aren’t changed. As a result, you can end up obliterating the changes of another user, if they are made between the time the page is requested and the time the page is updated.
For example, imagine Chen and Lucy are viewing the same table of employee records. Lucy commits a change to the address of an employee. A few seconds later, Chen commits a name

CHAPTER 9 ■ DATA BINDING |
321 |
change to the same employee record. However, that update command not only applies the new name, but it also overwrites every field with the values in Chen’s page—effectively replacing the address Lucy entered with the old address.
To defend against this sort of problem, you can enforce stricter concurrency checking. One way to do this is to create a command that performs the update only if every field matches. Here’s what that command would look like:
UpdateCommand="UPDATE Employees SET FirstName=@FirstName, LastName=@LastName,
Title=@Title, City=@City FROM Employees WHERE EmployeeID=@original_EmployeeID AND
FirstName=@original_FirstName AND LastName=@original_LastName AND
Title=@original_Title AND City=@original_City">
The problem is that the command doesn’t have access to the original values of every field— instead, it has only the original value of any key fields. You could define every field in the table as a key field, but this is certain to cause confusion. A better solution is to set the SqlDataSource.ConflictDetection property to ConflictOptions.CompareAllValues instead of ConflictOptions.OverwriteChanges (the default). The data control will then supply the original value of every field, and the command will work as written.
At the end of Chapter 10 you'll see an example that shows how you can implement a more sophisticated concurrency handling strategy that warns you when a change will conflict, and gives you the option of applying it or canceling it.
■Tip Commands that compare values are often inefficient, because they require more data to be sent over the network and mean more comparison work for the database. A better solution is to use a timestamp field. If the row is unchanged, the timestamp will always match. In this case, you would hide the timestamp column from the data control but set the DataKeyFields property to include it, so you could use it when constructing your command.
Updating with Stored Procedures
The update example works just as readily with stored procedures. In this case, you simply supply the stored procedure name for the UpdateCommand:
UpdateCommand="UpdateEmployee" UpdateCommandType="StoredProcedure"
However, this has a catch. As you’ve learned, the parameter names are based on the field names. If the stored procedure uses the same parameter names, the update works without a hitch. However, if the stored procedure parameter names are slightly different, the update will fail.
■Tip The order of parameters is irrelevant. Only the names are important. The SqlDataSource does a caseinsensitive comparison, so your parameters can have different capitalization.
For example, consider an UpdateEmployee stored procedure that takes parameters like this:
CREATE PROCEDURE UpdateEmployee
@EmployeeID |
int, |
@TitleOfCourtesy |
varchar(25), |
@Last |
varchar(20), |
@First |
varchar(10) |
AS |
|
... |
|

322 CHAPTER 9 ■ DATA BINDING
In this example, the FirstName and LastName fields map to parameters named @First and @Last. Unfortunately, there’s no declarative way to correct this problem and map these parameters to their correct names. Instead, you need to define the new parameters and write a little custom code.
The first step is to add two parameters to the SqlDataSource.UpdateParameters collection. Unfortunately, you can’t create these while the update is in progress. Instead, you need to add them to the SqlDataSource tag:
<asp:SqlDataSource ID="sourceEmployees" runat="server" ProviderName="System.Data.SqlClient"
ConnectionString="<%$ ConnectionStrings:Northwind %>" SelectCommand= "SELECT EmployeeID, FirstName, LastName, TitleOfCourtesy FROM Employees" UpdateCommand="UpdateEmployee" UpdateCommandType="StoredProcedure" OnUpdating="sourceEmployees_Updating" >
<UpdateParameters>
<asp:Parameter Name="First" Type="String" /> <asp:Parameter Name="Last" Type="String" />
</UpdateParameters>
</asp:SqlDataSource>
Note that the parameter names don’t include the @ symbol when you define them in the SqlDataSource tag.
The next step is to react to the SqlDataSource.Updating event, which fires immediately before the update is committed. You can then set the value for the @First and @Last parameters and remove the @FirstName and @LastName parameters from sight. Here’s the code you need:
protected void sourceEmployees_Updating(object sender, SqlDataSourceCommandEventArgs e)
{
e.Command.Parameters["@First"].Value = e.Command.Parameters["@FirstName"].Value; e.Command.Parameters["@Last"].Value = e.Command.Parameters["@LastName"].Value; e.Command.Parameters.Remove(e.Command.Parameters["@FirstName"]); e.Command.Parameters.Remove(e.Command.Parameters["@LastName"]);
}
This represents a fairly typical scenario in which the no-code data binding won’t work. Overall, if you can design your stored procedures and classes to work with the data source controls, you’ll avoid writing a great deal of code. On the other hand, if you introduce the data source controls to an existing application with a fixed database schema and database components, it may take a fair bit of extra code to fit these pieces together.
Disadvantages of the SqlDataSource
As you’ve seen, when you use the SqlDataSource, you can often avoid writing any data access code. However, you also sacrifice a fair bit of flexibility. Here are the most significant disadvantages:
Data access logic embedded in the page: To create a SqlDataSource control, you need to hardcode the SQL statements in your web page. This means you can’t fine-tune your query without modifying your web page. In an enterprise application, this limitation isn’t acceptable, as it’s common to revise the queries after the application is deployed in response to profiling, indexes, and expected loads.
■Tip You can improve this situation a fair bit by restricting your use of the SqlDataSource to stored procedures. However, in a large-scale web application, the data access code will be maintained, tested, and refined separately from the business logic (and it may even be coded by different developers). The SqlDataSource just doesn’t give you that level of flexibility.

CHAPTER 9 ■ DATA BINDING |
323 |
Maintenance in large applications: Every page that accesses the database needs its own set of SqlDataSource controls. This can turn into a maintenance nightmare, particularly if you have several pages using the same query (each of which requires a duplicate instance of the SqlDataSource). In a component-based application, you’ll use a higher-level model. The web pages will communicate with a data access library, which will contain all the database details.
Lack of flexibility: Every data access task requires a separate SqlDataSource. If you want to provide a user with multiple ways to view or query data, this can swamp your page with data sources objects, one for each command variant. This can get complicated—fast.
Inapplicability to other data tasks: The SqlDataSource doesn’t properly represent some types of tasks. The SqlDataSource is intended for data display and data editing scenarios. However, this model breaks down if you need to connect to the database and perform another task, such as placing a shipment request into an order pipeline or logging an event. In these situations, you’ll need custom database code. It will simplify your application if you have a single database library that encapsulates these tasks along with data retrieval and updating operations.
■Note In fact, in a well-abstracted three-tier application, your web page may call a method such as Business.PlaceOrder() without worrying about whether this operation involves saving an order record in a database, sending a message to a message queue, communicating with a remote component, or using a combination of all these tasks.
To get around these limitations, you should consider the ObjectDataSource. The ObjectDataSource allows you to bind your page to a custom data access component. Best of all, you get almost all the same frills, such as design-time data binding and no need to write code in your web page.
The ObjectDataSource
The ObjectDataSource allows you to create a declarative link between your web-page controls and a data access component that queries and updates data. The ObjectDataSource is remarkably flexible and can work with a variety of different components. However, to use it, your data access class must conform to a few rules:
•It must be stateless. That’s because the ObjectDataSource will create an instance only when needed and destroy it at the end of every request.
•It must have a default, no-argument constructor.
•All the logic must be contained in a single class. (If you want to use different classes for selecting and updating your data, you’ll need to wrap them in another higher-level class.)
•None of the linked methods (for selecting or updating records) can be static.
•It must provide the query results when a single method is called.
•The query results are several records, which can be represented as a collection, an array, or a list object that implements IEnumerable. Each record should be a custom object that exposes all its data through public properties.
You can work around many of these rules by handling ObjectDataSource events and writing custom code. However, if you want your data access class to plug into the data-binding model seamlessly without extra work, you should observe these guidelines.

324 CHAPTER 9 ■ DATA BINDING
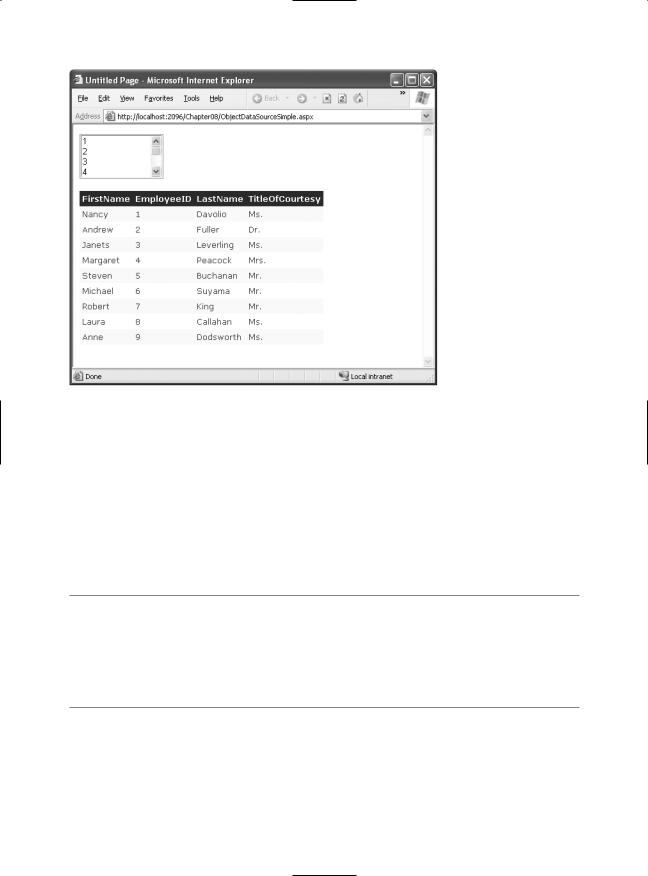
Selecting Records
For example, consider the data-bound page in Figure 9-8. You can create the same page using the custom data access component developed in Chapter 8. You can refer to Chapter 8 to see the full code, which has the following structure:
public class EmployeeDB
{
public int InsertEmployee(EmployeeDetails emp) { ... } public void DeleteEmployee(int employeeID) { ... } public EmployeeDetails GetEmployee() { ... }
public EmployeeDetails[] GetEmployees() { ... } public int CountEmployees() { ... }
}
The first step to use this class in your page is to define the ObjectDataSource and indicate the name of the class that contains the data access methods. You do this by specifying the fully qualified class name with the TypeName property:
<asp:ObjectDataSource ID="ObjectDataSource1" runat="server"
TypeName="DatabaseComponent.EmployeeDB" ... />
■Note For this to work, the DatabaseComponent.EmployeeDB class must exist in the App_Code folder or be compiled in an assembly in the Bin folder.
Once you’ve attached the ObjectDataSource to a class, the next step is to point it to the methods it can use to select and update records.
The ObjectDataSource defines SelectMethod, DeleteMethod, UpdateMethod, and InsertMethod properties that you use to link your data access class to various tasks. Each property takes the name of the method in the data access class. In this example, you simply need to enable querying, so you need to set the SelectMethod property:
<asp:ObjectDataSource ID="sourceEmployees" runat="server" TypeName="DatabaseComponent.EmployeeDB" SelectMethod="GetEmployees" />
Remember, the GetEmployees() method returns an array of EmployeeDetails objects. These objects fit the criteria of the ObjectDataSource—they provide all the appropriate record data through public properties.
Once you’ve set up the ObjectDataSource, you can bind your web-page controls in the same way you do with the SqlDataSource. You can even use the same drop-down lists in the Properties window, provided you click the Refresh Schema link in the ObjectDataSource smart tag first. When you click Refresh Schema, Visual Studio retrieves the property names and data types by reflecting on the EmployeeDetails class.
Here’s the complete page code, without the formatting details for the GridView:
<asp:ObjectDataSource ID="sourceEmployees" runat="server" TypeName="DatabaseComponent.EmployeeDB" SelectMethod="GetEmployees"/> <asp:ListBox ID="ListBox1" runat="server" DataSourceID="sourceEmployees" DataTextField="EmployeeID"></asp:ListBox>
<br />
<asp:GridView ID="GridView1" runat="server" DataSourceID="sourceEmployees"> </asp:GridView>
Figure 9-11 shows the result.
CHAPTER 9 ■ DATA BINDING |
325 |
Figure 9-11. Binding to a data access class
From the user’s perspective, this example is equivalent to the SqlDataSource page shown in Figure 9-8. The only difference is that by default, the columns are shown in the order that the properties are declared in the class, whereas the SqlDataSource shows them in the order they’re listed in the query. You can easily change the ordering of columns by customizing the GridView.
The apparent similarities conceal some real behind-the-scenes differences. In this example, the web page doesn’t require any hard-coded SQL details. Instead, all the work is handed off to the EmployeeDB class. When you run the page, the ListBox and GridView will request data from the ObjectDataSource, which will call the EmployeeDB.GetEmployees() method to retrieve the data (once for each control). This data is then bound and displayed in both controls, with no code required.
■Note Remember, the EmployeeDB class uses error-handling blocks to make sure connections are properly closed, but it doesn’t catch exceptions. (Best design practices are to let the exception notify the web page, which can then decide how best to inform the user.) You can handle errors with the ObjectDataSource in the same way you handle them with the SqlDataSource—first, handle the Selected, Inserted, Updated, or Deleted event; second, check for an exception; and third, mark it as handled. For more information, see the “Handling Errors” section earlier in the chapter.
Using a Parameterized Constructor
A key part of extending the data source controls takes place through event handling. For example, by default the ObjectDataSource is able to create your custom data access class only if it provides a zero no-argument constructor. However, you can extend the ObjectDataSource to work with data access classes that don’t meet this requirement by writing code that reacts to the ObjectDataSource.ObjectCreating event.

326 CHAPTER 9 ■ DATA BINDING
The current EmployeesDB class retrieves the database connection string directly from the web.config file, as shown here:
private string connectionString;
public EmployeeDB()
{
connectionString = WebConfigurationManager.ConnectionStrings["Northwind"].ConnectionString;
}
However, you might want to add another constructor that lets the web page supply a specific connection string of its choosing:
public EmployeeDB(string connectionString)
{
this.connectionString = connectionString;
}
To force the ObjectDataSource to use this constructor, you need to handle the ObjectCreating event, create the EmployeeDB instance yourself, and then assign it to the data source using the ObjectDataSourceEventArgs:
protected void sourceEmployees_ObjectCreating(object sender, ObjectDataSourceEventArgs e)
{
e.ObjectInstance = new DatabaseComponent.EmployeeDB("...");
}
Clearly, you could perform more complex initialization in the ObjectCreating event. For example, you could call an initialization method, choose to instantiate one of several derived classes, and so on.
■Tip The data source controls expose a rich event model. Events tend to fall into two categories. Events ending in ing such as ObjectCreating occur while a task is underway and give you the chance to cancel or customize what’s happening. Events ending in ed such as ObjectCreated occur when the task is finished and are suitable for logging the action, synchronizing other controls, and handling errors.
You can also react to the ObjectDisposing event to perform cleanup. The ObjectDisposing event is fired just before the data access object is released (before the page is served). Usually, you won’t need to use the ObjectDisposing event because a better alternative exists—place your
cleanup code in a dedicated Dispose() method inside your data access class. As long as you implement IDisposable, the ObjectDataSource will automatically call your Dispose() method. (To get
a painless implementation of IDisposable for free, just derive your data access class from the System.ComponentModel.Component class and override the Dispose() method.)
Using Method Parameters
Earlier, you saw how you could use the SqlDataSource to execute parameterized commands. The same feat is possible with the ObjectDataSource, if you provide a suitable select method that accepts one or more parameters. You can then map each parameter to a control value, query string argument, and so on.
To try this, you can use the EmployeeDB.GetEmployee() method, which retrieves a single employee by ID number. Here’s the method declaration:

CHAPTER 9 ■ DATA BINDING |
327 |
public EmployeeDetails GetEmployee(int employeeID) { ... }
The test page provides a list with all the employee IDs. This list control uses the GetEmployees() method through an Object data source:
<asp:ObjectDataSource ID="sourceEmployeesList" runat="server" SelectMethod="GetEmployees" TypeName="DatabaseComponent.EmployeeDB"/> <asp:ListBox ID="lstEmployees" runat="server" DataSourceID="sourceEmployeesList" DataTextField="EmployeeID" AutoPostBack="True"/>
When you choose an ID, the page posts back and uses a second data source to call GetEmployee(). The employeeID value is taken from the selected item in the list:
<asp:ObjectDataSource ID="sourceEmployee" runat="server" SelectMethod="GetEmployee" TypeName="DatabaseComponent.EmployeeDB"/> <SelectParameters>
<asp:ControlParameter ControlID="lstEmployees" Name="employeeID" PropertyName="SelectedValue" />
</SelectParameters>
</asp:ObjectDataSource>
The name you define for the parameter must match the parameter name you use in the method exactly. When the ObjectDataSource calls the method, it uses reflection to examine the method, and it examines the parameter names to determine the order of arguments. This system allows you to use overloaded methods, because the ObjectDataSource is able to correctly identify the overload you want based on the number of parameters you define and their names.
■Tip The data types are not used in the matching process—instead, the ObjectDataSource will attempt to convert the parameter value into the data type of the matching parameter using the appropriate type converter for that data type. If this process fails, an exception is raised.
Now, the single employee record returned from GetEmployee() is displayed in another rich data control—the DetailsView. By default, the DetailsView creates a basic table with one row for each field or property in the data item. Here’s a basic declaration for the DetailsView:
<asp:DetailsView ID="DetailsView1" runat="server" AutoGenerateRows="True"/>
You have one more detail to fill in. The first time the page is requested, there won’t be any selected value in the lstEmployees control. However, the DetailsView will still try to bind itself, so the ObjectDataSource will call GetEmployee(). The employeeID parameter is null, but the actual value that’s passed is 0, because integers aren’t nullable. When the GetEmployee() method executes the query, it doesn’t find a matching record with an employeeID of 0. This is an error condition, and an exception is thrown.
You could solve this problem by revising the GetEmployee() method to return null in this situation. However, it makes more sense to catch the binding attempt and explicitly cancel it when there’s no employeeID parameter. You can do this by handling the ObjectDataSource.Selecting event and looking for the employeeID parameter in the ObjectDataSourceSelectingEventArgs.InputParameters collection, which has every parameter you’re using indexed by name.
protected void sourceEmployee_Selecting(object sender, ObjectDataSourceSelectingEventArgs e)
{
if (e.InputParameters["employeeID"] == null) e.Cancel = true;
}