

Pro ASP.NET 2.0 In CSharp 2005 (2005) [eng]
.pdf288 C H A P T E R 8 ■ D ATA C O M P O N E N T S A N D T H E D ATA S E T
■Note The following examples use data binding to demonstrate the filtering and sorting features of the GridView. You’ll learn much more about data binding and the GridView control in Chapter 9 and Chapter 10.
The DataView Class
A DataView defines a view onto a DataTable object—in other words, a representation of the data in a DataTable that can include custom filtering and sorting settings. To allow you to configure these settings, the DataView has properties such as Sort and RowFilter. These properties allow you to choose what data you’ll see through the view. However, they don’t affect the actual data in the DataTable. For example, if you filter a table to hide certain rows, those rows will remain in the DataTable, but they won’t be accessible through the DataView.
The DataView is particularly useful in data binding scenarios. It allows you to show just a subset of the total data in a table, without needing to process or alter that data if you need it for other tasks.
Every DataTable has a default DataView associated with it, although you can create multiple DataView objects to represent different views onto the same table. The default DataView is provided through the DataTable.DefaultView property.
In the following examples, you’ll see how to create some grids that display records sorted by different fields and filtered against a given expression.
Sorting with a DataView
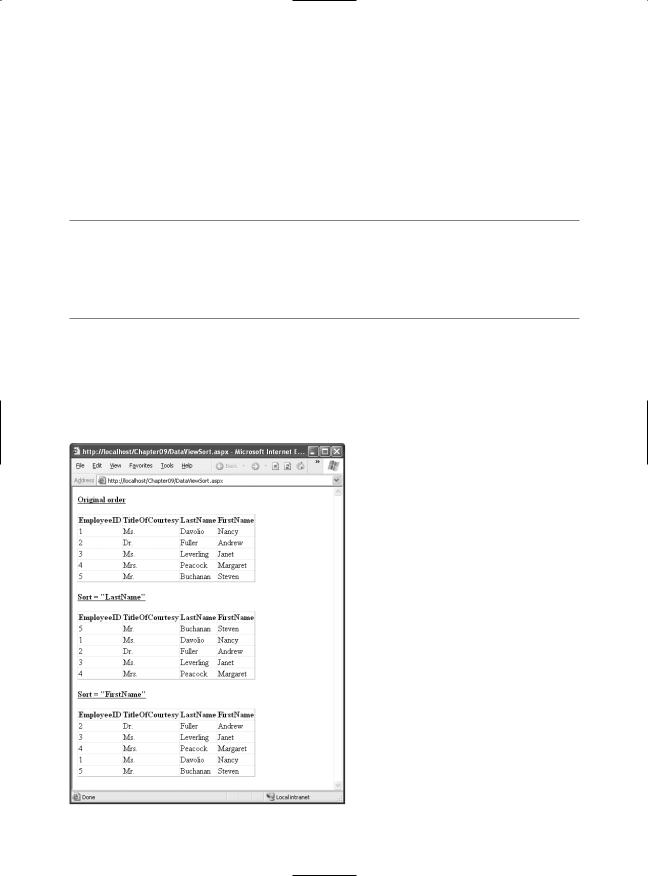
The next example uses a page with three GridView controls. When the page loads, it binds the same DataTable to each of the grids. However, it uses three different views, each of which sorts the results using a different field.
The code begins by retrieving the list of employees into a DataSet:
// Create the Connection, DataAdapter, and DataSet. string connectionString =
WebConfigurationManager.ConnectionStrings["Northwind"].ConnectionString; SqlConnection con = new SqlConnection(connectionString);
string sql =
"SELECT TOP 5 EmployeeID, TitleOfCourtesy, LastName, FirstName FROM Employees";
SqlDataAdapter da = new SqlDataAdapter(sql, con);
DataSet ds = new DataSet();
// Fill the DataSet. da.Fill(ds, "Employees");
The next step is to fill the GridView controls through data binding. To bind the first grid, you can simply use the DataTable directly, which uses the default DataView and displays all the data. For the other two grids, you must create a new DataView object. You can then set its Sort property explicitly.
//Bind the original data to #1. grid1.DataSource = ds.Tables["Employees"];
//Sort by last name and bind it to #2.
DataView view2 = new DataView(ds.Tables["Employees"]); view2.Sort = "LastName";
grid2.DataSource = view2;
C H A P T E R 8 ■ D ATA C O M P O N E N T S A N D T H E D ATA S E T |
289 |
// Sort by first name and bind it to #3.
DataView view3 = new DataView(ds.Tables["Employees"]); view3.Sort = "FirstName";
grid3.DataSource = view3;
Sorting a grid is simply a matter of setting the DataView.Sort property to a valid sorting expression. This example sorts by each view using a single field, but you could also sort by multiple fields, by specifying a comma-separated list. Here’s an example:
view2.Sort = "LastName, FirstName";
■Note The sort is according to the data type of the column. Numeric and date columns are ordered from smallest to largest. String columns are sorted alphanumerically without regard to case, assuming the DataTable.CaseSensitive property is false (the default). Columns that contain binary data cannot be sorted. You can also use the ASC and DESC attributes to sort in ascending or descending order. You’ll use sorting again and learn about DataView filtering in Chapter 10.
Once you’ve bound the grids, you still need to trigger the data binding process that copies the values from the DataTable into the control. You can do this for each control separately or for the entire page by calling Page.DataBind(), as in this example:
Page.DataBind();
Figure 8-6 shows the resulting page.
Figure 8-6. Grids sorted in different ways

290 C H A P T E R 8 ■ D ATA C O M P O N E N T S A N D T H E D ATA S E T
Filtering with a DataView
You can also use a DataView to apply custom filtering so that only certain rows are included in the display. To accomplish this feat, you use the RowFilter property. The RowFilter property acts like a WHERE clause in a SQL query. Using it, you can limit results using logical operators (such as <, >, and =) and a wide range of criteria. Table 8-3 lists the most common filter operators.
Table 8-3. Filter Operators
Operator |
Description |
<, >, <=, and >= |
Performs comparison of more than one value. These comparisons can be |
|
numeric (with number data types) or alphabetic dictionary comparisons |
|
(with string data types). |
<> and = |
Performs equality testing. |
NOT |
Reverses an expression. Can be used in conjunction with any other clause. |
BETWEEN |
Specifies an inclusive range. For example, “Units BETWEEN 5 AND 15” |
|
selects rows that have a value in the Units column from 5 to 15. |
IS NULL |
Tests the column for a null value. |
IN(a,b,c) |
A short form for using an OR clause with the same field. Tests for equality |
|
between a column and the specified values (a, b, and c). |
LIKE |
Performs pattern matching with string data types. |
+ |
Adds two numeric values or concatenates a string. |
- |
Subtracts one numeric value from another. |
* |
Multiplies two numeric values. |
/ |
Divides one numeric value by another. |
% |
Finds the modulus (the remainder after one number is divided by another). |
AND |
Combines more than one clause. Records must match all criteria to be |
|
displayed. |
OR |
Combines more than one clause. Records must match at least one of the |
|
filter expressions to be displayed. |
|
|
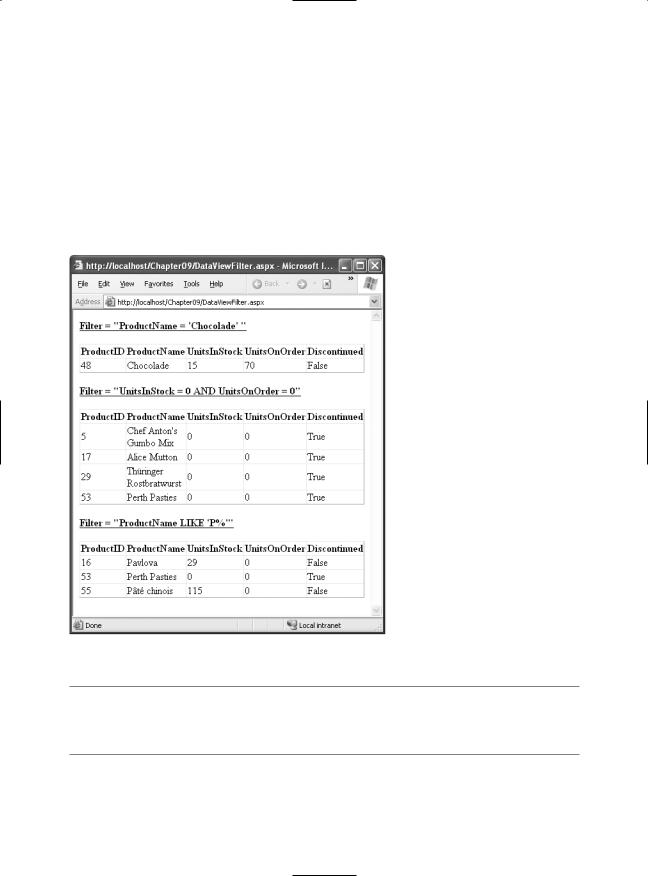
The following example page includes three GridView controls. Each one is bound to the same DataTable but with different filter settings.
string connectionString = WebConfigurationManager.ConnectionStrings["Northwind"].ConnectionString;
SqlConnection con = new SqlConnection(connectionString);
string sql = "SELECT ProductID, ProductName, UnitsInStock, UnitsOnOrder, " + Discontinued FROM Products";
SqlDataAdapter da = new SqlDataAdapter(sql, con); DataSet ds = new DataSet();
da.Fill(ds, "Products");
// Filter for the Chocolade product.
DataView view1 = new DataView(ds.Tables["Products"]); view1.RowFilter = "ProductName = 'Chocolade'"; GridView1.DataSource = view1;
C H A P T E R 8 ■ D ATA C O M P O N E N T S A N D T H E D ATA S E T |
291 |
//Filter for products that aren't on order or in stock. DataView view2 = new DataView(ds.Tables["Products"]); view2.RowFilter = "UnitsInStock = 0 AND UnitsOnOrder = 0"; GridView2.DataSource = view2;
//Filter for products starting with the letter P. DataView view3 = new DataView(ds.Tables[“Products”]); view3.RowFilter = "ProductName LIKE 'P%'"; GridView3.DataSource = view3;
this.DataBind();
Running the page will fill the three grids, as shown in Figure 8-7.
Figure 8-7. Grids filtered in different ways
■Tip The DataView also includes a RowStateFilter property that you can use to filter a DataTable so it shows rows in a specific row state (inserted, deleted, modified, or unchanged). By default, this property is set to show all rows except those that have been marked as deleted.

292 C H A P T E R 8 ■ D ATA C O M P O N E N T S A N D T H E D ATA S E T
Advanced Filtering with Relationships
The DataView allows for some surprisingly complex filter expressions. One of its little-known features is the ability to filter rows based on relationships. For example, you could display categories that contain more than 20 products, or you could display customers who have made a certain number of total purchases. In both of these examples, you need to filter one table based on the information in a related table.
To create this sort of filter string, you need to combine two ingredients:
•A table relationship that links two tables.
•An aggregate function such as AVG(), MAX(), MIN(), or COUNT(). This function acts on the data in the related records.
For example, suppose you’ve filled a DataSet with the Categories and Products tables and defined this relationship:
//Define the relationship between Categories and Products. DataRelation relat = new DataRelation("CatProds",
ds.Tables["Categories"].Columns["CategoryID"],
ds.Tables["Products"].Columns["CategoryID"]);
//Add the relationship to the DataSet. ds.Relations.Add(relat);
You can now filter the display of the Categories table using a filter expression based on the Products table. For example, imagine you want to show only category records that have at least one product worth more than $50. To accomplish this, you use the COUNT() function, along with the name of the table relationships (CatProds). Here’s the filter string you need:
MAX(Child(CatProds).UnitPrice) > 50
And here’s the code that applies this filter string to the DataView:
DataView view1 = new DataView(ds.Tables["Categories"]); view1.RowFilter = "MAX(Child(CatProds).UnitPrice) > 50"; GridView1.DataSource = view1;
The end result is that the GridView shows only the categories that have a product worth more than $50.
Calculated Columns
In addition to the fields retrieved from the data source, you can add calculated columns. Calculated columns are ignored when retrieving and updating data. Instead, they represent a value that’s computed using a combination of existing values. To create a calculated column, you simply create a new DataColumn object (specifying its name and type) and set the Expression property. Finally, you add the DataColumn to the Columns collection of the DataTable using the Add() method.
As an example, here’s a column that uses string concatenation to combine the first and last name into one field:
DataColumn fullName = new DataColumn( "FullName", typeof(string),
"TitleOfCourtesy + ' ' + LastName + ', ' + FirstName"); ds.Tables["Employees"].Columns.Add(fullName);

C H A P T E R 8 ■ D ATA C O M P O N E N T S A N D T H E D ATA S E T |
293 |
■Tip Of course, you can also execute a query that creates calculated columns. However, that approach makes it more difficult to update the data source later, and it creates more work for the data source. For that reason, it’s often a better solution to create calculated columns in the DataSet.
You can also create a calculated column that incorporates information from related rows. For example, you might add a column in a Categories table that indicates the number of related product rows. In this case, you need to make sure you first define the relationship with a DataRelation object. You also need to use a SQL aggregate function such as AVG(), MAX(), MIN(), or COUNT().
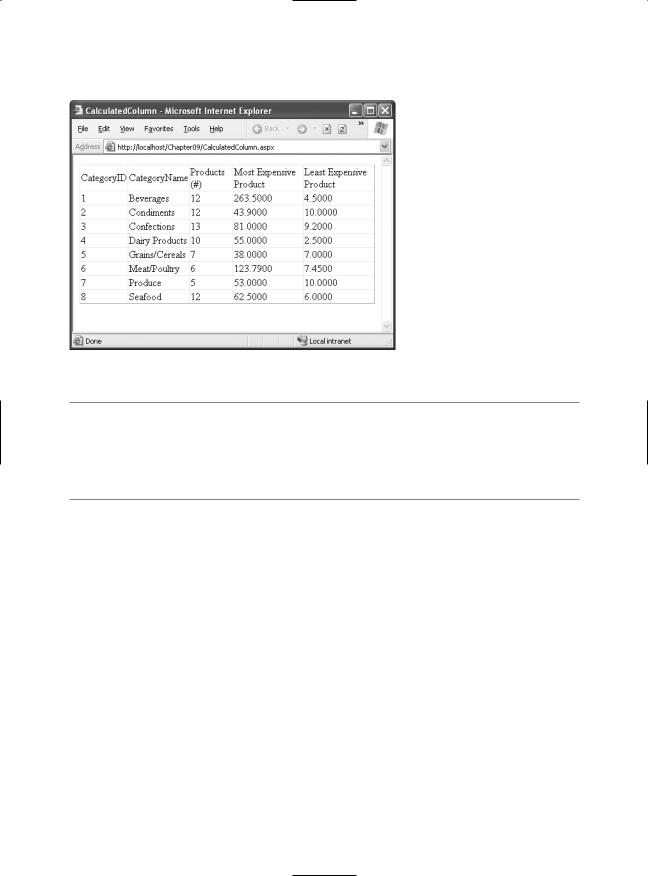
Here’s an example that creates three calculated columns, all of which use aggregate functions and table relationships:
string connectionString = WebConfigurationManager.ConnectionStrings["Northwind"].ConnectionString;
SqlConnection con = new SqlConnection(connectionString);
string sqlCat = "SELECT CategoryID, CategoryName FROM Categories";
string sqlProd = "SELECT ProductName, CategoryID, UnitPrice FROM Products"; SqlDataAdapter da = new SqlDataAdapter(sqlCat, con);
DataSet ds = new DataSet();
try
{
con.Open();
da.Fill(ds, "Categories"); da.SelectCommand.CommandText = sqlProd; da.Fill(ds, "Products");
}
finally
{
con.Close();
}
// Define the relationship between Categories and Products. DataRelation relat = new DataRelation("CatProds",
ds.Tables["Categories"].Columns["CategoryID"],
ds.Tables["Products"].Columns["CategoryID"]);
//Add the relationship to the DataSet. ds.Relations.Add(relat);
//Create the calculated columns. DataColumn count = new DataColumn(
"Products (#)", typeof(int), "COUNT(Child(CatProds).CategoryID)"); DataColumn max = new DataColumn(
"Most Expensive Product", typeof(decimal), "MAX(Child(CatProds).UnitPrice)"); DataColumn min = new DataColumn(
"Least Expensive Product", typeof(decimal), "MIN(Child(CatProds).UnitPrice)");
//Add the columns.
ds.Tables["Categories"].Columns.Add(count);
ds.Tables["Categories"].Columns.Add(max);
ds.Tables["Categories"].Columns.Add(min);
// Show the data.
GridView1.DataSource = ds.Tables["Categories"]; GridView1.DataBind();
294 C H A P T E R 8 ■ D ATA C O M P O N E N T S A N D T H E D ATA S E T
Figure 8-8 shows the resulting page.
Figure 8-8. Showing calculated columns
■Note Keep in mind that these examples simply demonstrate convenient ways to filter and aggregate data. These operations are only part of presenting your data properly. The other half of the equation is proper formatting. In Chapter 9 and Chapter 10, you’ll learn a lot more about the GridView so that you can show currency values in the appropriate format and customize other details such as color, sizing, column order, and fonts. For example, by setting the format, you can change 4.5000 to the more reasonable display value, $4.50.
Summary
In this chapter, you learned how to create basic database components and took an in-depth look at the DataSet and DataView. In the next chapter, you’ll continue working with the same database component and the DataSet—albeit through a new layer. You’ll learn how the data source controls wrap the ADO.NET world with a higher-level abstraction and let you build rich data-bound pages with minimal code.
If you do want to learn about all the features of the DataSet, including those that are tailored to distributed and rich client applications, you may want to consult Programming Microsoft ADO.NET 2.0: Core Reference (Microsoft Press, 2005) or Pro ADO.NET 2.0 (Apress, 2005).

C H A P T E R 9
■ ■ ■
Data Binding
Almost every web application has to deal with data, whether it’s stored in a database, an XML file, a structured file, or something else. Retrieving this data is only part of the challenge—a modern application also needs a convenient, flexible, and attractive way to display the data in a web page.
Fortunately, ASP.NET includes a rich and full-featured model for data binding. Data binding allows you to bind the data objects you’ve retrieved to one or more web controls, which will then show the data automatically. That means you don’t need to write time-consuming logic to loop through rows, read multiple fields, and manipulate individual controls.
ASP.NET 2.0 goes one step further with a new set of data source controls. A data source control allows you to define a declarative link between your page and a data source (such as a database or a custom data access component). Data source controls are notable for the way they plug into the data binding infrastructure. Once you’ve configured a data source control, you can hook it up to your web controls at design time, and ASP.NET will take care of all the data binding details. In fact, by using a data source control, you can create a sophisticated page that allows you to query and update a database—all without writing a single line of code.
■Tip Of course, in a professional application you probably will write code to customize various aspects of the data binding process, such as error handling. That’s why you’ll be happy to discover that the data binding model and data source controls are remarkably extensible. In the past, countless data binding models have failed because of a lack of flexibility.
In this chapter, you’ll learn how data binding and the data source controls work. You’ll learn a straightforward approach to using the data source controls and the best practices you’ll need to make them truly practical. This distinction is important, because it’s easy to use the data source controls to build pages that are difficult to maintain and impossible to optimize properly. When used correctly, data source controls don’t need to prevent good design practices—in fact, informed developers can plug their own custom data access classes into the data binding framework without sacrificing a thing.
But before you can tackle the data source controls, you need to start at the beginning—with a description of ASP.NET data binding.
■Note Although basic data binding hasn’t changed, the data source controls are an ASP.NET 2.0 innovation. Even if you’re an ASP.NET 1.x guru, you’ll want to pay special attention to the changes described in this chapter.
295

296 CHAPTER 9 ■ DATA BINDING
Basic Data Binding
Data binding is a feature that allows you to associate a data source to a control and have that control automatically display your data. The key characteristic of data binding is that it’s declarative, not programmatic. That means data binding is defined outside your code, alongside the controls in the .aspx page. The advantage is that it helps you achieve a cleaner separation between your controls and your code in a web page.
In ASP.NET, most web controls (including TextBox, LinkButton, Image, and many more) support single-value data binding. With single-value binding, you can bind a control property to a data source, but the control can display only a single value. The property you bind doesn’t need to represent something directly visible on the page. For example, not only can you bind the text of the hyperlink by setting the Hyperlink.Text property, but you can also bind the NavigateUrl property to specify the target destination of the link. To use single-value binding, you create data binding expressions.
Many web controls support repeated-value binding, which means they can render a set of items. Repeated-value controls often create lists and grids (the ListBox and GridView are two examples). If a control supports repeated-value binding, it always exposes a DataSource property, which accepts a data object. When you set the DataSource property, you create the logical link from the server control to the data object that contains the data to render. However, this doesn’t directly fill the control with that data. To accomplish that, you need the control’s DataBind() method, which loops through the DataSource, extracts its data, and renders it to the page. Repeated-value binding is by far the more powerful type of data binding.
In the following sections, you’ll consider both types of data binding.
Single-Value Binding
The controls that support single-value data binding allow you to bind some of their properties to a data binding expression. This expression is entered in the .aspx markup portion of the page (not the code-behind field) and enclosed between the <%# and %> delimiters. Here’s an example:
<%# expression_goes_here %>
This may look like a script block, but it isn’t. If you try to write any code inside this tag, you will receive an error. The only thing you can add is valid data binding expressions. For example, if you have a public or protected variable on your page named EmployeeName, you could write the following:
<%# EmployeeName %>
To evaluate a data binding expression such as this, you must call the Page.DataBind() method in your code. When you call DataBind(), ASP.NET will examine all the expressions on your page and replace them with the corresponding value (in this case, the current value that’s defined for the EmployeeName variable). If you forget to call the DataBind() method, the data binding expression won’t be filled in—instead, it just gets tossed away when your page is rendered to HTML.
The source for single-value data binding can include the value of a property, member variable, or return value of a function (as long as the property, member variable, or function has an accessibility of protected or public). It can also be any other expression that can be evaluated at runtime, such as a reference to another control’s property, a calculation using operators and literal values, and so on. The following data binding expressions are all valid:
<%# GetUserName(ID) %> <%# 1 + (2 * 20) %>
<%# "John " + "Smith" %>
<%# Request.Browser.Browser %>

CHAPTER 9 ■ DATA BINDING |
297 |
You can place your data binding expressions just about anywhere on the page, but usually you’ll assign a data binding expression to a property in the control tag. Here’s an example page that uses several data binding expressions:
<html>
<body>
<form method=post runat="server">
<asp:Image ID="image1" runat="server" ImageUrl='<%# FilePath %>' /><br /> <asp:Label ID="label1" runat="server" Text='<%# FilePath %>' /><br /> <asp:TextBox ID="textBox1" runat="server" Text='<%# GetFilePath() %>' /><br /> <asp:HyperLink ID="hyperLink1" runat="server"
NavigateUrl='<%# LogoPath.Value %>' Font-Bold="True" Text="Show logo" /> <br />
<input type="hidden" ID="LogoPath" runat="server" value="apress.gif"> <b><%# FilePath %></b><br />
<img src="<%# GetFilePath() %>"> </form>
</body>
</html>
As you can see, not only can you bind the Text property of a Label and a TextBox, but you can also use other properties such as the ImageUrl of an Image, the NavigateUrl property of a HyperLink, and even the src attribute of a static HTML <img> tag. You can also put the binding expression elsewhere in the page without binding to any property or attribute. For example, the previous web page has a binding expression between the <b> and </b> tags. When it’s processed, the resulting text will be rendered on the page and rendered in bold type. You can even place the expression outside the <form> section, as long as you don’t try to insert a server-side control there.
The expressions in this sample page refer to a FilePath property, a GetFilePath() function, and the Value property of a server-side hidden field that’s declared on the same page. To complete this page, you need to define these ingredients in script blocks or in the code-behind class:
protected string GetFilePath()
{
return "apress.gif";
}
protected string FilePath
{
get { return "apress.gif"; }
}
In this example, the property and function return only a hard-coded string. However, you can also add just about any C# code to generate the value for the data binding expression dynamically.
It’s important to remember that the data binding expression does not directly set the property to which it’s bound. It simply defines a connection between the control’s property and some other piece of information. To cause the page to evaluate the expression, run the appropriate code, and assign the appropriate value, you must call the DataBind() method of the containing page, as shown here:
protected void Page_Load(object sender, System.EventArgs e)
{
this.DataBind();
}